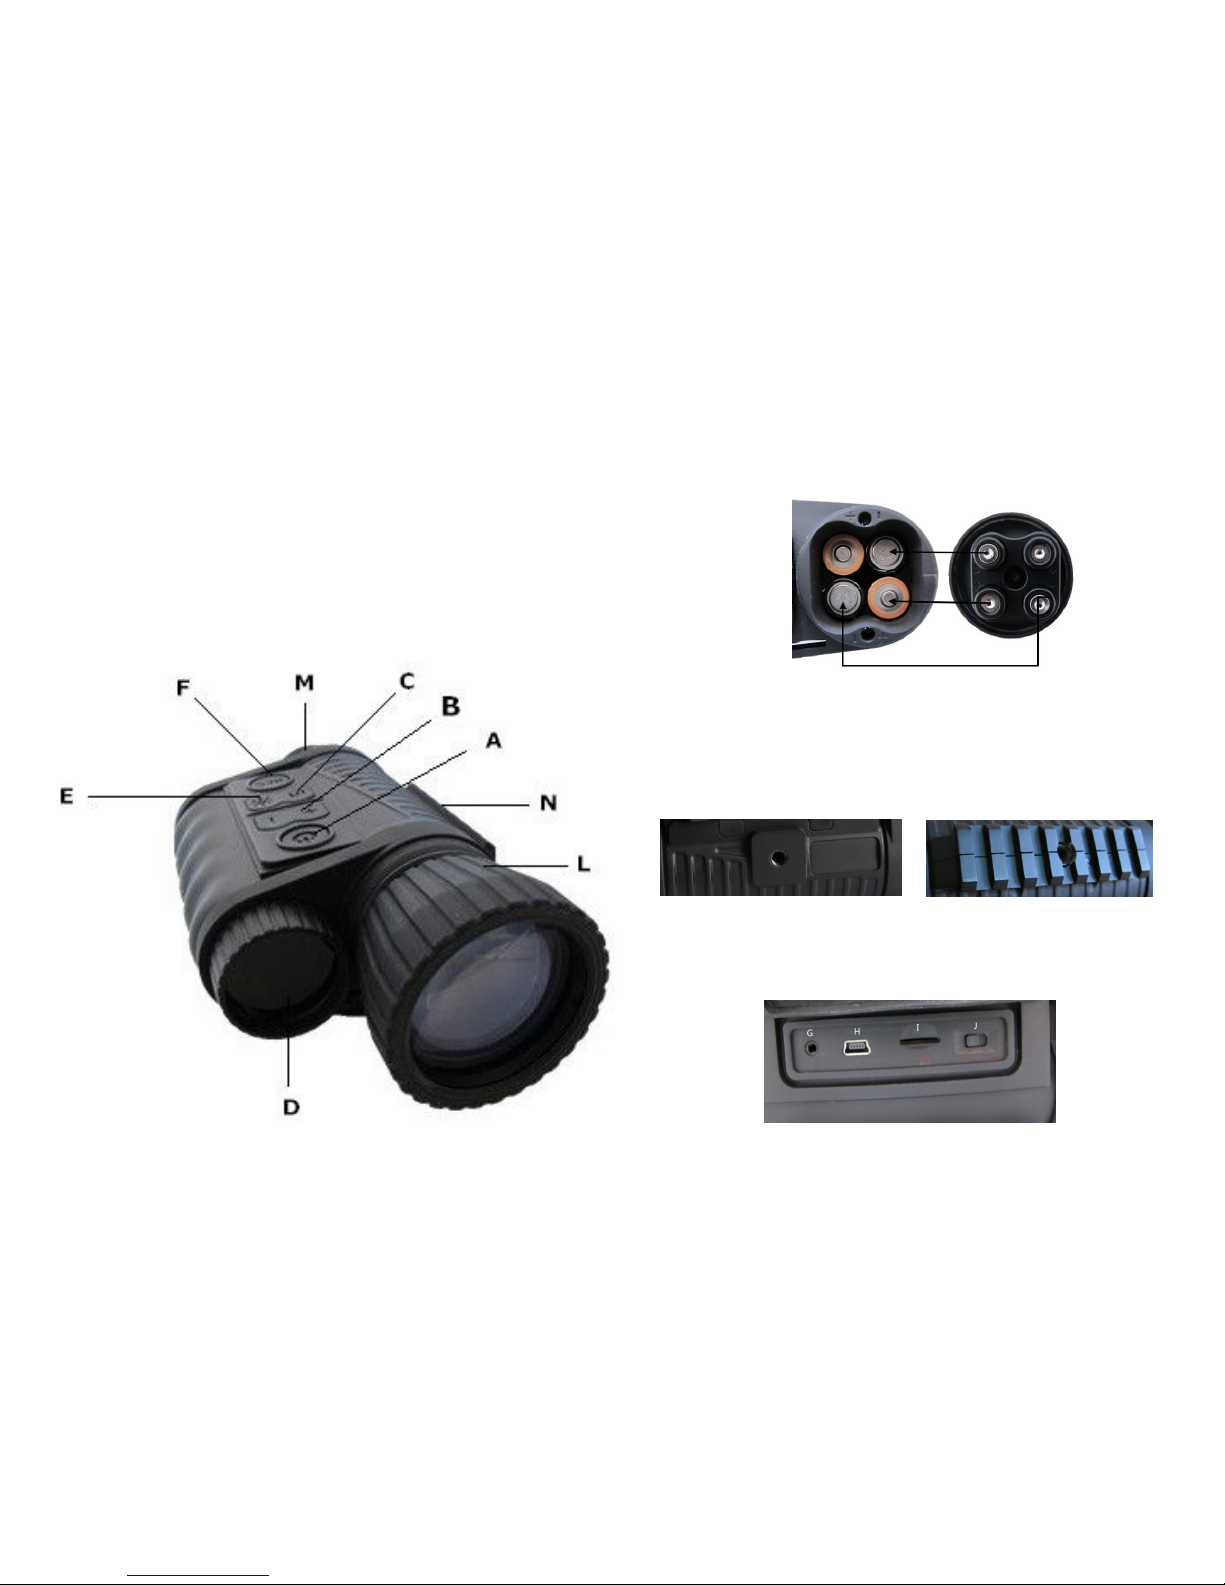
L-Shine LS-650 User manual

L-Shine
LS-650
MULTIFUNCTIONAL NIGHT VISION 6X50
INSTRUCTION MANUAL

Contents
ABOUT LS-650 MULTIFUNCTIONAL NIGHT VISION
3
PARTS AND CONTROLS GUIDE
4
HOW DIGITAL NIGHT VISION WORKS
4
CONTROLS / FUNCTIONS
5-8
SETUP AND BASIC OPERATION
8-10
OTHER OPERATIONS/ FEATURES
10-12
DISPLAY ICONS
11
TECHNICAL SPECIFICATIONS
19
ONE YEAR LIMITED WARRANTY
20

ABOUT LS-650 MULTIFUNCTION NIGHT VISION
Thanks for purchasing of our LS-650 Multifunctional Night Vision. Comprised of high quality electronics and optics, the
LS-650 Multifunctional Night Vision is a portable digital night vision viewing system that utilizes an infrared sensitive
CMOS sensor, providing edge-to-edge resolution and outstanding image quality. Fully multi-coated optics increase
light transmission and decrease glare. The LS-650 6x50 Multifunction Night Vision monoculars are versatile enough
for many applications including hunting, camping, boating/fishing, caving, paintball, stargazing, rescue/recovery,
security surveillance, law enforcement, and video recording in continuously changing light conditions - from dawn to
absolute darkness. Not only can you view your subject at day and night, you can also record it’s image as a still photo
or video clip, and store it on micro SD card. The LS-650 6x50 Multifunction Night Vision units also include a video
output port (G) (user switchable to NTSC or PAL standard), which allows connection to video or computer equipment
for recording or “live” monitoring. A built-in accessory mounting rail (N) enables the user to attach a more powerful
IR illuminator or other compatible accessories.
FEATURES
Large Objective Size 50mm
High Sensitivity infrared CMOS Sensor
Long Viewing Range(in full dark) 350m
Powerful Infrared Spotlight
Accurate Focus Adjustment
Optical magnification from 1.0x to 5.0x
Wide field of view
In-view 1.5” TFT display
JPEG Display:2560X1920

Video:1280x720@20fps
Build-In Clock
Built-in tripod mountable
Water Resistance Standard IPX4
Resistant Bright Light Exposure
Wide range of operating temperature
TF card: up to 32G(no included)
Magnification(optical): 6
Intuitive Easy-to-use Interface
HOW DIGITAL NIGHT VISION WORKS
LS-650 Multifunctional Night Vision products collect existing light through the objective lens. The image is then
processed through a digital CMOS sensor module and transferred to the micro liquid crystal display (LCD). Images
viewed on the LCD are magnified 6 times. LS-650 Multifunctional Night Vision models are equipped with a built-in
powerful IR (infrared) illuminator (D) that enables clear viewing in low ambient light conditions or even total darkness,
further more LS-650 Multifunctional Night Vision can also be used in daytime as telescope and there is a crosshair at
the central of the display for aiming and position.

CONTROLS/ FUNCTIONS
PARTS AND CONTROLS GUIDE
Observe battery polarity marks inside battery
compartment when inserting batteries, and ensure
polarity marks on cap match polarity in battery
compartment when replacing cap (+ to + and - to -).
Under Interface Cover Flap
Side Mount Hole
Bottom Mount Hole

POWER BUTTON (A)
The Power button (Power icon) turns the unit ON or OFF.
•Press and hold the power button for 2 seconds to turn the unit ON
•Press and hold the power button for 2 seconds to turn the unit OFF
DIGITAL ZOOM BUTTONS (B)
The “+” and “-” buttons adjust the digital zoom power, with a range of 1.0x to 5.0x.
The displayed numbers represent a multiplication factor over the fixed optical magnification of the unit.
Maximum effective magnification = 5.0 x 6.0 (30x) for the 6x50 model.
•Pressing and releasing the “+” button will gradually “zoom in” to the subject in view, by 0.1x increments
•Pressing and holding the “+” button will rapidly zoom in, until the maximum 3.0x magnification factor is reached
•Pressing and releasing the “-” button will gradually “zoom out” from the subject in view, by 0.1x increments
•Pressing and holding the “-” button will rapidly zoom out, until the digital zoom returns to the starting point of 1.0x
(no digital zoom applied, view represents the original 6x optical magnification)
IR BUTTON (C)
The“IR”button turns on/off the Infrared LED illumination (D) for low light operation, and is also used to
reduce its brightness if necessary.
•Press and release the “IR” button to turn on the infrared LED light (D) when ambient light levels are too low to
provide good viewing quality. The IR illumination will be at “100%” level when first turned on, and the display
will indicate “IR3”. The LS-650 model has 3 IR brightness settings.
•Press the “IR” button a second time to reduce the IR LED brightness level when viewing subjects at close range to
avoid glare or “washout” of the image. The display will indicate “IR2”. Press “IR” again if necessary on the 6xmodel,
to reduce the IR LED brightness to its lowest setting, indicated by “IR1” in the display.

•Press the “IR” button again to switch off the IR LED light. “IR0” will be shown at the lower center of the display.、
Switching off the IR LED when ambient light levels are adequate for viewing without it (full moon, near streetlights,
etc.) will extend battery life and running time. Press the “IR” button once again to switch to DAY Mode-no IR value
will be indicated.
IMAGE BRIGHTNESS BUTTON (E)
The Image Brightness (Sun Icon) button can be used to change the digital imaging frame rate, producing
a brighter image for viewing or recording.
•Pressing the Brightness (Sun icon) button repeatedly will cycle through the available frame rates, beginning with
the default frame rate (fastest), until the last (slowest, brightest) frame rate is reached. After that, the next press
of the button returns back to the original fastest rate. The default, fastest frame rate in Night Mode is 25fps.Pressing
the Brightness button cycles through the other frame rate settings, with the third press returning to the default
again: 25fps>15fps>8fps>25fps>etc.
•In Day Mode, the default frame rate is 30fps. The frame rate cannot be changed in Day Mode, therefore the
Brightness button will have no effect. The display is a color LCD, and images will appear in color in daytime use, or
in strong artificial lighting conditions.
NOTE: selecting frame rates lower than the default 25fps in Night Mode will provide a brighter
image, however the decreased frame rate may cause moving subjects to appear less smooth or
stable when viewed.

7
RECORD BUTTON (F)
The Record button is used to capture still photos or videos of the image being viewed, dependent on the
setting of the Photo/Video switch. The photos and/or videos are stored on a (user supplied) micro SD
card, with up to 32GB capacity. The unit has no internal memory.
•When the unit is in Photo Mode, pressing the record button will take a single photo of the displayed image,
standard .jpg format, at a resolution of 2592x1944/1600x1200/640x480 (adjustable) pixels.
•When the unit is in Video Mode, pressing the record button will start a new video recording. The Record icon in the
display will begin flashing, and the Video Time display will increase as the recording continues. Video is captured
in .avi format at a resolution of 1280x720/ 640x480 (adjustable) pixels per frame (VGA).
•To stop recording in Video Mode, press the Record button again.
(The following items are located on the bottom of the unit, under the Interface Cover Flap)
PHOTO/VIDEO SWITCH (J)
The Photo/Video slide switch under the Interface cover flap determines whether still photos or videos
are captured when using Record.
•Set the switch to the “Photo” position to select still photo recording mode when the Record button is pressed.
•Set the switch to the “Video” position to select video recording mode when the Record button is pressed.
MICRO SD CARD SLOT (I):a micro SD card (user supplied, up to 32GB maximum) must be inserted before it is
possible to use the Record function. If a card is not inserted, the message “No Card” will be seen on the display when
the unit is turned on.
USB PORT (H):connect a USB cable (MSDC and PCCAM adjustable) between this port and a PC/Mac to download
photos/videos without removing the card. The LS-650 is USB mass storage compliant.

8
VIDEO OUTPUT JACK (G):the “live” image as seen on the unit’s display is output here. Connect the included video
cable (1/8” to RCA) (3.5mm) between this jack and a video monitor or recorder to remotely view or record the
image from the night vision unit.
SETUP AND BASIC OPERATION
1) LOAD BATTERIES
Turn the battery compartment cover (K) in a counter-clockwise direction to remove it, and insert 4 AA batteries as
indicated inside the battery compartment. Lithium AA batteries are recommended for maximum running time, but
alkaline or rechargeable NiMh AAs may be used as well.
2)Installation of mount
The LS-650 can be used with various mount types such as Weaver, Europrism,Los, Side mount, MAK adapter etc. that
allow the scope to be installed on different types of rifles.
The mounting holes in the base of the LS-650 enable the mount to be installed in one of the multiple positions. The
choice of the mounting position helps the user to ensure the correct eye relief depending on the rifle type.
Attach the mount to the base of the LS-650 using a hex-nut wrench and screws (see installation scheme).
Install the scope on the rifle and check if the position is suitable for you.
If you are happy with its position, remove the scope, unscrew the screws halfway, apply some thread sealant onto
the thread of the screws and tighten them fully (do not overtighten). Let the sealant dry for a while.
NOTE
:
DO NOT MIX BATTERY TYPES, OR NEW AND OLD BATTERIES. Remove the batteries if the unit will
be stored for a month or longer between uses.

9
The LS-650 is ready to be installed on a rifle and to be zeroed.
After first installation of your LS-650 on a rifle, please follow instructions in the section “Zeroing”.
3)REMOVE LENS COVER, ADJUST DISPLAY (EYEPIECE) FOCUS FOR YOUR VISION
Press the Power button (A) to turn on the unit. A battery level icon is displayed at the top right corner of the
screen.
While looking through the eyepiece (M) at the LCD display screen, rotate the eyepiece (eyecup) until the display
icons or edges of the display screen appear sharp to your eye.
Remove the lens cover from the front of the objective lens (K).
4)TURN ON IR LIGHT (IF NEEDED), ADJUST OBJECTIVE LENS FOCUS FOR SUBJECT DISTANCE
If the image is too dark to easily view (in most building interiors, and outdoors when away from artificial lighting),
press the IR button (C) to turn on the Infrared LED light.
If the image is too bright after turning on the IR light (when viewing at close range), press the IR button again to
reduce the IR light level.
If the image is still too dark after turning on the IR light, try pressing the Image Brightness button (E) once or
twice to lower the frame rate of the digital sensor.
Note:Please check that your LS-650 is duly zeroed after changing a mount.
Note: since the LS-650 uses digital night vision technology (not analog “Gen 1”, etc.), the unit
cannot be damaged by exposure to normal indoor or outdoor light levels-however, you should avoid
pointing it directly at the sun or other very bright light sources to avoid overloading the sensor.

10
If the image is not sharp, rotate the objective lens barrel (L) to change the focus until the subject appears sharp.
5)ENTER INTO SETUP MENU INTERFACE
Press brightness level (E) switch and held for 2 seconds to enter the SETUP MENU INTERFACE.The SETUP MENU
includes the following options:
Choice of Resolution
Choice of Movie Size
Date&Time set up
BackLight Brightness set up
USB
In setup interface, the buttons are given the following function.
“-” button (B): enter into submenu, can be also used to lower the back light
when in Back Light Setting interface;
“+” button (B): drop out of one interface, can be also used to enhance the back light when in Back Light Setting
interface;
IR button (C): option key, can be also used to switch “DAYTIME LCD BRIGHTNESS” to “NIGHTTIME LCD
BRIGHTNESS” or in turn setting;
Image Brightness button (E): be used as confirm button when in Back Light Setting interface;
Record button (F): confirm button.
Note:Do not re-adjust the Display (Eyepiece) Focus (as set in Step 2), unless the display icons are
unsharp.

11
DISPLAY ICONS
1“#####”, Photo Count
When the device in photo mode,the number of photos
reminding(memory available)will be displayed.
2“00:00:00,”
-Reminding Recording Time
When the device in video,and NOT recording, the remind
recording time will be displayed (hrs/ min/sec).
-Relapse Recording Time
When the device in video,and recording, the elapsed
recording time will be displayed (hrs/ min/sec).
3“NO CARD”
When an SD card no inserted into the card slot,the”No Card”
will be displayed.
4“ “ Record Indicator
When the device in video mode, it will be displayed.
5“1.7x” Zoom Factor
The digital zoom magnification factor will be displayed, in 0.1x
increments from 1.0x ~ 5.0x.
6“IR2” IR Level
IR3(6x)/IR2(4.5x)=Normal; IR2(6x)/IR1(4.5x)=Low
IR1(6x only)=Very Low; IR0=OFF; No Icon=DAY Mode.
7Battery Level
This icon indicate the reminding battery power level.
8Image Brightness(frame rate)
OFF=Day/30fps; LOW=Night/25fps;
MED=Night/15fps; HIGH=Night/8fps
OFF
LOW
MED
HIGH
No Icon

12
•Resolution: press “-” button (B) and enter into adjust interface, press IR Button (C) to choose your
favorable resolution: 2592x1944, 640x480. 2592x1944 would be much clearer but 640x480 would take less
storage space. After choosing, press the record button (F) to confirm or “+” button (B) to drop out of setting.
•Movie Size: press “-” button (B) and enter into adjust interface, press IR Button (C) to choose your
favorable movie size: 1280x720, 640x480. 1280x720 would be much clearer but 640x480 would take less
storage space. After choosing, press the record button (F) to confirm or “+” button (B) to drop out of setting.

13
•Date &Time: press “-” button (B) to check the default time & date, if need to adjust, press the “-” button (B)
enter into adjust interface, press IR Button (C) to select Year/Month/Day/Hour/Minute then press “-” button (B)
enter for choosing the right number, after that, press the record button (F) to confirm.
•Backlight Setting: press “-” button (B) to enter into Backlight setting interface. The LCD backlight level can be
toggled from Level 00 to Level 03,press “+” and “-” button to adjust, this allows you to quickly make a significant
change in viewing brightness, and also provides a greater total range of adjustment. After finish the setting, press
image brightness button (E) to confirm.

14
•USB: Press “-” button (B) enter into setting interface, press IR Button (C) choose MSDC or PCCAM then press
Record button (E) to confirm and exit.
OTHER OPERATIONS/FEATURES
•AUTO POWER OFF
If a button has not been pressed for 10 minutes, the display screen will drop to 50% brightness level. If no button
is pressed within one minute after that, the unit will power off to extend battery life. Pressing any button quickly any
time before the unit turns off will return the screen to full brightness level and reset the auto off countdown process,
without changing any other settings.
•ICON OVERLAY ON/OFF
The user has the option to control how the icons are displayed on the LCD screen. Normally, when any button is first
pressed, All icons are displayed for 5 seconds, but no change to the unit’s settings is made (the Record and IR
buttons is an exception-image capture begins immediately the first time “Record” is pressed, and the IR light turns
on at the first press of “IR”). If the same button is pressed again, the button performs its function, and the display
icons remain visible for 10 seconds after the last press, before turning off automatically. To display all icons

15
constantly, press and hold the IR button for 3 seconds. Repeat to switch back to auto icon overlay (only visible for
10 sec. max following the use of a button).
•USING THE DIGITAL ZOOM
Press the “+” button (B) to zoom in. Press the “-” button (B) to zoom out. Hold the button down to zoom in/out
rapidly. The Digital Zoom icon at the lower left corner of the display will indicate the magnification factor, from 1.0x
to 5.0x (in 0.1x increments).
•SELECTING PAL OR NTSC VIDEO OUTPUT
The Video Output jack (G) is set to NTSC format (30fps TV standard in the USA, Canada, Mexico, etc.) by default.
To select PAL video output (25fps) format as used in other countries,
Connect the unit to your video device first.
Hold both the IR button (C) and Image Brightness (E) buttons down for 5 seconds while viewing the display
through the eyepiece.
When the display changes to “PAL”, release the buttons.
To switch back to NTSC video output format, hold both buttons for 5 seconds until the display indicates “NTSC”,
then release the buttons.
TECHNICAL INSPECTION
It is recommended that you inspect the sight before every use. Make sure to check for the following:
Visually inspect that the unit is free from any physical damage; cracks, dents or signs of corrosion which may
Note: The“Auto Off” feature is disabled when using the Video Output jack.

16
disqualify it from proper use.
Check the sturdiness and proper fit of the mounting system.
Ensure that the objective lens and eyepiece are free of cracks, grease spots,dirt, water stains and other residue
before use.
Visually inspect the condition of the battery and the battery compartment; the battery should be free of electrolyte
and oxidation residue, especially where the battery makes contact with metal.
Verify the proper function of the following: selector switch, display brightness adjustment knob and other
operation buttons.
Verify the smoothness of the objective lens focus knob, dioptre focus knob.
WARNING AND PRECAUTIONS
• Avoid dropping or otherwise shocking the unit. Although designed for rugged outdoor use, this device
incorporates sophisticated digital circuitry which could be damaged in extreme cases of misuse.
• Do not open the body of the device or otherwise attempt to service this device.
• Never pour alcohol or any other liquids directly onto the lens surfaces.
• Do not clean lenses and unit surfaces with paper based products, such as newspaper, textbook paper, etc. as it
can damage the coating.
• Avoid removing the eyepiece as the LCD display could become damaged.
• Do not leave the device in direct sunlight or rain. The unit is water resistant, but is not designed for prolonged
exposure to moisture and cannot be submerged in water.
• After the unit is operated in temperatures below zero, wait at least 3 hours at room temperature, to avoid
condensation accumulating on the internal lens surfaces and the consequent fogging caused by extreme temperature
differences.

17
TECHNICAL MAINTENANCE
Technical maintenance should be done at least twice a year, includes the following steps:
• Clean the outside metal and plastic surfaces from dust, dirt and moisture;wipe the scope with a soft lint free cloth.
• Clean the battery compartment's electric contact points using an oil-free solvent.
• Inspect the eyepiece lens and the objective lens and gently blow off any dust and sand, and clean using lens cleaner
and a soft cloth; see section 6 “GUIDELINES FOR OPERATION”.
CARE AND MAINTENANCE
Your LS-650 Digital Night Vision device was designed to provide many years of reliable service. To ensure that you get
the most enjoyment out of your Digital Night Vision device, always obey the following warnings and precautions.
• Keep the device away from any heating and air conditioning vents or other heating devices, direct sunlight, and
moisture.
• Always store the unit in its carrying case in a dry well ventilated space in temperature above +15°C (60° F). Do not
store near heating devices. Do not store in direct sunlight or high humidity conditions (higher than 70 %).
• Clean the optical lens with camera lens cleaning supplies.
• Clean the exterior of the device with a soft clean cloth.
• Remove the batteries if the device will not be used for longer than a few weeks.
TROUBLESHOOTING
Unit does not turn on
1. Reinstall the batteries, making sure of the correct polarity (+/- terminals) orientation (refer to the Parts and Controls
Guide page).
2. Replace all batteries.
3. Clean the battery compartment, especially the contact points.

18
Observed image is too bright
The ambient light level is too high, and/or the IR light is at 100% level (IR3).
1. If you are using the IR light, press the IR button (C) to select a lower illumination level (IR2 or IR1).
2. Turn off the unit or place the objective lens cover over the lens.
Observed image is too dark
The ambient light level is too low.
1. Press the IR button (C) to activate the Infrared Light.
2. Press the Image Brightness button (E) to select a lower frame rate from the digital sensor.
Image is blurry
1. Re-focus by adjusting the objective lens (L). Adjust the diopter setting if necessary by rotating the eyepiece (M) until the
edges of the LCD display appear sharp (see “Focusing“in this instruction manual).
2. Check the condition of the objective lens surface and eyepiece and clean if necessary.
3. Replace the batteries.
4. In low light conditions, activate the IR illumination (C).
Image disappears or its quality is reduced
Bright light sources (e. g. street lights at night time) may cause decreased visibility or reduced contrast.
1. Turn the night vision unit away from the light source; visibility will return momentarily.

19
TECHNICAL SPECIFICATIONS
Magnification (Optical)
6x
Battery Type
4xAA,lithium,alkaline or NiMh
Digital Zoom
5
Battery Runtime (IR OFF)
4 Hours
In-view display
1.5” TFT
Battery Runtime (IR ON)
3 Hours
Field of View @ 100 yds/m
20.5ft/6.8m
Built-in 2tripod mountable
YES
Objective Lens
50mm
Weaver Rall
YES
Micro SD Card
UP To 32 GB
Crosshairs
YES
Viewing Range
1150ft/350m
Time Stamp (Picture &Video)
YES
Obj. field
100yds
Video Out Type
PAL/NTSC
Eyepiece exit pupil distance
20mm
USB
1.1
Eyepiece exit pupil diameter
18mm
Language
English
Infrared Illuminator
Yes, 850NM
Power Voltage
6V
JPEG
2592 x 1944
Dimensions
62x105x208mm
Video
1280 x 720@20FPS
Weight
765g
Observing Distance(Low Ambient Light)
2m ~ ∞
Waterproof grade
IPX4
Observing Distance(Total Darkness)
1150ft/350M
Operation Temperature
-30~55C
Video Out
PAL or NTSC
Operation humility
5% ~ 95%
Field of view
4°x3.3°
Security authentication
FCC, CE, RoHS
Note: failure to follow the warnings and precautions as stated in this manual may damage the unit
and void the manufacturer’s warranty.
Table of contents