AIR QUALITY MONITOR
Instructions manual
INTRODUCTION:
Congratulations on purchasing this Air Quality Monitor with wireless
868 MHz transmission of outdoor temperature and display of indoor
temperature/humidity, and time. With only four easy to use function
keys, this innovative product is ideal for use in the home or office.
FEATURES:
AIR QUALITY MONITOR
12/24h time display
Temperature display in ºC / ºF
Indoor and outdoor temperature display with MIN/MAX records
Indoor humidity display in RH%
Air quality alert
Air quality indicator
Low battery indicator
THE OUTDOOR TEMPERATURE TRANSMITTER
Remote transmission of outdoor
temperature to the air quality monitor
by 868 MHz signal
Rain proof casing
Wall mounting case
TO INSTALL AND REPLACE BATTERIES IN THE
TEMPERATURE TRANSMITTER
The temperature transmitter uses 2 x AA, IEC,
LR6, 1.5V batteries. To install and replace the
batteries, please follow the steps below:
1. Remove the cover.
2. Insert the batteries, observing the
correct polarity (see marking).
3. Replace the battery cover on the unit.
TO INSTALL AND REPLACE BATTERIES IN THE AIR
QUALITY MONITOR
The air quality monitor uses 2 x C, IEC LR14, 1.5V battery. To install
and replace the battery, please follow the steps below:
1. Remove the cover at the back of the air quality monitor.
2. Insert batteries observing the correct polarity (see marking).
3. Replace compartment cover.
SETTING UP:
1. First, insert the batteries in the transmitter (see “Install and
replace batteries in the temperature transmitter”above).
2. Within 2 minutes of powering up the transmitter, insert the
batteries in the Temperature Station (see “Install and replace
batteries in the air quality monitor”above).
3. The indoor temperature/humidity and the time as 0:00 will be
displayed. If these information are not displayed on the LCD
after 60 seconds, remove the batteries and wait for at least 60
seconds before reinserting them. Once the indoor data is
displayed user may proceed to the next step.
4. The air quality monitor will start receiving data signal from the
transmitter. The outdoor temperature data should then be
displayed on the air quality monitor. If this does not happen
after 2 minutes, the batteries will need to be removed from both
units and reset from step 1
Note:
The Equivalent CO2 ppm will only be displayed after 30
minutes.
The air quality sensor will take up to 5 days after inserting
batteries to condition itself for the room it is placed. If the unit is
placed into another room, there might be a reconditioning time
of several days as well.
BATTERY CHANGE:
It is recommended to replace the batteries in the unit regularly to
ensure optimum accuracy of the unit (Battery life See Specifications
below).
Please participate in the preservation of the
environment. Return used batteries to an authorised
depot.
KEY FUNCTIONS:
The Air Quality Monitor has 4 easy-to-use keys:
SET key:
Press and hold to enter the manual setting modes: 12/24 hour
time display, manual time, and ºC / ºF temperature display
settings
+ key:
Press to change, set, toggle all manual settings
AL key:
Stop the LED air quality alert
Exit the manual setting mode
MIN/MAX key:
Press to toggle between MAX/MIN and current indoor
temperature/humidity and outdoor data
Exit the manual setting mode
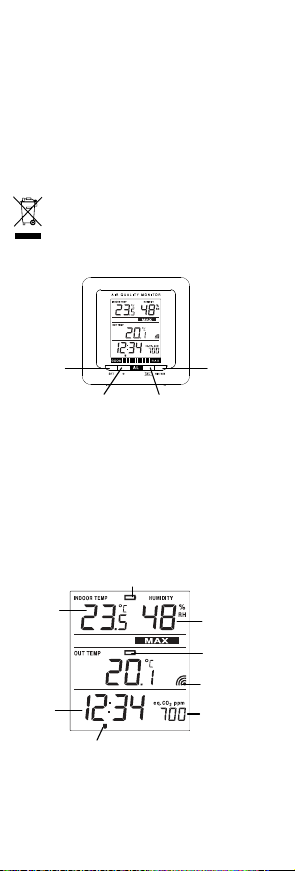
LCD SCREEN
* When the signal is successfully received by the temperature station,
the outdoor transmission icon will be switched on. (If not successful,
the icon will not be shown on LCD). The user can then easily see
whether the last reception was successful (icon on) or not (icon off).
On the other hand, the short blinking of the icon shows that a
reception is currently taking place.
MANUAL SETTINGS:
The following manual settings can be done in the setting mode:
12/24 hour time setting
Time setting
ºC / ºF temperature display setting
Press and hold the SET button for about 3 second to enter the setting
mode:
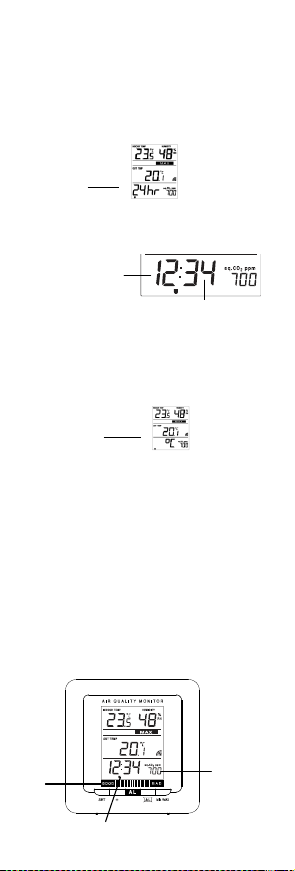
12/24 HOUR TIME DISPLAY SETTING
1. “12hr” or “24hr” flashes in the LCD. (default 24hr)
2. Press the +key to select the “12hr” or “24hr” display mode.
3. Confirm with the SET key and enter the Manual time setting.
MANUAL TIME SETTING
To set the clock:
1. The hour digits start flashing in the time display section.
2. Use the +key to adjust the hours and then press SET key to go
to the minute setting.
3. The minute will be flashing. Press the +key to just the minutes.
4. Confirm with the SET key and enter the °C/°F temperature
unit setting.
°C/°F TEMPERATURE UNIT SETTING
The default temperature reading is set to °C (degree Celsius). To
select °F (degree Fahrenheit):
1. The “°C” will be flashing, use the +key to toggle between “°C”
and “°F”.
2. Confirm with the SET key and exit the manual settings.
AIR QUALITY ALERT:
The LED will flash when:
Equivalent CO2 ppm> 1500ppm:
LED alert blinks at a slower speed (1.5s).
Equivalent CO2 ppm> 2000ppm:
LED alert blinks at faster speed (0.5s).
Note about the air quality alert:
The air quality alert will sound for a maximum duration of 30
minutes.
To stop the alert, press any key.
AIR QUALITY INDICATOR
The air quality indicator is located on the bottom of the LCD. It
changes from GREEN (GOOD) to RED (BAD) by measuring the
Equivalent CO2 ppm.
* The air quality value shown, after sensor conditioning, may differ +/-
250 ppm.
Note:
A 9-level bar graph is used to indicate “GREEN” to “RED” air quality
level in the surrounding environment:
DISPLAY OF MIN/MAX TEMPERATURE AND HUMIDITY
RECORDS:
1. In normal display mode, press the MIN/MAX key once. The
MIN indoor/outdoor temperature and indoor humidity will be
shown in the LCD.
2. Then press the MIN/MAX key one more time, the MAX
indoor/outdoor temperature and indoor humidity will be shown
in the LCD.
3. Press one more time the MIN/MAX key to go back to the
normal display.
RESETTING THE INDOOR MAXIMUM/ MINIMUM
RECORDS
Note: The indoor/outdoor minimum and maximum and humidity
records will be reset at the same time
1. Press and hold the MIN/MAX key for about 3 seconds, this will
reset the indoor/outdoor MIN/MAX temperatures and humidity
to the current temperature and humidity.
TEMPERATURE TRANSMITTER
The outdoor temperature is measured and transmitted every 4
seconds.
The range of the temperature transmitter may be affected by the
temperature. At cold temperatures the transmitting distance may be
decreased. Please bear this in mind when placing the transmitter.
868 MHz RECEPTION:
If the outdoor data are not being received within three minutes after
setting up (or outdoor display always show “- -. -” in the outdoor
sections of the temperature station during normal operation), please
check the following points:
1. The distance of the air quality monitor or transmitter should be
at least 2 meters away from any interfering sources such as
computer monitors or TV sets.
2. Avoid placing the transmitters onto or in the immediate
proximity of metal window frames.
3. Using other electrical products such as headphones or
speakers operating on the 868MHz-signal frequency may
prevent correct signal transmission or reception. Neighbors
using electrical devices operating on the 868MHz-signal
frequency can also cause interference.
Note:
When the 868MHz signal is received correctly, do not re-open the
battery covers of either the transmitter or air quality monitor, as the
batteries may spring free from the contacts and force a false reset.
Should this happen accidentally then reset all units (see Setting up
above) otherwise transmission problems may occur.
The transmission range is about 100 m fromthe transmitter to the air
quality monitor (in open space). However, this depends on the
surrounding environment and interference levels. If no reception is
possible despite the observation of these factors, all system units
have to be reset (see Setting up).