manuals.online logo
Brands
  1. Home
  2. •
  3. Brands
  4. •
  5. La Pavoni
  6. •
  7. Coffee Maker
  8. •
  9. La Pavoni P06 User manual

La Pavoni P06 User manual

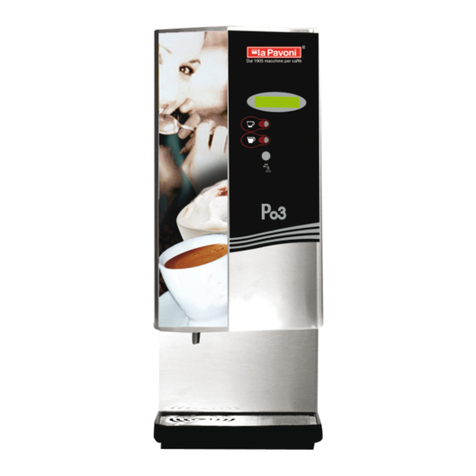
P03 / P06 / P09
Cod. 2850018 - Rev. 00 - Marzo 2009
®
INTRODUCTION
Dear Customer,
Thank you for choosing our product.
This machine, thanks to its reliability, will be able to win your preference also
for other products in our range.
Each dealer will be able to refer you to the nearest Service Centre.
Notwithstanding the ease of use of the machine, in order to get the best
results it is important to thoroughly read this booklet and follow all
instructions before starting the machine.
GENERAL INFORMATION
The machine is suitable for preparing hot drinks, obtained by mi ing hot
water and granulated soluble products. The body of the machine is designed
for indoor use only.
Any service or repair work, with the e ception of cleaning and normal
maintenance, shall be carried out by an authorised Service Centre.
To make reading of the manual easier, important information, which must be
observed for the safeguard of the user and for the prevention of accidents,
will be shown in bold and in some cases indicated by the following symbols:
GENERIC HAZARD: it indicates important rules to be observed
in order to avoid hazards to the user.
ELECTROCUTION HAZARD: it indicates important information
to be followed in order to avoid risks resulting from electric
power
Th machin was conc iv d for us by adult p rsons only, who hav th ir
psycho-physical faculti s unalt r d. It is not suitabl for us by childr n.
- 3 -
IMPORTANT PRECAUTIONS
When using electric material it is important to ensure the appropriate
precautions are adopted in order to avoid electric shock, accidents
and damage to persons and things.
•
Thoroughly read all information contained in
this manual and in any
other attachment included in the packing.
• Ensure that the power supply voltage indicated on the data plate of the
machine is compatible with the one from your power supply outlet.
• Take special care while using the machine in the presence of children.
• Verify that the main switch of the machine is not pressed before
plugging or unplugging the power supply plug.
• Unplug the power supply plug from the power outlet and wait for the
machine to cool down before starting any maintenance or cleaning
operations.
• Do not use the machine when one or more components are damaged or
missing (power supply cable, plug, switches, etc.). Get the machine to be
checked or repaired at the nearest service centre.
• The use of accessories that are not recommended by the manufacturer
can cause damage to persons or things.
• Do not immerse the machine in any kind of liquid; do not clean it with
any strong detergents. It is sufficient to use a soft cloth soaked in
warm water.
• To avoid short-circuits and/or electric shocks keep away from the
machine liquids that may accidentally be spilled over the machine.
In case of doubt or should the instructions in this manual not be clear enough, do
not hesitate to ask for clarification from the supplier, an authorised service centre
or directly from the manufacturer.
4
SAFETY REGULATIONS
Make sure to implement all necessary precautions to avoid contact of the
machine with liquids. Liquids can seep inside the machine and cause short-
circuits or energise e ternal parts of the machine.
INTENDED USE OF THE MACHINE
The machine is intended for adult persons informed on its operation, to be
used in a sensible, conscious and careful manner (should the machine be used
by other persons, we recommend to make this booklet available to them).
It is intended for indoor use only.
The machine is intended e clusively for dispensing hot drinks through the use
of suitable granulated soluble products.
Do not make any changes, and do not use the machine improperly or for a
purpose different from the one for which it was designed.
INSTALLATION
After opening the packing ensure that the machine is intact and check that all
of the main parts are included (refer to the figures in the following pages).
Plastic bags, polystyrene, nails etc. are potential sources of danger, therefore
they must not be left unattended or within the reach of children.
The machine must be positioned on a level, solid and stable surface, away from
heat sources. Ensure a free space at the sides and at the back of the machine
of at least 20 cm.
Th r must b suffici nt fr spac to allow th op rator to hav acc ss
to th machin in th v nt of malfunctions.
Choose a hygienic and well lit room with an easy to access power outlet.
•Ch ck that th pow r supply voltag of th machin
is th sam as th on of th pow r supply outl t.
•Th pow r supply outl t must b conforming to th plug of
th machin , siz d to m t th charact ristics indicat d
on th data plat of th machin and conn ct d to an
ffici nt arth circuit.
5
•Ch ck that th pow r supply cabl is not damag d or d f ctiv . If
th r is a probl m, do not us th machin und r any
circumstanc s. Th pow r supply cabl must b r plac d by th
manufactur r or by on of its s rvic c ntr s.
Pay attention to the position of the cable during installation, it must
not b :
- a hindrance to persons or things
 crushed, pressed or placed on sharp surfaces
 bent forcefully
 placed near hot surfaces
 immersed, or placed near water or other liquids
 wound around itself when the machine is in operation
 tampered with.
DANGER ASPECTS
It is important to nsur that no childr n can touch th machin !
• Th machin can b dang rous for childr n and must b mad
inacc ssibl to th m. If not us d or if l ft unatt nd d, it must
b d activat d.
• Do not l av any mat rials us d for packing th machin within
th r ach of childr n.
• Do not ins rt any obj cts through th machin op nings (Dang r!
El ctric curr nt!).
• Do not touch th plug and th cabl whil th machin is in
op ration; do not unplug by pulling th cabl .
••Th parts n ar th disp nsing zon can b v ry hot. Caution!
Risk of burns from contact.
6
CLEANING
Before starting any cleaning on the machine, ensure that it is switched off
and that the plug is unplugged.
Wait several minutes to allow the components to cool down.
Do not insert any objects in the holes of the machine.
REPAIRS AND MAINTENANCE
In th v nt of failur s, d f cts, susp ct d d f cts or if th
machin is dropp d, imm diat ly unplug th plug from th pow r
outl t. N v r start a d f ctiv machin .
Only th Authoris d S rvic C ntr or th Manufactur r can
mak r pairs.
In th v nt of r pairs that ar not w ll mad , w d clin all
r sponsibility for any damag .
DISPOSAL
The directive WEEE (Waste Electrical and Electronic
Equipment) indicates that electrical and electronic
products must be disposed of separately from normal
urban waste and similar. The aim is to send the waste to
authorised waste disposal centres, for the purpose of
promoting ways of recovering or recycling.
The directive includes also the accessories, the power
supply cables, etc
To correctly dispose of these products, follow the regulations provided by
the municipal authority and/or request further information from your
dealer when purchasing a new product.
7
OPERATING INSTRUCTIONS
1 Drip tray
2 Cup support grille
3 Canister of product A
3 Canister of product B
3 Canister of product C
4 Door
5 Water level sensor
6 Water tank
7 Main switch
8
Control panel
The figure shows the F09,
which has 3 canisters. The
F06 and F03 versions differ
from this in number of
canisters, respectively 2 and
1
8
CONTROL PANEL
F03
F06
F09
9
•As indicated in the figures of the previous page, the machines have 2
dispensing buttons for each granulated product:
-Large cup: long dose
-Small cup: short dose
In addition, they have a rinse button for each mi er unit installed.
The name assigned to the buttons in the figure (e.g. A1-A2), indicates the
name of the controlled mi er unit, A is the first one from the left.
PRELIMINARY OPERATIONS
Before inserting the plug and switching the machine on, remove the water
tank, thoroughly rinse it and fill it with fresh water.
Replace the tank, ensuring that the level sensor is immersed in the water.
Pour in th tank only fr sh drinking still wat r. Hot wat r or oth r liquids
can damag th machin .
Do not start the machine without water; for correct dispensing, the softener
filter located at the end of the intake tube must be immersed completely.
LOADING THE GRANULATED PRODUCT
IMPORTANT NOTICE:
The products dispensed by the machine with the appropriate mi ing and
associations to the control panel are preset at the factory.
It is not possible to dispense different products from the ones for which the
machine is manufactured.
For machines equipped with more than one canister, make sure that each
product is located in the correct position.
Remove the canister, rinse it and dry it thoroughly. Pour the granulated
powder product, then fit the lid and replace the canister in its place. Verify
that the pin protruding from the base is inserted into the corresponding hole
of the machine.
YES
11
Make sure the main switch is set to the position “0”
Insert the plug in the power outlet.
It is important for th pow r outl t to
b compatibl with th plug of th
machin and provid d with th arth
conn ction pin.
For correct dispensing, it
is important that the
product inside the
canister never falls below
this level.
12
STARTING THE MACHINE
N.B.: th machin r quir s littl tim for h ating, if not
us d in th imm diat futur , it is advisabl to switch it off.
After completing the preliminary operations, place a large enough container in
the drink dispensing point.
NOTE: the different configurations of the machine allow one or more
dispensing points.
It is possible to understand if your model dispenses drinks in a single
point by the pattern on the grille, which has a sector with concentric
circles. On the contrary, the product will be dispensed under its own
mi er body.
Start the machine by pressing the main switch. After appro imately 10
seconds, press the rinse button “L” to fill the machine internal circuit (if the
dispensing points are not grouped, make sure to press the rinse button
corresponding to the mi er body where the contained was placed).
Water coming out of the mi er spout means that the circuit is full.
Dispense at least two cups of water (it may be necessary to press the button
several times).
N v r op rat th machin without first filling th wat r circuit, not to
damag th h ating l m nt. If th wat r l v l in th tank is too low and
th wat r l v l s nsor is not imm rs d, this will disabl th l ctronic
card
.
13
Pay attention now, the display will indicate the message “READY -
SEL.PRODUCT“ and at this point it will be possible to dispense the desired
drink by pressing the corresponding button.
INSTRUCTIONS FOR ROUTINE CLEANING
In order to keep the machine efficient and ensure a long lasting
duration, it is sufficient to take some simple precautions.
When switching the machine on, every now and then during the
course of the day and before switching it off, clean the mi er
by pressing the rinse button.
Every day, at the end of the day,
disassemble the parts that compose
the mi er unit (‘X’, ‘Y’, ‘Z’, ‘K’, ‘J’ and
the internal plastic impeller ‘W’) and
therefore wash them with hot water.
The figure is only an e ample;
the shape of the elements may
vary according to the product
to be mi ed.
14
Periodically wash the water tank and replace the water.
Using a soft cloth damp with warm water, clean the outside of the softener
filter and the intake tube to which it is fitted.
N.B.: Th soft n r filt r op rat s corr ctly up to 35 litr s of wat r,
aft r which it must b r plac d.
The machine will indicate on the display the end of the recommended filter
autonomy; after replacing the filter to reset the message, press and keep
pressed the rinse button of mi er A.
Clean the inside of the canister compartments.
Und r no circumstanc s proc d by disass mbling th machin .
DESCALING
Periodically it may be useful to descale the circuit using a specific product for
coffee machines, of the NON TOXIC type. Normally available in major
stores.
Warning! Und r no circumstanc s us vin gar for d scaling.
After using the product, thoroughly wash the water tank and rinse the circuit
by dispensing water only continuously, using a few times the ma imum capacity
of the water tank.
15
TROUBLE-SHOOTING
•Th machin disp ns s too littl wat r:
replace the resin filter fitted on the water intake tube and located
inside the water tank.
•Th machin disp ns s on drink and th n stops:
check the water level in the tank and if necessary refill it or verify
that the shut-off valve is open.
•Th powd r is not disp ns d:
check that the product canister is correctly inserted in its seat
and/or there is sufficient product.
•Th r is a wat r l ak b tw n compon nt Z and its conn ction P in th
machin :
check that the component Z is inserted correctly.
•Wh n pr ssing buttons A or B th product is not disp ns d:
the operating temperature has not been reached yet, wait a few
minutes.

This manual suits for next models

2

Other La Pavoni Coffee Maker manuals

La Pavoni professional User manual

La Pavoni

La Pavoni professional User manual

La Pavoni Hotel V Series User manual

La Pavoni

La Pavoni Hotel V Series User manual

La Pavoni LPSGEG03 User manual

La Pavoni

La Pavoni LPSGEG03 User manual

La Pavoni DOLCE ESPRESSO User manual

La Pavoni

La Pavoni DOLCE ESPRESSO User manual

La Pavoni P1 User manual

La Pavoni

La Pavoni P1 User manual

La Pavoni Barat ES Instructions for use

La Pavoni

La Pavoni Barat ES Instructions for use

La Pavoni PROFESSIONAL PC-16 User manual

La Pavoni

La Pavoni PROFESSIONAL PC-16 User manual

La Pavoni PCN User manual

La Pavoni

La Pavoni PCN User manual

La Pavoni PROBAR User manual

La Pavoni

La Pavoni PROBAR User manual

La Pavoni Nepolitana PA-1200 User manual

La Pavoni

La Pavoni Nepolitana PA-1200 User manual

La Pavoni Romantica De luxe User manual

La Pavoni

La Pavoni Romantica De luxe User manual

La Pavoni espresso inn User manual

La Pavoni

La Pavoni espresso inn User manual

La Pavoni Pub Automatic User manual

La Pavoni

La Pavoni Pub Automatic User manual

La Pavoni GRAN CAFFE User manual

La Pavoni

La Pavoni GRAN CAFFE User manual

La Pavoni DAYTONA 1-POWER Owner's manual

La Pavoni

La Pavoni DAYTONA 1-POWER Owner's manual

La Pavoni CASABAR PID User manual

La Pavoni

La Pavoni CASABAR PID User manual

La Pavoni GIOTTO EVOLUTION User manual

La Pavoni

La Pavoni GIOTTO EVOLUTION User manual

La Pavoni EBR-EDL User manual

La Pavoni

La Pavoni EBR-EDL User manual

La Pavoni CREMA User manual

La Pavoni

La Pavoni CREMA User manual

La Pavoni LPSGEG03 User manual

La Pavoni

La Pavoni LPSGEG03 User manual

La Pavoni Espresso Si' User manual

La Pavoni

La Pavoni Espresso Si' User manual

La Pavoni P180 User manual

La Pavoni

La Pavoni P180 User manual

La Pavoni BARETTO User manual

La Pavoni

La Pavoni BARETTO User manual

La Pavoni Verobar V User manual

La Pavoni

La Pavoni Verobar V User manual

Popular Coffee Maker manuals by other brands

Miele DGC 6800 quick start guide

Miele

Miele DGC 6800 quick start guide

Tower Hobbies T13001 Safety and instruction manual

Tower Hobbies

Tower Hobbies T13001 Safety and instruction manual

Sage Barista Touch SES880 user guide

Sage

Sage Barista Touch SES880 user guide

Philips HD8847 Quick instruction guide

Philips

Philips HD8847 Quick instruction guide

Newco ACE-S Installation, operation and service manual

Newco

Newco ACE-S Installation, operation and service manual

Beko CEP 5302 B user manual

Beko

Beko CEP 5302 B user manual

Matsui MCE100 manual

Matsui

Matsui MCE100 manual

izzy Limited Edition IZ-6009 manual

izzy

izzy Limited Edition IZ-6009 manual

Jura ENA 3 Instructions for use

Jura

Jura ENA 3 Instructions for use

Philips HD7450 manual

Philips

Philips HD7450 manual

Nespresso Koenig Citiz user manual

Nespresso

Nespresso Koenig Citiz user manual

Ninja Hot & Cold Brew System CP301 Series owner's guide

Ninja

Ninja Hot & Cold Brew System CP301 Series owner's guide

Grindmaster AT-AP Specifications

Grindmaster

Grindmaster AT-AP Specifications

Unic STELLA quick start guide

Unic

Unic STELLA quick start guide

Alhafidh COER01 user manual

Alhafidh

Alhafidh COER01 user manual

2elle BETA manual

2elle

2elle BETA manual

DeLonghi Dinamica manual

DeLonghi

DeLonghi Dinamica manual

POLTI TRIS AROMA Instructions for use

POLTI

POLTI TRIS AROMA Instructions for use

manuals.online logo
manuals.online logoBrands
  • About & Mission
  • Contact us
  • Privacy Policy
  • Terms and Conditions

Copyright 2025 Manuals.Online. All Rights Reserved.