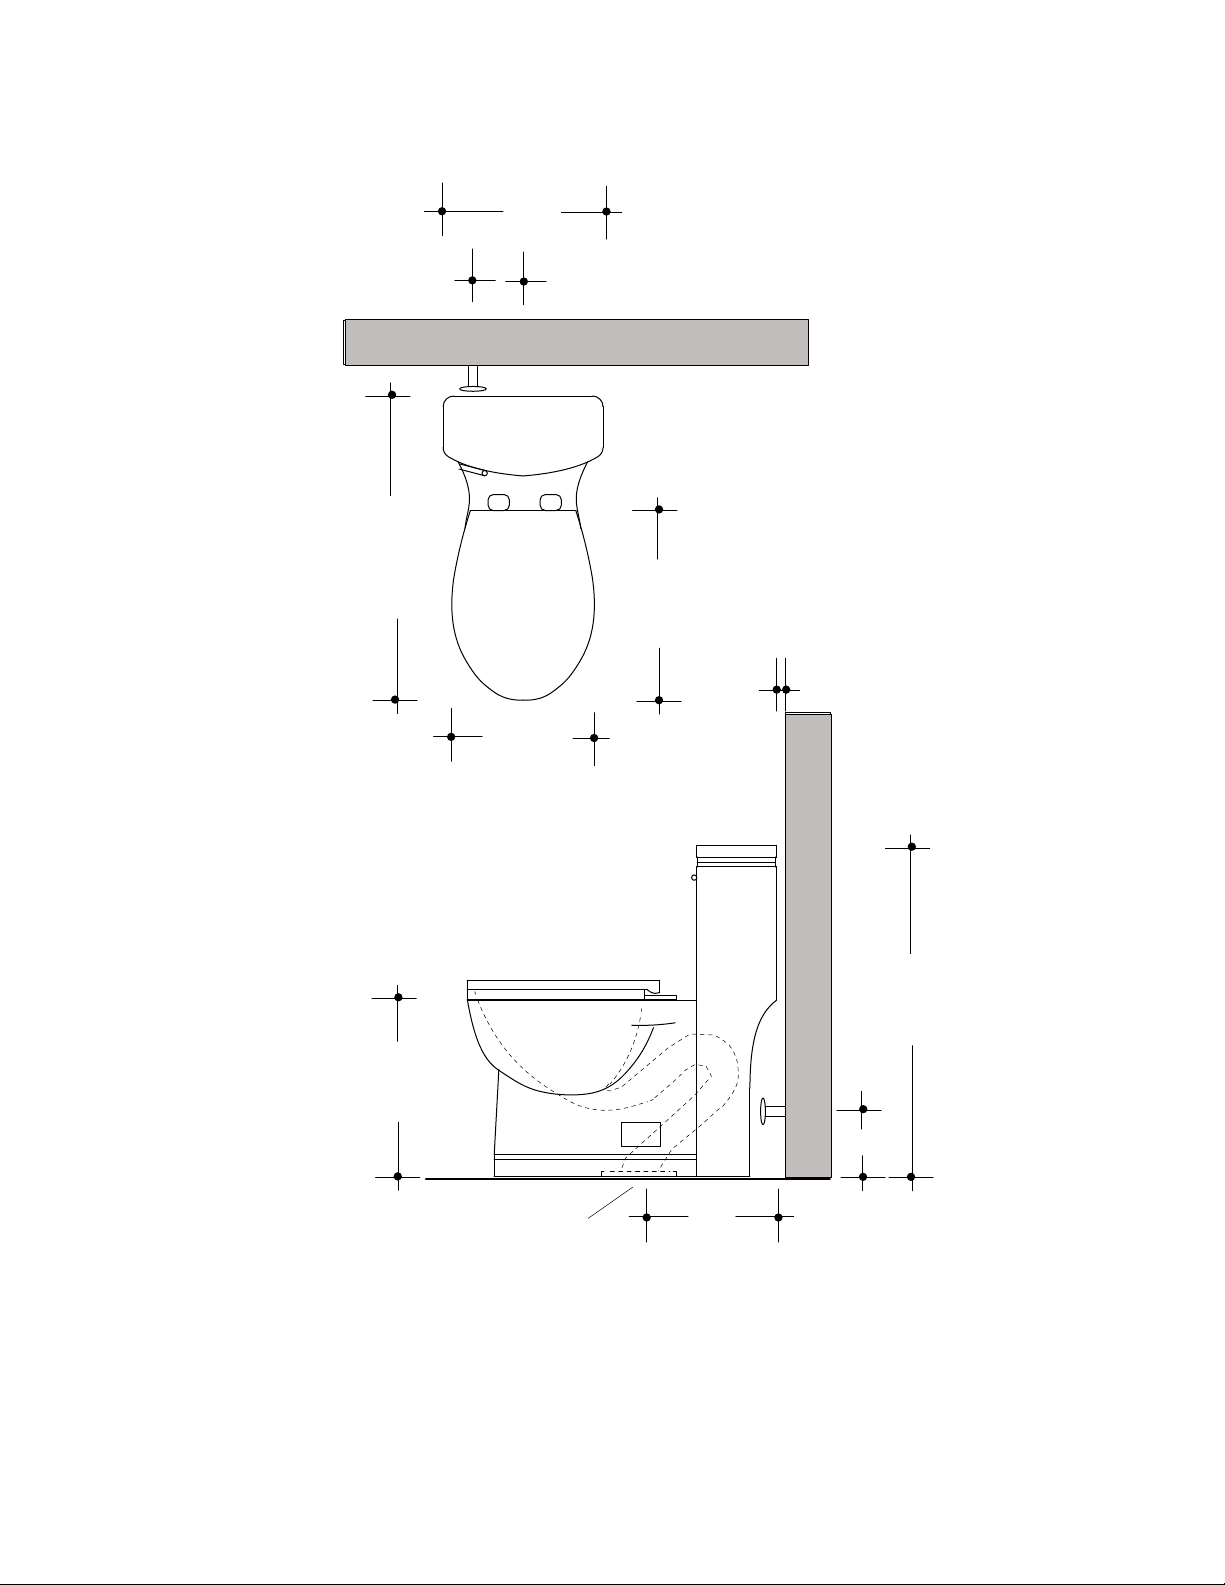
LACAVA 8
Warranty
LACAVA LLC provides a Limited Lifetime Warranty on its faucetry. This warrants any faucet, installed in a residential
application, to be free of defects in material and workmanship for as long as the original consumer owns his or her
home. Any product installed in a commercial application is covered under warranty for one year. LACAVA warrants
all other products to be free from any defects in materials or workmanship, during normal residential or commercial
use including all hinges, drawer slides, finishes, and general workmanship of the item for a period of one year.
LACAVA warranties do not cover normal wear and tear, damages due to negligence, faulty installation, improper
alterations and repairs, improper cleaning and care, or damages due to uses of the product other than its intended
and normal use. If a defect is found under normal use, while under warranty, LACAVA will repair or replace the
product (whichever cost is smaller to LACAVA) at its own expense (excluding shipping and installation charges).
Under no circumstances is LACAVA responsible for installation/service fees or any dollar amount beyond the cost of
the item. In addition, all LACAVA products are to be installed by experienced professionals properly licensed and
bonded; otherwise, any LACAVA warranty and liability is to be considered waived. All warranties are non-transfer-
able and proof of purchase is required for any warranty claim.
In accordance with the laws of limitation and exclusion state by state, and therefore provided the duly exceptions,
LACAVA will not be held liable, in any event, for any special, indirect, incidental or consequential damages or losses
(including but not limited to damages for loss of business, loss of profits, etc.) for breach of contract, tort (including
negligence), product liability or otherwise, even if it has been advised of the possibility of such damages. LACAVA’s
liability on any claim (including negligence) will not in any case exceed the contract price paid by the original
purchaser for the product claimed defective or unsuitable. It is the responsibility of the homeowner to ensure that all
installed fixtures comply with all local plumbing codes.
LACAVA LLC proporciona una Garantía Limitada de por Vida en sus grifos. Esto garantiza que cualquier grifo,
instalado en una aplicación residencial, no presentara defectos en el material o de fabricación, mientras que el
consumidor original posea su casa. Cualquier producto instalado en una aplicación comercial está cubierto bajo
garantía por un año. LACAVA garantiza que todos los otros productos no presentaran defectos en el material o de
fabricación, durante el uso normal, residencial o comercial incluyendo las bisagras, rieles, acabados, y confección
en general del artículo, por un período de un año. Las garantías de LACAVA no cubren el desgaste normal, los
daños debido a negligencia, instalación errónea, modificaciones y reparaciones impropias, limpieza y cuidado
impropio, o daños debido a la utilización de los productos distintos de su uso previsto y normal. Si un defecto es
encontrado bajo el uso normal, mientras bajo garantía, LACAVA reparará o reemplazará el producto (el costo
menor a LACAVA) a su cargo (excluyendo cargos de envío e instalación). Bajo ninguna circunstancia LACAVA
será responsable por servicios de instalación, compensaciones por servicios o cualquier cantidad que exceda el
costo del artículo. Además, todos los productos de LACAVA deben de ser instalados por profesionales experiment-
ados con licencia y seguro; de otro modo, cualquier garantía de LACAVA y obligación será cancelada. Todas las
garantías son intransferibles y el comprobante de compra es requerido para cualquier reclamo de garantía.
En conformidad con las leyes de la limitación y exclusión de estado a estado, y con las excepciones aquí debida-
mente presentadas, LACAVA no será responsable, en cualquier caso, por ningún daño especial, indirecto,
incidental o consecuencial o pérdidas (incluyendo pero no limitadas a daños por pérdida de negocio, pérdida de
beneficios, etc) por incumplimiento de contrato, agravio (incluyendo negligencia), responsabilidad por
Productos defectuosos o de otro modo, incluso si se ha advertido de la posibilidad de tales daños. La Responsa-
bilidad de LACAVA en caso de reclamaciones (incluyendo negligencia) no superarán en ningún caso el precio del
contrato pagado por el comprador original del producto reclamado defectuoso o no apto. Es la responsabilidad
del propietario garantizar que todos los accesorios instalados cumplan con todos los códigos de plomería locales.
Garantía