LAIA CUTE 30X User manual

Warning
The improper operation may destroy the structure of the product and lead to abnormal operation of
the camera. Please pay attention to the following operations.
Do not grasp the lens barrel with your
hand while moving the camera;
Move the camera by holding the bottom
with both hands or one hand.
Wh
ether
electrified or not, do not shake the lens and the platform by hand,
otherwise it may damage the platform, resulting in abnormal self-
examination of the camera, unable to start normally.。
Copyright © 2021 Laia · www.laiatech.com All rights reserved

Copyright © 2021 Laia · www.laiatech.com
- 1 -
All rights reserved
Attentions
This manual describes in detail the functions, installation and operation principles and methods of the
product. Before installing and using this product, please read it carefully.
1. Use Attention
★ During transportation, storage, installation and use, it is necessary to prevent heavy pressure,
severe vibration and immersion so as to avoid damage to products.
★The product shell is made of organic material. It is strictly forbidden to contact with corroded liquid,
gas or solid substances.
★Don't let the product get wet or rained. Don't use it beyond the limit of temperature and humidity.
★When cleaning equipment lens, please use dry soft cloth to wipe. When dirt is serious, please use
neutral cleaner to wipe gently.
★Do not use strong or corrosive detergents to avoid scratching the lens and affecting the image
effect.
★This product has no parts that users can repair by themselves, and the damage caused by
users'self-disassembly does not fall within the scope of warranty.
2. Electrical safety
★ The installation and use of products must strictly comply with the national and local electrical
safety standards.
★ Do not use power adapters beyond the specifications of the power supply, otherwise the
equipment components will burn out and will not work properly.
★ In the process of using the product, we should keep enough distance from the high-power
equipment, and do a good job of lightning protection, surge protection and other protective measures
when necessary.
★When the product is not in use, please disconnect the power switch
and disconnect the power adapter from the power socket.
★The product uses DC 12V power supply, and the polarity of the
power plug is as shown in the right picture.
3. Careful installation

Copyright © 2021 Laia · www.laiatech.com
- 2 -
All rights reserved
★ Do not rotate the cylinder of the product by hand, otherwise it will destroy the rotating shaft of the
structure or cause abnormal work of the signal line.
★Installation and placement of equipment should be horizontal and stable, and the product should
not be tilted, otherwise the picture may be skewed.
★Installation ensures that there are no obstacles in the rotating range of the platform to prevent
damage to the rotating shaft of the structure.
★Do not turn on power until all installation work is completed.
4. Magnetic Interference
★ The electromagnetic field at a specific frequency may affect the local image.The product is Class A
product. Radio interference may occur in the home environment, and users need to take appropriate
measures.

Copyright © 2021 Laia · www.laiatech.com
- 3 -
All rights reserved
Content
1. FAST INSTALLATION...................................................................................................................................................- 4 -
1.1 PRODUCT INTRODUCTION.................................................................................................................................... - 4 -
2. PRODUCT OVERVIEW..........................................................................................................................................- 5 -
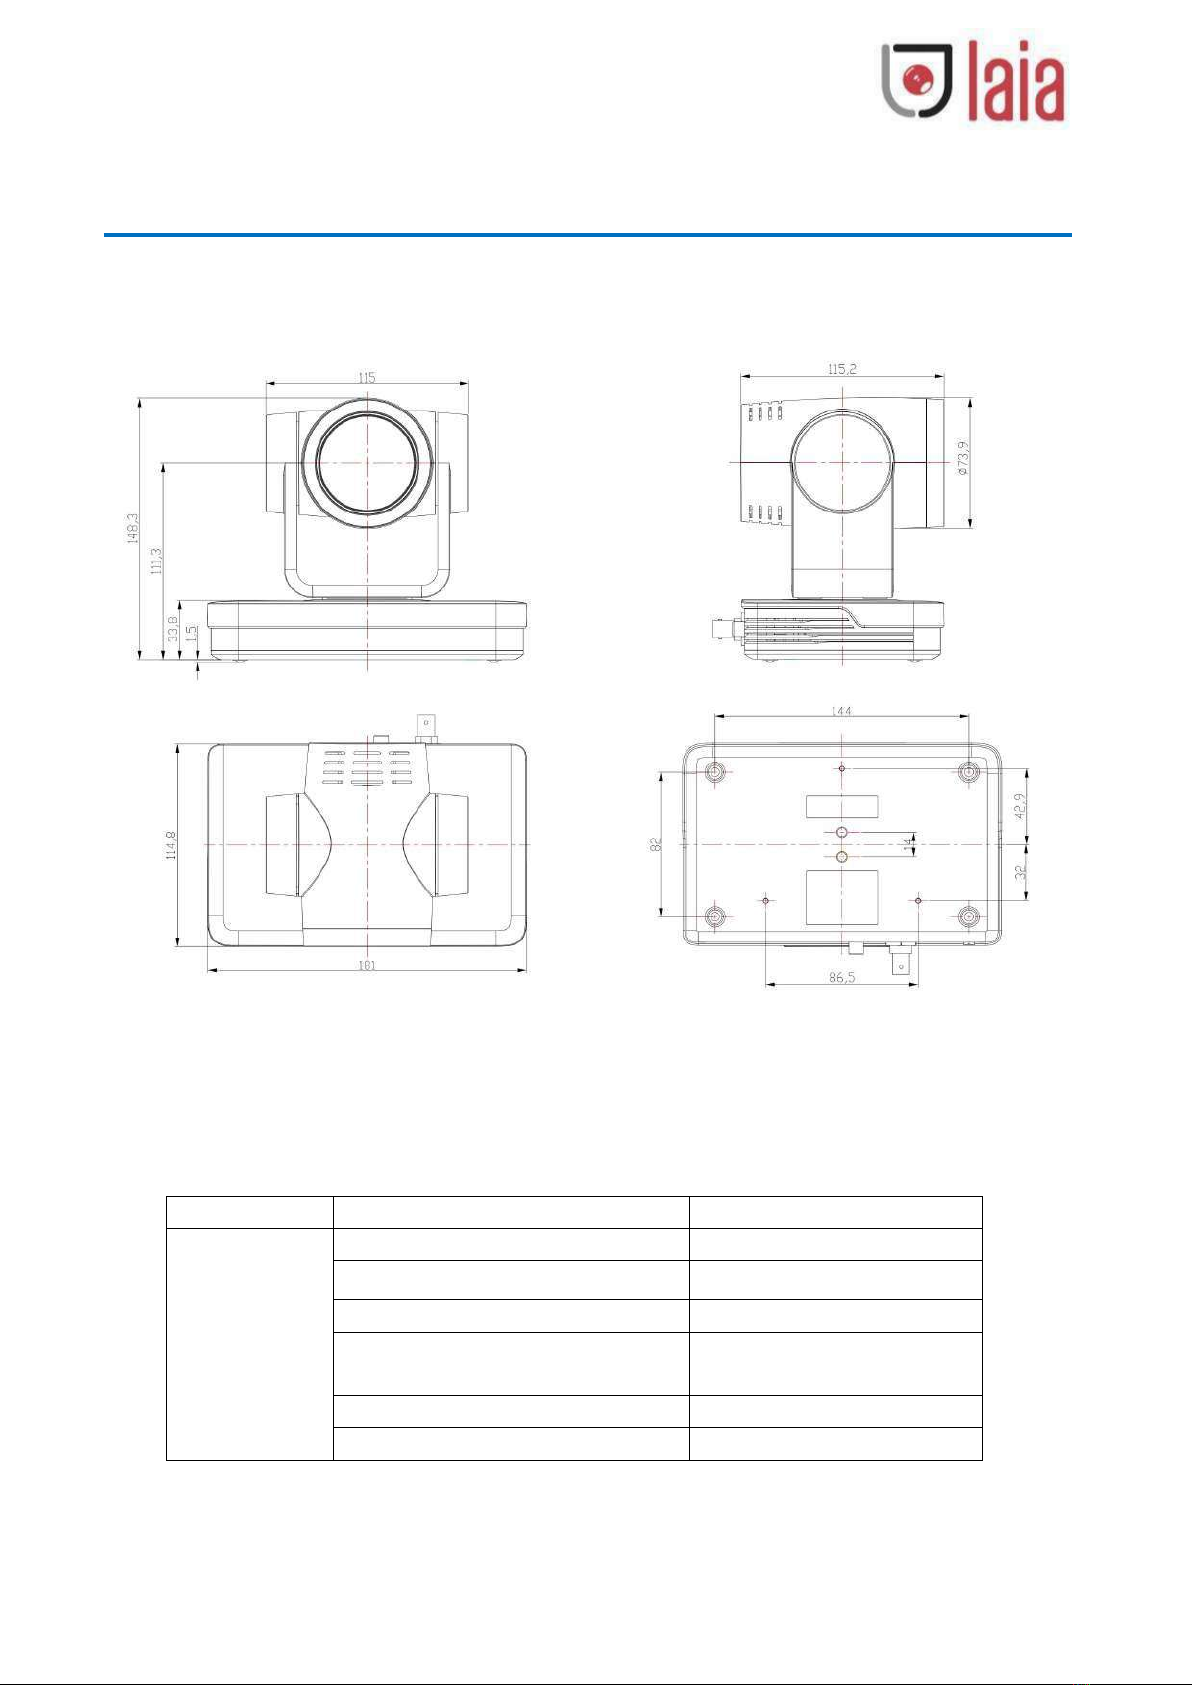
2.1 DIMENSION ...................................................................................................................................................... - 5 -
2.2 ACCESSORY....................................................................................................................................................... - 5 -
2.3 RS-232 INTERFACE ............................................................................................................................................ - 6 -
2.4 MAIN FEATURES ................................................................................................................................................ - 7 -
2.5 TECHNICAL SPECIFICATION ...................................................................................................................................- 8 -
3. REMOTE CONTROLLER ......................................................................................................................................- 10 -
3.1 CODING OF WIRELESS REMOTE CONTROLLER........................................................................................................ - 10-
3.2 KEYS INSTRUCTION........................................................................................................................................... - 11 -
3.3 MENU INTRODUCTION......................................................................................................................................- 13 -
4. NETWORK CONNECTION ..................................................................................................................................- 15 -
4.1. NETWORK CONNECTION .................................................................................................................................. - 15 -
4.2 INTERNET EXPLORER LOG IN ..............................................................................................................................- 17 -
5. SERIAL COMMUNICATION CONTROL ................................................................................................................- 18 -
5.1 VISCA PROTOCOL LIST ......................................................................................................................................- 18 -
5.1.1 Camera return command.....................................................................................................................- 18 -
5.1.2 Camera control command ...................................................................................................................- 18 -
5.1.3 Inquiry command.................................................................................................................................- 21 -
5.2 PELCO-D PROTOCOL COMMAND LIST ................................................................................................................... - 23 -
5.3 PELCO-P PROTOCOL COMMAND LIST ................................................................................................................... - 24 -
6. MAINTENANCE AND TROUBLESHOOTING ........................................................................................................- 25 -
6.1. PRODUCT MAINTENANCE .................................................................................................................................- 25 -
6.2 TROUBLESHOOTING.......................................................................................................................................... - 25 -
COPYRIGHT ...........................................................................................................................................................- 26 -

Copyright © 2021 Laia · www.laiatech.com
- 4 -
All rights reserved
1. Fast Installation
1.1 Product introduction
Interface specification:
Picture 1.1 Interface
1. Lens 7. Power Switch Key 13. Audio Input Interface (Line-IN)
2. Camera Base 8. Power input socket(DC12V)14. RS232 Input Interface
3. Remote Controller
Receiver Light
9. HDMI Output Interface 15. RS232 Output Interface
4. Infrared reception 16. RS485 input interface (left plus
right minus)
5. Tripod Screw Hole 11. USB2.0 Interface (U Disk
Storage)
17. Rotary dial switch
6. Tripod Screw Hole 12. CVBS Output Interface 18. Network LAN Interface

Copyright © 2021 Laia · www.laiatech.com
- 5 -
All rights reserved
2. Product overview
2.1 Dimension
Figure 2.1 Camera dimension
2.2 Accessory
When you unpack, check that all the supplied accessories are included:
Configuration
Standard
Optional
Accessory
Power adapter 1piece
IR Remote controller 1 piece
USB3.0 Cable (U3 Model)
WR Remote controller 1 piece
RS232 Cable
Wall mounting bracket
User manual 1
Upside-down mounting
bracket
Double-side glue shim
Warranty card 1 piece

Copyright © 2021 Laia · www.laiatech.com
- 6 -
All rights reserved
2.3 RS-232 Interface
1)RS-232 interface
2)Mini-DIN8-pin Port
3)RS232(DB9)Port
Computer or Control Keyboard and Product
Connection Method
NO.
Port
Definition
1
DCD
Data Carrier Detect
2
RXD
Receive Data
3
TXD
Transmit Data
4
DTR
Data Terminal Ready
5
GND
System Ground
6
DSR
Data Set Ready
7
RTS
Request to Send
8
CTS
Clear to Send
9
RI
Ring Indicator
Product
1.DTR
2. DSR
3. TXD
4. GND
5. RXD
6. GND
7.IR OUT
8.NC
WindowsDB-9
1. DCD
2. RXD
3. TXD
4. DTR
5. GND
6. DSR
7. RTS
8. CTS
9. RI
NO.
Port
Definition
1
DTR
Data Terminal Ready
2
DSR
Data Set Ready
3
TXD
Transmit Data
4
GND
Signal ground
5
RXD
Receive Data
6
GND
Signal ground
7
IR OUT
IR Commander Signal
8
NC
No Connection

Copyright © 2021 Laia · www.laiatech.com
- 7 -
All rights reserved
4)ISCA networking mode is as follows:
2.4 Main Features
Product Cascade Connection Method
Product 1 Product 2
1.DTR 1.DTR
2.DSR 2.DSR
3.TXD 3.TXD
4.GND 4.GND
5.RXD 5.RXD
6.GND 6.GND
7.IR OUT 7.OPEN
8. NC 8.OPEN
This series camera offers perfect functions, superior performance and rich interfaces. The features
include advanced ISP processing algorithms to provide vivid images with a strong sense of depth, high
resolution and fantastic color rendition. It supports H.265/H.264 encoding which makes motion video fluent
and clear even with less than ideal bandwidth conditions.
1. Superb High-definition Image:It employs 1/2.8 inch high quality CMOS sensor. Resolution is up to
1920x1080 with frame rate up to 60 fps.
2. Various Optical Zoom Lens: It has 5X/10X/12X/20X/30X optical zoom lens for options. The 5X zoom lens is
with 83.7 ° wide view angle without distortion.
3.Leading Auto Focus Technology: Leading auto focus algorithm makes lens a fast, accurate and stable
auto-focusing.
4. Low Noise and High SNR: Low Noise CMOS effectively ensure high SNR of camera video.
Advanced 2D/3D noise reduction technology is also used to further reduce the noise, while ensuring image
sharpness.
5. Multi-Format Video Outputs: support HDMI、LAN interfaces; HDMI、LAN interfaces support audio and
video output simultaneously.
6. Multiple Video compression: Support H.265/H.264 video compression; Supports video compression up
to 1920 x 1080 resolution 60 frames/seconds. Support AAC, MP3, G. 711A audio compression, support 8000,
16000, 32000, 44100, 48000 sampling frequency.
7. Audio and video storage: USB2.0 interface supports U disk storage function, real-time recording and
storage
8. Built-in gravity sensor: Built-in gravity sensor, supporting the automatic overturn function of the platform,
convenient for engineering installation.
Note: The product has RS232 input and output interface, which can be cascaded in the above way.

Copyright © 2021 Laia · www.laiatech.com
- 8 -
All rights reserved
9. Multiple Network Protocol:Support ONVIF, GB/T28181RTSP, RTMP protocols and support RTMP push
mode,easy to link streaming media server (Wowza,FMS); Support RTP multicast mode, support network full
command VISCA control protocol.
9. Control interface: RS485, RS232; RS232 support cascade, easy to install and use.
10. Multiple Control Protocols: Support VISCA, Pelco-D, Pelco-P and support auto-recognize protocol.
11. Silent platform: High precision stepping motor and precise motor drive controller are used to ensure
stable operation and no noise.
12. Low-power sleep function: Support low-power sleep/wake up, the consumption is lower than 400mW
under sleep mode
13. 255 Presets Positions: Up to 255 presets (10 presets by remoter).
14. Various remote controllers: Users can choose infrared or wireless remote controllers according to the
environmental conditions used. 2.4G wireless remote controller is not affected by angle, distance and
infrared interference. Support remote control signal transmission function, convenient for the use of back-
end equipment.
15. Wide Application: Tele-education, Lecture capture, Webcasting, Videoconferencing, Tele-training,
Tele-medicine, Interrogation and Emergency command systems.
2.5 Technical Specification
Model
CUTE 12X
Camera Parameter
Optical Zoom
12X
f=3.9~46.8mm
Sensor
1/2.8 inch high quality HD CMOS sensor
Effective Pixels
16: 9, 2.07 megapixel
Video Format
HDMI video format
1080P60/50/30/25/59.94/29.97, 1080I60/50/59.94, 720P60/50/30/25/59.94/29.97
CVBS output: 570i 480i
USB3.0 interface video format: 1920X1080@60fps Max
View Angle
6.3°(tele)
72.5°(wide)
AV
F1.8 –F2.4
Digital Zoom
10X
Minimum
Illumination
0.5Lux (F1.8, AGC ON)
DNR
2D & 3D DNR
White Balance
Auto / Manual/ One
Push/ 3000K/3500K/4000K/4500K/5000K/5500K/6000K/6500K/7000K
Focus/Aperture/
Electronic Shutter
Auto/Manual/One Push Focus
Iris
Auto/Manual
Shutter
Auto/Manual
BLC
ON/OFF
WDR
OFF/ Dynamic level adjustment
Video Adjustment
Brightness,Color,Saturation,Contrast,Sharpness,B/W mode,Gamma curve
SNR
>55dB

Copyright © 2021 Laia · www.laiatech.com
- 9 -
All rights reserved
Input/Output Interface
Video Output
HDMI, LAN PoE, USB3.0
Video Stream
Dual stream output
Video Compression
Format
LAN Interface: H.265, H.264, Dual stream output
USB3.0 Interface: YUV
Audio Input Interface
Double track 3.5mm linear input
Audio Output Interface
HDMI, LAN
Audio Compression
Format
AAC/MP3/G.711A
Network Protocol
RTSP, RTMP, ONVIF, GB/T28181, Support network VISCA control protocol
Support remote upgrade, remote restart, remote reset
Control Interface
RS232, RS485
Control Protocol
VISCA/Pelco-D/Pelco-P, Baud Rate: 115200/9600/4800/2400bps
Power Interface
HEC3800 outlet (DC12V)
Input Voltage
DC12V±10%
Input Electric Current
Maximum: 1A
Power Consumption
Maximum: 12W
PTZ Parameter
Pan/Tilt Rotation
±170°, -30°~+90°
Pan Control Speed
0.1 -60°/sec
Tilt Control Speed
0.1-30°/sec
Preset Speed
Pan: 60°/sec, Tilt: 30°/sec
Preset Number
255 presets (10 presets by remote controller)
Other Parameter
Stored Temperature
-10℃~+60℃
Storage Humidity
20%~95%
Working Temperature
-10℃~+50℃
Working Humidity
20%~80%
Dimension
178mmX115.5mmX150.9mm
Weight
1.38KG
Attachment
Package
12V/1.5A Power supply, RS232 control cable, USB3.0 connection cable(U3 model),
USB2.0 connection cable(U2 model), Remote Controller, Manual, Warranty Card
Accessories Optional
Mount (Extra Cost)

Copyright © 2021 Laia · www.laiatech.com
- 10
All rights reserved
3. Remote Controller
Instructions for the application of remote controllers: Remote controllers are divided into two types:
infrared remote controllers and wireless remote controllers. Please read the following according to the
actual type of remote controllers.
3.1 Coding of Wireless Remote Controller
Wireless remote control: The steps of using, code checking and code clearing are as follows.
A single pair of one-to-one codes
Press the "Set" button + "*" button for 3 seconds and the LED lights will blink
continuously after the key is released. The receiving end will power on and the LED
will be extinguished if the code is successfully matched. The product can only be
controlled by this remote controller after the code is matched alone. If other remote
controllers need this remote controller to clear the code, or the new remote
controller can re-code. If the alignment is unsuccessful, the red LED lights flicker for
20 seconds and then go to sleep. At this time, press any key to wake up and re-align.
Note: After successful code alignment, you need to choose the camera
address to be controllable.
Clear the code data
Press the "Setup" button + "" button LED lamp flickers from off to on, the
receiver power off and power on again, and the LED extinction indicates the
successful removal of the code data.
Sleep and wake-up
When working, no operation immediately enters the sleep mode and wakes up by
pressing any key. The keys of infrared remote controller and wireless remote
controller are the same.

Copyright © 2021 Laia · www.laiatech.com
- 11
All rights reserved
3.2 Keys Instruction
After the product starts normally, it receives the infrared command and executes it. Press the key of the
remote control. The remote control receives the green flashing of the indicator lamp. Release the key and
stop the flashing of the indicator lamp. Infrared remote control can be used for preset setting, positioning,
horizontal, pitch rotation and other operations.
1) The key-press mode mentioned in this manual refers to the two actions of pressing and relaxing the keys
on the remote controller. For example, "press the [HOME] key" refers to the action of pressing the [HOME]
key and then relaxing. If it takes a long time to press the key, it will be specified in the manual.
2) When the combination keys need to be operated according to the instructions, they are operated in the
order of the instructions. For example, "press the [*]+ [#]+ [F1] key" means first press the [*] key, then press
[#], and finally press the [F1] key.
1. Address selection
Select the camera address to control.
2. Standby Key
After 3S long press, the camera will step into standby mode. Long press 3S again, the camera will
self-test again and back to HOME position. (Note: If power-on mode is turned on and Preset 0 is set, and
there is no operation within 12s, it will automatically point to the specified preset position
3. Focus Control Key
4. Zoom Control Key
【Auto Focus】: Enter into auto focus mode.
【Manual Focus】: Enter into manual mode;
【Focus+】:focal length(Effective only in manual focusing
mode)
【Focus-】:Focal distance(Effective only in manual
focusing mode)
If these two keys are pressed for a long time, they will
continue to pull closer/farther and stop when they are
released.
【zoom+】: Close the picture and increase the lens
multiples
【zoom-】:Scene widening and lens multiples narrowing
If these two keys are pressed for a long time, they will
continue to pull closer/farther and stop when they are

Copyright © 2021 Laia · www.laiatech.com
- 12
All rights reserved
released.
5. Set or Clear Preset key
6. Pan/Tilt Control Key
7. Menu Setting
8. Remote Controller Address Settings
9. Combination key function
Set Preset: Set preset key + 0-9 number key:
Note: Up to 10 presets can be set by remote control.
Call preset:Set preset key + 0-9 number key.
Note: If the number key is not preset, it is invalid.
Clear Preset key:Press [clear the preset] first, then press
one of the numeric keys 0 - 9, then cancel the
corresponding preset.
Note: Press the key three times in a row to cancel all
presets.
Press Key :Up Press Key :Down
Press Key :Lef Press Key: Right
“HOME” Key: Return to the middle position or enter into
the next level menu
Up and down left and right key: control the top and
bottom left and right rotation of the platform; long press
the top and bottom left and right rotation button, the
platform from slow to fast continuous rotation until the
end of the journey position; halfway release stop rotation.
【HOME】:The platform goes back to the middle or into the
next menu.
【HIME】:Open or close the OSD menu, or Enter / exit
the OSD menu or return to the previous menu.
【HOME】:The PTZ goes back to the middle, decides to
modify, or enters the next menu.
【↑】【↓】:Select controls
【←】【→】:Modify parameter values
【Backlight on/off】: Backlight on /off
【*】+【#】+【F1】:Set Address No. 1
【*】+【#】+【F2】:Set Address No. 2
【*】+【#】+【F3】:Set Address No. 3
【*】+【#】+【F4】:Set Address No. 4
【#】+【#】+【#】:Cancel all presets 【#】+【#】+【0】:Switching Video Format 1080P60

Copyright © 2021 Laia · www.laiatech.com
- 13
All rights reserved
【*】+【#】+【6】:Restore Factory Defaults 【#】+【#】+【1】:Switching Video Format 1080P50
【*】+【#】+【3】:The menu is set in Chinese 【#】+【#】+【2】:Switching Video Format 1080I60
【*】+【#】+【4】:The menu is set in English 【#】+【#】+【3】:Switching Video Format 1080I50
【*】+【#】+【9】:Switching Forward and Flip 【#】+【#】+【4】:Switching Video Format 720P60
【*】+【#】+ Auto:Entering the Aging Model 【#】+【#】+【5】:Switching Video Format 720P50
【#】+【*】+ Auto:Stop aging mode 【#】+【#】+【6】:Switching Video Format 1080P30
【*】+【#】+ Manual:IP, User name, Password
Recovery Default
【#】+【#】+【7】:Switching Video Format 1080P25
【#】+【#】+【8】:Switching Video Format 720P30
【#】+【#】+【9】:Switching Video Format 720P25
Note:If the address of the remote control used before is not 1, but one of 2, 3, 4;
After restoring the default of the factory, the product address corresponding to the remote
controller will be restored to 1;
At this time, it is necessary to change the address of the remote controller back to 1, that is,
press the remote controller to select the [1] key and then control normally.
3.3 Menu introduction
Note: To modify the parameters in the menu, you need to exit the menu before you can save it by power
off.
1)Menu Control Key
【MENU】:Enter/exit OSD menu or return to previous menu
【HOME】:Go to the next menu
【↑】【↓】:Select controls
【←】【→】:Modify parameter values
2)English menu interface

Copyright © 2021 Laia · www.laiatech.com
- 15
All rights reserved
4. Network Connection
4.1. Network Connection
Direct connection: Connect the camera and computer by network connecting cable.
Internet connection mode: Connect the camera to Internet by Router or Switch and user can log in the
device by browser.
Note: Please do not put the power and network cable in places where can be easily touched to prevent
video quality lowered by unstable signal transmission due to poor contact of cables.
The computer must have the network segment where the camera IP address belongs to. The device will
not be accessible if without the segment. I.E. The camera default IP address is 192.168.5.163, then segment
5 must be added in the computer. Specific steps are as below:
Firstly, open the window of Local Area Connection Properties on computer, select the “Internet
protocol version 4(TCP/IPv4)” as shown by picture. Double click or click the property “Internet” protocol
version 4 (TCP/IPv4) to enter into the Internet Protocol Version 4(TCP/IPv4) Properties window, select
“Advanced” to enter into the Advanced TCP/IP Setting and add IP and subnet mask (192.168.5.26 /
255.255.255.0) in the IP browser as picture shown below. Click the “Confirm” to finish the adding of IP
segment. User can add the corresponding network segment according to the revised IP address of the
camera.

Copyright © 2021 Laia · www.laiatech.com
- 16
All rights reserved
Note: The IP address to be added cannot be same with that of other computers or devices. The
existence of this IP address needs to be verified before adding.
Click the “Start”and select “Operation”to input cmd as picture below to verify if the network
segment has been successfully added.

Copyright © 2021 Laia · www.laiatech.com
- 17
All rights reserved
User can verify network connection as steps above mentioned after the finish of camera self-check. If IP
is default, open DOS command window and input 192.168.5.163, then press Enter key. It will show message
as below: which means network connection is normal.
4.2 Internet Explorer Log In
1. Web client Log In
Input the IP address 192.168.5.163 of the device in the address filed of browser and click Enter button
to enter into Web Client login page as below picture. User can login as administrator and normal user. If
login as administrator (Default User name/Password: admin), users can preview, playback, configuration
and cancel in the Web Client; If login in as normal user(Default User name/Password:user1 or user2),users
can only preview, playback and cancel, no option for configuration.
Language Selection: The upper right corner of the login interface shows "Chinese | English" clickers can
choose the language type of the web interface.
Note: Web access supported browsers: IE,360 browser and other conventional browser.
2. Web login
Enter the username and password, click login (initial default username and password is "admin". After
entering, you can change the username and password by yourself), and enter the Web client management
interface.

Copyright © 2021 Laia · www.laiatech.com
- 18
All rights reserved
5. Serial Communication Control
Under common working condition,the camera could be controlled through RS232/RS485 interface(VISCA),RS232C
serial parameter are as follows:
Baud rate: 2400/4800/9600/115200 bits / sec; Start bit: 1; data bits: 8; Stop bit: 1; Parity: None.
After power on,the camera first go left,then back to the middle position.Self-test is finished after the zoom moved to the farthest
and then back to the nearest position. If the camera saved 0 preset before,it will be back to that position after initialization.At this
point,the user can control the camera by the serial commands.
5.1
VISCA protocol list
5.1.1 Camera return command
Ack/Completion Message
Command packet
Note
ACK
z0 41 FF
Returned when the command is accepted.
Completion
z0 51 FF
Returned when the command has been executed.
z = camera address + 8
Error Messages
Command packet
Note
Syntax Error
z0 60 02 FF
Returned when the command format is different or when a
command with illegal command parameters is accepted
Command Not Executable
z0 61 41 FF
Returned when a command cannot be executed due to current
conditions. For example,when commands controlling the focus
manually are received during auto focus.
5.1.2 Camera control command
Command
Function
Command packet
Note
AddressSet
Broadcast
88 30 0p FF
p:Address setting
IF_Clear
Broadcast
88 01 00 01 FF
I/F Clear
CommandCancel
8x 21 FF
CAM_Power
On
8x 01 04 00 02 FF
Power ON/OFF
Off
8x 01 04 00 03 FF
CAM_Zoom
Stop
8x 01 04 07 00 FF
Tele(Standard)
8x 01 04 07 02 FF
Wide(Standard)
8x 01 04 07 03 FF
Tele(Variable)
8x 01 04 07 2p FF
p = 0(low) - F(high)
Wide(Variable)
8x 01 04 07 3p FF
Direct
8x 01 04 47 0p 0q 0r 0s FF
pqrs: Zoom Position
Stop
8x 01 04 08 00 FF
This manual suits for next models
1
Table of contents
Other LAIA Security Camera manuals