Lake Powell 65' AXIOM User manual

65’ AXIOM
HOUSEBOAT MANUAL
WELCOME TO


TABLE OF CONTENTS
Marine Radio .....................................................................................................1
Engines/Helm .................................................................................................. 3
Generator ..........................................................................................................7
Water Pressure ............................................................................................... 11
Hot Water ....................................................................................................... 12
Holding Tanks..................................................................................................13
Gas/Propane .................................................................................................. 15
Refrigerator ..................................................................................................... 17
Range................................................................................................................ 19
Grill................................................................................................................... 20
Heater............................................................................................................... 21
Cooling.............................................................................................................22
Accessories.....................................................................................................23

Safe Loading
• When loading your houseboat be
sure to follow these guidelines for
proper floatation.
Guidelines
• Boat must sit level front to back and
side to side.
.• Note the red lines on the aft port
and starboard hull of the boat.
.• While the boat is sitting still, water
must not be touching either of these
lines.
.• If water is at or above these lines,
re-adjust the load.
.• If water is at or above these lines
and the boat is not level from front
to rear, the boat is overloaded –
contact boat rentals for assistance.
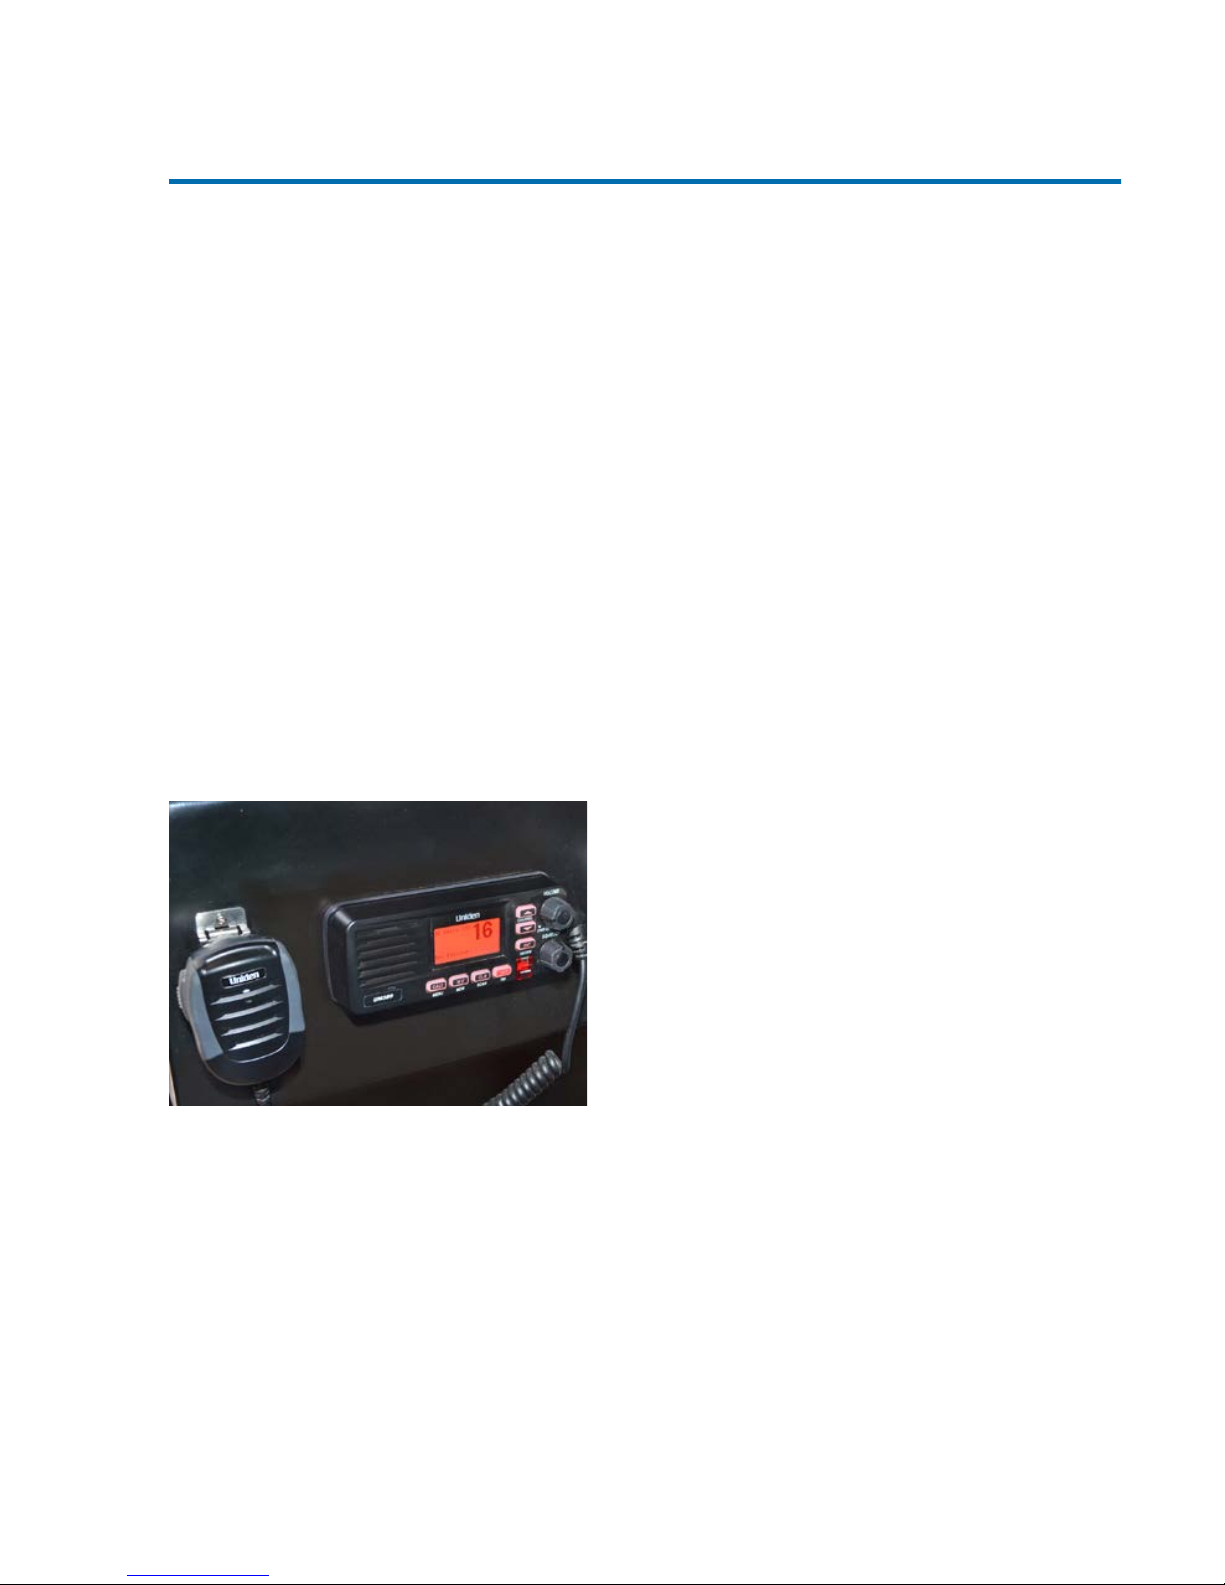
Your Houseboat has come equipped with
a VHF Marine Band Radio. It is located at
the helm, to the left of the steering wheel.
ON/OFF
• Turn the volume knob in a clockwise
direction to turn on the radio.
CHANNEL 16
Use Channel 16 for hailing and
emergencies only. Never use Channel 16
for routine conversations.
In case of an emergency, hail the National
Park Service on channel 16. They monitor
this channel 24 hours a day.
To hail Boat Rentals, turn radio ON and
to Channel 16, depress button on side of
handheld microphone to talk, and release
the button when you are finished talking.
The Boat Rentals Oce monitors this
channel during regular business hours.
Say “_________ (the name of the marina
you are calling) BOAT RENTALS this is
houseboat # _____” (number of your
houseboat). For example: “Bullfrog Boat
Rentals, this is houseboat # S11.”
When communication is established,
we will direct you to another channel.
Commonly used channels are 10, 12,
68 and 72. Be sure to acknowledge
that channel, before you change to the
channel. Then turn to that channel, and
we will continue the conversation.
Information you will need when you
call us:
1. Your boat number.
2. Your exact location, if known.
3. Description of the problem.
4. Any details on the trouble-shooting
you have already tried.
If you need assistance we will attempt
to help you troubleshoot a problem over
the radio. If we are not successful, we will
dispatch a technician out to help you.
For safety, our technicians can only be
dispatched if they can fix the problem
and return to our docks before dark. If
we receive your call late in the day, we
will gladly respond first thing the next
morning.
MARINE RADIO
1

WEATHER
W/X button or Channel 1 on your marine
radio is the weather channel.
This channel is updated periodically by
the National Weather Service.
Be sure to check this channel regularly
during your trip to keep apprised of the
changing weather conditions here at Lake
Powell.
REQUEST FOR ASSISTANCE CARD
If for some reason you cannot reach us
by Marine Radio, fill out your Request for
Assistance Card located in your manual.
Flag down a boat passing by and ask
them to take it to the nearest marina for
assistance.
We will dispatch a technician out to your
boat as soon as we can safely do so.
OTHER INFO
Do NOT use VHF antenna as a flag pole
or hang anything on the antenna.
Channel 26 is the Marine Operator.
Marine Radios transmit line-of-sight. So if
you are back in a canyon, you may have to
ask assistance from another boater with a
radio to help contact us if you cannot get
through directly.
Profanity over the public airways is a
federal crime.
Reminder: Your Marine Radio is not a
toy and should be operated only by a
responsible adult.
A VHF marine radio is not the same
as a Citizen’s Band Radio. CB lingo and
10-codes are not used.
COMMON TROUBLESHOOTING
PROBLEM POSSIBLE CAUSES REMEDIES
Not transmitting
or receiving
Low house battery
Radio not set on USA
Radio blocked by
canyon walls
Set on 1 watt mode
Antenna has fallen
down
Charge house battery
Push USA/Int button
Move the houseboat to
open water
Push 1/25 or Hi/Lo button
to change to 25 watt
Raise antenna
2

YOUR HOUSEBOAT HAS
TWO ENGINES…
• For greater maneuverability
and power.
• To provide you with a spare in case
of engine failure.
Your engines are well maintained, but
occasional breakdowns can occur. The
spare is to ensure your safety and save
you inconvenience. Don’t let the loss of
one engine delay your vacation. Proceed
on your planned itinerary with the good
engine and we will catch up to you as
soon as possible and make necessary
repairs.
GAUGES
Vessel View
• Your Axiom Star Houseboat features
a simple to use Vessel View Gauge
Package. The Vessel View Gauge is
located at both helms
• Key must be turned to ON position
for VesselView gauge to work.
Engine Management Screen
• Push Propeller Button on Display
• Includes Time, Prop rotation, Depth,
Engine RPM, Engine Temperature,
Engine Battery Voltage & PSI
Steering Position Screen
• Push Ship Button on Display
• Includes Depth, Prop rotation,
Steering Position, Depth Finder
Fuel Tank Screen
• Push Ship button to Display (Toggle
R to L)
• Includes Fuel Tank Status, Depth
and Time
Vessel Status Screen
• Push Ship button to Display (Toggle
R to L)
• Includes MPH, Time, Engine Hour,
Fuel Level & Fuel Remaining
ENGINES/HELM
3

RPM
• Monitors the engine revolutions.
• Wide-Open Throttle (WOT) should
be 4400 RPM’s.
• The most ecient cruising RPM will
be 3200 RPM
NAUTICAL NOTE: When leaving a dock,
signal with 1 long blast (4 seconds) and
3 short blasts (1 second each).
Halon System
• Halon System is an automatic fire
suppression system located in the
engine compartment
Keys are turned ON
• LED light turns on and should be
green. If no light, please contact
LPMR to inspect the system.
THROTTLE
Setting Neutral Throttle for Starting
• Confirm that the throttle is in
neutral position.
• Turn the key to first click – Beeper
will sound. VesselView will power
up.
• Everything is ready to start.
• Turn key to start then release key. If
the engine fails to start on its own,
wait 30 seconds and try again.
• Insure throttle only indicator is
solid red, then control will engage.
If blinking, press to throttle only
button to make solid light.
GETTING UNDER WAY
From Neutral Throttle
• Red light on controls will be solid.
• Push throttle lever forward to go
forward or pull back for reverse.
• Advance throttle to increase speed.
• Always pause in neutral before
changing gears.
Shut Down
• Return throttles to neutral position.
• Turn engine keys to o the engine
will no longer be running.
4

ENGINES/HELM
5
FLYING BRIDGE CONTROLS
Operation from Upper Deck
To get power to the upper deck controls:
Helm Transfer – WARNING:
• Avoid serious injury or death from loss
of boat control. The operator should
never leave the active station while
engine is in gear. Helm transfer should
only be attempted while the engine is in
neutral and both stations are manned.
• NOTE: Neutral position is preferred
when doing a station transfer. If
conditions do not allow the remote
control to be placed in the neutral
position, a helm transfer can be
done while in gear. The helm transfer
function allows the boat operator to
select which helm is in control of engine
operation. Pressing the “TRANSFER”
button two times allows engine control
to be transferred to a new helm. When
a helm transfer is initiated, the control
will automatically start adjusting
engine RPM and gear position to match
the control handle setting at the new
helm. Adjust the control handles to the
desired throttle and gear.
• Once the “TRANSFER” button is
pressed, the transfer LED will light up
and one beep will sound. Press the
“TRANSFER” button again to complete
the helm transformation. When helm
transformation is complete, another beep
will sound and the transfer LED will turn
o.
• NOTE: There is a 10 second time frame
to complete a helm transfer. If the helm
transfer is not completed, the action
will be cancelled and a double beep will
sound. Pressing the “TRANSFER” button
again will re-initiate a helm transfer.
Synchronizing Engines
• The auto synchronizing feature, when
engaged, will automatically adjust all
engine speeds to match the speed of
the starboard engine. Press the “SYNC”
button on the CAN trackpad to turn auto
synchronization on or o. When the sync
LED is yellow, the “SYNC” button has
been pressed, but the conditions are not
right for auto synchronization to engage.
When the sync LED turns red, engine
synchronization has been engaged.
The engines will remain synchronized
as long as engine speed is over 900
RPM for two seconds, remote control
handles are positioned within 10% of
each other, and the engines are below
95% throttle opening. To disengage the
auto synchronization feature, press the
“SYNC” button.

.
COMMON TROUBLESHOOTING
PROBLEM POSSIBLE CAUSES REMEDIES
Engine doesn’t turn
over
Engine turns over
but won’t start
Is the throttle in neutral
Out of fuel
Put throttle in neutral
Check VesselView fuel
gauge for fuel level.
Don’t Drive From The Upper Deck:
• In any wakeless area, including the
marina.
• When approaching a dock.
• When approaching a beach.
• In narrow channels.
• In any situation that requires
maneuvering your vessel, always
pilot from the main helm
Note: Do not try to start the engines
from the upper helm.
6

The Generator is located between the
engines at the rear deck of your houseboat.
Starting/ Warm Up
• Turn on the blower switch at the
Lower Helm.
• The remote start is located on the
lower right of the Main Control
Panel.
• Confirm that the Main Breaker and
Rotary Switch are OFF.
• Press Start/Stop and release. Once
generator is running, switch will turn
green.
• If generator fails to start, it will
automatically try restarting again.
NOTE:Do not start generator with an AC
Load. Be sure Rotary switch is o.
• Allow the engine to warm up for 5
minutes.
• Switch the Main Breaker ON
and switch the Rotary Switch to
Generator.
• You may now turn on individual
breakers to provide power to your
houseboat.
• Whenever you have your generator
running, always switch on the
inverter breaker and battery charger
breaker.
AC Breaker Panel - Non-Inverted
**These breakers will only work when
Generator is running and the Rotary switch
is turned to generator.
• AC Unit
• Range/Microwave
• Bath 1 & 2 Outlets
• Battery Charger
• Inverter
• Water Heater
• Spa
• Dish/Disposal
To Shut Down Generator
• Turn Main AC breaker and Rotary
Switch OFF.
• Wait 5 minutes to allow generator
to run with no load.
• Push START/STOP button.
• Turn o blower.
GENERATOR
7

8
Generator Special Notes
•
If your houseboat breaks anchor
and/or drifts sideways onto a beach,
the generator must be shut down
immediately to prevent the cooling
system from being fouled with sand
and silt. This can cause overheating
and disable your generator.
•
Below deck generators are equipped
with coolant (lake water) strainers.
Do not open this unit.
The 12-volt house system includes all boat
lighting, navigational lights, water pumps,
the horn, VHF Radio, bilge pumps, CO
detectors and helm power.
Charging
• Start the Generator following
Generator Starting Procedures.
• Turn on the breaker for the inverter
on the AC panel. This will charge the
inverter battery.
• Turn on the breaker for battery
charger. This will charge the engine.
• Charging is most ecient with
unnecessary DC breakers o.
DC Breaker Panel
• Bow Light
• Stern Light
• Second Deck Light
• Cuddy Fans
• Main Water Pump
• Satellite
• Upper Helm Power
• Lower Helm Power
• Bilge Pumps Constant Power
• CO Detectors Constant Power

9
GENERATOR
BATTERY TEST
1. Inverter Remote
• Located in the middle left of the
main panel is the Inverter Remote.
• Push ON/OFF Inverter button to
start inverted power.
• Choose inverted breakers as
needed.
• Inverter display Should be between
11-13 volts when generator is not
running.
• When generator is running and the
Inverter is on, should be 12.5 volts or
greater.
• The Generator must be run 6 to 8
hrs per day to keep the batteries
charged
• A low battery alarm will sound and
the LED on the control panel will
flash when the inverter batteries
drop to 10.5 volts
• DC power will shut down at 10 volts
2. Engine and Generator Starting
Batteries
•
One engine starting battery per engine
with dedicated charging system.
• One generator starting battery with
dedicated charging system.
• To charge batteries when generator
is on – Switch battery charger
breaker ON.
Remember: Each light or appliance will
need to be turned on individually once the
breaker is on.
Tips for Getting the Most from your
Houseboat Batteries
• When generator is running ALWAYS
have the AC MAIN, Inverter and
Battery charger breakers on.
• Charge daily.
NOTE: Deep Cycle batteries are used
to extend the time between charging.
However, they also require more time to
recharge when they are discharged for
too long.
Inverter
This boat is equipped with one inverter.
The inverter remote is located at the
bottom left side of the Main Panel.
The inverter will run the following systems
o the 120 VAC Inverted breakers:
• Ref/Freezer
• Outlets
• Ceiling Fans/Rope
• Upper Ice Maker
• Upper Bev Center
• Upper Deck Power
• Water Filtration System
These appliances will all work without the
Generator running.

10
To Start the Inverter
• Push the ON/OFF Inverter button to
start the power.
• Turn on individual inverted breakers
once invertor is powered on.
GFI Outlets
• Some electrical outlets have a GFI
breaker. Push in the reset button to
reset.
COMMON TROUBLESHOOTING
PROBLEM POSSIBLE CAUSES REMEDIES
No generator power
(Gen running but no
AC power present at
panel)
Outlet doesn’t work
Generator Shut down
Generator cranks but
won’t start
Generator won’t start
or crank
AC MAIN breaker o
Is the generator on?
AC MAIN breaker o?
Is that area’s breaker on?
Is GFI tripped?
Out of Fuel
Out of Fuel
Inspect red button on
Generator
Check breaker on
generator
Start generator
Check breaker on panel
Reset GFI Outletdeck
Check gauges
Refuel
Press to Auto start at
electrical panel
• Red Button
• White Breaker
• Remote Start/Auto

COMMON TROUBLESHOOTING
PROBLEM POSSIBLE CAUSES REMEDIES
No Lake Water
No fresh water
WATER PUMP breaker
may not be on
Low batteries
Fresh Water breaker not
on.
Turn on breaker
Charge batteries
Press down toilet flush for
a minute to restore prime
Turn on Breaker
WATER PRESSURE
11
YOURHOUSEBOAT IS SUP-
PLIED WITH ULTRAVIOLET
WATER FILTRATION SYSTEM:
UNLIMITED WATER SUPPLY.
• UVBB and filter is located below
deck on Port front of boat next to
Hot Water Heater.
Note: When the blue light is on your filter
is working properly.
Lake Water Pressure
• Turn on the Main Water Pump
Breaker on the DC Panel
Filtration System Special Notes:
• Turn o the DC Main Water pump
breaker along with the Inverted
Water Filtration System breaker
while underway beaching, or un-
beaching. Once you are beached,
leave these breakers o for an
additional 15 minutes to let sand
and sediment in the water settle.
• It is not necessary to switch on
the bilge pump unless water is
noted. The bilge pump is wired to
automatically switch on when water
is present.
Faucets
• All Faucets are fresh water.
• All sinks and showers empty directly
into the lake.
Head/Toilet
• Main water pump breaker must be
on to have water pressure.
• To fill toilet bowl with water, lift up
on the foot pedal for a few seconds.
• To flush, step down on the foot
pedal.
• The head empties directly into the
black-water tank.
NOTE: Be sure pedal returns to the
up position. Failure to do so can cause
flooding.

HOT WATER
YOUR BOAT IS EQUIPPED
WITH ONE 19-GALLON
CAPACITY WATER HEATER.
To Start Water Heater
• Start generator.
• Turn on the WATER HEATER breaker
located on the DC panel.
• The yellow light will be on when
water heater is on.
• Allow approximately 30 minutes for
the water to heat.
COMMON TROUBLESHOOTING
PROBLEM POSSIBLE CAUSES REMEDIES
Ran out of hot water You only have 19 -gallons
of hot water
Allow 30 minutes to heat
more water
12

HOLDING TANKS
YOUR HOUSEBOAT HAS BEEN
EQUIPPED WITH BLACKWATER
TANKS THAT HAVE A COM-
BINED 300-GALLON CAPACITY.
Full Service Pumpout
• Radio into any of the Rental Docks.
• Give us an estimated time for
arrival.
• We will direct you where to park and
will pump out your houseboat for
you.
Self Service Pumpout
• Located in any marina.
• The pump-out fittings are located
on the forward Starboard side of the
boat. There are three fittings, two
black water waste fittings and one
spa drain.
• Remove the cap.
• Screw the correct sized fitting
into the pump-out port on your
houseboat. (Fittings are available at
the dock on the pumps.)
• Attach the pump-out hose to the
fitting.
• Open the valve and follow the
directions on the pump.
• When finished, close the valve
before removing the hose.
• Remove the fitting from your
houseboat and replace on the dock.
• Place the end of the lake water hose
inside the pump-out portal.
• Fill the tank with approximately 2 to
3 gallons of water.
• Empty one packet of provided
chemical into the head/toilet and
flush.
• Put all the hoses back and replace
the cap on the WASTE opening.
Remote Station Pumpout
• See HELP PRESERVE in your
Nautical Notes for locations of
Remote Pumpouts.
• Unscrew WASTE cap.
• Place end of hose into opening.
• Work the hand lever to pump.
Hot Tub Pump-out
• The Hot Tub pumps at the same
location as the waste.
• Attach the pump-out hose to the
fitting.
• Open the gate valve on the spa
located at the access panel at the
side of the spa heater cabinet and
start pumping.
13

COMMON TROUBLESHOOTING
PROBLEM POSSIBLE CAUSES REMEDIES
Odor Holding tanks are full Pump-out at the nearest
marina or remote station
After pumping out, add
a packet of chemical and
two gallons of water in the
head
Leave some water in the
bowl to trap any odor
14

GAS/PROPANE
Fuel Tanks
• Your houseboat has four separate
and independent 650 gal fuel tanks.
• The fuel tank is centered behind
the engines, under the rear deck
hatches.
• This single 650-gal tank has
engines, generator and toy pump
pulling gas from the same tank.
• The engines have access to 100% of
the fuel tank (650-gal).
• The generator has access to
approximately 80% of the fuel tank
(520-gal).
• The toy tank pump has access to
approximately 55% of the fuel tank
(360-gal).
Checking Fuel Level
• Fuel tank level is located on the
VesselView gauge at both helms.
• Power to the helm is required to
view tank levels.
Refueling
• Turn o grill.
• Turn o all propane tanks 10
minutes prior to refueling.
• Turn o all electrical breakers.
• Turn o the generator.
• Close all doors and windows.
Caution: NEVER siphon gas from your
houseboat fuel tanks.
NOTE: Captain and Crew must remain on
board your houseboat. Wait for Fuel Dock
personnel to assist you.
Propane Tank
• Propane tanks are located at
the second level hot tub storage
compartment.
• A valve is located on the top of each
tank. Turn counterclockwise to open.
Turn clockwise to close.
• Whenever propane is not being
used, always turn o the propane
fume detector by pressing the valve
ON/OFF button.
• Remember to turn valve on when
needing propane.
15

COMMON TROUBLESHOOTING
PROBLEM POSSIBLE CAUSES REMEDIES
16
Propane Smell
Toy Tank Stops
Pumping Gas
Generator Stops
Running
The grill is not turned
o all the way
Range not o
Toy Tank fuel availability
is empty
Breaker not turned on at
panel
Generator fuel
availability is empty
Turn o grill and tank
Make sure burner valves
are all the way o
Refuel at Marina
Turn on Toy Pump Breaker
Refuel at Marina

REFRIGERATOR
How to Start
• Turn on the Inverter breakers.
• Turn on the REFRIG breaker on the
Main DC Panel.
• The refrigerator on this model
operates on standard 110V
electricity just like the one at home.
• Refer to the instructions located
inside the refrigerator/freezer for
more details.
Getting the most out of your Refrigerator
• Put cold or frozen food into the
refrigerator rather than try to cool
warm items.
• Open door only when necessary.
• Don’t pack the refrigerator full; leave
space for air to circulate freely.
• Do not overload your refrigerator.
Cover foods with strong odors.
• Cover foods that easily absorb odor.
• The coldest areas in the refrigerator
are at the bottom.
• Warmest areas are on the upper
door shelves.
17
Table of contents
Other Lake Powell Boat manuals
Popular Boat manuals by other brands

Sea Ray
Sea Ray 300 Select Ex owner's manual

Maverick Boat Company
Maverick Boat Company Pathfinder 2300 HPS owner's manual

Sea Ray
Sea Ray 240 Sundeck owner's manual

Boston Whaler
Boston Whaler 305 conquest owner's manual

Access
Access Liberty owner's manual

Pro-Line Boats
Pro-Line Boats 26 Super Sport owner's manual