Landport Deluxe User manual

GUIDE

Thank you for purchasing a Landport,™ the container for what life
brings you. We hope you love this charming delivery lockbox as
much as we do.
Sincerely,
The Landport Team
INSIDE FRONT COVER
(THIS TYPE DOES NOT PRINT)

Using the Keypad.................................................................................Pg. 11
Battery Installation..............................................................................Pg. 11-12
Locking Your Landport......................................................................Pg. 11
Unlocking Your Landport..................................................................Pg. 11
Operating & Programming the Keypad.......................................Pg. 13-14
Changing the Administrator Code ................................................Pg. 15-16
Setting the Access Codes.................................................................Pg. 15-16
Assigning Codes to Keypad Positions.........................................Pg. 17-18
Setting the Administrator Code Algorithm...............................Pg. 19-20
Setting the Access Codes Algorithm ...........................................Pg. 21-22
Deactivation Security Feature........................................................Pg. 23
Low Battery Indicator........................................................................Pg. 23
Contact Us .............................................................................................Pg. 23
Warranty ..................................................................................................Pg. 23
Keypad Codes Card............................................................................Pg. 24
Key Replacement.................................................................................Pg. 25
TABLE OF CONTENTS
USER GUIDE
TABLE OF CONTENTS
INSTALLATION
What You’ll Find in the Landport...................................................Pg. 1
Landport Dimensions: Deluxe | Rectangle | Cube..................Pg. 2
Placement Considerations................................................................Pg. 3
Choose Number of Anchors to Use..............................................Pg. 4
Safety Considerations........................................................................Pg. 4
Installation Methods............................................................................Pg. 5-10
Landport Care.......................................................................................Pg. 10
Touch-up Paint......................................................................................Pg. 10

2
LANDPORT DIMENSIONS & WEIGHT:
DELUXE | RECTANGLE | CUBE
Model Dimensions
34” x 17” x 17”
34” x 17” x 17”
17” x 17” x 17”
50 lbs.
50 lbs.
35 lbs.
Approx. Weight
Deluxe
Essentials
Rectangle
Essentials
Cube
1
WHAT YOU’LL FIND IN THE LANDPORT
Landport Guide House Sign
Delivery & Pickup
Please use LANDPORT
find access code in second line of address
or in your company's instructions.
Batteries (Installed)
1.5V
1.5V
1.5V
1.5V
1.5V
1.5V
1.5V
1.5V
Shoes (Deluxe model shown) Wedge Anchor
Bolts Nuts
Washers
GUIDE

34
PLACEMENT CONSIDERATIONS
A few things to consider when deciding where to install your Landport:
1. Landport will function best on a stable, firm and level surface that has good
drainage.
2. Landport should be readily accessible
to delivery personnel and other users.
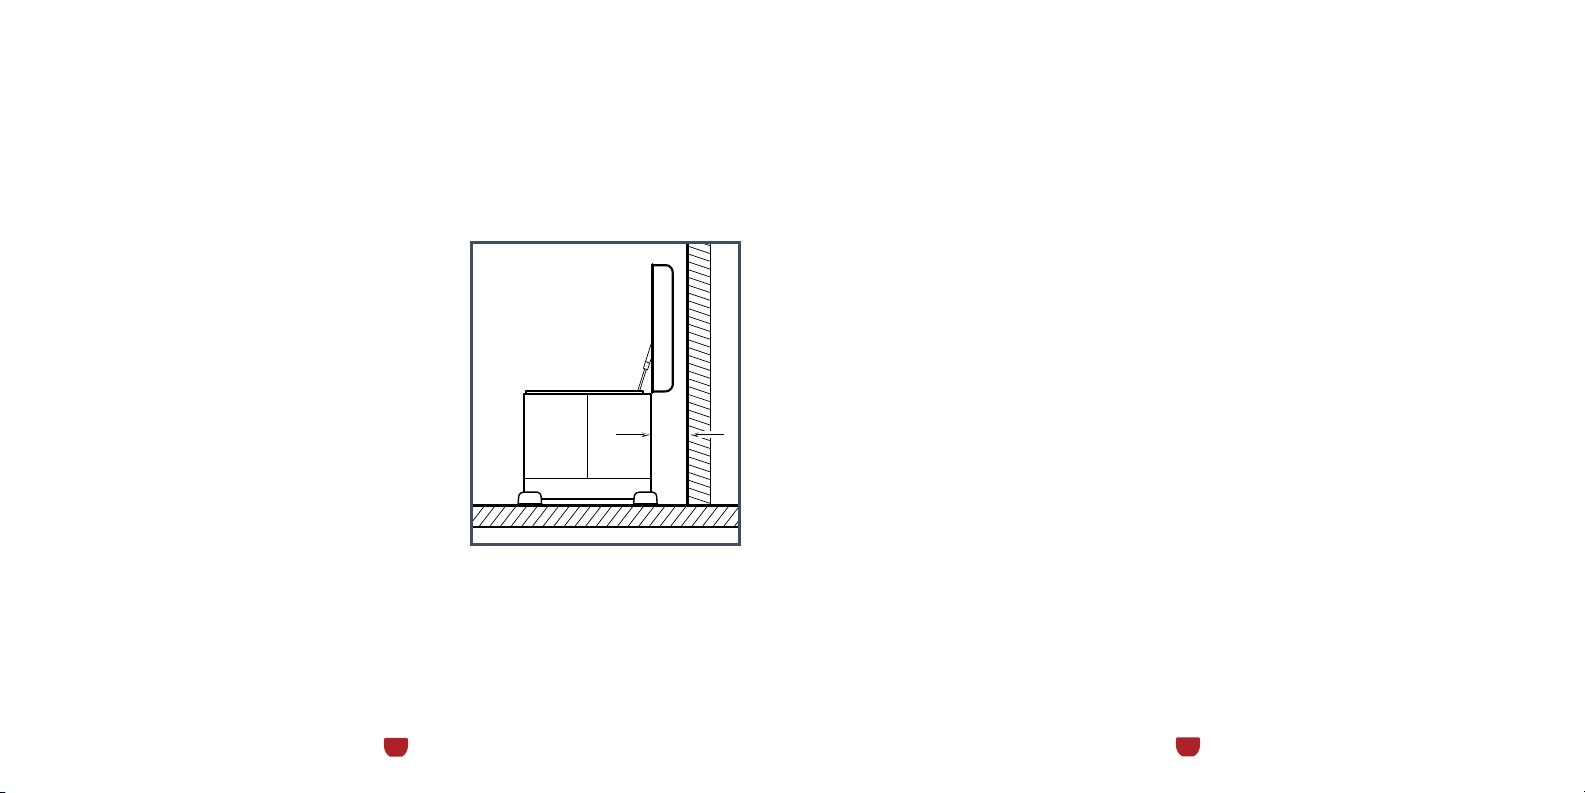
3. Do not place Landport where its lid
will be obstructed (such as under a branch),
or where you can’t open the lid completely
(such as too close to a wall). We recommend
a distance of 4” measured from the back of
the Landport to the wall behind it. (Fig. 1)
4. Avoid installing Landport where water
or snow may accumulate.
5. You may want to give some thought to the amount and intensity of sun
exposure your Landport will receive throughout the year. Landport’s steel
body can heat up and become hot to the touch if left in direct sunlight.
Also, a darker colored Landport like brown or black will absorb more heat.
4”
Fig. 1
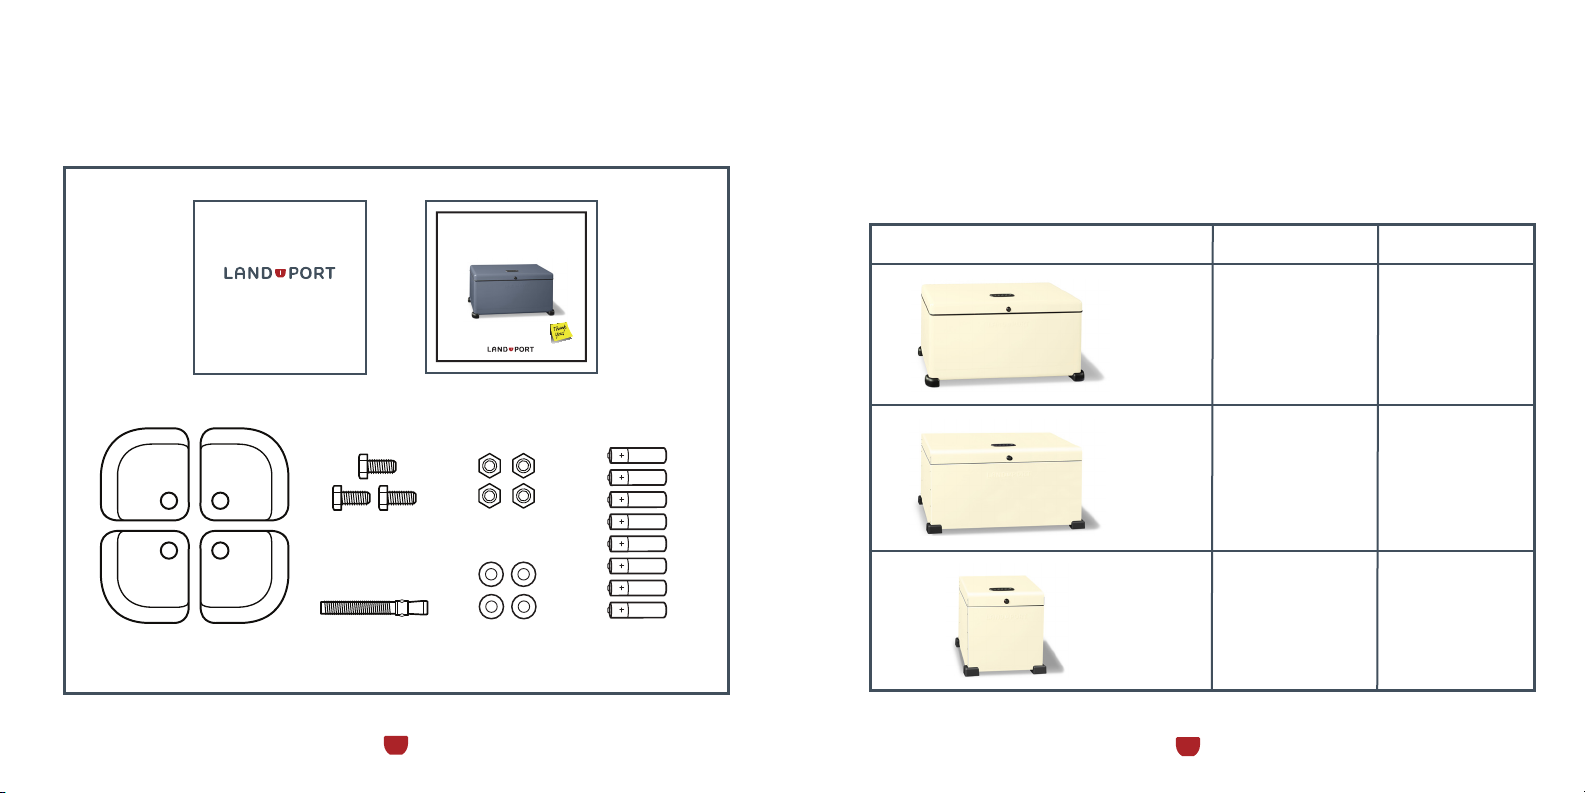
CHOOSE NUMBER OF ANCHORS TO USE
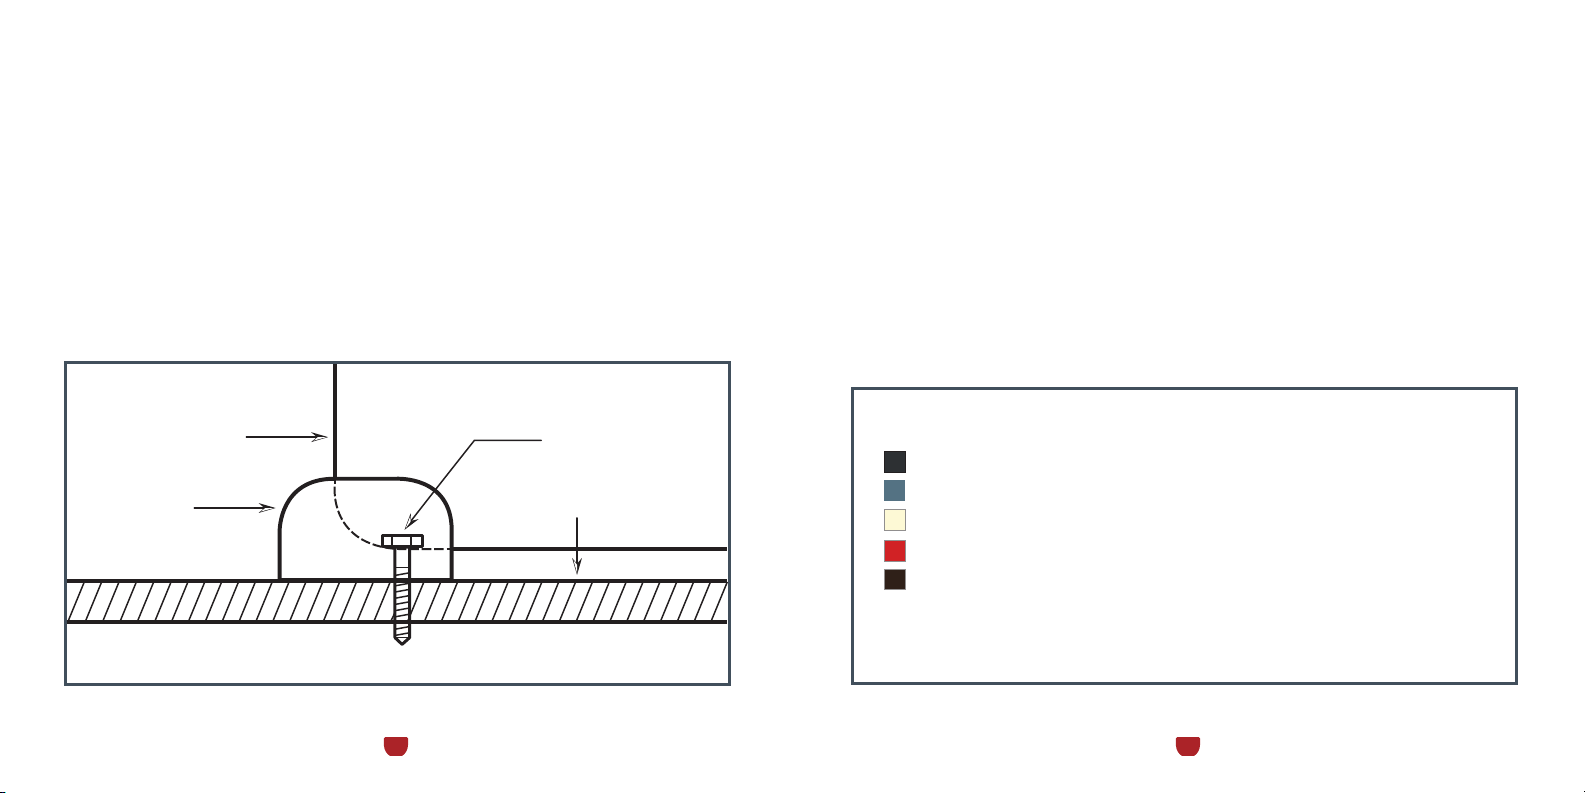
You have the option to anchor Landport at 1, 2, 3 or all 4 points. We have
included one anchor for you, but the decision is up to you. More anchors
mean more security. The shoes hide the bolts, so it won’t be obvious where
or how your Landport is anchored to the surface.
Note: If you decide to get more anchors, purchase 3/8” diameter, 3” long
stainless steel wedge anchors. Using stainless steel prevents rust.
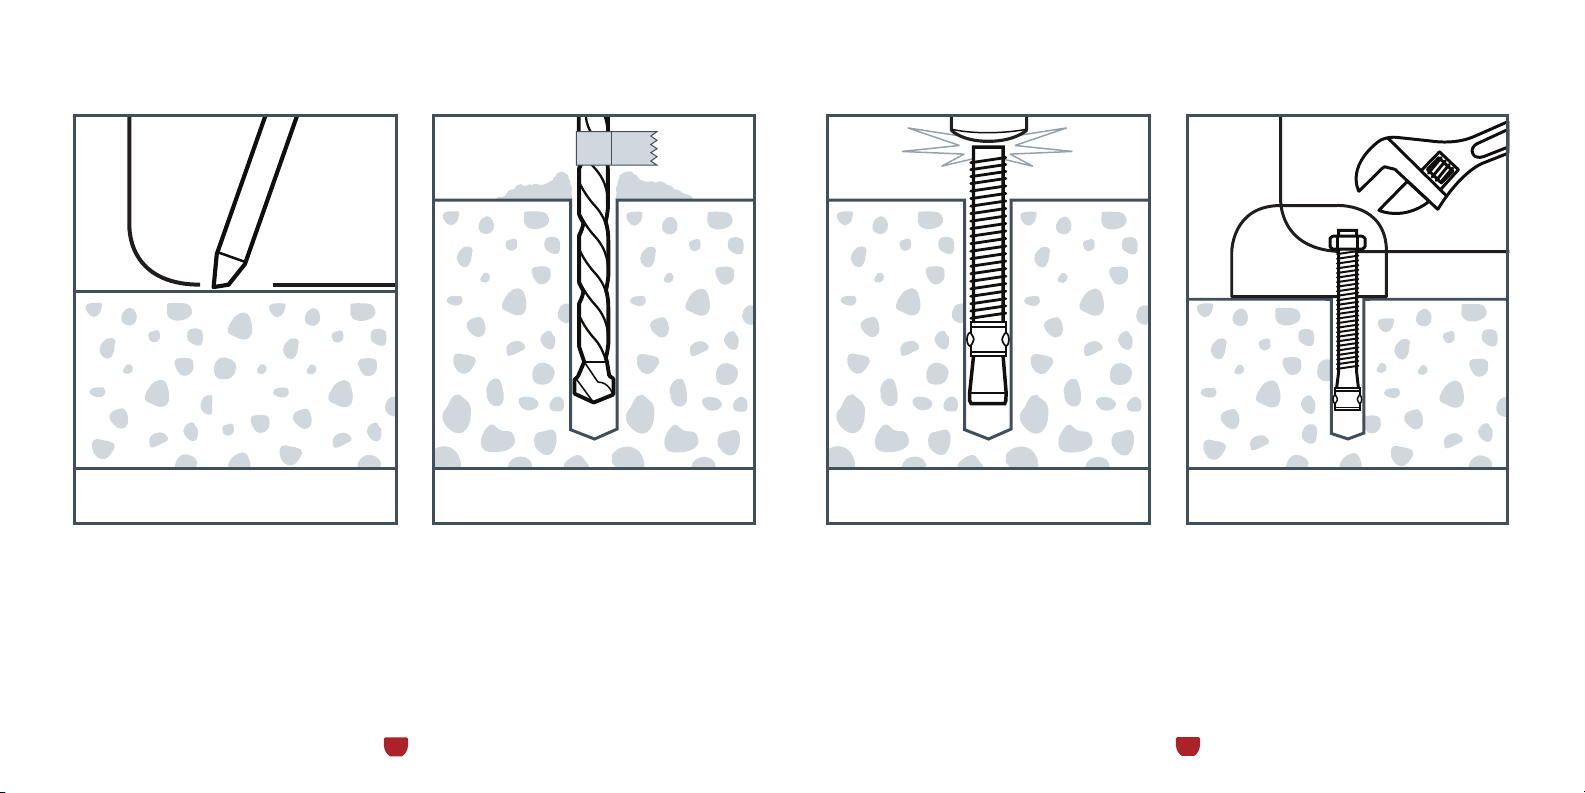
SAFETY CONSIDERATIONS
Please read and follow all safety instructions when using power equipment.
We strongly recommend using protective eyewear and earplugs when using
the hammer drill.

INSTALLATION METHODS
ONE OF THESE
SECURING LANDPORT
TO EXISTING CONCRETE
WHAT YOU’LL NEED
If you are not comfortable installing Landport yourself, we suggest you
seek a contractor or an experienced handyperson to do the job. For such
a professional, installing Landport should be a quick and easy process.
The following installation procedure applies to existing concrete driveways,
walkways, porches or patios. Expect to drill into the material and insert anchors.
5 6
• Roto hammer or hammer drill, which can be found at Home Depot tool
rental or similar tool rental outlets.
• 3/8” masonry drill bit - carbide is recommended.
• 1 or more 3/8” diameter stainless steel concrete wedge anchors 3” in length.
• A hammer.
• A 9/16” combination wrench, adjustable wrench or 9/16” socket wrench.
• Chalk, marker, crayon, pencil – anything that can be used to mark the
concrete for drilling.
Note: Landport anchor hole is 1/2”; we recommend 3/8” diameter bolts.
Masonry Drill Bit
Adjustable Wrench
10 IN.
9/16
Socket Wrench
Chalk
Hammer Drill
Wedge Anchor
9/16 9/16
Combination Wrench
Hammer

78
1. Position your Landport where
you want it.
2. Mark the holes with chalk or
other marker.
3. Move Landport out of the way.
1. Wrap a bit of visible tape around
the drill bit at 3 ¼”– then you’ll know
when to stop drilling.
2. Drill a 3 ¼” deep hole into the
concrete using a 3/8” bit, drilling ¼”
more than the length of the anchor.
3. Clean the concrete dust out of the
hole with a vacuum.
1. Remove the nut and the washer
from the wedge anchor.
2. Hammer the wedge anchor bolt
into the hole. The threaded part of
the bolt should be up, such that the
wedge is in the bottom of the hole.
1. Place the shoe over the wedge
anchor bolt and position the Landport
over the shoe and the bolt.
2. Attach the washer and the nut to the
anchor bolt from inside the Landport.
3. Tighten the nut 2 - 3 complete
turns. This will cause the wedge to
expand and anchor into the concrete.
Step 3Step 2Step 1 Step 4
INSTALLING THE WEDGE ANCHORS

9 10
SECURING LANDPORT
TO A WOOD PORCH OR DECK
If you can access the underside of your wood porch or deck, use nuts and bolts.
If you can’t access the underside of the wood porch or deck, you can secure
your Landport with 3/8” x 3” lag bolts. Drill a 5/16” pilot hole first. (Fig. 2)
Note: We recommend using stainless steel hardware to prevent rusting.
Landport Lag Bolt
Shoe Deck
Fig. 2
OTHER INSTALLATION OPTIONS:
If the installation methods described aren’t possible, you can also:
1. Secure Landport to a concrete footing using a threaded rod.
2. Pour a new concrete slab and secure using a threaded rod.
LANDPORT CARE
To clean Landport use a soft cloth, water and a nonabrasive mild detergent
cleanser, such as dish washing liquid or car washing detergent. Do not use
solvents such as paint thinner, acetone or nail polish remover, which may dull
the finish.
TOUCH-UP PAINT
If Landport gets scratched, we recommend
applying oil on the scratch to temporarily
delay rusting.
We also recommend touching up the
scratch with the appropriate paint as soon
as possible. Please see Parts & Accessories
at www.theLandport.com for information
on ordering touch up paint.
*RAL ia a color matching
standard for powder coating.
Black - RAL* 9005
Blue Gray - RAL 7031
Cream - RAL 9010
Red - RAL 3013
Brown Black - RAL 8022

BATTERY INSTALLATION
USING THE KEYPAD
Prior to using the keypad please install the batteries.
LOCKING YOUR LANDPORT
UNLOCKING YOUR LANDPORT
1. Remove battery enclosure cover by lifting up the finger-hold indentation. (Fig. 3)
2. Install 8 AA alkaline batteries as shown and replace cover. (Fig. 4)
3. Make sure the battery enclosure ON/OFF switch is in the ON position.
To lock Landport simply close the lid – the lock automatically engages.
To unlock Landport use the key or the keypad.
The keys can be used for regular operation of your Landport or as an override
in case of a forgotten Access Code.
Please do not store your keys in the Landport.
SIZE “AA”OR EQUIV
1.5V
1.5V
1.5V
1.5V
1.5V
1.5V
1.5V
Fig. 3
Fig. 4
11 12

OPERATING & PROGRAMMING THE KEYPAD OPERATING MODE
PROGRAMMING MODE
The Keypad has 2 modes:
1. Operating Mode – regular use
2. Programming Mode – setting Administrator and Access Codes
The Keypad has 2 types of codes:
1. Administrator Code (one)
2. Access Code (up to five)
NOTE: The 2 numbers on each key represent a choice. For example 1/2 means 1 or 2.
Thus the keypad has 5 distinct keys. A code of 1-3-5-7-9 is the same as 2-4-6-8-0.
This is the same convention used by automobile manufacturers. (Fig.5)
When you press the buttons in Operating Mode, you will hear 1 beep for
each button press.
When the correct Access Code is entered, you will hear the keypad make
2 short beeps and the latch will release to unlock the Landport.
When you press the buttons in Programming Mode, you will hear 2 beeps
for each button press.
Programming mode enables the Administrator (that’s you!) to set Access
Codes.
You are the keeper of the keys or, in this case, the keypad Access Codes.
You can assign up to 5 dierent Access Codes for other people, such as
delivery personnel, friends and neighbors, and reset these codes as needed.
The Administrator Code is the master code that allows you to set Access
Codes.
13 14
Fig. 5

CHANGING THE ADMINISTRATOR CODE
PROGRAMMING THE ACCESS CODES
IMPORTANT: Changing the Administrator Code resets all Access Codes.
The black square button at the bottom of the black metal enclosure is the
button to start setting the Administrator Code sequence. (Fig. 6)
[See: Setting the Administrator Code Pg. 19-20]
NOTE: All Landports come with the preset Administrator Code of 7-7-7-7-7
and a preset Access Code of 1-3-5-7-9. Please change these codes prior to
use or the items in the Landport will not be secure.
The center button in the keypad is the button used to start setting the
Access Codes sequence. (Fig. 7)
[See: Setting the Access Codes Pg. 21-22]
Fig. 6
Fig. 7
15 16

ASSIGNING CODES TO KEYPAD POSITIONS
IMPORTANT: Codes are assigned to positions. (Fig. 8)
1/2 = Position 1 - an Access Code and an Administrator Code
3/4 = Position 2 - an Access Code
5/6 = Position 3 - an Access Code
7/8 = Position 4 - an Access Code
9/0 = Position 5 - an Access Code
The Administrator Code is assigned to Position 1.
The Access Codes are assigned to Positions 1, 2, 3, 4, 5.
Changing the Administrator Code will erase all previously set Access Codes
in Positions 1, 2, 3, 4, 5.
You can assign up to 5 dierent Access Codes. As additional Access Codes
are assigned, existing Access Codes are overwritten.
Fig. 8
17 18
Pos. 1 Pos. 2 Pos. 3 Pos. 4 Pos. 5

Press & hold
the black
square button
1 long
beep
Enter a
5-digit code 3 beeps
Code received
Re-enter 5-digit
code to confirm
2 short &
1 long beep
Start over
3 beeps
You are now
in Administrator Code
programming mode
Code successfully
programmed and
all previous Access
Codes erased
SETTING THE ADMINISTRATOR CODE
19 20

Press & hold
the middle button
1 short
beep
Enter 5-digit
Administrator
Code
Constant
beep
Select position
Press a button to
select position
1 long
beep
Start over, wrong
Admin. Code
1 long
beep
Start over, code
not confirmed
Enter new
5-digit Code 3 beeps
Code received
Re-enter
new 5-digit
Code to confirm
3 beeps
Code is
successfully
programmed
You are now
in Access Code
programming
mode
SETTING THE ACCESS CODES
21 22

DEACTIVATION SECURITY FEATURE
LOW BATTERY INDICATOR
CONTACT US
After repeated entering of incorrect codes (20 button presses without enabling
the system), the keypad is deactivated for 1 minute. This helps prevent
unauthorized access with random codes. While the keypad is deactivated,
no beeps will sound.
The keypad normally runs on 12 volts. When the keypad is at a voltage level
of 9.0V or less, the keypad provides a short beep 0.5 seconds after unlocking.
This indicates that it’s time to replace the batteries.
Website: www.thelandport.com Email: [email protected]om
Phone: 971.258.1970 Hours: Monday-Friday, 8am-5pm (PST)
#
The Codes can be changed at any time. See your Landport Guide.
ADMINISTRATOR CODE
ACCESS CODES
___ ___ ___ ___ ___
___ ___ ___ ___ ___
___ ___ ___ ___ ___
___ ___ ___ ___ ___
___ ___ ___ ___ ___
___ ___ ___ ___ ___
1
2
3
4
5
23 24
WARRANTY
We sincerely want you to be happy with your purchase, and will work with
you in good faith through any reasonable and unforeseen issues that aect
your Landport. The metal structure itself, including the steel and brackets,
is guaranteed for 10 years. Other components are guaranteed for 1 year.

INSIDE COVER
(THIS TYPE DOES NOT PRINT)
© 2014 Portland Landport LLC All rights reserved.
KEY REPLACEMENT
We strongly suggest you take the following
steps before your keys are misplaced:
1. Locate the 4-digit number inscribed on
your key. (Fig. 9)
2. Write down your key number here:
_____ _____ _____ _____
3. Keep this information in a safe place
where you can easily find at a later date.
In the event that you do misplace the
keys to your Landport, we can send you
a replacement set for a minimal fee plus
shipping. For more information, visit
www.thelandport.com and click on Parts
and Accessories.
25
Fig. 9

BACK COVER
(THIS TYPE DOES NOT PRINT)
This manual suits for next models
2
Table of contents
Popular Indoor Furnishing manuals by other brands

Salon & Co
Salon & Co SC169 owner's manual

Shockwave
Shockwave S2 Operation & service manual

LDI
LDI SAFCO Optimus 3590 Assembly instructions

Styleworks
Styleworks NYC-HB SW-60504 operating instructions

CAPIEM
CAPIEM FURTIF User Instruction with warranty specifications

Livarno Living
Livarno Living Z30614A manual

Whittier Wood
Whittier Wood 4651AFDHa Assembly instructions

JourTym
JourTym BM2860 Assembly instructions

Vamol
Vamol Classic Monel Bancada Princess 010062150 Assembly instructions

ROOMS TO GO
ROOMS TO GO KIDS GLOB 1497-17F-1 Assembly instructions

PAIDI
PAIDI 3T3S CLAIRE Instructions for use

Furinno
Furinno FNCL-33001 Assembly instruction