Paso 6: acoplamiento a la bicicleta
El gancho de tracción se acopla a la bicicleta
mediante el racor suministrado. Fije el racor en la
parte izquierda de la rueda trasera de la bicicleta
quitando la tuerca del eje. Coloque el racor en el eje y
apriete la tuerca del eje. Si la bicicleta cuenta con una
rueda de acople rápido, quite el acople rápido del eje,
colóquelo mediante el gancho de tracción y vuélvalo
a montar seguidamente a través del eje.
El racor deberá instalarse con el conector macho hacia
atrás, alejado de la bicicleta. Coloque el remolque
detrás de la bicicleta de manera que el conector
hembra pueda acoplarse con el conector macho.
Bloquee dichos conectores en su sitio con el pasador.
Haga un nudo con el cinturón de seguridad negro
alrededor del bastidor de la bicicleta y fije el gancho
de clip en la anilla en forma de D en las dos barras.
Paso 7: fijación del banderín de seguridad
1. Monte el banderín
2. Introduzca el extremo en el pequeño casquillo en la
parte derecha del remolque.
Cómo meter y sacar las mascotas:
Meta y saque la mascota únicamente haciendo uso
de la puerta trasera, con la puerta delantera cerrada
y el remolque fijado en la bicicleta. Mientras coloca
su mascota en el remolque, deberá acoplar uno de
los extremos del cinturón de seguridad (suministrado)
en el collar y el otro extremo en la anilla en forma de
D del remolque. Ajuste la longitud del cinturón de
manera que su mascota no pueda salir a través de la
ventanilla delantera cuando esté abierta. Durante el
trayecto cierre siempre la puerta trasera.
Instrucciones de seguridad:
•El remolque está exclusivamente destinado al
transporte de mascotas.
•Carga máxima: 30 kg
•Velocidad máxima: 16 km / hora.
•Compruebe cuidadosamente los tornillos, pernos
y pasadores de seguridad. Asegúrese de que todas
esas piezas estén bien ajustadas o bloqueadas.
•Tenga en cuenta que al conducir con el remolque se
incrementa la distancia de frenado. Practique en un
entorno seguro hasta que adquiera confianza.
•Utilice exclusivamente las ruedas suministradas de
fábrica con neumáticos inflados hasta 2,07 – 2,41 bar.
Compruebe la presión antes de cada uso.
•No realice cambios en el remolque ni en el gancho
de tracción, ya que corre el riesgo de producir daños.
POR: Manual de utilização
Componentes:
1. Atrelado
2. Gancho de reboque e respetivo conector do
gancho de reboque (dobrado sob o atrelado)
3. Pega dobrável
4. Rodas traseiras com botão de libertação
5. Roda dianteira
6. Bandeira de segurança
Siga estas instruções para garantir a segurança.
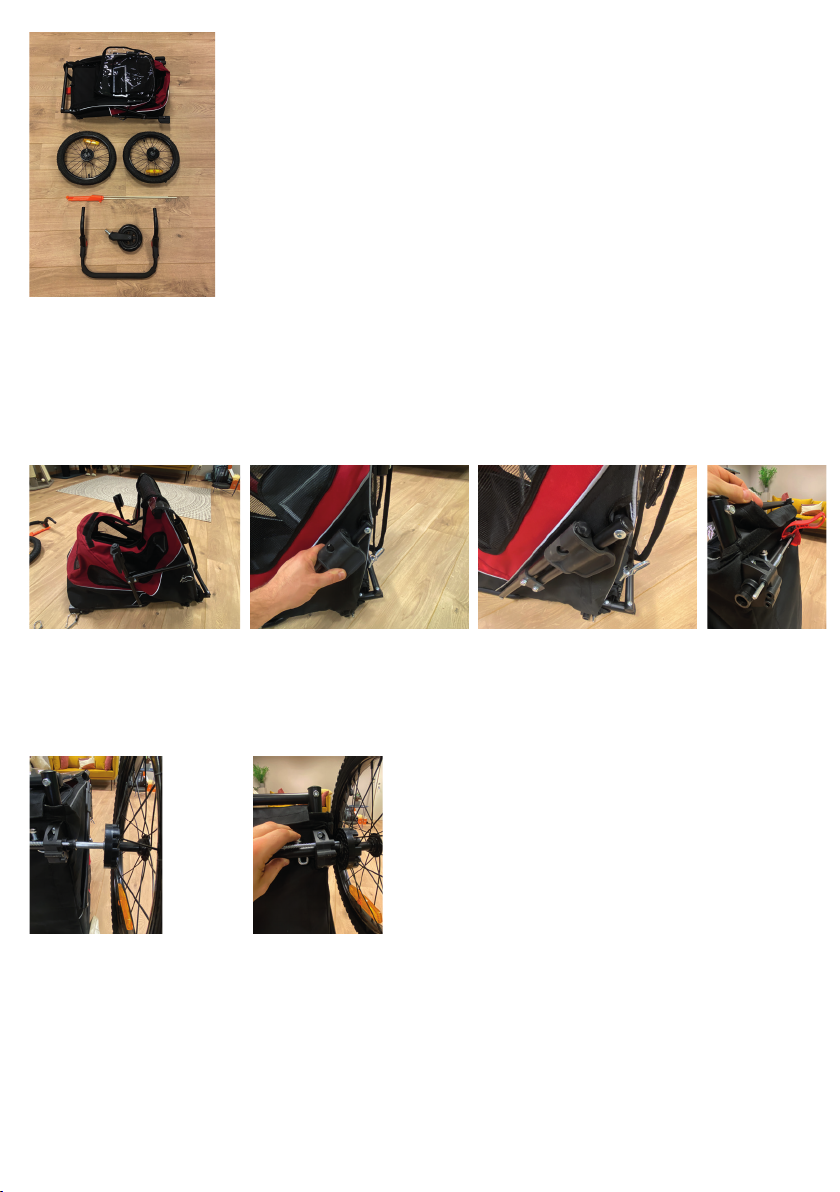
Passo 1: Montar o atrelado
Abra o atrelado e bloqueie a estrutura. Aplique os
fechos de velcro e aperte os dispositivos de fixação
em ambos os lados, conforme demonstrado nas fotos
abaixo.
Passo 2: Instalar as rodas
Instale uma roda de cada lado, inserindo-a no eixo.
Pressione o botão no tubo inferior para fazer deslizar
o veio da roda pelo eixo até ficar devidamente preso.
Puxe a roda várias vezes para garantir a devida
instalação.
Para remover a roda, pressione novamente o botão no
tubo inferior enquanto puxa a roda, para a desinstalar.
Passo 3: Fixar o gancho de reboque
Para fixar o gancho de reboque, insira a extremidade
arredondada no suporte previsto para o efeito (Figura
1), à esquerda. Fixe o gancho de reboque com o tensor
fornecido (posição A) e o pino de bloqueio (Figura 2).
O cotovelo do gancho de reboque ficará virado para a
direita relativamente ao sentido da marcha.
Importante: certifique-se de que o pino fica
devidamente travado, dado que a barra de reboque
solta pode causar perda de controlo do atrelado
durante a utilização.
Passo 4: Montar a barra de direção
Faça deslizar as extremidades da barra de direção
nos respetivos tubos de direção, alinhe os orifícios,
instale e bloqueie os pinos de segurança.
Regule a barra para a altura desejada, pressionando
os dois botões vermelhos.
Passo 5: Instalar a roda dianteira na estrutura
Insira o veio da roda no suporte de montagem
correspondente e use o pino de segurança para
o bloquear, conforme demonstrado nas imagens.
Certifique-se de que a roda fica devidamente
instalada e segura.
Passo 6: Ligação à bicicleta
O gancho de reboque é ligado à bicicleta através do
conector fornecido. Fixe o encaixe no lado esquerdo
da roda traseira da bicicleta removendo a porca do
eixo. Posicione o conector no eixo e aperte a porca do
eixo. Se sua bicicleta estiver equipada com uma roda
de fixação rápida, remova o pino de fixação rápida
do eixo, encaixe-o no gancho de reboque e volte a
instalá-lo no eixo.
O encaixe deve ser instalado com o conector macho
voltado para trás, na direção oposta à bicicleta.
Posicione o atrelado atrás da bicicleta de forma que
o conector fêmea possa deslizar sobre o conector
macho.
Bloqueie estes conectores com o contrapino para
os manter na devida posição. Passe a correia de
segurança preta em redor do quadro da bicicleta e
prenda o dispositivo de fixação à argola em D em
ambas as barras.