Laser AO-BT404 User manual

U
SE
R
M
A
N
U
A
L
AO
-
B
T
404
0
BLUETOOTHHEADPHONES
Pleasereadcarefullybeforeuse

U
SE
R
M
A
N
U
A
L
AO
-
B
T
404
1
TABLEOFCONTENTS
IMPORTANTSAFETY INSTRUCTIONS AND PRECAUTIONS 1
RODUCT CONNECTIONS AND USE 2
WHAT’S IN THE BOX 2
CHARGING 3
SWITCH ON /OFF 3
PAIRING WITH OTHER BLUETOOTH DEVICES 3
A: PAIRING WITH MOBILEPHONE(HFP) 4
B: PAIRING AO-BT404WITH IPAD /IPHONE 4
C: PAIRING WITH PC/NOTEBOOK OR TABLET 5
D: PAIRING WITH MAC OS X 10 OR ABOVE 5
E: PAIRING WITH A SONY PLAYSTATION 4 ® (PS4) 6
RE-CONNECTING TO A BLUETOOTH DEVICE 6
MAKING PHONE CALLS 7
CONTROLS FOR MUSIC 8
LED AND TONEINDICATIONS 8
SPECIFICATIONS 9
TROUBLE SHOOTING / Q & A
10
IMPORTANTSAFETYINSTRUCTIONSANDPRECAUTIONS
-
Pleasereadallinstructionscarefullybefore use
-
Please retain this manualfor future reference
-
Use this product only inthemannerdescribed
-
Only use a water-dampened softcloth to clean thesurface of this product
-
Thefollowing will damage this product: any liquid suchas water or moisture,
extreme heat;cold; humidity, dustyor sandyenvironments
-Itis recommendedto thoroughlycharge this device before first use. Subsequent
charges may beas needed
-
During charging,or extended use, the product may become warm. This is normal
-
There areno userserviceable parts in this product
-
Unauthorizedattempts to dismantle orrepair this product will void product
warranty
-
Usingthisdevice nearotherelectronic devicesmaycauseinterference
-
Do not use this product inelectricalstorms

U
SE
R
M
A
N
U
A
L
AO
-
B
T
404
2
PRODUCTCONNECTIONSANDUSE
LEDindicator
Microphone
Multi-Functionbuttons
MicroUSBCharging port
(MultifunctionButton(MFB))
On,Off(Headset)
A
n
s
w
er
o
r
S
t
o
p
c
a
l
l
L
a
s
t
N
u
m
b
er
R
e
d
i
al
Pa
u
s
e,
P
l
ay
Last,nextSong
I
n
c
r
ea
s
e,
D
e
c
r
ea
s
e
v
o
l
um
e
WHAT’S IN THEBOX
1xBluetoothheadsetAO-BT404
1xMicro USB charge cable
1x User manual

U
SE
R
M
A
N
U
A
L
AO
-
B
T
404
3
CHARGING
Note: It is recommended to thoroughly charge this device beforefirst use. Subsequent
charges maybe as required.
•
Ensure theAO-BT404is turned off before charging
•
Connectthe includedUSB cable into the micro USB portonthe headphones.
•
Connect theother end of the USB cable to a USB power adapter, an in car 12vDC to
USB adaptor, a PC or notebook USB portor anyother device which can supply power
viaUSB (5volts)
•
When the RED LED lightis on, the headset is charging
•
When the RED & BLUE LED lights are slowly flashing, the headset is fully charged
•
Itshouldtake around 3hours to fully charge theAO-BT404
(if connectedto a PC which has a sleep/hibernate function, the device will notcharge)
SWITCHON/OFF
F
un
ct
i
o
n
Op
e
r
a
ti
o
n
LE
D
I
n
di
c
t
o
r
I
ndi
c
a
ti
o
n
t
o
n
e
SwitchOn
Press the MFB button for 5
s
e
c
o
nd
s
,
u
n
t
i
l
t
h
e
b
l
u
e
LE
D
i
s
o
n
BlueLED
blinks 2 times
Poweron
SwitchOff
Press the MFB buttonfor 5
s
e
c
o
nd
s
,
u
n
t
i
l
t
h
e
r
ed
LE
D
i
s
o
n
RedLED
bl
i
n
k
s
2
t
i
m
es
Poweroff
PAIRINGWITHOTHERBLUETOOTHDEVICES
Function
Operation
LEDindicator
Indicationtone
Enterpairing
mode
Makesure the headset is
off. Press and hold MFB
buttonfor7seconds,and
release ituntil the blue &
redLEDs blinking.
Blue& Red
LEDs blink
alternatively.
Pairing

U
SE
R
M
A
N
U
A
L
AO
-
B
T
404
4
A:PAIRING WITH MOBILEPHONE (HFP)
Note:Ensure yourmobile phone has Bluetooth capability.Pairing procedures may
vary between brand types and handsets. Please refer to yourmobile phone manual
forfurtherinformation
1)
Pleasekeep the headsetand mobile phone within 1meter of eachother whilst
pairing.
2)
Activatethe headsetpairing mode(hold theMFB (middle button) for 7seconds–
thered and blue LED will blink alternately)
3)
Activate the Bluetooth function on your mobile phone so it can search(discover)
Bluetoothdevices.
4)
When located,SelectAO-BT404 in theBluetooth device list onyour phone.
5)
If a passwordor PINis required, enter 0000, and press Yes or Confirm if required.
6)
Aftersuccessfully pairing,selectAO-BT404 in theBluetooth device listandpress
connectonyour mobilephone.
7)
If the pairing is successful a blue LED onthe headset will blinkevery 4seconds.
Note: If the pairing is not successful,switch off the headset,and then restart the
procedure. Your device may also need to be reset.
Note: After pairing is successful, the paired devices willbe stored in memory so there
is no need to repeat the pairing process. Some devices may only allowyou to pair one
set of Bluetooth headsets at a time however you can use the AO-BT404on multiple
devices (butnotat the same time)
B: PAIRING AO-BT404 WITH IPAD /IPHONE
Note: Please keep the headset and iPhone/iPad® within a range of 1 meter of each
otherwhilstpairing.
1)
Activate the headset pairing mode (hold the MFB (middle button) for 7 seconds –
thered and blue LED will blink alternately)
2)
IntheiPhone/iPadhomescreen,selectsettings,thengeneral,thenBluetooth

U
SE
R
M
A
N
U
A
L
AO
-
B
T
404
5
3)
Swipe the ON/OFF switch to ON.The messageNow Discoverable willappear
4)
The Headsetshould beidentified by youriPhone/iPad. Select it to complete the
pairing
C: PAIRINGWITH PC/NOTEBOOKOR TABLET
Before installing this product,please make sure your PC or device supports Bluetooth,
that the Bluetooth feature is enabled or that the Bluetooth dongle has been installed
correctly
1)
Open the Bluetooth programof your PCor device andkeep the AO-BT404 and PC
within 1 meterof each other whist pairing.
2)
Activate the headset pairing mode: hold the MFB (middle button)for 7seconds –
thered and blue LED will blink alternately
3)
ActivateBluetoothconnectivityonyourPC andbeginthe SEARCH NEW DEVICE
function.
4)
Aftera short scanning period,yourPC or Device will indicate thatyour AO-BT404
headset has been discovered andis readyfor connection/pairing
5)
If youare prompted to enter a pin-code, use the code 0000(four zero’s)
6)
Theconnection should thenbe complete and the headset willbe readyfor use
Note: If the above pairing process has failed,please ensure your Bluetooth receiver or
software has been installed correctly and then repeatthe abovesteps.
Note: Once paired and recognized by your PC/notebook, you can use the headset for
chatfunctions such as Skype®or MSN®.
D: PAIRING WITH MAC OS X 10 OR ABOVE
1)
Activate the headset pairing mode: hold the MFB (middle button)for 7seconds –
thered and blue LED will blink alternately
2)
From the Setup Bluetooth Device inthe Bluetooth status menu / menu bar,
followtheonscreen instructionsto help pairyour headset.

U
SE
R
M
A
N
U
A
L
AO
-
B
T
404
6
Note: If the Bluetooth status menu is notavailable,open Bluetooth Preference
and select the Show Bluetooth status in themenu bar checkbox.
3)
As part of the pairing process, you will enter a passkey 0000 (four zero’s)
4)
OpenSystem PreferencesandclickSound
5)
ClickOutput andselectBluetoothheadset
6)
lickInputand select yourheadset. Adjust the InputandOutput volumeas needed
Note: Some applications, including iChat AV,allowyou to select the audio device
from within the application (independently of thedefaultaudio input andoutput
selected on the Sound pane of System Preferences). To use a Bluetooth headset
within iChat AV, select the Bluetooth headset foraudio inputand outputon the
Videopaneof iChatpreferences.
E: PAIRING WITH A SONY PLAYSTATION 4 ® (PS4)
Note.PS3doesn’tallowyou to listen tomusic/game/video contentona Bluetooth
headset– it’s only for online gaming chat
1)
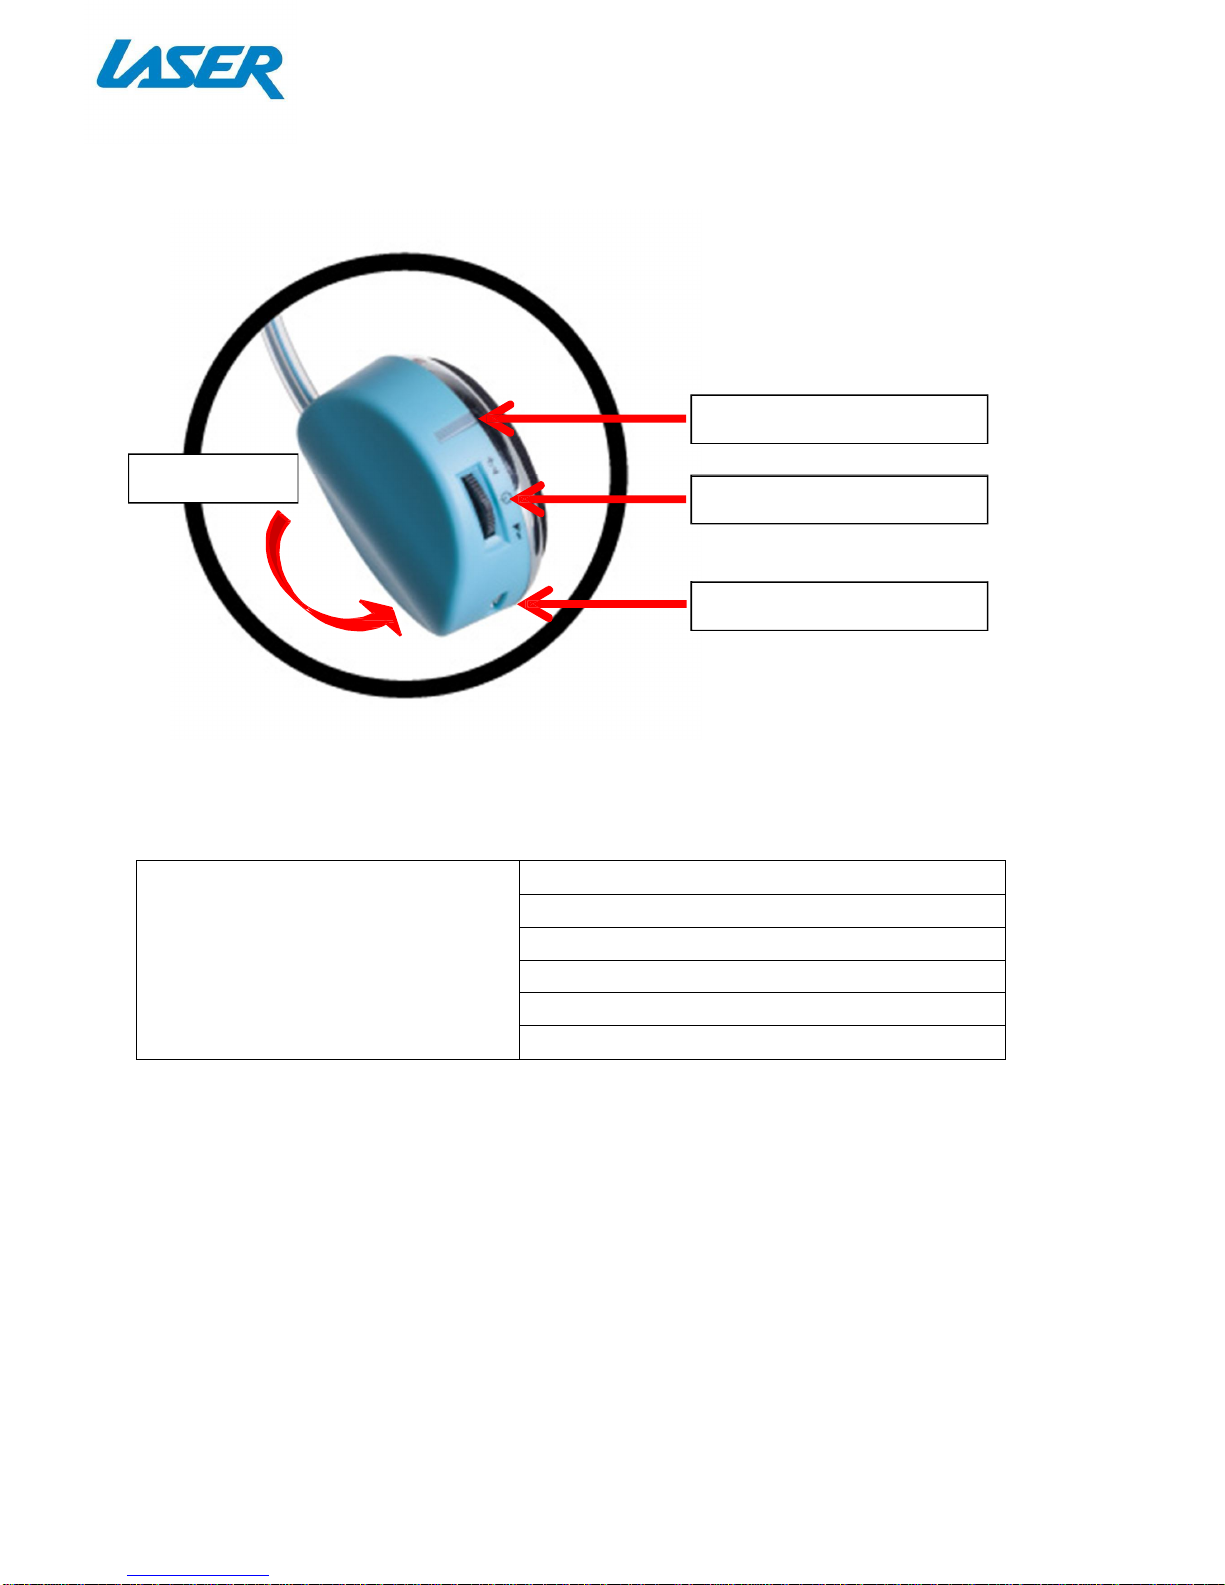
Activate the headset pairing mode: hold the MFB (middle button) for7 seconds –
the redand blue LED will blinkalternately In the PS3 menu
2)
Go to thesettings section,selectDevices,thengotoBluetoothDevices.Itwill
automaticallysearchforBluetoothdevices.
3)
WithyourAO-BT404 inpairing mode, let the PS4 scan for your headset. When your
headsetisfound,follow the promptsandenterthe pin-code 0000 (four zero’s).
4)
Thepairingshouldnowbecomplete.
Note: More help can be found at:
http://community.us.playstation.com/thread/2344930?start=0&tstart=0
RE-CONNECTING TO ABLUETOOTHDEVICE
Automatic connecting: Every time the AO-BT404is switchedon,it willconnect to last
connecteddeviceautomatically

U
SE
R
M
A
N
U
A
L
AO
-
B
T
404
7
Manually connecting tothe last connected HFPdevice:WhentheAO-BT404is in
standby modeand doesn’t connect to any HFP devices, press the MFB button twice,
itwillconnect to thelastconnecteddevice automatically
Note:Before connecting toa Bluetooth device,please enable thedevice’s Bluetooth
function.
MAKINGPHONECALLS
Note: The headsetmust beconnected and pairedwith a Bluetooth compatible mobile
phone
F
un
c
t
i
o
n
S
t
a
tu
s
Ope
ra
t
i
o
n
Voicedial
Standbymode Press and hold the MFB button for 3
s
e
c
o
nd
,
r
e
l
ea
s
e
i
t
wh
e
n
y
o
u
h
ear
a
t
o
n
e
R
e
di
al
l
a
s
t
n
u
m
b
er
S
t
a
n
d
b
y
m
o
d
e
P
r
e
s
s
th
e
MF
B
b
u
t
t
o
n
t
w
i
c
e
q
ui
c
kl
y
V
o
lum
e
u
p
C
o
n
v
e
r
s
a
t
i
o
n
m
o
d
e
S
lid
e
u
p
(
a
n
d
r
e
l
ea
s
e)
MF
B
k
ey
V
o
lum
e
d
o
w
n
C
o
n
v
e
r
s
a
t
i
o
n
m
o
d
e
S
lid
e
d
o
w
n
(
a
n
d
r
e
l
ea
s
e)
MF
B
k
ey
A
n
s
w
er
c
a
l
l
R
in
g
i
n
g
S
h
o
r
t
pr
e
s
s
MF
B
k
e
y
Rejectcall
Ringing Press and hold MFB for 3second,and
releaseit tillhearing "call rejected"
voiceprompt
Note:
•
Notall the mobile phones support all the functions listed above. Please refer to the
instructionofyourmobile phone.
•
When the volume is adjusted to max or min, you will hear an indication tone.
•
The AO-BT404 can be switched between music or phone call,so you won’tmiss
incoming calls whilstlistening to music
•
Notall the mobile phones supportallthe functions listed above. Please refer to
theinstruction manualofyourmobilephone.
•
Some functions and indicationtones may vary withdifferentmobilephones.
•
When the volume is adjusted to max or min, you will hear an indication tone.
•
When accepting or making calls on some mobile phones, the defaultsetting may
be to communicate via the phone (speaker and microphone) instead of on the
headset. If the is the case,simply switch over to the headset within the phones
relevant menu. Please refer to the instruction manualof your mobile phone for
furtherinformation

U
SE
R
M
A
N
U
A
L
AO
-
B
T
404
8
CONTROLSFOR MUSIC
Once the AO-BT404headset connects with a music device (suchas an iPod touch,
iPhone orSmartphone) high qualitystereo music canbe transmittedto the headset
withvolumeand trackplaybackfunctionscontrolledfromthe headset:
F
un
c
t
i
o
n
S
t
a
tu
s
o
f
he
a
d
se
t
Ope
ra
t
i
o
n
Pa
u
s
e
P
l
a
y
i
n
g
m
u
s
i
c
S
h
o
r
t
pr
e
s
s
MF
B
P
l
ay
Pa
u
s
e
S
h
o
r
t
pr
e
s
s
MF
B
L
a
s
t
so
n
g
P
l
a
y
i
n
g
m
u
s
i
c
S
lid
e
u
p
(
a
n
d
H
o
l
d
)
MF
B
k
ey
N
e
x
t
so
n
g
P
l
a
y
i
n
g
m
u
s
i
c
S
lid
e
d
o
w
n
(
a
n
d
h
o
l
d
)
MF
B
k
ey
V
o
lum
e
u
p
P
l
a
y
i
n
g
m
u
s
i
c
S
lid
e
u
p
MF
B
k
ey
V
o
lum
e
d
o
w
n
P
l
a
y
i
n
g
m
u
s
i
c
S
lid
e
d
o
w
n
MF
B
k
e
y
Note:
•
On some mobile phones, when playing music,the sound may be heard on the
speaker of the mobile phone. If this is the case,please choose “transmit the sound
through Bluetooth /AO-BT404” (or something similar). This isnormally found within
the settings section on yourdevice. When the volumeof headsetisadjusted to
maximumor minimum,you willhearan indication tone.
•
TheRemote controlfunctions will only work withdevices which supportBluetooth
standardAVRCP(suchasiPhone/iPad/somesmartphones). Pleaserefertothe
instructionmanualofyour mobilephoneor Bluetooth transmitter forfurther
Information.
LEDANDTONEINDICATIONS
L
E
D
i
nd
i
c
a
to
r
S
t
a
tu
s
o
f
th
e
he
a
d
se
t
Red LED is on The headset is charging
B
l
u
e
L
E
D
i
s
o
n
Th
e
h
e
a
d
s
et
h
as
f
i
n
i
s
h
e
d
c
h
a
r
g
i
n
g
Redandblue LEDs blink
(
A
lt
e
rn
a
t
e
l
y
)
Pairingmode – the headsetis now
di
s
c
o
v
e
r
a
bl
e.
RedLED blinks twice
(Every20seconds)
Lowpower
BlueLED quickly blinks twice
(
E
v
e
r
y
s
e
c
o
n
d
)
The headset is not connected to a device.
BlueandRed LED rapid blink
(Three times every 2seconds)
SetupHFPandA2DPconnection
Toneindicator Status of the headset Analert tonesounds every 20seconds
P
o
w
er
i
s
l
o
w

U
SE
R
M
A
N
U
A
L
AO
-
B
T
404
9
SPECIFICATIONS
B
lu
e
t
oo
t
h
P
r
o
t
o
c
o
l
’
s
V.
3
.
0
+
E
D
R
(
H
S
P
,
H
F
P
,
A
2
D
P
a
n
d
A
V
R
CP)
Operatingrange Upto 10meters
T
a
l
k
t
i
m
e
U
p
t
o
1
0
h
o
ur
s
P
l
ay
mu
s
i
c
t
i
m
e
U
p
t
o
1
0
h
o
ur
s
Stand bytime Upto 200hours
B
a
tt
e
r
y
R
e
c
h
a
rg
ea
b
l
e
32
0
m
A
h
L
i
-
p
o
l
ym
e
r
b
a
t
t
e
r
y
C
h
a
r
g
i
n
g
t
i
m
e
U
p
t
o
3
h
o
ur
s
C
h
a
rg
e
i
n
pu
t
v
o
l
t
a
g
e
D
C
5
V
v
i
a
M
i
c
r
o
U
S
B
Compatibility iPod/iPad,iPhone 3G, 3GS, 4, 4S, 5, 5S and beyond,
N
o
t
e
b
oo
k
/
PC
(B
lu
e
t
oo
t
h
d
o
n
g
l
e
r
e
q
uir
e
d
)
W
e
ig
h
t
(
g
)
7
0
g
Dimension W: 156mm x H: 163mm x D : 55mm

U
SE
R
M
A
N
U
A
L
AO
-
B
T
404
10
TROUBLE SHOOTING / Q & A
IalwaysfindconfiguringBluetooth
software to be very difficult. Do you
have any tips to make this easier?
Forthefirst time user,we recommend
thatyouread these instructions carefully
beforeconnectingyourfirstdevice.
Bluetooth technologyis the preferred
wirelesstechnology, withthesetup
stepssimplyrepeatedforanyBluetooth
device.
Is“discovering”a newdeviceand
“pairing”a newdevice two different
things?
Yes. Think of it like tuning stations into
your TV. The same applies to your
headset. First you have to scan for all
stations (in this case, devices) then
decide what stationto watch(in this
case,pair with) Note: Remember to
enter the pairingmode onyourheadset
first beforeconnectingfor thefirst time.
I have paired AO-BT404 withanother AO-BT404 can “pair” two devices atthe
B
lu
e
t
oo
t
h
d
e
v
i
c
e
(
e
g
.
an
i
P
h
o
n
e)
b
e
fo
r
e.
s
a
m
e
t
i
m
e.
Y
o
u
mu
s
t
g
o
t
h
r
o
u
g
h
p
a
i
r
i
n
g
I
am
n
o
w
t
r
y
i
n
g
t
o
p
a
i
r
w
i
t
h
a
n
o
t
h
er
a
g
a
i
n
w
i
t
h
n
ew
d
e
v
i
c
e
a
n
d
m
a
n
u
a
l
l
y
r
e
-
d
e
v
i
c
e
(
e
g
.
i
Pa
d
)
a
n
d
i
t
d
o
e
s
n
’
t
w
o
rk
.
c
o
nn
e
c
t
b
a
c
k
t
o
f
ir
s
t
d
e
v
i
c
e.
I amhaving troublepairing withWIN7/8.
I can“discover” the headset OK but I
thinkI do not have the right drivers.
AlthoughWIN7isasuperioroperating
system withmost drivers already built-in,
insome cases this does notcover the
varioushardwareconfigurations built
into the device(eg. PC, Notebook,
Netbooketc) from themanufacturer.In
thiscase, pleasevisitthemanufacturer’s
websitefor the latestBluetooth drivers
foryou’reonboardBluetoothdevice.
Is there a function to remind me when I
havereachedthe normaloperating
distance of the device
Yes. Once youhave breached the normal
operating distanceforthe devicean
audible“beepbeep” noise willsound.
You will then needto reconnect (only)
thedevice.
Forfurtherproduct informationand instructions pleasevisitourproduct
webpageatwww.laserco.com.auoremailsupport@laserco.com.au
Differencesmayoccur.Forthemost up-to-date usermanual,please visitourwebsite.

U
SE
R
M
A
N
U
A
L
AO
-
B
T
404
11
WarrantyAgainstDefects
LaserCorporationPty Ltd(“Laser”)warrants your newproduct tobefree fromdefects in
materials andworkmanshipfor12 months,from the date of purchase,provided that the
productisusedinaccordancewithaccompanying recommendationsorinstructionswhere
provided. Thebenefit ofthiswarranty is inadditiontoyourrightsunder theAustralian
ConsumerLawandtoother rights andremedies oftheconsumerundera law inrelationto
thegoods orservicestowhichthewarrantyrelates.
Throughanetwork ofretailers andresellers,Laser willprovideyouwithyourchoiceof a
repair,exchange (where possible)orrefund(withinDeadon Arrivalperiod) forthis product
ifitbecomesdefectivewithinthewarrantyperiod.
This warranty will no longer apply where the defect is a result of alteration, accident,
misuse, abuse, normal wear and tear, neglect or improper storage. Please retain your
receiptasproofofpurchase
Howtomakeaproduct warranty claim:
Step1: Findyour receiptwhichprovesthedateofpurchase. Wherethedateofpurchase
cannotbeverified,your place ofpurchase orLaser willmakean assessment basedonthe
date ofmanufacture,the condition of theLaser Product andthetype ofdefect.
Step2a):Contact yourplace ofpurchase. They willassess thenatureofthefault andrepair,
replace orfund the product aspertheir store refundor warranty policy.
Step2b): If your place ofpurchase cannot be contacted,thenyou cancontact Laser.
CustomerServicewithdetailsofyourdefective LaserProduct:Phone:(02) 98703355; or
Email:[email protected]oronlinewww.laserco.com.au/warranty(clickon
“Consumers(EndUsers)”). Ourbusiness addressisat 1/6-8ByfieldStreet,NorthRyde,NSW
2113
Step 3: Laserwillissue youwitha ReturnAuthorisation(RA)numberwithin 48 hours.
When requested,send us the defective Product anda copy of your receipt. Laserwillcover
the cost ofthe return delivery.
Step 4: Waitfor us tocontactyou. Oncewe have receivedyourdefective LaserProduct for
inspection,we will inform youof ourassessment ofyourclaimwithin 7days. Whenwe
contactyou,we willfirstlylet youknowwhetheryouhave avalidclaim underthisWarranty,
andifso, wewill informyouwhetheryourdefective LaserProductwill be replacedor
repaired,togetherwiththe numberofdays youcanexpecttowaittoreceiveyourreplaced
orrepairedLaserProduct.
Step5:Forfurtherdetails onwarranty coverand returns,please checkTerms and
ConditionsforWarrantyReturnssectiononhttp://www.laserco.com.au/warranty
Ourgoodscomewithguarantees thatcannotbeexcludedundertheAustralianConsumer
Law. Youare entitledtoa replacement orrefund fora majorfailure andcompensation for
any otherreasonablyforeseeable loss ordamage. Youarealsoentitledtohavethe goods
repairedor replacedifthe goodsfail tobe ofacceptablequality andthefailure does not
amounttoamajorfailure.
Table of contents
Other Laser Headphones manuals

Laser
Laser EPS-KWGLOW-GN User manual

Laser
Laser AO-EVDBL-019 User manual

Laser
Laser AO-AK350TWS User manual

Laser
Laser AO-BTHD User manual

Laser
Laser HPS-KBTPOP-PK User manual

Laser
Laser HPS-KANC User manual

Laser
Laser EPS-KTWSGO User manual

Laser
Laser AO-AK250TWS User manual

Laser
Laser AO-BT88NC Owner's manual

Laser
Laser AO-LED18BLK User manual