Laser 6804 User manual

www.lasertools.co.uk
Part No. 6804
Thermal Printer
For Battery Testers
2 3
www.lasertools.co.uk www.lasertools.co.uk
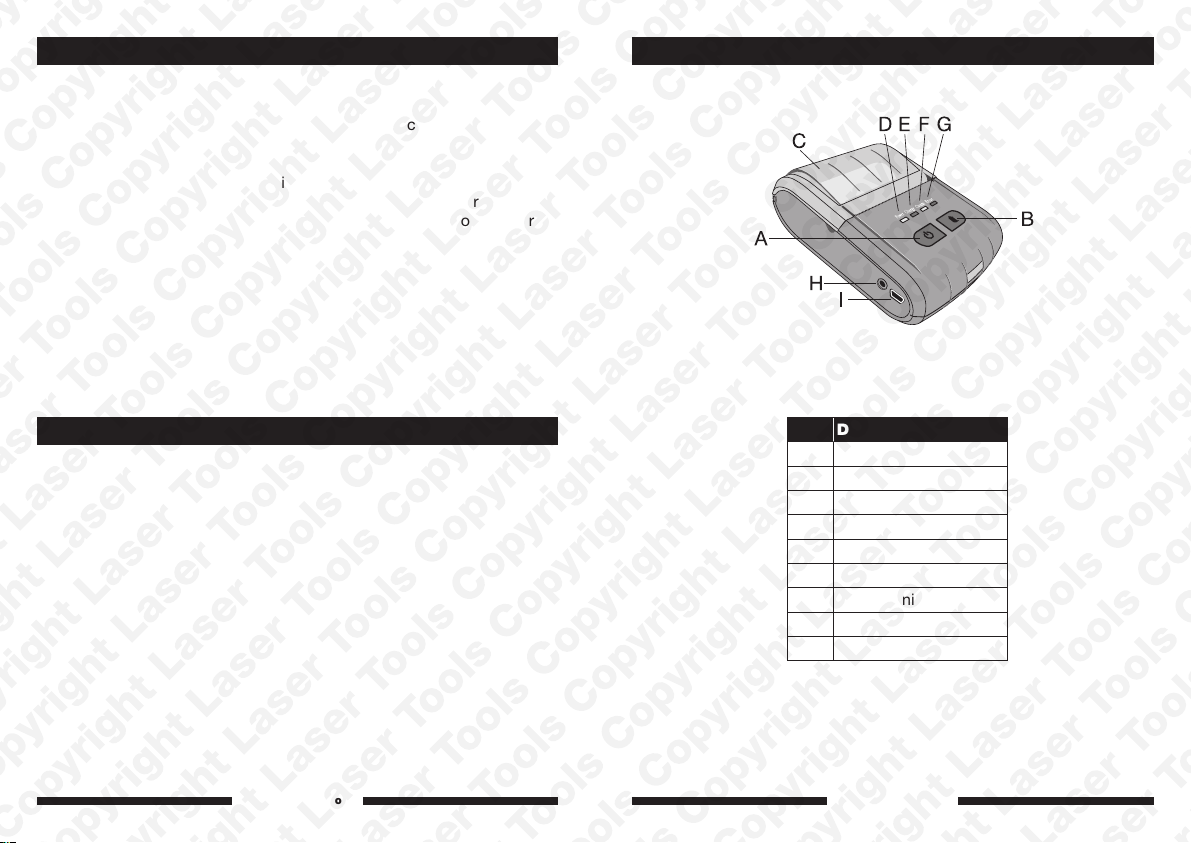
Ref. Description
AON / OFF button
BPaper feed / self-test
CPaper roll cover
DPower indicator light
ECharging indicator light
FComms indicator light
GError warning light
HPort (battery charger)
IPort (Mini-USB)
The Laser 6804 Thermal Printer is designed to accompany the Laser
6803 Battery Tester and is a quick and convenient method of printing
out the test results which can then be shown to the customer and kept
with the service documentation.
It is a paper roll thermal printer which is powered by a Lithium Polymer
battery; the battery is charged via the mains-powered charger provided.
The battery should initially be charged for a minimum of 8 hours before
using the thermal printer.
Introduction
Specifications
• Thermal printer (thermal paper roll)
• Mini USB interface
• Lithium Polymer battery (7.4V 1200mAh)
• ‘No paper’ alarm
• Overheating protection
• Self-test print function
• Paper roll width: 55mm
• Battery charger: input 100-240V AC, output 9V DC, 1.5A
Controls
Fig 1
4 5
www.lasertools.co.uk www.lasertools.co.uk
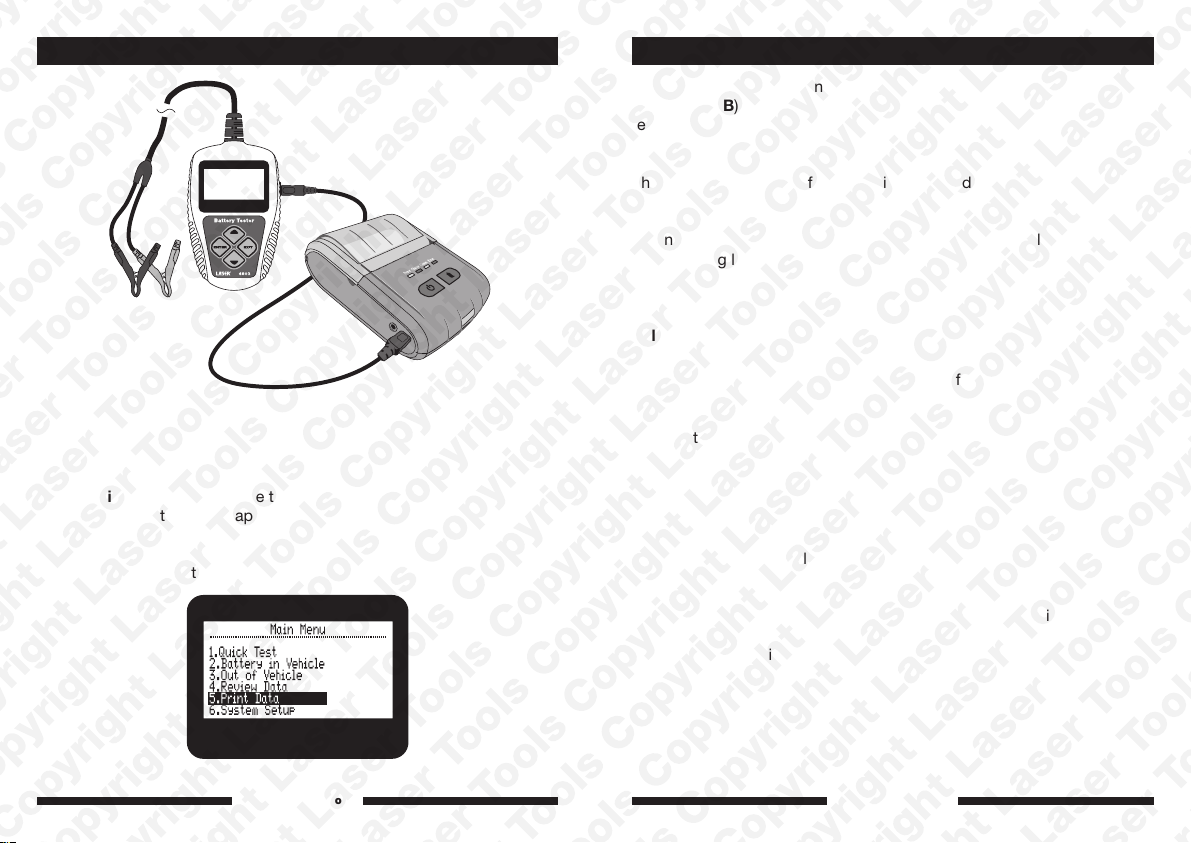
Refer to Figure 2: connect the 6803 Battery Tester to the 6804 Thermal
Printer via the Mini-USB interface cable supplied with the printer. The
battery tester will power up from the printer’s battery.
Refer to Figure 1: switch on the thermal printer by pressing and holding
the ON / OFF button (A) for approximately 1-2 seconds. The green
power indicator light will illuminate.
On the main menu of the battery tester select 5.Print Data, then press
enter.
Instructions
The test results will be printed off. You may wish to press the paper
feed button (B) to advance the paper forwards a few millimetres before
tearing it off. One press of the button moves the paper forwards by
approximately 12mm.
The printer is switched off by pressing and holding the ON / OFF button
(A) for approximately 1-2 seconds.
When the printer paper roll runs out or there is an internal error, the red
error warning light (G) will illuminate (plus audible beep warning).
Self-Test Function:
Switch on the printer and wait for approximately 10-15 seconds. Press
and hold the Paper feed / self-test button (B) for approximately 1-2
seconds. The self-test will be printed which provides a number of
different test parameters. A useful indicator on the self-test print out
is the battery level, which gives a visual representation of the state of
charge as well as the measured voltage.
Charging the internal battery:
The battery should initially be charged for a minimum of 8 hours before
using the thermal printer. The battery is charged via the mains-powered
charger provided, connecting the lead to the charging port (H) on the
side of the thermal printer. The charge indicator light (E) will illuminate
immediately to show that the battery is being charged. The charge
indicator light (E) will go out when the battery is fully charged.
Fig 2
Instructions

6 7
www.lasertools.co.uk www.lasertools.co.uk
• Always refer to instructions before use.
• Observe standard workshop safety procedures when using the
thermal printer.
• Keep the print mechanism and paper roll clean and free from paper
dust and paper scrap; clean regularly with compressed air (air duster).
• Caution: after using the printer, let it cool down before changing the
paper roll or cleaning the mechanism; the internal print head platen
gets very hot in use (burn risk).
• When working with or near a lead-acid battery make sure to remove
personal metal items such as watch straps, rings, bracelets,
necklaces, etc. A short across the battery terminal from one of the
above could cause severe burns.
• Protect the thermal printer from prolonged exposure to humid or
damp conditions.
• Ideal storing and operating temperature: 0˚C to +50˚C.
• Do not let the printer or tester get wet or use in damp or wet
conditions.
• Dispose of printer battery according to local authority guidelines.
• Please keep away from children at all times (burn risk).
PrecautionsInstructions
Changing the paper roll:
Refer to Figure 3: lift up the paper roll cover to access and remove the
paper roll. Drop in the new paper roll, leaving enough paper to come up
over the tear-off blade. Close the cover then tear off the excess paper.
New paper rolls are available: Laser Part No. 5283.
Changing the internal battery:
Refer to Figure 4: when refitting or replacing the battery be aware that
the terminals are located on the lower left-hand side of the battery. After
fitting the battery, make sure the battery cover is fitted correctly and
firmly closed.
Fig 3
Fig 3
Fig 4
Fig 4
www.lasertools.co.uk
Our products are designed to be used correctly and with care for the purpose
for which they are intended. No liability is accepted by the Tool Connection for
incorrect use of any of our products, and the Tool Connection cannot be held
responsible for any damage to personnel, property or equipment when using the
tools. Incorrect use will also invalidate the warranty.
If applicable, the applications database and any instructional information provided
has been designed to offer general guidance for a particular tool’s use and while
all attention is given to the accuracy of the data no project should be attempted
without referring first to the manufacturer’s technical documentation (workshop or
instruction manual) or the use of a recognised authority such as Autodata.
It is our policy to continually improve our products and thus we reserve the right to
alter specifications and components without prior notice. It is the responsibility of
the user to ensure the suitability of the tools and information prior to their use.
Table of contents


