LaserLight LL-2W RGB User manual

Please read over this manual before operating the light
RoHS
User manual
Professional stage animation laser light
LL-2W RGB

TABLE OF CONTENT
Brief............................................................................................................1
Packing list............. .................................................................................1
Installation and safety instruction......................................................................2
Power supply and signal connect.........................................................................3
Safety warning and maintain............................................................10
Specification..........................................................................................10
Opening the package.......................................................................................1
Installation location.........................................................................................2
Installation caution.........................................................................................2
Pack list..........................................................................................................2
Connect the power and control .................................................................................3
Safety warning.............................................................................................10
Maintain.......................................................................................................10
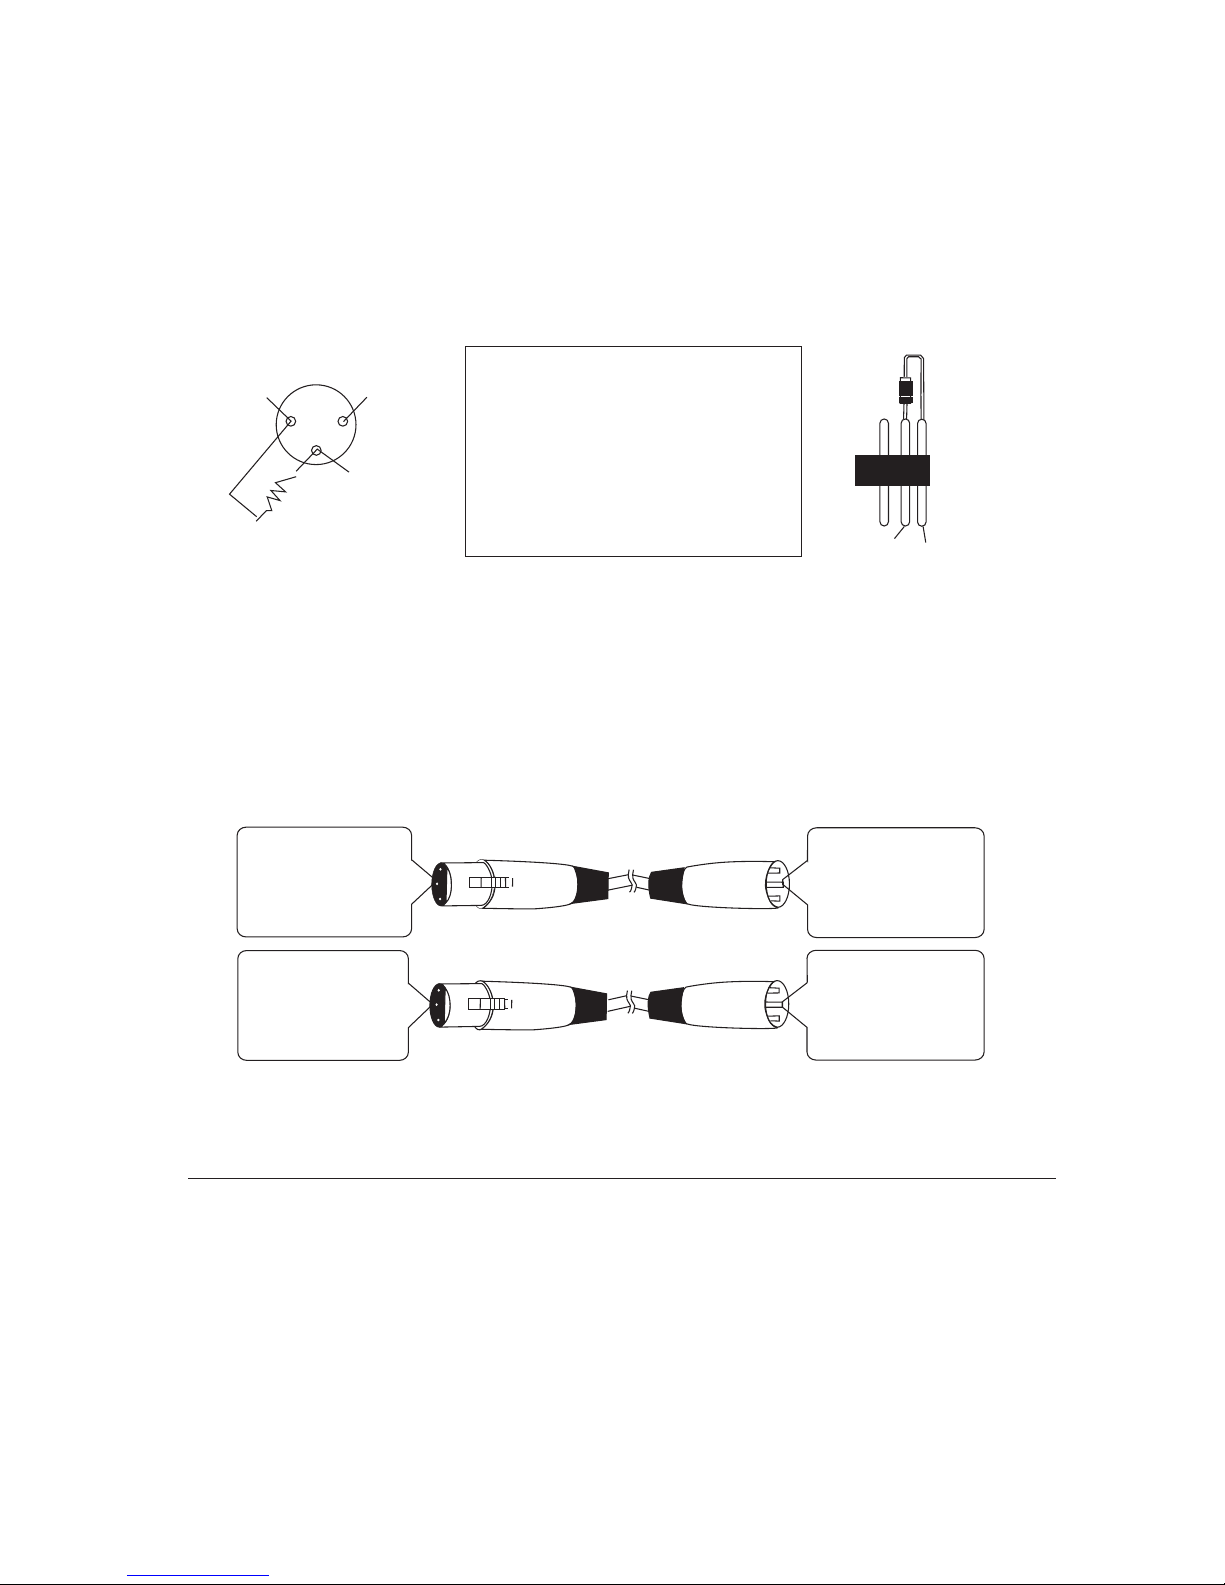
Connect the signal cable............................................................................................3
Automatic...................................................................................................................8
The light has five functions.............................................................................4
Operation instruction ............... .........................................................4
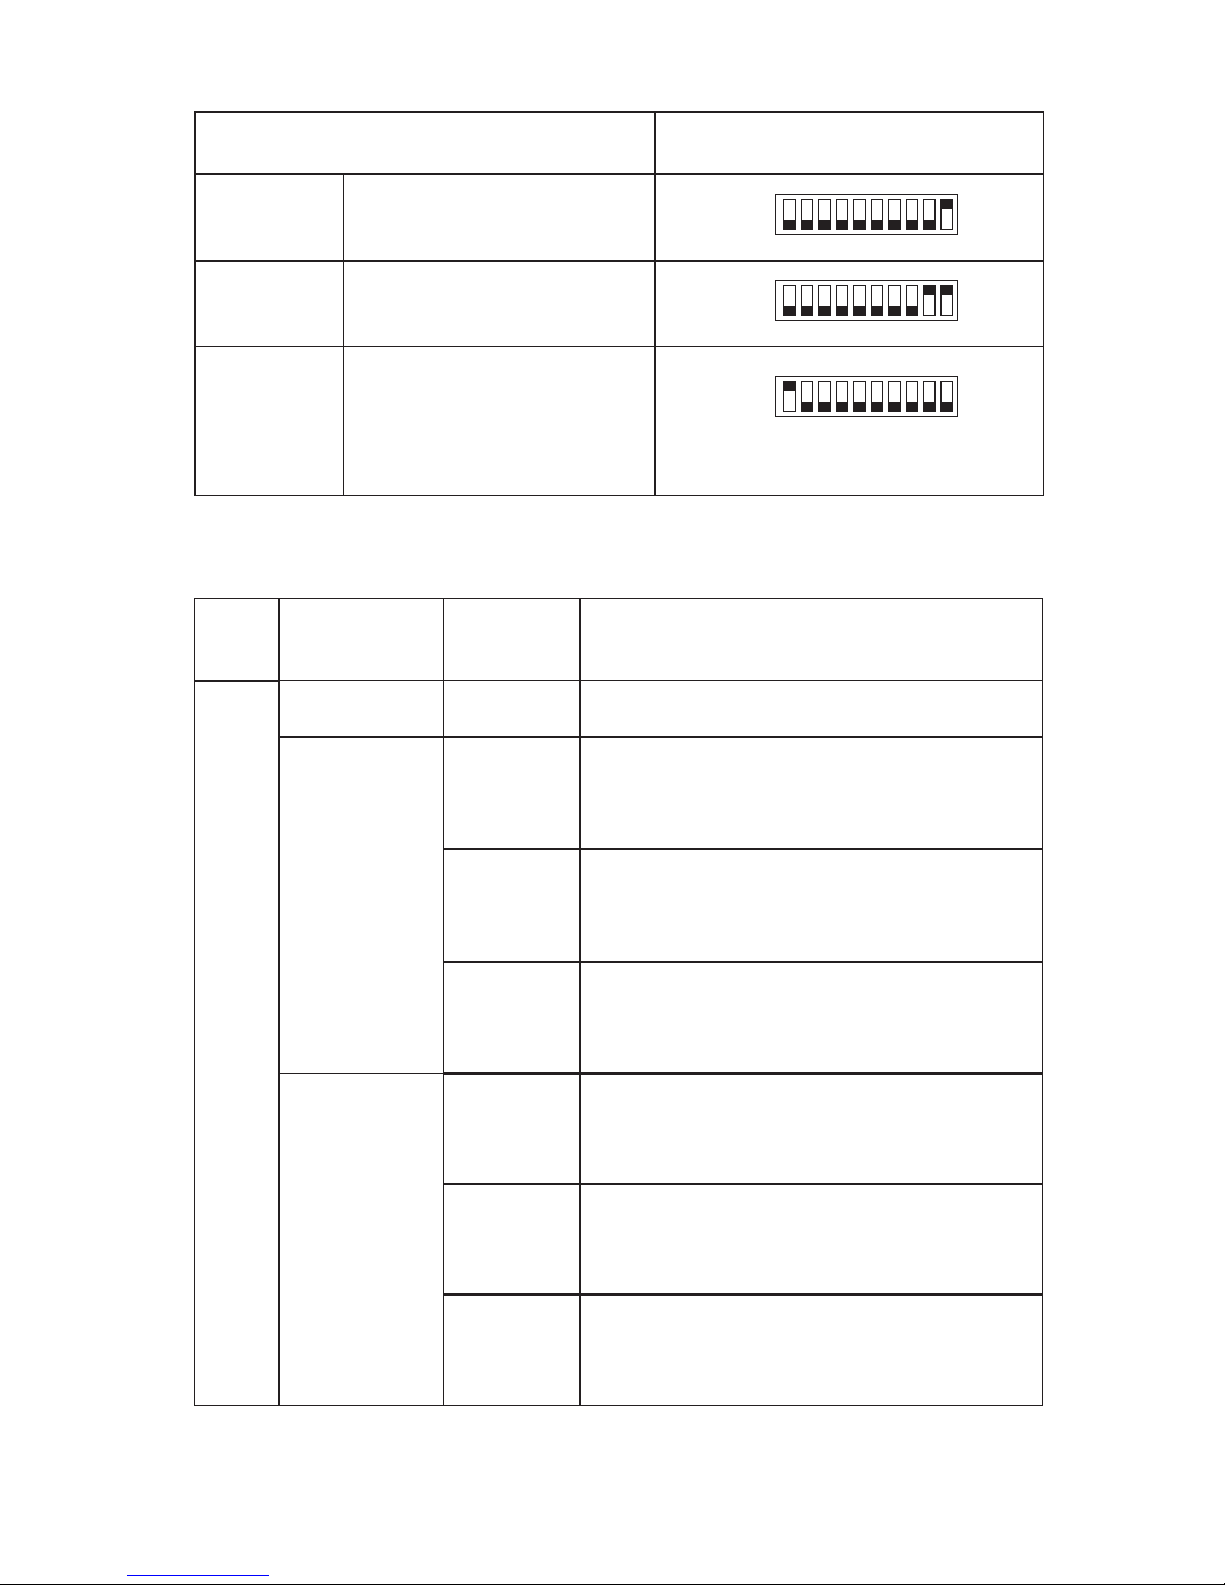
DMX Address quick reference chart..............................................11
Product common breakdown comparative chart........................12
DMX Control Function..............................................................................................5
Sound mode function.......................................................................................8

1
The manual of Laser show system
First、Brief
D A N G E R
AVOID DIRECT
E X P O S U R E T O B E A M
Avoid evectric
Thank you for purchasing of our professional show system. We
always try to develop our product with high-tech and high perform ance
to meet your requirement and expectation.
The unit is designed strictly according to the international standard.
The control way is single or master/slave in option.The manual is included
the skill parameter and detail instructions etc. Please read the manual
carefully before using the product.
laser
Second、Packing list
SECURITY WARNINGS
2 - 1 We use the carton to pack normally. You may choose the fly case.
2 - 2 Opening the package
Open the case and take out the enclosed spare parts, remove the drier,
take the unit and put it in a flat place to operate.
2 - 3 Spare parts
With of exception of this equipment, the pacing enclosed as following
Green package

2
Power line
Projector
The manual
1pcs
1pcs
1pcs
Package List
Third、installation and safety instruction
3 - 1 installation:
1, Installation location
Before the installation, to ensure the stability of the installation
points, can withstand the product weight at least ten times more
than the bearing structure.
2,Installation method
Use two professional lamp hook, M10 bolts to secure the
mounting nut through the lamp comes with fixed; dispensing (or
supplied) through the installation of the safety lock handle and
other hanging objects. When installing the lighting to ensure
stable, ban pedestrians through the installation process under the
lighting. In addition, when the demolition of lighting to cut off the
power supply to ensure the same security, first take the safety rope,
hang down again, at the same time ensure that beneath the
pedestrian safety.
3-2 Caution:
1, the laser beam should avoid direct or indirect fired people's
eyes, and keep a distance between the lamp and combustible
material at least 0.5 m.
2, Do not frequent switching of light, so as not to affect the light
life, and try to avoid prolonged open, ensure that the ambient
temperature does not exceed 35 ℃.
Using before pls must be check power supply link with earth
wire correctly or not.

3
4 - 2 Connect the signal cable
The laser light may be controlled the DMX 512 signal. Under sound
and Atuo control. the master/slave can be used. The master/slave mode
is lined by signal line. Connect the DMX-out of the first fixture in the
DMX-chain with the DMX-input of the next fixture. Always connect one
output with the input of the next fixture until all fixtures are connected.
Fourth、power supply and signal connect
4 - 1 Connect the power and control
Use the professional plug to connect the laser light and power cable.
Before installing the unit, please confirm whether the voltage and
frequency indicated on the real panel of laser light. Voltage and frequency
parameters(is matching)
Voltage
Opt
Opt
50Hz 60Hz
Frequency
First unit Second unit Nth unit
DMX512
Controller
IN
OUT
IN
OUT
IN
OUT
OUT
Control line Control line
- - - - - - - - - - - - - - -
AC100~240V AC100~120V
50~60Hz
AC200~240V

Caution: Please remember the signal output of last machine must
connect the attached circle plug .The circle plug connect a 120
resistor between 2 feet and 3 feet canon plug. The signal reflects
phenomena can be avoided by using circle plug during DMX 512
signal transfer. (DMX TERMIN ATOR CONNECTION):
PIN 2 PIN 3
21
3
120Ω
Connect a 120 resistor
across2-pin and 3-pin XLR
plug and insert into the
DMX OUT socket on the
last unit in the chain.
The light use 3 feet XLR plug, if the controller you use is 5
feet XLR plug. You must use a inter change line from 5 feet to 3 feet.
See the following. The transform of 3-pin and 5-pin XLR adaptor.
laser
The 3pin and 5pin Canon DMX512 connector circuit
5 pin cannon (input)
Pin 1: GND (SCREEN)
Pin 2: Signal(-)
Pin 3: signal(+)
Pin 4: N/C
Pin 5: N/C
5 pin cannon (output )
Pin 1: GND (SCREEN)
Pin 2: Signal(-)
Pin 3: signal(+)
Pin 4: N/C
Pin 5: N/C
3 pin cannon (input)
Pin 1: GND (SCREEN)
Pin 2: Signal(-)
Pin 3: signal(+)
3 pin cannon (output)
Pin 1: GND (SCREEN)
Pin 2: Signal(-)
Pin 3: signal(+)
4
Fifth、Operation instruction
The light has five functions: Music, Automatic, DMX 512,
Master-Slave/ILDA PC
5-1 The international standard DMX512 control. When the
DIP10 is OFF, the DIP 1-9 are DIP swift.

5
DMX address DIP set
1
13
49
133
1 ON
4,3,1 ON
6,5,1 ON
8,3,1 ON
............
DMX IN DMX OUT
DMX 512
3 DATA+
2 DATA-
1 GND
5-1.2、DIP swift code is used as the setting of function and DMX address
code. DIP 1-9 are used as the setting of channel. Adopt binary code, for
example 4,3,1 are ON, 2 OFF, namely 1101 ,value is 13. Another way is
ADD=ΣDIPi as follows:
i 89 7 6 5 4 3
DIPi +128+256 +64 +32 +16 +8 +4
38=32+4+2, If set the incipient code is 38.Only need set DIP6,DIP3,
DIP2 are ON, Set the prime code is following (For example use 12
channels DMX console):
16
27
38
49
510
↑
ON
DMX-512 contorl mode
5-1.1、The Cannon adaptor is used to input and output the DMX512 signal.
The transmission is used 2-pin shielded cable. Connect the shielded coat to 1
and the middle 2-pin to 2,3separately.
5-1.3 、DIP address code function mode set as following( if have
computer ILDA signal input, ILDA signal will be priority, address
code is invalid.)
DMX 512
3 DATA+
2 DATA-
1 GND
PIN FUNCTION
2 1
+2 +1

1
2
3
CH
CH1
6
MODE
Sound mode
DMX-512 contorl
(1~9 is address set, detail information
pls check DMX cheat sheet)
DIP Switch
16
27
38
49
510
↑
ON
16
27
38
49
510
↑
ON
16
27
38
49
510
↑
ON
Automatic mode
5-1.4 DMx Channel desription:、
168~209
210~251
252~255
Laser off
Run animation effects build-in,
RGB CH2-CH12 invalid
Function DMX512
value Description
0~41
42~83
84~125
126~167
Run animation effects build-in,
RGB CH2-CH12 invalid
(CH2-CH10 invalid)Single color
Run beam effects build-in,
RGB CH2-CH12 invalid
(CH2-CH10 invalid)Single color
Run beam effects build-in,
RGB CH2-CH12 invalid
(Single color CH2-CH10 invalid)
Laser off
Automatic
(Single color CH2-CH10 valid)
(CH2-CH10 valid)Single color
Manual control, RGB CH2-CH12 valid
Music-active
Manual control CH2-CH12 valid

This
channel
single
color,pink
is invalid
This
channel
single
color,pink
is invalid
7
CH2
CH3
CH4
CH5
CH6
CH7
CH8
CH9
CH10
0~255
0~127
128~191
192~255
0~127
128~255
0~127
128~255
0~127
128~255
0~127
0~63
64~127
128~191
192~255
0~255
0~127
128~255
128~255
Patterns selection
Patterns rotation
Patterns selection
Rotation angle selection
Opposition rotation speed selection
Positive rotation speed selection
Flip horizontal position selection
Flip vertical position selection
Horizontal moving position selection
Vertical moving position selection
Flip horizontal speed selection
Flip vertical speed selection
Horizontal moving speed selection
Vertical moving speed selection
Pattern size selection
Zoom out speed selection
Zoom in speed selection
Gradually drawing speed selection
Pattern scanning speed selection
Hot spot adjustion
Speed selection
Patterns flip
horizontal
Patterns
horizontal
moving
Pattern
vertical
moving
Pattern size
Scanning
Hot spot effects
Patterns gradually drawing
Pattern zoom
in/out
CH11
CH12
0~255
0~24
25~199
200~224
225~255
Color change effects
Color change rotation
Change color from slow to fast
Fixed color
Color selection
Color
Color change speed
Patterns flip
vertical

8
16
27
38
49
510
↑
ON
16
27
38
49
510
↑
ON
5-2 Sound function: set DIP1~10 is ON, DIP1~9set OFF,Then in the
voice control pattern , the light set at the build-in microphone by on the
voice control activate, the lamps have the rhythm along with the music
transform colour and pattern. Synchronous signal lamps. Pay attention to
in the same DMX512 signal network allows only one lamps as acoustic
control host, can be either one, the other as from the machine.
Following chart:
Min Max
The sound control may be adjusted
by the regulator on the rear of case.
IN IN IN
OUT OUT OUT
DMX512 DMX512
- - - - - - - - - - - - - - -
First unit Second unit Nth unit
IN IN IN
OUT OUT OUT
DMX512 DMX512
- - - - - - - - - - - - - - -
First unit Second unit Nth unit
Main engine pattern
(sound control)
5-3 Automatic mode: the DIP10 ,DIP9 set to ON at the same time DIP8
set to OFF. Then laser lights controlled by the internal, external voices are
not selfcontrol movement, to achieve silent static or more occasions, the
same to you As mistydream feeling.
Main engine pattern
(Auto control)

9
The laser light built-in two major effects, part cartoon effects, part of
beam effects. sound and automatic mode the DIP1 DIP2 settings.
Sound or Automatic mode, the DIP1set to OFF, DIP2 set to ON, the
laser lights cartoon effect.
Sound or Automatic mode, the DIP1set to ON, DIP2 set to OFF, the
laser lights beam effect.
Sound or Automatic mode, the DIP1and DIP 2set to OFF, the laser
lights cartoon and beam mixing effect.
16
27
38
49
510
↑
ON
16
27
38
49
510
↑
ON
16
27
38
49
510
↑
ON
Sound mode( effect )cartoon
Sound mode(beam effect)
Sound mode(mixing effect)
Automatic mode( effect )cartoon
Automatic mode(beam effect )
Automatic mode(mixing effect )
16
27
38
49
510
↑
ON
16
27
38
49
510
↑
ON
16
27
38
49
510
↑
ON
5-4 Sound 、 Automatic mode function effect select :
16
27
38
49
510
↑
ON
16
27
38
49
510
↑
ON
16
27
38
49
510
↑
ON
Address establishment schematic drawing as follows:
The DMX address is 1 The DMX address is 21 The DMX address 41
5-5 DMX mode: the DIP 10 set to OFF, DIP1~9 set to address. Then laser
lights controlled by the DMX controler
Prompt: If for the non- LED numerical code tube demonstration
type, the outset address establishment passable DMX address
has speed-searched the table to be conveniently and quickly
inquires obtains, sees attaches the page.

10
Sixth、Safety warning and maintain
6 - 1 Safety warning:
1、The product must be installed by a qualified professional. Please
do not open the equipment.
2、The fans and air-vents should not be jammed by other equipment
or decorate materials.
3、Avoid looking directly in the light source.
6 - 2 Maintain:
1、Please read the user manual in detail before operating the
equipment Please call the technician in case the machine broken down.
2、Keep the equipment away from water or moisture.
3、Make sure the power is off and the equipment is not connected
to the mains power supply before opening the unit or carrying and any
maintenance.
4、If there has been any damaged caused to the laser diode by the user
Laser Graphic - Animated - PC Control ILDA
Professional 25Kbps High Speed Optical Scanner
Diodes:
- Red 600mW / 638nm
- Green 400mW / 532nm
- 1W / 445nm Blue
Color Mix: White Laser 2W
Working Modes: Sound, Auto Animation, Auto, ILDA PC Control, Dmx 512,
Master / Slave.
DMX: DMX 12 Channels
Product Size: 47x39x21cm
Product Weight: 4kg
Packing size: 35x31x25
Gross weight: 4,8kg

11
DMX Address Quick Reference Chart
DipSwitch Position
DipSwitch Position DMX Address
DMX:DIPSWITCH SET
0=OFF
1=ON
X=OFF or ON
#9 0
1
0 0 0 0 0 0 0 1 1 1 1 1 1 1 1
#8 0
2
0 0 0 1 1 1 1 0 0 0 0 1 1 1 1
#7 0
3
0 1 1 0 0 1 1 0 0 1 1 0 0 1 1
#6 0
4
5
6
7
8
9
1 0 1 0 1 0 1 0 1 0 1 0 1 0 1
#1 #2 #3 #4 #5
0 0 0 0 0
1 0 0 0 0
0 1 0 0 0
1 1 0 0 0
0 0 1 0 0
1 0 1 0 0
0 1 1 0 0
1 1 1 0 0
0 0 0 1 0
1 0 0 1 0
0 1 0 1 0
1 1 0 1 0
0 0 1 1 0
1 0 1 1 0
0 1 1 1 0
1 1 1 1 0
0 0 0 0 1
1 0 0 0 1
0 1 0 0 1
1 1 0 0 1
0 0 1 0 1
1 0 1 0 1
0 1 1 0 1
1 1 1 0 1
0 0 0 1 1
1 0 0 1 1
0 1 0 1 1
1 1 0 1 1
0 0 1 1 1
1 0 1 1 1
0 1 1 1 1
1 1 1 1 1
32 64 96 128 160 192 224 256 288 320 352 384 416 448 480
33 65 97 129 161 193 225 257 289 321 353 385 417 449 481
34 66 98 130 162 194 226 258 290 322 354 386 418 450 482
35 67 99 131 163 195 227 259 291 323 355 387 419 451 483
36 68 100 132 164 196 228 260 292 324 356 388 420 452 484
37 69 101 133 165 197 229 261 293 325 357 389 421 453 485
38 70 102 134 166 198 230 262 294 326 358 390 422 454 486
39 71 103 135 167 199 231 263 295 327 359 391 423 455 487
40
41
42
43
44
45
46
47
48
49
50
51
52
53
54
55
56
57
58
59
60
61
62
63
10
11
12
13
14
15
16
17
18
19
20
21
22
23
24
25
26
27
28
29
30
31
72
73
74
75
76
77
78
79
80
81
82
83
84
85
86
87
88
89
90
91
92
93
94
95
104
105
106
107
108
109
110
111
112
113
114
115
116
117
118
119
120
121
122
123
124
125
126
127
136
137
138
139
140
141
142
143
144
145
146
147
148
149
150
151
152
153
154
155
156
157
158
159
168
169
170
171
172
173
174
175
176
177
178
179
180
181
182
183
184
185
186
187
188
189
190
191
200
201
202
203
204
205
206
207
208
209
210
211
212
213
214
215
216
217
218
219
220
221
222
223
232
233
234
235
236
237
238
239
240
241
242
243
244
245
246
247
248
249
250
251
252
253
254
255
264
265
266
267
268
269
270
271
272
273
274
275
276
277
278
279
280
281
282
283
284
285
286
287
296
297
298
299
300
301
302
303
304
305
306
307
308
309
310
311
312
313
314
315
316
317
318
319
328
329
330
331
332
333
334
335
336
337
338
339
340
341
342
343
344
345
346
347
348
349
350
351
360
361
362
363
364
365
366
367
368
369
370
371
372
373
374
375
376
377
378
379
380
381
382
383
392
393
394
395
396
397
398
399
400
401
402
403
404
405
406
407
408
409
410
411
412
413
414
415
424
425
426
427
428
429
430
431
432
433
434
435
436
437
438
439
440
441
442
443
444
445
446
447
456
457
458
459
460
461
462
463
464
465
466
467
468
469
470
471
472
473
474
475
476
477
478
479
488
489
490
491
492
493
494
495
496
497
498
499
500
501
502
503
504
505
506
507
508
509
510
511

12
Breakdown cause Major breakdown analysis and solution
Product common breakdown comparative chart
The fixture no work
1. Check the power cable whether to connect the fixture, whether the fuse
does burn out.
2. Check the input voltage whether to assign the voltage match with the
fixture.
No sound control
1. Check the address code or the display whether establishes according to
the instruction booklet is the voice control pattern.
2. Check the potentiometer possibly moves is smallest, attempt to adjust
the potentiometer.
Master-slave mode, The
master mode is normal,but
slave mode is not normal
1. Please conformed only one for the master and the master without DMX
be connected, and to set master as sound control or auto pattern.
2. If the Master-slave setting is right but still have problem, please check
the XLR connect cable.
The button malfunction,
does not work.
1. Check the buttons whether to have some button not to have the
normal reset.
The fixture can
bright normally,
but it not controlled
by controller
1. Please check the fixtures' DIP outset address setting whether correctly.
2. Please check the XLR signal cable whether be damage.
The fixtures' brightness
obvious dim
1. Check the LED tubes or the laser already whether to be service life.
2. Check the internal and external optical system whether to be clean.

Table of contents
Other LaserLight Dj Equipment manuals
Popular Dj Equipment manuals by other brands

Chauvet
Chauvet VIP DRIVER Quick reference guide

ColorMaker
ColorMaker Cyclone360 user manual

Chauvet Professional
Chauvet Professional Ovation E-2FC Quick reference guide

thomann
thomann Fun generation PicoSpot 45 user manual

Ibiza sound
Ibiza sound STANDUP-DJ 15-6032 instruction manual

CLS
CLS Sapphire GIII Series manual