LaserLight LL-4WLD RGB User manual

Please read over this manual before operating the light
RoHS
User manual
LL-4WLD RGB
Professional stage animation laser light

TABLE OF CONTENT
Brief............................................................................................................1
Packing list............. .................................................................................1
Installation and safety instruction......................................................................2
Power supply and signal connect.........................................................................3
Safety warning and maintain............................................................19
Specification.........................................................................................19
Opening the package.......................................................................................1
Installation location.........................................................................................2
Installation caution.........................................................................................2
Pack list..........................................................................................................2
Connect the power and control .................................................................................3
Safety warning.............................................................................................19
Maintain.......................................................................................................19
Connect the signal cable............................................................................................3
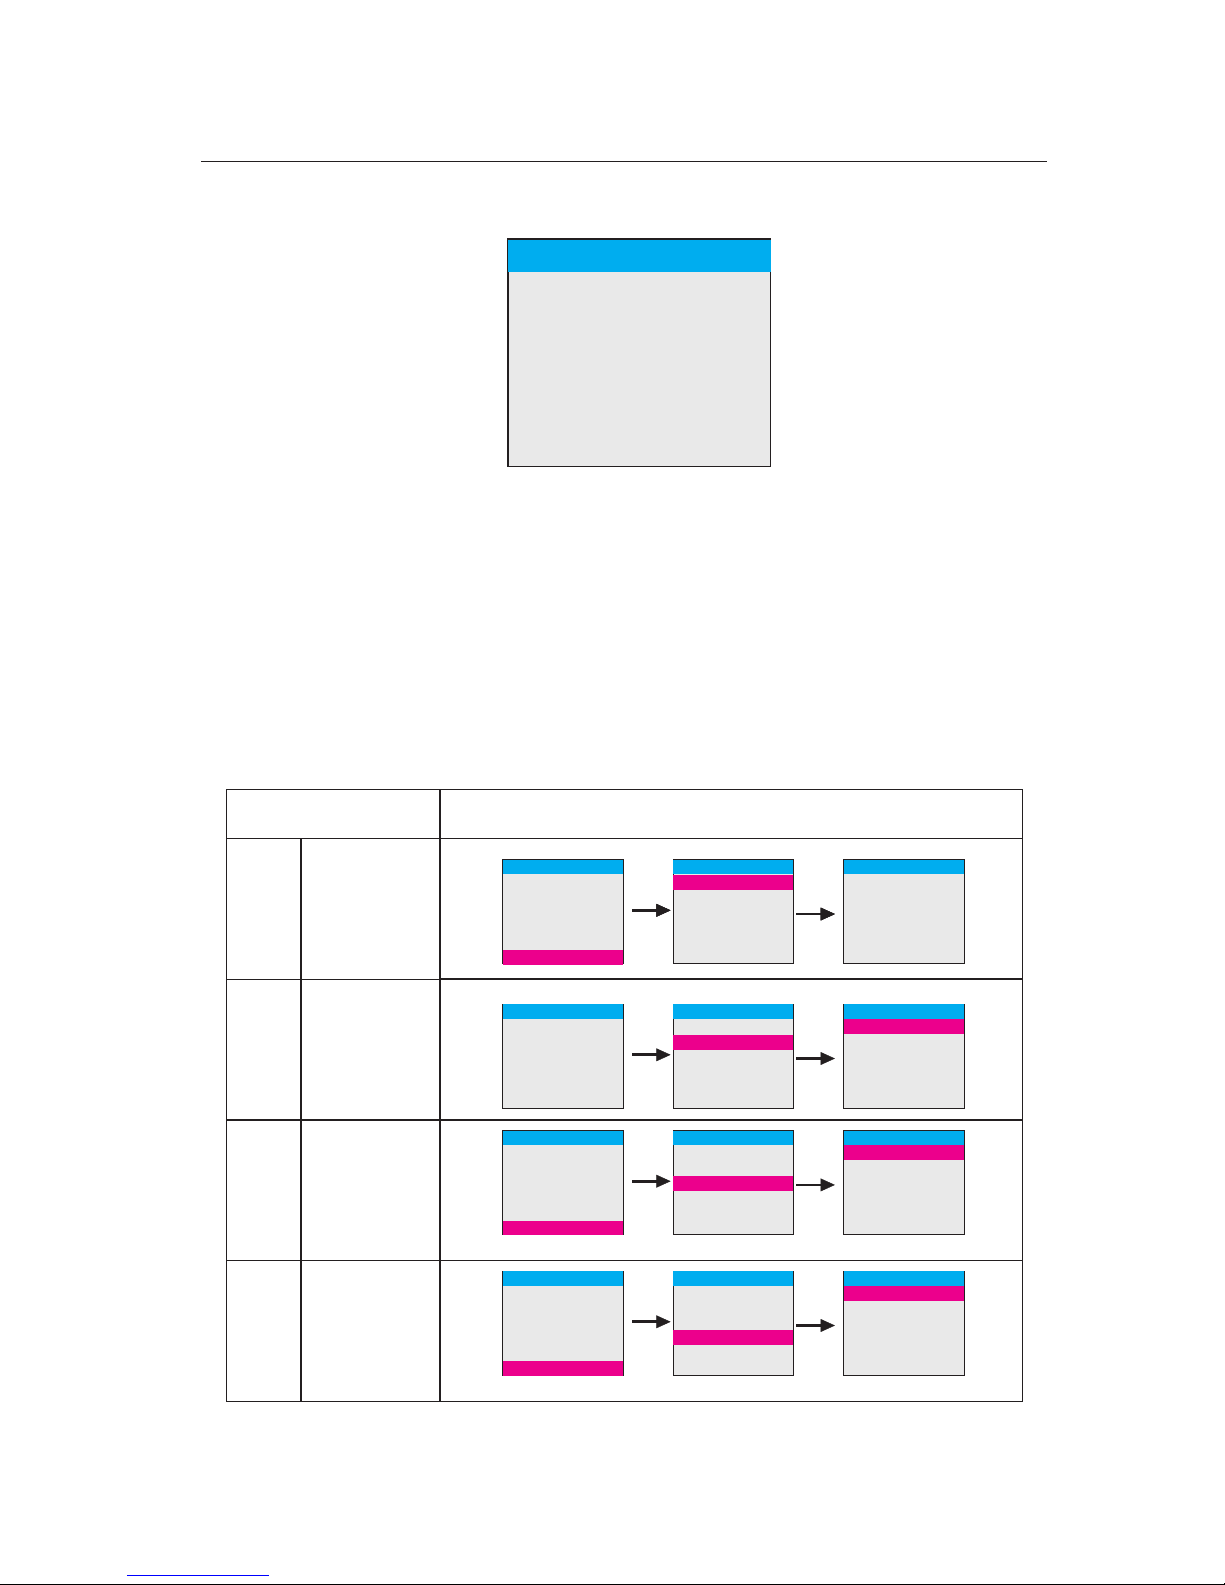
TFT Function display menu setting................................................................6
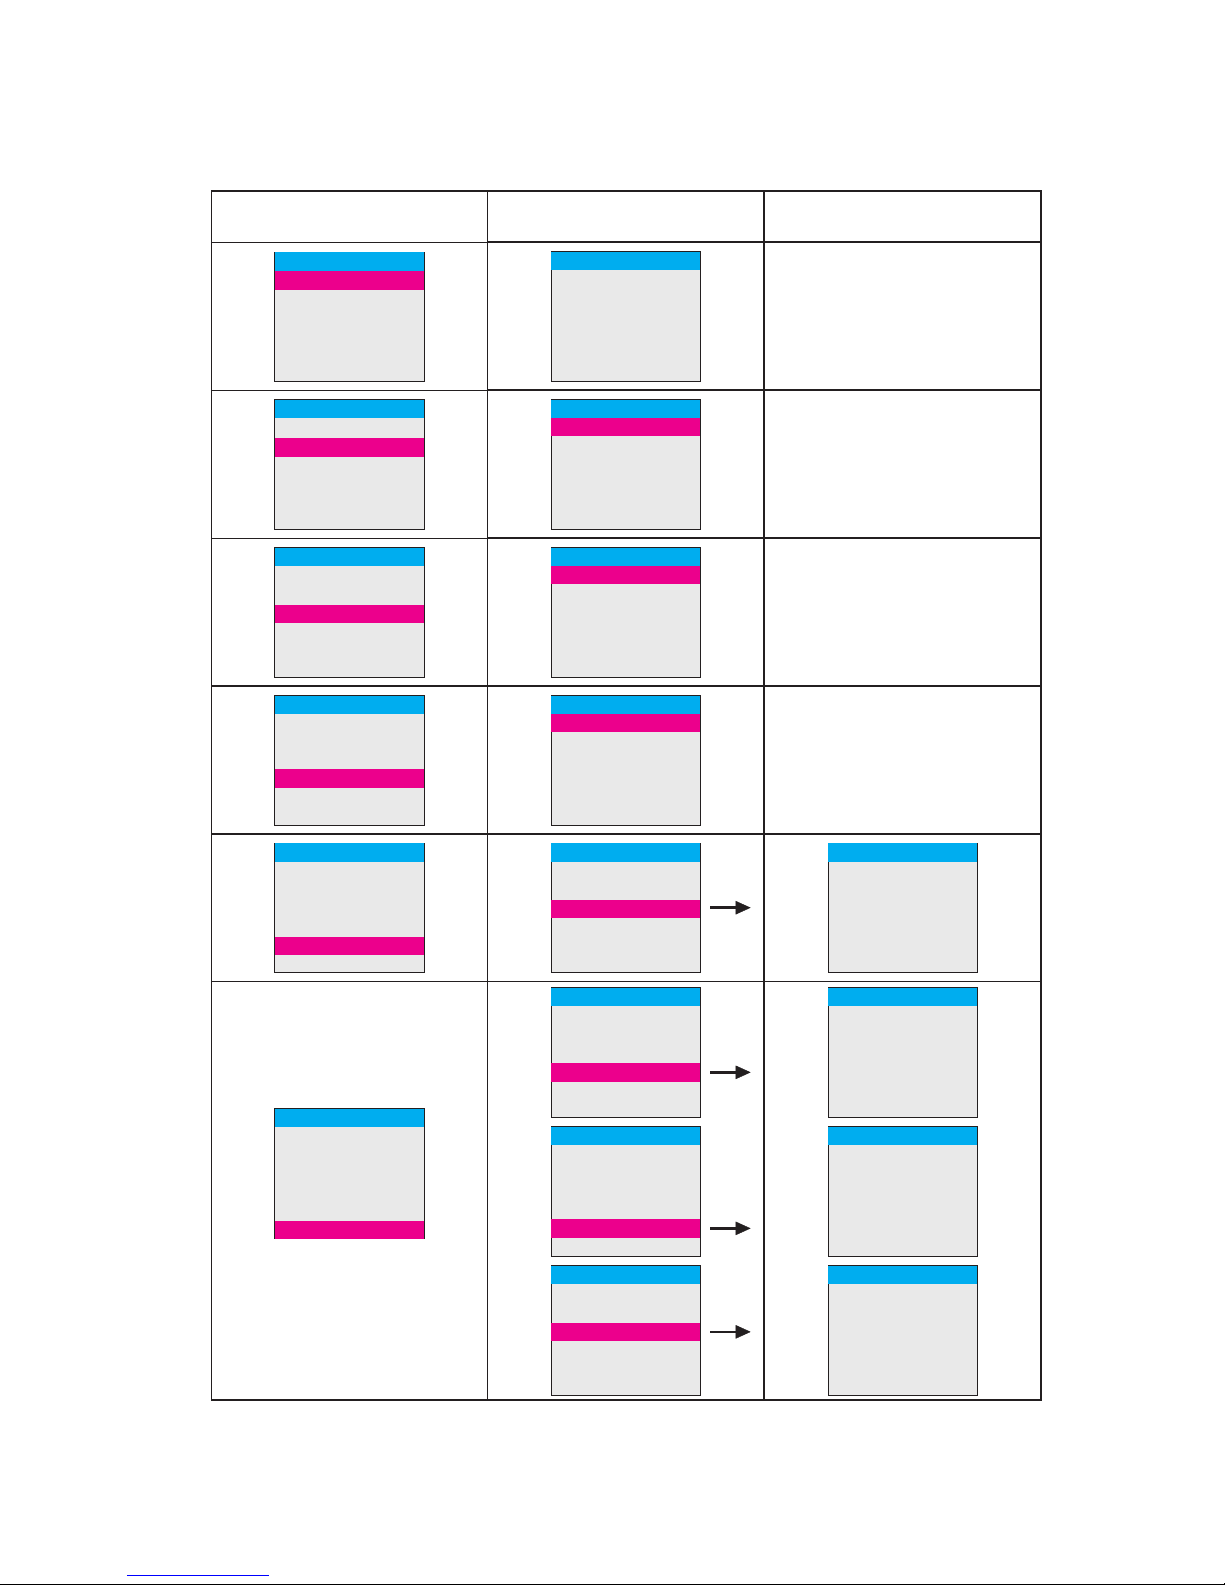
DMX512 control mode...................................................................................7
Operation instruction ............... .........................................................5
13CH mode................................................................................................................7
25CH mode....................................................................................................10
SD card control .............................................................................................16
Product common breakdown comparative chart...................20

1
First、Brief
Thank you for purchasing of our professional show system. We
always try to develop our product with high-tech and high perform ance
to meet your requirement and expectation.
The unit is designed strictly according to the international standard.
The control way is single or master/slave in option.The manual is included
the skill parameter and detail instructions etc. Please read the manual
carefully before using the product.
laser
Second、Packing list
SECURITY WARNINGS
2 - 1 We use the carton to pack normally. You may choose the fly case.
2 - 2 Opening the package
Open the case and take out the enclosed spare parts, remove the drier,
take the unit and put it in a flat place to operate.
D A N G E R
AVOID DIRECT
E X P O S U R E T O B E A M
Avoid evectric Green package
Note: based on the policy of our company constantly upgrade the product improvement and
contained in this manual. Data is likely to change in the future, and will not notice the
alterations, the company keep in Product improvement when change the power of the relevant
specification data. If you want to know the specific upgrades, please contact with sales
department of the company, thank you. The publisher of this manual will not for the information
in this manual is accurate is responsible for, also not due to the information the relevant
consequences of any responsibility.

2
Power line
Projector
The manual
1pcs
1pcs
1pcs
Package List
Third、installation and safety instruction
3 - 1 installation:
1, Installation location
Before the installation, to ensure the stability of the installation
points, can withstand the product weight at least ten times more
than the bearing structure.
2,Installation method
Use two professional lamp hook, M10 bolts to secure the
mounting nut through the lamp comes with fixed; dispensing (or
supplied) through the installation of the safety lock handle and
other hanging objects. When installing the lighting to ensure
stable, ban pedestrians through the installation process under the
lighting. In addition, when the demolition of lighting to cut off the
power supply to ensure the same security, first take the safety rope,
hang down again, at the same time ensure that beneath the
pedestrian safety.
3-2 Caution:
1, the laser beam should avoid direct or indirect fired people's
eyes, and keep a distance between the lamp and combustible
material at least 0.5 m.
2 - 3 Spare parts
With of exception of this equipment, the pacing enclosed as
following

3
4 - 2 Connect the signal cable
The laser light may be controlled the DMX 512 signal. Under sound
and Atuo control. the master/slave can be used. The master/slave mode
is lined by signal line. Connect the DMX-out of the first fixture in the
DMX-chain with the DMX-input of the next fixture. Always connect one
output with the input of the next fixture until all fixtures are connected.
Fourth、power supply and signal connect
4 - 1 Connect the power and control
Use the professional plug to connect the laser light and power cable.
Before installing the unit, please confirm whether the voltage and
frequency indicated on the real panel of laser light. Voltage and frequency
parameters(is matching)
Voltage
Opt
Opt
50Hz 60Hz
Frequency
AC100~240V AC100~120V
50~60Hz
AC200~240V
2, Do not frequent switching of light, so as not to affect the
light
life, and try to avoid prolonged open, ensure that the ambient
temperature does not exceed 35 ℃.
Using before pls must be check power supply link with
earth

4
Caution: Please remember the signal output of last machine must
connect the attached circle plug .The circle plug connect a 120
resistor between 2 feet and 3 feet canon plug. The signal reflects
phenomena can be avoided by using circle plug during DMX 512
signal transfer. (DMX TERMIN ATOR CONNECTION):
PIN 2 PIN 3
21
3
120Ω
Connect a 120 resistor
across2-pin and 3-pin XLR
plug and insert into the
DMX OUT socket on the
last unit in the chain.
The light use 3 feet XLR plug, if the controller you use is 5
feet XLR plug. You must use a inter change line from 5 feet to 3 feet.
See the following. The transform of 3-pin and 5-pin XLR adaptor.
laser
The 3pin and 5pin Canon DMX512 connector circuit
5 pin cannon (input)
Pin 1: GND (SCREEN)
Pin 2: Signal(-)
Pin 3: signal(+)
Pin 4: N/C
Pin 5: N/C
5 pin cannon (output )
Pin 1: GND (SCREEN)
Pin 2: Signal(-)
Pin 3: signal(+)
Pin 4: N/C
Pin 5: N/C
3 pin cannon (input)
Pin 1: GND (SCREEN)
Pin 2: Signal(-)
Pin 3: signal(+)
3 pin cannon (output)
Pin 1: GND (SCREEN)
Pin 2: Signal(-)
Pin 3: signal(+)
First unit Second unit Nth unit
DMX512
Controller
IN
OUT
IN
OUT
IN
OUT
OUT
Control line Control line
- - - - - - - - - - - - - - -

5
五:Operating instructions
TFT display menu Settings, as following:
Main MenuMain Menu
Main Menu
Main Menu
Main Menu
Main MenuMain Menu
Main Menu
Main Menu
Main Menu
Dmx AddressDmx Address
Dmx Address
Dmx Address
Dmx Address
DMX AddressDMX Address
DMX Address
DMX Address
DMX Address
Auto In-playAuto In-play
Auto In-play
Auto In-play
Auto In-play
Auto In-playAuto In-play
Auto In-play
Auto In-play
Auto In-play
Music In-playMusic In-play
Music In-play
Music In-play
Music In-play
Music In-playMusic In-play
Music In-play
Music In-play
Music In-play
SDcard Mode
SDcard Mode
SDcard ModeSDcard Mode
SDcard ModeSDcard ModeSDcard ModeSDcard Mode
SDcard Mode
SDcard Mode
Laser settingLaser setting
Laser setting
Laser setting
Laser setting
Laser settingLaser setting
Laser setting
Laser setting
Laser setting
Main Menu
Dmx Address
Auto In-play
Music In-play
SDcard Mode
Laser Setting
System Setting
System settingSystem setting
System setting
System setting
System setting
System settingSystem setting
System setting
System setting
System setting
DMX AddressDMX Address
Auto In-play
Auto In-play
SDcard Mode
Use button TFT LCD display menu function,easy to use, starting
up auto-loading system software.
Through UP.DOWN choose the desired function.
Through enter,back to confirm choose function,Back To
Previous Menu.
1
2
3
4
DMX512
Auto
In-play
Music
In-play
SDplay
Model TFT display
001001
Fast Beat
Fast Beat
Fast Beat
Medium Beat
Medium Beat
Medium Beat
Slow Beat
Slow Beat
Slow Beat
Animation
Cartoon
Cartoon
The light have six control model: DMX address, auto
in-play, music in-play, SDcard mode, master-
slave,ILDA control mode (If computer ILDA signal
input ILDA signal priority) setting as following:

Main Menu
DMX Address
Auto In-play
Music In-play
SDcard Mode
Laser setting
System setting
Main Menu
DMX Address
Auto In-play
Music In-play
SDcard Mode
Laser setting
System setting
Main Menu
DMX Address
Auto In-play
Music In-play
SDcard Mode
Laser setting
System setting
Laser setting
Color RGB/G
Scan 6~40K
Design >>
TTL Color ON/OFF
Invert X ON/OFF
Invert Y ON/OFF
System setting
Master Setting ON/OFF
Channel Setting 13/25CH
Reset Setting >>
Test Image >>
Common >>
About... >>
System setting
Master Setting ON/OFF
Channel Setting 13/25CH
Reset Setting >>
Test Image >>
Common >>
About... >>
System setting
Master Setting ON/OFF
Channel Setting 13/25CH
Reset Setting >>
Test Image >>
Common >>
About... >>
Test Image
Image ON/OFF
Image ON/OFF
Image ON/OFF
Image ON/OFF
Common
One Beam ON/OFF
Lcd Light 1~5min
Language CH/EN
Easy ILDA ON/OFF
About
Running Time ......
Servicing Time.. . ...
Version.. . ...
Serial......
Auto In-play
Fast Beat
Medium Beat
Slow Beat
Cartoon
Auto In-play
Fast Beat
Medium Beat
Slow Beat
Animation
Main Menu
DMX Address
Auto In-play
Music In-play
SDcard Mode
Laser setting
System setting
DMX AddressDMX Address
001
Main Menu
DMX Address
Auto In-play
Music In-play
SDcard Mode
Laser setting
System setting
6
R Fade 0~255
G Fade 0~255
B Fade 0~255
Zoom 0~255
X Size 0~255
Y Size 0~255
Design
TFT LCD display control panel function menu setting,
as following::
First menu second menu Third menu
Main Menu
DMX Address
Auto In-play
Music In-play
SDcard Mode
Laser setting
System setting
SDcard Mode
Fast Beat
Medium Beat
Slow Beat
Cartoon

7
CH1
0~31
32~47
48~63
64~79
80~95
96~159
160~175
176~239
240~255
1).IPLA13CH model follow
CH1=32~47 or 64~79,when manual control CH3~CH13 valid,
CH1=48~63 or 80~95,when automatic controlCH3~CH13 invalid,
CH1
CH2
CH3
0~31
32~47
48~63
64~79
80~95
0~255
0~15
16~255 each 10 value one pattern
light off
Pattern
each 32 value choose pattern group
each 64 value choose pattern group
pattern group
choose
music manual selection pattern
no music manual selection pattern
light off
light off
light off light off
IPLAY mode
IPLAY mode
SD-PLAY mode
no music manual selection pattern
no music auto effect
music manual selection pattern
music auto effect
no music manual selection pattern
no music auto effect
music manual selection pattern
music auto effect
1、DMX-512 control mode:
CH
CH
Function
Function
value
value
Description
Description
This light of IPLAY mode have 2 kinds channel mode(at
system set of next menu channel number set can choose
channel mode) SD card mode is no effect of channel number
set. SDPLAY just 1 channel mode, mode and instruction as

8
CH5
CH6
CH7 horizontal move speed choose
horizontal move position choose
pattern
horizontal
move
vertical rotating speed choose
vertical rotating angle choose
pattern vertical
rotating
pattern
horizontal
rotating horizontal rotating speed choose
horizontal rotating angle choose
CH4
0~127
0~127
0~127
0~127
128~143
128~143
128~143
128~143
144~159
144~159
144~159
144~159
160~175
160~175
160~175
160~175
176~191
176~191
176~191
176~191
192~207
192~207
192~207
192~207
224~239
224~239
224~239
224~239
208~223
208~223
208~223
208~223
240~255
240~255
240~255
240~255
positive rotation speed choose
rotating angle choose
Pattern rotating

9
0~127
0~127
0~39
128~143
128~143
40~79
144~159
144~159
80~119
160~175
160~175
0~127
120~159
176~191
176~191
128~159
160~199
192~207
192~207
160~191
201~255
224~239
224~239
224~255
208~223
208~223
192~223
240~255
240~255
CH8
CH9
CH11
CH10
zoom size choose
drawing speed choose
strobe
two-way drawing
one-way drawing
one-way re-back drawing
zoom size choose
pattern zoom
wave mode
(the second
channel pattern
mode, when
use wave can
be control
wave moving
direction.)
vertical move speed choose
vertical move position choose
pattern vertical
move
Pattern
gradually
smaller amplitude wave speed
and cycle choose
Small amplitude wave speed
and cycle choose
middle amplitude wave speed
and cycle choose
more amplitude wave speed and
cycle choose
wide amplitude wave speed and
cycle choose
pattern wave moving speed and
amplitude choose

10
0~127
128~255
0~7
24~31
48~55
128~143
208~223
16~23
40~47
64~127
192~207
160~175
240~255
8~15
32~39
56~63
176~191
144~159
224~239
CH12
drawing speed choose
strobe
default color
RG
B
Swap color change
color table change
RGB
G
RB
7 color change
three colors change
color table flow
R
GB
Swap color
7 color flow change
three colors flow change
drawing effect speed choose
CH13 color mode
2).IPLA25CH model follow
CH1=32~47 or 64~79,when manual control CH3~CH25 valid,
CH1=48~63 or 80~95,when automatic controlCH3~CH25 invalid,
CH1
CH2
CH3
0~31
32~47
48~63
64~79
80~95
0~255
0~15
16~255 each 10 value one pattern
light off
Pattern A
each 32 value choose pattern group
each 64 value choose pattern group
pattern A group
choose
music manual selection pattern
no music manual selection pattern
light off
light off
IPLAY mode
CH Function value Description
pattern point

11
CH5
CH6
CH7 horizontal move speed choose
horizontal move position choose
pattern A
horizontal
move
vertical rotating speed choose
vertical rotating angle choose
pattern A
vertical
rotating
pattern A
horizontal
rotating horizontal rotating speed choose
horizontal rotating angle choose
CH4
0~127
0~127
0~127
0~127
128~143
128~143
128~143
128~143
144~159
144~159
144~159
144~159
160~175
160~175
160~175
160~175
176~191
176~191
176~191
176~191
192~207
192~207
192~207
192~207
224~239
224~239
224~239
224~239
208~223
208~223
208~223
208~223
240~255
240~255
240~255
240~255
positive rotation speed choose
rotating angle choose
Pattern A
rotating

12
0~127
0~127
0~39
128~143
128~143
40~79
144~159
144~159
80~119
160~175
160~175
0~127
120~159
176~191
176~191
128~159
160~199
192~207
192~207
160~191
201~255
224~239
224~239
224~255
208~223
208~223
192~223
240~255
240~255
CH8
CH9
CH11
CH10
zoom size choose
smaller amplitude wave speed
and cycle choose
Small amplitude wave speed
and cycle choose
middle amplitude wave speed
and cycle choose
more amplitude wave speed and
cycle choose
wide amplitude wave speed and
cycle choose
pattern wave moving speed and
amplitude choose
drawing speed choose
strobe
two-way drawing
one-way drawing
one-way re-back drawing
zoom size choose
pattern A zoom
vertical move speed choose
vertical move position choose
pattern A
vertical move
Pattern A
gradually
wave A mode
(the second
channel pattern
mode, when
use wave can
be control
wave moving
direction.)

13
0~127
128~255
0~7
24~31
48~55
128~143
208~223
16~23
40~47
64~127
192~207
160~175
240~255
8~15
32~39
56~63
176~191
144~159
224~239
CH12 drawing speed choose
strobe
default color
RG
B
Swap color change
color table change
RGB
G
RB
7 color change
three colors change
color table flow
R
GB
Swap color
7 color flow change
three colors flow change
drawing effect speed choose
CH13 color A mode
pattern A point
CH14
CH15
0~255
0~15
16~255 each 10 value one pattern
light off
Pattern B
each 32 value choose pattern group
each 64 value choose pattern group
pattern B group
choose
CH16
0~127
128~143
144~159
160~175
176~191
192~207
224~239
208~223
240~255
positive rotation speed choose
rotating angle choose
Pattern B
rotating

14
CH17
CH18
CH19 horizontal move speed choose
horizontal move position choose
pattern B
horizontal
move
vertical rotating speed choose
vertical rotating angle choose
pattern B
vertical
rotating
pattern B
horizontal
rotating horizontal rotating speed choose
horizontal rotating angle choose
0~127
0~127
0~127
128~143
128~143
128~143
144~159
144~159
144~159
160~175
160~175
160~175
176~191
176~191
176~191
192~207
192~207
192~207
224~239
224~239
224~239
208~223
208~223
208~223
240~255
240~255
240~255
0~127
128~143
144~159
160~175
176~191
192~207
224~239
208~223
240~255
CH20 vertical move speed choose
vertical move position choose
pattern B
vertical move

15
0~127
0~39
128~143
40~79
144~159
80~119
160~175
0~127
120~159
176~191
128~159
160~199
192~207
160~191
201~255
224~239
224~255
208~223
192~223
240~255
CH21
CH23
CH22
zoom size choose
drawing speed choose
strobe
two-way drawing
one-way drawing
one-way re-back drawing
zoom size choose
pattern Bzoom
Pattern B
gradually
48~55 B
0~127
128~255
0~7
24~31
16~23
40~47
8~15
32~39
CH24 drawing speed choose
strobe
default color
RG
RGB
G
R
GB
pattern B point
smaller amplitude wave speed
and cycle choose
Small amplitude wave speed
and cycle choose
middle amplitude wave speed
and cycle choose
more amplitude wave speed and
cycle choose
wide amplitude wave speed and
cycle choose
pattern wave moving speed and
amplitude choose
wave B mode
(the second
channel pattern
mode, when
use wave can
be control
wave moving
direction.)

16
128~143
208~223
64~127
192~207
160~175
240~255
56~63
176~191
144~159
224~239
Swap color change
color table change
RB
7 color change
three colors change
color table flow
Swap color
7 color flow change
three colors flow change
CH25 color B mode
drawing effect speed choose
3).SD PLAY 14 Channel model follow:
0~31
32~95
96~111
112~127
128~143
144~159
160~175
176~191
192~207
208~223
224~239
240~255
standard range
1~8CH value
extended range
1~12CH value
full range
1~14CH value
folder pattern loop 1~2CH value
basic range
1~4CH value
standard range
1~8CH value
extended range
1~12CH value
full range
1~14CH value
music triggered folder pattern
loop
basic range
1~4CH value
light off
light off
IPLAY mode
SDIPLAY
mode
CH1
Channel
Function value Description
No music
triggered
manual
choose pattern
Music
triggered
manual
choose pattern
BASIC RANGE

17
0~255
0~15
0~15
16~255
16~31
32~255
each 32 values choose 1 page
off
100%
each 10 value pattern
pause
25%~200%
folder
file
display speed
CH2
CH3
CH4
CH13
CH14
scanner k
color
0~31
32~223
32~255
0~31
224~255
default
default
RED-ORANGE-YELLOW-
LIME-REEM-CYAN-BLUE-
PURPLE-PINK-RED-WHITE
6K~29K
30K
CH5
CH6
CH9
CH7
CH10
CH12
CH8
CH11
light(TTL
mode can not
use it)
zoom
rotating angle
X size
X position
Valid visible
point
Y size
Y position
0~255
0~255
0~255
0~255
0~255
0~255
0~255
0~255
100% 0%
100% 0%
0° 360°
100% 0%
-100% 100%
100% 0%
100% 0%
-100% 100%
2、Automatic play mode
In LCD display by UP, DOWN keys to select
"Auto Play", then the laser light AutoPlay
choreographed patterns, fast-paced, medium-paced,
slow-paced, animation effect,four different modes to
choose.
STANDARD RANGE EXTENDED RANGE FULL RANGE

18
3、Music automatic play mode
In LCD display by UP,DOWN keys to select”music automatic play
mode”,then Voice activated by the built-in microphone,and lighting
built-in fast paced, medium-paced, slow paced, animation effect four
modes, select any effect of the music transformation color and pattern.
4、SD card play mode
In TFT LCD display by UP,DOWN select SD card mode.
a).looping play: select the corresponding folder pattern file loop
playback. ON for Loop play, OFF for single file play.
b).music trigger: select trigger pattern file of play mode,ON for music
trigger, OFF for automatic play.
c).catalog: SD card can be identification 8 peaces folder. Folder only
for English or number. By UP,DOWN keys to choose folder, below the
screen can be display folder name and file name.
d).folder: each folder can put 48 peaces ILDA form of pattern file.
File only for english or number. By UP,DOWN keys to choose pattern
file. If Loop play for ON, means loop play all file.(choose single file is
invalid.) if choose single file play need re-back loop play for OFF is ok.
5、master-slave mode
Master---In LCD display by UP,DOWN keys to select "system
set"menu master as ON. Then light as master.
Slaver----- in LCD display by “UP ,DOWN” keys to select”system
set”menu master as OFF( default off),press BACK key ,then select
“DMX address” menu DMX address as 001. Then the light as slaver.
6、ILDA control mode
If use DB25 ILDA single cable link laser software or laser light,
laser light will be priority selection ILDA single . No need any set. If
use RJ45 internet cable link, need use Lightful ILDA 1 for 4 controller
box then in LCD display press UP,DOWN select” system set” menu
ILDA switch as ON, Then can link it.(default off).
Table of contents
Other LaserLight Dj Equipment manuals
Popular Dj Equipment manuals by other brands

Chauvet
Chauvet VIP DRIVER Quick reference guide

ColorMaker
ColorMaker Cyclone360 user manual

Chauvet Professional
Chauvet Professional Ovation E-2FC Quick reference guide

thomann
thomann Fun generation PicoSpot 45 user manual

Ibiza sound
Ibiza sound STANDUP-DJ 15-6032 instruction manual

CLS
CLS Sapphire GIII Series manual