LaserLine QUAD 4000 User manual

QUAD 4000
LINE, SQUARE, LEVEL & PLUMB
ALL IN ONE – ALL AT ONCE.
U.S. Patent No. 7266897 & Patent Pending Designed and built in Redmond, Oregon
ONE MAN LAYOUT AND CONTROL
OWNERS MANUAL


1QUAD 4000
CONTENTS
System Overview ......................................................................................................2, 3
Quad 4000 Controls and Features..............................................................................4
LineLokr™Controls and Features...............................................................................5
What happens when you power up the Quad 4000 and LineLokr..................6, 7
Agular Accuracy and how setup can affect it .......................................................8
Setup considerations when using the LineLokr ....................................................9
Let’s get started – How to set it up....................................................................10, 11
Checking for square calibration (vertical) ............................................................12
Checking for level calibration (horizontal).............................................................13
Laser compliance and safety ...................................................................................13
FCC declaration ...........................................................................................................14
Warranty .......................................................................................................................14
Specifications ..............................................................................................................14

2QUAD 4000
The Quad 4000 long range layout and control laser system with LineLokr Technology (LLT) enables you to
square your job, control elevation, snap your lines and plumb a structure with just one person, using just one
laser, and often from one setup. The Quad 4000 was designed from the ground up to provide accurate layout
and control functions while at the same time being easy to use.
LineLokr Technology (LLT) is the cornerstone of the system for layout, Line control, squaring and plumbing. The
LineLokr communicates with the Quad 4000 laser automatically driving the laser to centerline and holding it
there all day long. Line, square and plumb will not drift off because it is always being monitored and corrected
back to line via the LineLokr communication.
THE LASERLINE 4000 QUAD PROVIDES
• Level control covering a 1500 foot radius
• Line Control to ± 1/16 inch @ 600 feet
• Squaring left and right from center to
within ± 1/16 inch per 100 feet
• Plumb control to within ± 3/32 per 100
vertical feet
The Quad will automatically default to
vertical control when turned on. You
can select horizontal only or vertical
and horizontal using the “Mode”
button on the far left.
VERSITAL | ACCURATE | EASY TO USE
THE SYSTEM OVERVIEW

3QUAD 4000
2SQUARE
Once locked to your far point, the Quad 4000
then simultaneously transmits a rotating
plane of light at 90° angle left and right from
your baseline.
This creates a 600 foot square left and right
of centerline for any squaring application
such as building, structures, foundations, etc.
90°
90°
600’
3PLUMB
Since the Quad 4000 produces a vertical plane of
light along your baseline in front of the laser, plus
a vertical plane of light both left and right at 90°,
it allows you to plumb two sides of a structure
simultaneously from one setup. The Quad 4000
not only plumbs, but squares and controls rack
along the the entire vertical surface of your
structure. For shaft work, it provides plumb,
square and rack control on all four sides of the
interior wall structure at the same time.
ALL IN ONE, ALL AT ONCE.
Square your job, control elevation, snap your lines and plumb the structure with just one man at one time, with one
laser, from one setup. It’s easy to use and accurate!
LINE LOCKING
The Quad 4000 sets up on a tripod like a standard
instrument. It has a downward pointing laser
plummet through the center of the unit, allowing
you to easily get over your point. No offsets!
Once rough aimed within its line adjust limit, the
system will create a vertical plane forward of
the Quad 4000 that will automatically seek the
LineLokr module at your second point, lock on,
and then stay locked onto your far point. Line can
be locked up to 600 feet!
1
600’
41, 5 0 0 ’ 1, 5 0 0 ’
LEVEL
While the Quad 4000 is producing line and square,
it can also transmit a 360° level plane over the
entire job site. This allows for multiple uses. A
single person can establish line, as well as grade,
in applications such as screed lines, foundation
work and setting templates to name a few.
THE SYSTEM OVERVIEW

4QUAD 4000
NOTE: Automatic Shutoff Feature: If after initial
setup, the Quad 4000 is bumped or moved, the
system shuts down to avoid line, square, plumb or
level errors from occurring.
!
12
13
15
16
17
18
14
2
6 8
7
11
910
34
5
1
43
5
18
19
1. Power Button: System defaults to vertical
and will start “seeking” the LineLokr (LL)
automatically. If LineLokr is not turned on,
the display reads
“No Signal”
2. Mode Button: You can select “Horizontal
Mode” or “Vertical and Horizontal Mode”
by toggling the button
3. Mode Status: Indicates what mode you
are in 1 Vertical Mode, 2 Horizontal Mode, 3
Vertical & Horizontal
4. Battery Status: Indicates approximate
battery life
5. Self-Leveling Status: Indicates if unit is in
process of leveling, or if it is level
6. Manual Line Mode Button: The Quad 4000
can manually be adjusted for line if LineLokr
is not used
7. Manual Line Left: With the Quad in
“Manual Line Mode”, depressing this
button drives laser to the left
8. Manual Line Right: With the Quad in
“Manual Line Mode”, depressing this
button drives laser to the right
9. Laser Plumb Bob: Used to set Quad over a
point when in vertical & horizontal mode or
vertical only mode. Plumb- bob laser shuts off
after 3 minutes to save battery power
10. 5/8x11 Mount: On bottom side of Quad for
tripod mounting
11. Battery Door Knob: Turn ¼ turn to left
to open door (Takes 4ea. D cell Alkaline
batteries)
12. Horizontal (Level) Exit Window: Provides
360° level control for your jobsite
13. Vertical Laser Exit Windows: Provides line,
square and plumb control for your jobsite
14. Bulls Eye Bubble: For leveling to bring the
Quad within its self-leveling range
15. Sighting Device: For aiming the Quad to the
LineLokr
16. Communication Antenna: Receives signal
from the LineLokr to drive laser left or right
for centerline
17. Molded Carrying Handle: Allows easy and
sure handling of the Quad 4000
18. LCD Display: Displays function status of the
Quad 4000
19. Radio Signal Strength: Displays signal
strength between Quad and LinLokr™
QUAD 4000 CONTROLS & FEATURES
Vertical laser exit
windows on the
front, rear, left
and right

5QUAD 4000
LINELOKR™TECHNOLOGY (LLT) AUTOMATICALLY LOCKS YOUR
LASER ONLINE AND KEEPS IT THERE UP TO 600 FEET AWAY.
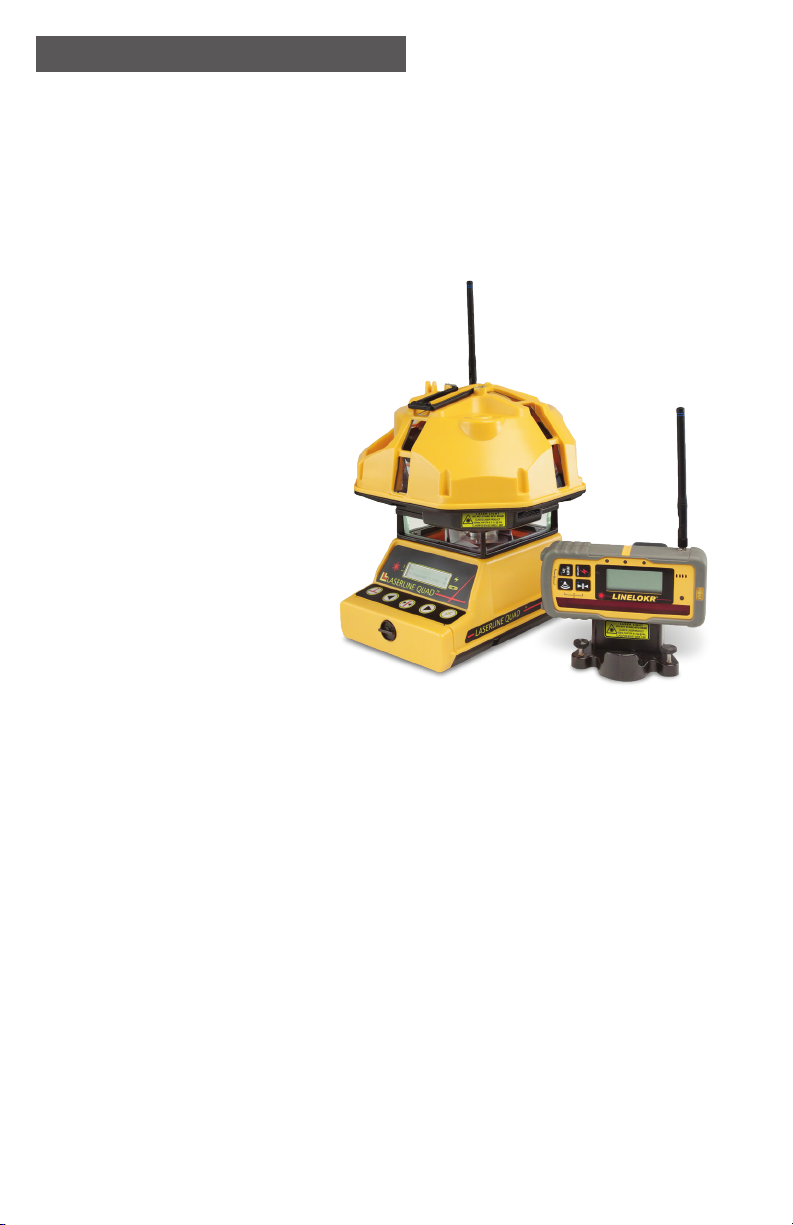
LLT provides a two-way communication between the Quad 4000
Laser and the LineLokr Line Control Module for vertical control
applications such as plumb, squaring and line layout.
LLT allows you to setup your laser at one point and then merely
push a button to obtain line. The Quad 4000 and LineLokr
communicate via a special radio link causing the Quad 4000 to
automatically drive itself to centerline and lock onto your far
point. The Quad 4000 and LineLokr continuously communicate
to maintain centerline and will not drift off due to wind and
temperature changes throughout the day.
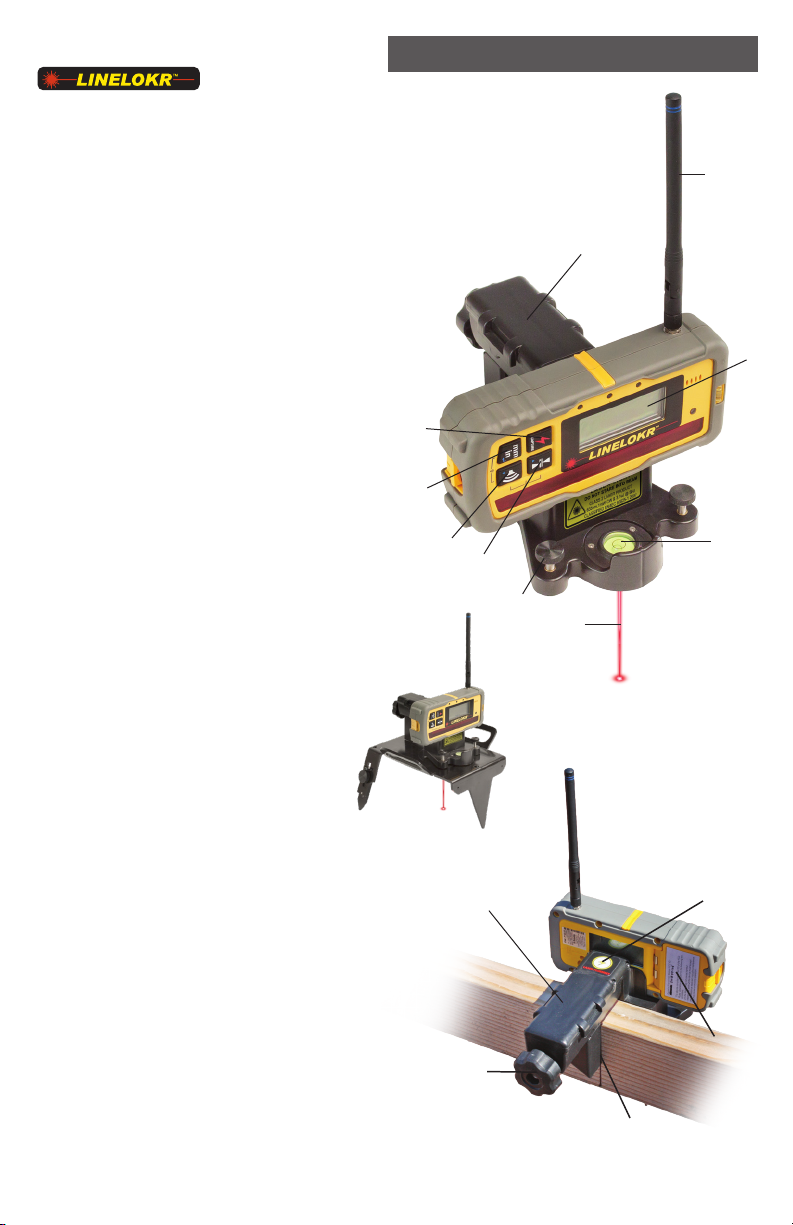
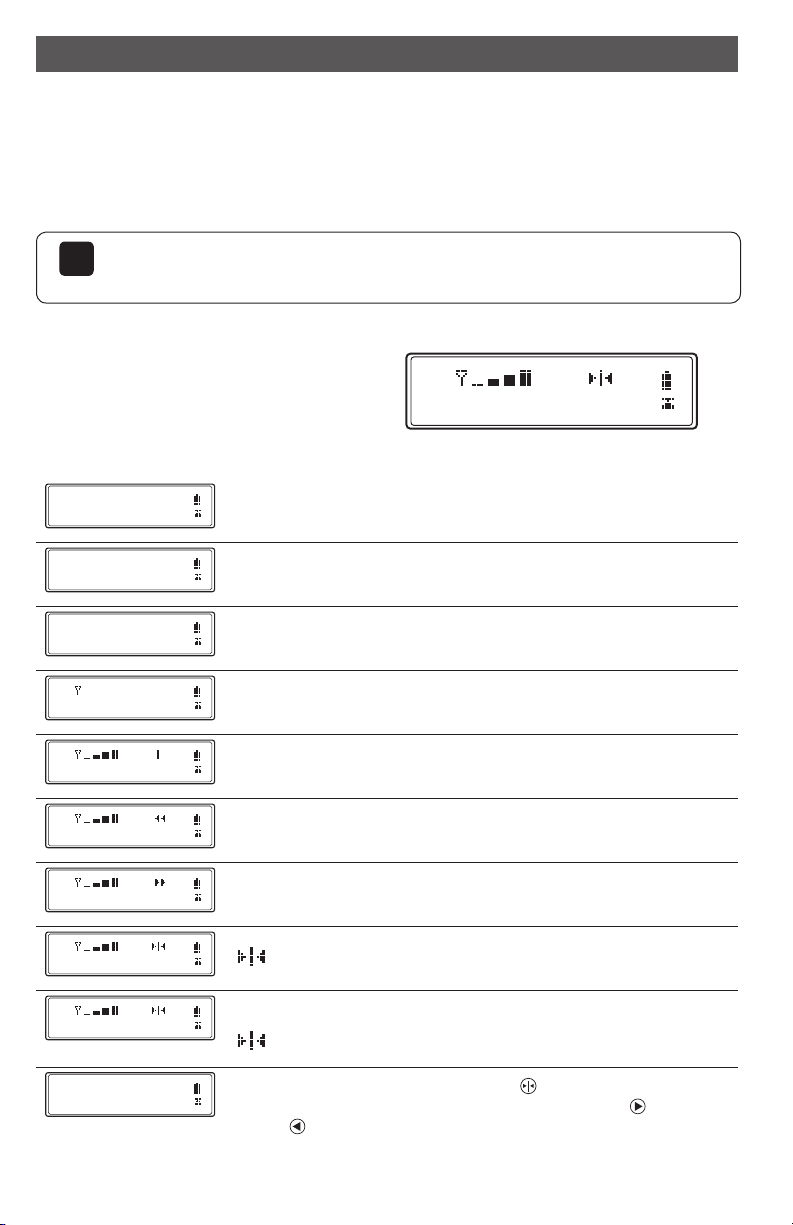
1. Power Button: Depress to activate LineLokr and
communicate with the Quad 4000 (When first
activated, unit will Self Test Mode 4 seconds)
When turning off, hold power button down for two
seconds
2. MM/Inches Button: Changes display only – Not
operational in LineLokr
3. Speaker Button: Increase or decrease volume
4. Widen/Narrow Deadband Button: Regardless of the
LCD display, the LineLokr will continue to lock to the
highest possible accuracy (LineLokr accuracy is
not affected by deadband setting)
5. LCD Display: Indicates whether Quad 4000 is
driving left, driving right or is on center and locked
on line.
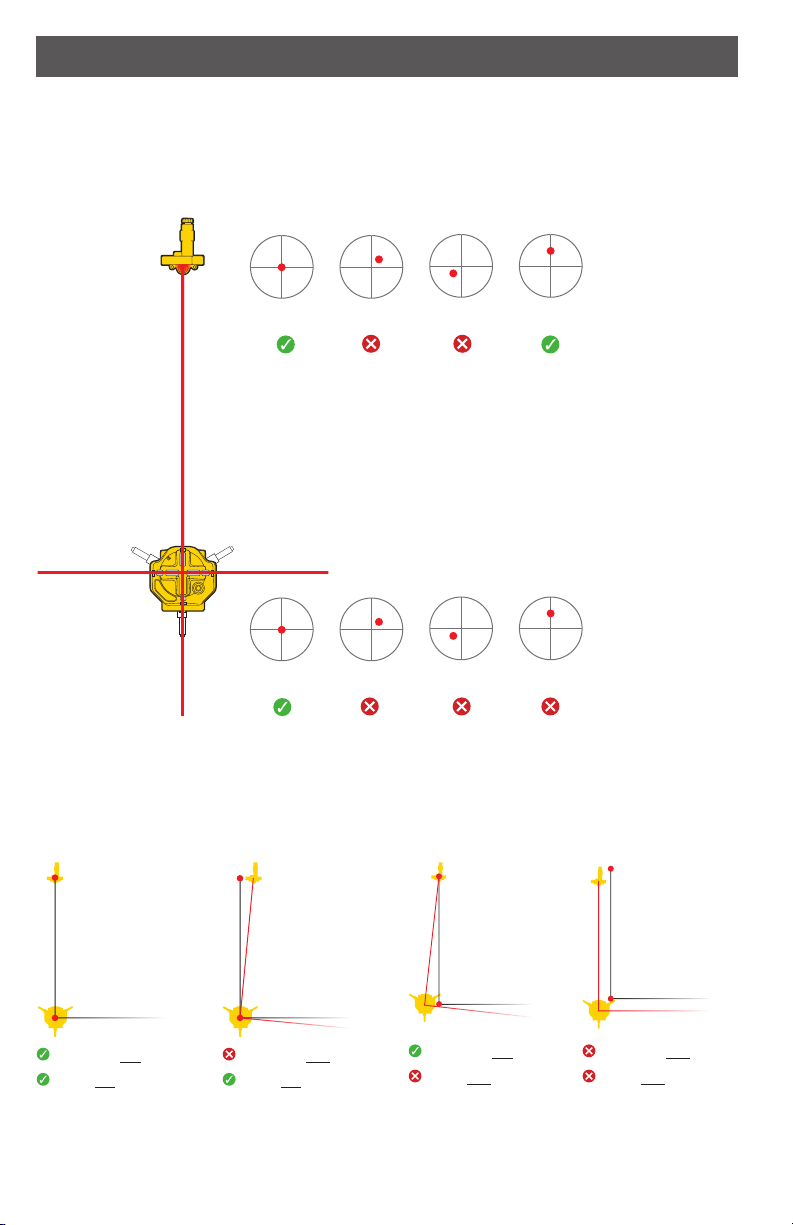
6. Leveling Screws: Used to level the bulls eye bubble
when the LineLokr is mounted on a tripod in order to
get the laser plumb bob (8) over your point
7. Bulls Eye Bubble: Used when LineLokr is
mounted to tripod or floor to insure laser
plumb bob is plumb and over your point
8. Laser Plumb Bob: For tripod set up, allows
you to set LineLokr over your point
9. Laser Plumb Bob Battery Door Access:
For laser plumb bob battery access (4ea. Alkaline
batteries)
10. Laser Plumb Bob Power Button: Activates laser
plumb bob; Automatically turns off after 3 minutes
to save battery power
11. Batter Board Line Indicator: Lines up with line
reference on the batter board to get LineLokr on
line
12. Batter Board Lock Knob: Used to attach and
tighten LineLokr to batter board
13. LineLokr Battery Door: Allows access to LineLokr
batteries (2ea. AA Alkaline batteries)
14. LineLokr Communication Antenna: Sends Line
control information to Quad – drive right, drive left
for centerline and “locked on”
1
14
3
6
8
9
7
5
10
13
11
12
9
2
4
LINELOKR CONTROLS & FEATURES

6QUAD 4000
When powered up, the Quad will automatically default to vertical mode control functions.
1. The Quad will start self-leveling and the downward shooting laser plumb bob will be activated.
2. Only the vertical laser coming out of the front of the Quad will come on until it locks on to the LineLokr at
centerline. Once line is locked, and the Quad has leveled, then all vertical planes are activated. This is
a safety feature to insure that someone cannot use the vertical reference until the Quad is in its proper
alignment, line locked, and level.
Vert Mode
*
Quad 4000 is providing line, square and plumb only. (Quad 4000 defaults to this
mode when powered up)
Horiz Mode
*
Quad 4000 is providing level control only.
Vert + Horiz
*
*Quad 4000 is providing line, square, plumb and level.
No Signal
*
*
Quad 4000 and LineLokr are not communicating.
Seeking Line
*
*
Briefly displayed when the Quad 4000 and LineLokr are communicating.
Seeking Left
*
*
Laser is driving to the left looking for the LineLokr.
Seeking Right
*
*
Laser is driving to the right, looking for LineLokr.
Locking Line
*
*
Quad 4000 has found the LineLokr and is driving to center.
(Flashes until locked on.)
Line Locked
*
*
Quad 4000 is locked on to line and will continue to
correct to center until shut off.
(Steady when locked on.)
Manual Line
*Is activated by depressing the center button Quad will not automatically
seek line. Line must be obtained by pressing to drive line right and to drive
line left when using a standard laser detector instead of the LineLokr to
establish line.
QUAD DISPLAY INFORMATION
Locking Line
*
*
THE QUAD DISPLAY STATUS
NOTE: If the Linelokr is not powered up then the Quad 4000 will display “No Signal.” Once you power up the
Linelokr the display will briefly show “Seeking Line.” This lets you know that the laser and the LineLokr are
communicating and will show you the strength of the radio communication between the Quad and the Linelokr.
!
WHAT HAPPENS WHEN YOU POWER UP THE QUAD AND LINELOKR?

7QUAD 4000
AUTO LINE RESET FEATURE
If the signal between the Quad 4000 and the LineLokr is blocked, the display will read “NO SIGNAL” then
after one minute the system will shut down and then begin automatically searching for line again. During
the searching process time the 90° lasers are shut off so that you cannot take an inaccurate shot. Once
the Quad 4000 is again locked to line, then the 90° beams are reactivated and you’re ready to go back to
squaring or plumbing.
(This function does not work if the unit is in the manual line mode)
QUAD 4000 KNOCKED/DISTURBED AUTO SHUT DOWN FEATURE
If the quad 4000 is operating in the “Vertical Mode” and gets jostled or disturbed, the system will shut
down, so that no bad line or grade shots can be taken.
The Quad 4000 must then be reset which allows you to insure that the Quad is directly over your point for
maximum line, square and plumb accuracy.
WHAT HAPPENS WHEN YOU POWER UP THE QUAD AND LINELOKR?

8QUAD 4000
1. The accuracy of the Quad 4000 being ± 1/16 per 100 feet
2. How close you are on your set up to having The Quad 4000 and The LineLokr DIRECTLY over your point
ANGULAR (SQUARE) ACCURACY ON THE JOBSITE IS PRIMARILY AFFECTED BY TWO THINGS:
FOR LINE, SQUARING AND PLUMB, GET TO THE POINT!
GET DIRECTLY OVER YOUR POINT OR YOU WILL BE OFF
LINELOKR ON POINT
QUAD ON POINT
LINELOKR ON POINT
QUAD OFF POINT
LINELOKR OFF POINT
QUAD OFF POINT
LINELOKR OFF POINT
QUAD ON POINT
LINELOKR
QUAD
4000
YES NO NO YES
YES NO NO NO

9QUAD 4000
SETUP CONSIDERATIONS WHEN USING THE LINELOKR
The LineLokrTM is a control device that communicates with the Quad 4000 via radio transmission. When the Quad
4000 receives a signal from the LineLokr the Quad 4000 will begin to search left and right to find the LineLokr. Once
the Quad 4000 laser strikes the active photocell of the LineLokr the Quad will slowly drive to the center and lock on.
The normal operating range of the LineLokr is 600 feet assuming that the Quad 4000 and the LineLokr are both
about three to four feet or more off the ground (mounted to tripods)
THE ACTUAL RANGE CAN VARY DEPENDING ON CONDITIONS SUCH AS:
• HEIGHT OFF THE GROUND (HIGHER IS BETTER)
• SPARKING OR WELDING OPERATION NEARBY
• IN SOME CASES, THE TYPE OF OUTDOOR LIGHTING
• HIGH WINDS BUFFETING THE LASER AND LINELOKR
• RADIO INTERFERENCE FROM AN OUTSIDE SOURCE
TOTAL LINE ADJUST LEFT AND RIGHT AT DISTANCE
500’
10’
8’
6’
4’
2’
10’
8’
6’
4’
2’
400’
300’
200’
100’
NOTE: The shorter the distance from the Quad to the LineLokr the more critical the rough aiming. LineLokr time
is dependent on distance, aiming, ambient temperature and battery power. Normally The Quad 4000 will line
lock in about one or two minutes.
!
NOTE: When mounting the LineLokr to a tripod, use a standard tribrach and 5/8 thread tribrach adapter. Level
tribrach using bulls eye bubble on the tribrack, disregarding the bubble on the LineLokr.
!

10 QUAD 4000
YOU ARE READY TO GO TO WORK!
SEEKING LEFT/RIGHT LOCKING LINE LINE LOCKED
DISPLAY WILL READ:
ALINE, SQUARE & PLUMB: YOU CAN SQUARE LEFT AND RIGHT FROM YOUR BASE LINE.
LineLokr
Quad
90° 90°
LineLokr
Quad
90°
LineLokr
Quad
90°
SQUARE LEFT SQUARE RIGHT SQUARE LEFT & RIGHT
1Set up LineLokr on centerline of far point, turn on
power and raise antenna.
If using a tripod, make sure the LineLokr bullseye
bubble is level and the plumb bob laser spot is
directly over your point.
2Set up Quad at corner point that you want to
square off of or center point to square left and
right at one time as illustrated above.
3Power up the Quad 4000 and make sure the
antenna is in the upright position. When powered
up, the Quad will automatically default to the
‘VERTICAL’ mode for the line, square and plumb
applications.
4Level the bullseye bubble on the Quad by
extending or contracting the tripod legs.
5Adjust the Quad directly over your point using the
laser plumb bob (readjust tripod if necessary to
get over point)
6Aim the Quad at the LineLokr using sighting device
(recheck and make sure you are still directly over
your point) The Quad 4000 will automatically seek
the LineLokr and lock on to line. Once locked on,
the Quad will transmit both vertical lasers for line,
square and plumb.
NOTE: The key to achieving the most precise results for line, squaring and plumb applications is making sure the
Quad 4000 is directly over the center point and the LineLokr is directly on centerline at your far point.
!
LET’S GET STARTED

11QUAD 4000
90°
90°
Follow steps 1- 2in A(reverse side), but after 3powering up with Quad 4000, depress (mode
button) until display reads “Vert + Horiz” then follow steps 4, 5and 6.
LINE, SQUARING, PLUMB AND LEVEL (ALL FUNCTIONS AT ONCE)
C
LEVELING ONLY: FOR ALL LEVELLING TASKS
B
1Set up Quad 4000 on the tripod and level Quad bulls eye bubble by extending or contracting the tripod
legs
2Power up Quad
3Using “Mode” button toggle until “Horiz Mode” is displayed on the control panel. Quad 4000 will
automatically self-adjust to level. Once level, the horizontal laser will begin transmitting a 360° signal.
(Self-leveling time is about 15 seconds)
LET’S GET STARTED

12 QUAD 4000
Using the Quad 4000 and
the LineLokr, strike a line at
least 200 feet (400+ is better)
and mark both ends and
midway point
NOTE: Always use the
finest “on-line” setting
on your laser detector for
establishing all your line
reference points in steps
1 through 5.
NOTE: Angle error read at points A &
B will be 2 times the true error. (i.e., 1/4
inch off at point A would actually be 1/8
in 200 feet, or 1/16 in 100 feet.)
LINELOKR
A
C
B
400
QUAD Set Quad at middle
point on point (C)
Relock to LineLokr at
point (B)
A
C
B
LINELOKR
200
200
QUAD
1
LINELOKR
A
CD
B
200
200
200
QUAD
From (C) mid point, go out 200 feet
to left and mark your 90° at point
(D) using a laser detector
3
A
CD
B
QUADLINELOKR
Check here
Check here
Using a laser detector, go to (A) and (B) and measure where the
laser is relative to your (A) and (B) points. This will indicate your
square accuracy over the distance from the Quad. (i.e. at 200 feet
1/8 inch= 1/16 per hundred or 10 arc seconds accuracy)
5
A
CD
B
QUADLINELOKR
Move LineLokr to (D) point.
Rotate Quad aiming to LineLokr
and lock on (Be sure the Quad
is still over the point!)
4
2
NOTE: Insure that you are precisely establishing your points and that you are precisely setting up over those
points in order to obtain maximum accuracy for this field calibration check.
!
CHECKING FOR SQUARE ACCURACY OF THE QUAD 4000

13QUAD 4000
1. Set the Quad 4000 on a 5/8x11 tripod at least 100 feet from a wall surface
2. Level the tripod head using the bulls eye bubble on the Quad 4000 by raising or lowering the tripod legs until
the bulls eye bubble is centered
3. Aim the Quad 4000 at the wall using the sighting device on the top of the Quad
4. Turn the power on and select the “Horizontal Mode” and allow the unit to level up
5. Place your laser detector on the “Fine” or narrowest dead band setting and locate the “ON GRADE” signal
against the wall that you have aimed the laser at and mark this spot.
6. Rotate the Quad 4000 180°
7. Find “ON GRADE” on the wall at the same location as your first mark
8. The two marks should be within 1/16 of each other at 100 feet from the laser to the wall for the Quad 4000 to
be within its level spec. (± 1/16 per 10 linear feet-10 arc seconds)
9. Repeat the above process by aiming the laser out of the right and left sides to determine if the Quad is level
on that axis as well (± 1/16 within)
CHECKING FOR LEVEL ACCURACY OF THE QUAD 4000
LASER SAFETY
For safe operation read all the user guide information and instructions
IDENTIFICATION CERTIFICATION
COMBO HAZARD-CLASS III
EXPLANATORY
NON-INTERLOCKED
PROTECTIVE HOUSING
APERTURE
(FRONT SIDE NOT SHOWN)
APERTURE

Self Leveling Electronic servo temperature compensation
±3° leveling range
Horizontal Accuracy
± 10 arc seconds
± 1/16 per 100 feet
(± 1.5mm/30M)
Baseline accuracy
using LineLokr
To 1/16 (1.5mm) at up to 600 feet (183M)
(Depending on conditions)
Square Accuracy
± 10 arc seconds
± 1/16 per 100 feet
(± 1.5mm/30M)
Vertical (Plumb)
Accuracy
± 15 arc seconds
± 3/32 per 100 vertical feet
(± 2.25mm/30M)
Laser Range
with Detector
1,500 Feet/457M Radius
(Dependent on conditions and laser
detector)
LineLokr™Range 600 feet/183M
(Dependent on conditions)
Battery Life
(Quad 4000) 50 hours Standard Alkaline
Battery Life
(LineLokr™) 70 hours Standard Alkaline
Quad 4000 Weight 10.5 lbs./4.76k
Quad 4000 Mount 5/8 x 11 Standard Tripod
Operating
Temperature 0° to +120°F (-18° to +50°C)
Storage Temperature -4° to +158°F (-20° to +70°C)
Quad 4000
Rotation Speed 300 RPM
Laser Type/Class 635nm Red Diode/Class 2
Number of Beams 3 Rotating, 1 Static
Beam Diameter Rotating, .60” (1.52cm)/Static, .050” (1.27mm)
QUAD 4000 SPECIFICATIONS
WARRANTY
This product is guaranteed against defects in materials and workmanship for both parts and labor, under normal working conditions for one
year from the date of purchase, except as noted herein. LaserLine Mfg., Inc. liability under this warranty is limited to repairing or replacing any
product returned to an authorized service center for that purpose. Any evidence of attempts to repair this unit by other than factory authorized
personnel automatically voids the warranty. LaserLine does not take liability for any damages caused by non-accuracy of this product. Before using
the product always check for accuracy per the enclosed instructions in this manual
Warning! Under no circumstances, attempt to open or disassemble Laser Housing.
Doing so may cause exposure to potentially hazardous levels of laser radiation.
Factory Service Center
LaserLine MFG., INC.
1810 S.E. First Street, Suite H
Redmond, OR 97756
Factory Service: New Product Warranty service policy for new
products stated above.
For all Warranty: Call Order Processing for RMA # at 541-548-0882.
The Unit will be repaired and returned by prepaid freight.
Non-Warranty
Send to: LaserLine MFG., INC. at above address
Service Warranty: 1 year on replacement Parts, 90 days on Labor.
FCC DECLARATION
This device complies with Part 15 of the FCC rules. Operation is subject to the following two conditions:
1. this device may not cause any harmful interference, and
2. this device must accept any interference received, including interference that may cause undesired operation.
This equipment has been tested and found to comply with the limits for a class B digital device, pursuant to Part 15 of the FCC Rules. These
limits are designed to prove reasonable protection against harmful interference in a residential installation. This equipment generates, uses and
can radiate radio frequency energy and, if not installed and used in accordance with the instructions, may cause harmful interference to radio
communications. However, there is no guarantee that interference will not occur in a particular installation. If this equipment does cause harmful
interference to radio or television reception, which can be determined by turning the equipment off and on, the user is encouraged to try to correct
the interference by on or more of the following measures:
• Reorient or relocate the receiving antenna.
• Increase the separation between the equipment and receiver.
• Connect the equipment into an outlet on a circuit different from that to which the receiver is
connected.
• Consult the dealer or an experienced radio/TV technician for help.
The antenna connector is designed to fit the supplied antenna. Do not modify the antenna or
connect any other type of antenna. If a replacement antenna is required, contact your dealer for
an authorized antenna.
Any changes or modifications not expressly approved by the party responsible for compliance
could cause the module to cease to comply with Part 15 of the FCC Rules, and thus void the
user’s authority to operate the equipment.
A label is affixed to the outside of the
LineLokr that reads:
©2018 LaserLine Mfg., Inc. All rights reserved.
1810 SE First Street, Suite H
Redmond, OR 97756
Phone 541 548 0882
www.LaserLineMfg.com
Highest Quality - Most Versatile
Contains Transmitter Module
FCC ID: ZNS40105
This device complies with Part 15 of the
FCC Rules. Operation is subject to the
following two conditions: (1) this device
may not cause harmful interference, and
(2) this device must accept any interference
received, including intererence that may
cause undesired operation.
LASER LIGHT
DO NOT STARE INTO BEAM
CLASS 2 LASER PRODUCT
635nm, 1mW CW & 3.1uJ@5Hz
Table of contents
Popular Construction Equipment manuals by other brands

Schwing
Schwing SP 1800 Original operating instructions

HIAB
HIAB 160TM Operating manual / spare parts list

Lumag
Lumag RPi13N Operator's manual

stellar labs
stellar labs CDT 5521 owner's manual

Schmalz
Schmalz SK-JU-110-2000-SRS63-3000-VSL-EX Operating and maintenance instructions

Masalta
Masalta MMD Operation manual