Laufband PROSPORT XPC 700 User manual

PROSPORT XPC 700
ELLIPTICAL TRAINER
INSTRUCTION MANUAL

Dear Customers,
We want to thank you for having chosen an Elliptical Trainer and
wish you a lot of fun and success during training.
Please note and follow the enclosed safety and assembly
instructions carefully.
If you have questions please do not hesitate to contact us.
Table of Content as blew:
1.) Safety Instruction
2.) Exploded Drawing
3.) Parts List
4.) Assembly Instruction
5.) Computer Instruction
6.) Training Instruction
1

SAFETY INSTRUCTION
Before you start training on your home Elliptical Trainer, please
read the instructions carefully. Be sure to keep the instructions for
information, in case of repair and for spare pare delivery.
This elliptical trainer is made for home use only and tested up to
a maximum body weight of 150 kg.
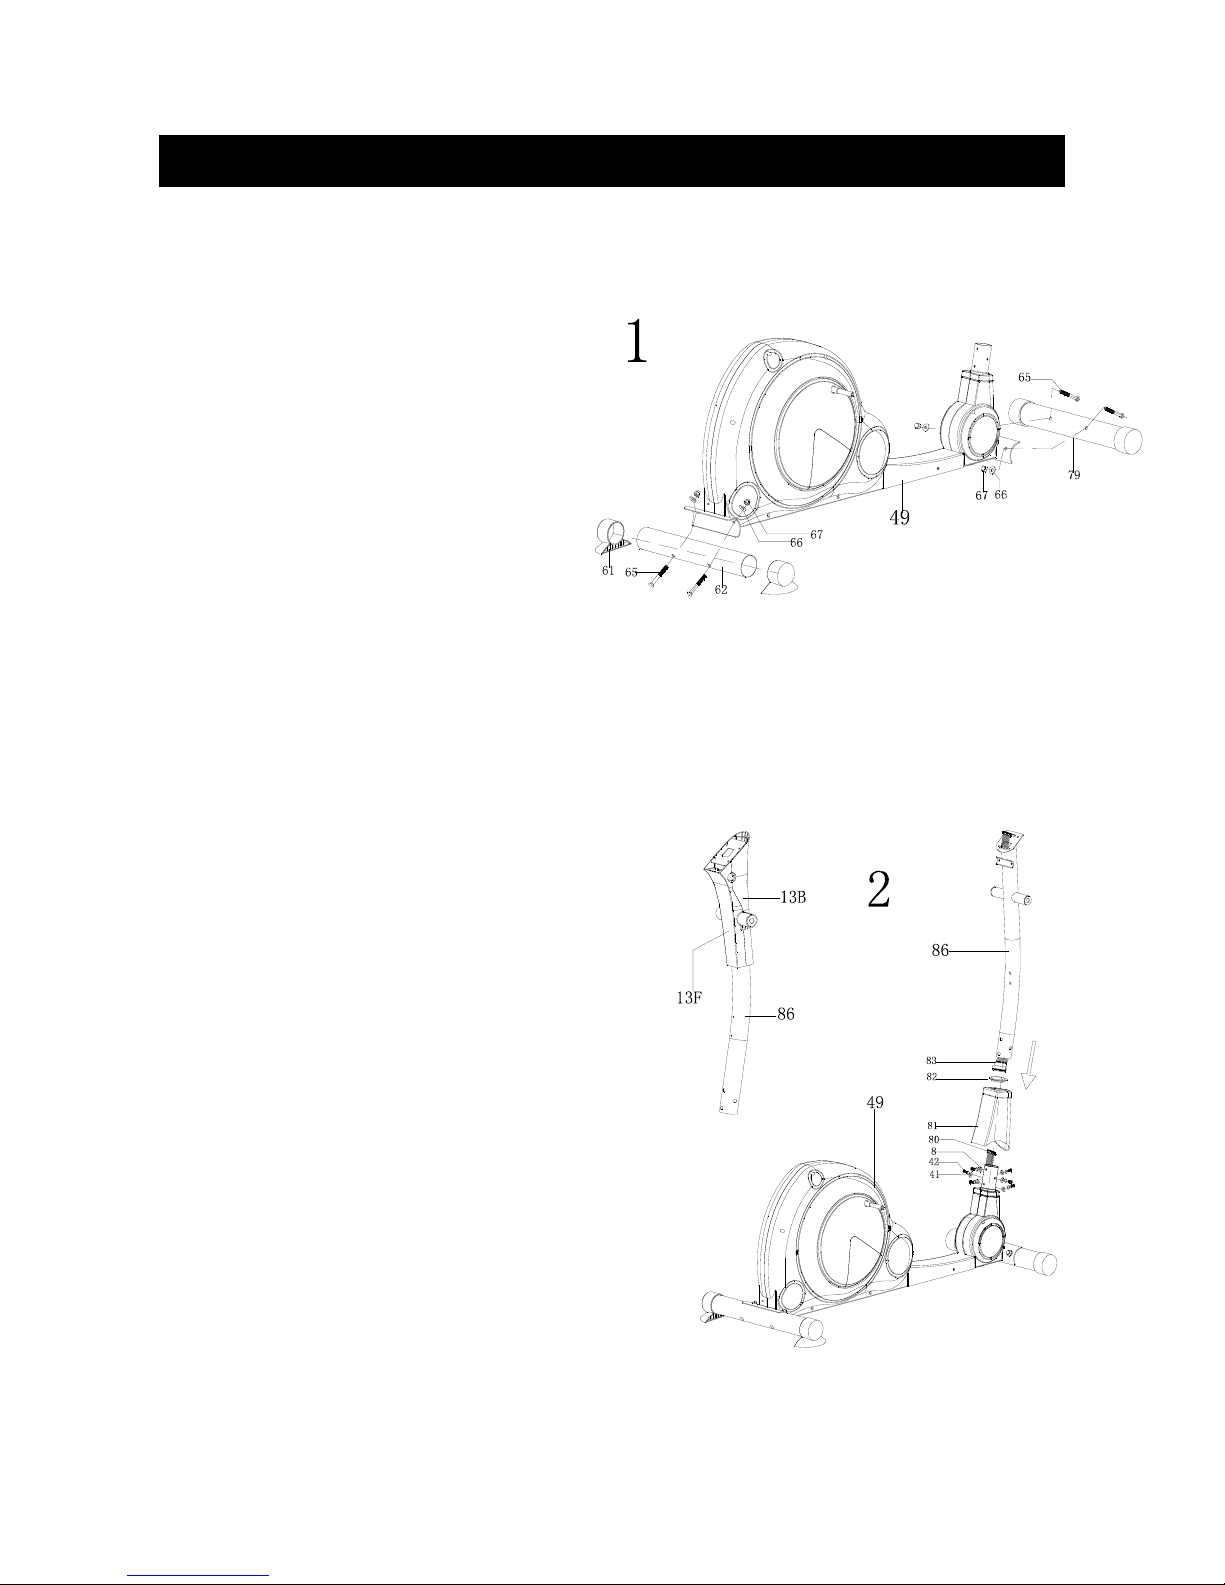
Follow the steps of the assembly instructions carefully.
For assembly use only suitable tools and asks for assistance with
assembly if necessary.
Check before the first training and every 1-2 month that all
connecting elements are tight fitting and are in the correct
condition. Replace defective components immediately and/ or
keep the equipment out of use until repair. For repairs, use only
original parts.
In case of repair, please ask your dealer for advice.
Avoid the use of aggressive detergents when cleaning the home
exerciser.
Ensure that training starts only after correct assembly and
inspection of the item.
For all adjustable parts be aware of the maximum positions to
which they can be adjusted/tightened to.
The home exerciser is designed for adults. Please ensure that
children use it only under the supervision of an adult.
2

Ensure that those present are aware of possible hazards, e.g.
movable parts during training.
Consult your physician before staring with any exercise program.
He or she can advise on the kind of training and which impact is
suitable.
WARNING!
INCORRECT/EXCESSIVE TRAINING CAN CAUSE HEALTH
INJURIES.
Please follow the advice for correct training as detailed in training
instructions.
The load/work level can be adjusted by turning the adjustment
knob on the handle bar stem.
The safety level of this equipment can be maintained only if it is
check regularly for all assembly procedure mentioned in the
assembly instruction sheet.
Please check regularly for the tightening knobs to notice any
irregular wear.
3

EXPLODEDDRAWING
4

PARTLIST
Part# Description Quantity
1 Computer 1
2 End cap 2
3 Upper Swing Bar (L+R) 2
4 Sponge (L+R) 2
5 Hand Pulse Cable 1set
6 Hand Pulse 2
7 M8*40mml Screw 4
8 8*19*1.5mmT Washer 14
9 M8 Nut 6
10 8*36*3T Washer 2
11 M8*20 Screw 2
12 Plastic Cover (F+B) 1 set
13 Plastic Cover (F+B) 1 set
14 Plastic Cover (L+R) 2 sets
15 Screw 14
16 Hand Sponge 2
17 Hand Bar 1
18 Pedal (L+R) 2
19 M8*35 Screw 2
20 M6 Screw 4
21 Plastic Cover 1 set
22 Nylon Nut 4
23 8*15.8*10 Tube 2
24 8*24*2T Washer 2
25 M8*30 Screw 2
26 Junction 2
27 φ8*16*15mmT Washer 2
28 M5*15 Washer 15
29 M4*10 Washer 2
30 knob 4
31 6*14*1.5Washer 4
32 M8*48 Screw 2
33 Spring Washer 4
5

Part# Description Quantity
34 Pedal Bar(L+R) 1set
35 M10*78 Screw 2
36 End Cap 2sets
37 10*26*8 Nut 4
38 Lower swing bar (L+R) 1set
39 M10*19*1.5T Washer 2
40 M10 Nut 3
41 M8 Washer 6
42 M8*20 Screw 6
43 Plastic cover(L+R) 1set
44 Plastic cover 1
45 Motor 1
46 M5*15 Screw 4
47 Screw 1
48 Sensor set 1 set
49 Main frame 1 set
50 Screw 8
51 Crank(L+R) 2
52 Chain cover(L+R) 2
53 M8 Screw 2
54 Plastic cover 2
55 C Ring 2
56 Tube 1
57 Bearing 4
58 10*19 Washer 1
59 M10*40 Screw 1
60 Main cover(L+R) 1 set
61 Rear end cap(L+R) 2
62 Rear stabilizer 1
63 DC cable 1
64 Computer cable 1
65 10*88mml Screw 4
66 10*24*2T washer 4
67 M10 Nut 4
68 Fly wheel 1
69 Chain adjuster 2 sets
6

Part# Description Quan1ity
70 3/8” Screw 2
71 Belt 1
72 Axle 1 set
73 8*12 Screw 3
74 17*22*2T Washer 2
75 M4.5*25 Screw 11
76 M5*25 Screw 10
77 Plastic cover 1 set
78 Front end cap 2
79 Front stabilizer 1
80 Lower computer cable 1
81 Plastic cover 1
82 Lute 1
83 Upper computer cable 1
84 Bottle 1
85 Bottle fix 1
86 Upper support 1 set
87 19*38*0.5 washer 2
88 Nylon tube 6
89 Axle 1
90 Plastic cover(F+B) 1 set
91 Screw 4
92 M5*15 Screw 2
93 Belt wheel 1
94 Adapter 1
95 5mm Wretch 1
96 Wretch 2
7

ASSEMBLYINSTRUCTION
STEP1
I. Fasten front stabilizer (79) with2
bolts from the underside of
stabilizer and secure it with 2
washers and 2 cap nuts.
II. Fasten rear stabilizer (62) with 2
bolts from the underside of
stabilizer and secure it with 2
washers and 2 cap nuts.
STEP2
I. Take the plastic cover(F+B)(13)
from the upper support(86).
II. Connect the upper computer cable
(83) to the lower computer cable
(80). And install the plastic cover
(81),lute(82) and the upper
support(86) on the main
frame(49).
III. Fasten them with the washers
(8),sping washer (41) and screw.
8

STEP3
Fasten lower swing bars(L+R)(38)
With axle(89) from upper support
(86) and secure it with &screws
(11)& washer (10)(87),tightly.
STEP4
I. Put the Upper swing bars(R+L)(3) with screws from right lower swing
bars(38) and secure it with screws(7) & washers(8) & nuts(9).
II. Fasten pedal bars(R+L)(18)from the crank (51)with bolts (25)& washers(24)
& tube(23)
III. Fasten pedal bars(R+L)(18) to the lower swing bars(38)with bolts(35)and
secure it with nuts(40) & washers(39).
9

STEP5
I. Fasten the handle bar (17) to
the upper support (86) and
screw it with bolts(19) tightly.
II. Connect computer cable
(83)with computer (1) and
fix it into bracket of upper
support.
III. Fasten the bottle fix (85) to
the upper support (86) and
screw it .put the bottle (84)
into the bottle fix .
STEP6
I. Fasten the plasic cover(L+R)(12)
to the lower swing bar(38) with
screw(15).
II. Fasten the plasic cover(F+B)(13)
to the upper support(86) with
screw(15).
Now, your machine is ready for use.
10

COMPUTERINSTRUCTION
CLASS-A MOTORIZED
COMPUTER OPERATION MANUAL
FUNCTION:
1.Program:21programs as following
A:1 Manual Program
B:10 preset Program Profile:
P1:ROLLING P2:VALLEY P3:FATBURN P4:RAMP
P5:MOUNTAIN P6:INTERVAL P7:CARDIO P8:ENDURANCE
P9:SLOPE P10:RALLY
C:1 Watt Control Program
D:4 Heart Rate Control Program:55%H.R 75%H.R 90%H.R and TARGET H.R
E:4 User Setting Programs:CUSTOM1 to CUSTOM4
F:1 Boby Fat Measuring Program
2.Record the user’s data of GENDER HEIGHT WEIGHT and AGE even cut off the power.
3.Dot matrix display showing your current status.
4.Simulative ECG measuring the heart rate
5.Display Speed(RPM) TIME DIST CAL WATT PULSE LEVEL at the same time.
6.The computer will turn off automatically if there is no operation speed signal and pulse signal
over 4 minutes. Meanwhile it will store your current exercise data and turn the loading resistance
to the minimum.Once you press any button or in motion.the computer will turn on automatically.
BUTTONS:
1ENTER
●In “stop” mode (display STOP) press ENTER button to enter into program selection and setting
value which flash in related window.
A:When you choose the program press Enter to confirm the one you like.
B:When in setting press ENTER to confirm the value that you would like to preset.
●During the start mode (display START) press ENTER to choose display the speed or RPM or
11

switch automatically.
●During any mode hold down this button for 2 seconds to totally reset the computer.
2 START/STOP
●Press START STOP button to start or stop the programs.
●During any mode hold down this button for 2 seconds to totally reset the computer.
3 UP
●In stop mode and the dot matrix character flash press this button to select the program up.If the
related window value flash press this button to increase the value.
●During the start mode (display START) press this button to increase the training resistance.
4. DOWN:
●In stop mode and the dot matrix character flash press this button to select the program down. If
the related window value flash press this button to decrease the value.
●During the start mode (display START) press this button to decrease the training resistance.
5. RECOVERY
●First test your current heart rate and show your heart rate value press this button to enter into
pulse recovery testing.
●When you are in pulse recovery mode press this button to exit.
12

OPERATION
1. Turn on the computer
Plug in one end of the adaptor to the AC electrical source and connect the other end to the
computer. The computer will beep and enter into initial mode.
2. Program select and value setting
●Manual Program and Preset Program P1~P10
A. Press UP DOWN button to select the program that you like.
B. Press ENTER button to confirm the selected program and enter time setting window.
C. The time will flash and then press UP DOWN button to set up your desired time. Press
ENTER to confirm the value.
D. The distance will flash and then press UP DOWN to set up the desired calories to be consumed.
Press ENTER to confirm the value.
E:The calories will flash and then press UP DOWN to set up the desired calories to be
consumed. Press ENTER to confirm the value.
F:Press START/STOP to begin exercise.
●Watt Control Program
A. Press UP DOWN to select the watt control program
B. Press ENTER to confirm the selected watt control program and enter into time setting
window.
C. The time will flash and then press UP DOWN button to set up the desired time. Press ENTER
to confirm the value.
D. The distance will flash and then press UP DOWN to set up the desired distance value. Press
ENTER to confirm the value.
E. The calories will flash and then press UP DOWN to set up the desired calories to be
consumed Press ENTER to confirm the value.
F. The watt display will flash and then press UP DOWN to set up the watt to do the exercise.
Press ENTER to confirm the value.
G. Press START/STOP to begin exercise.
NOTE:
The WATT value is decided by the TORQUE and RPM. In this program the WATT value will
keep at constant value. It means that if you peddle quickly the load resistance will decrease and
if you peddle slowly the load resistance will increase to ensure you at the same watt value.
●HEART RATE CONTROL PROGRAM:55%H.R 75%H.R and 90% H.R
The maximum heart depends on different age and this program will ensure you do the healthy
exercise within maximum heart rate.
A. Press UP DOWN to choose the heart rate control program
B. Press ENTER to confirm the heart rate control program and enter into time setting window.
C. The time will flash and then press UP DOWN button to set up the desired time. Press ENTER
13

to confirm the value.
D. The distance will flash and then press UP DOWN to set up the desired distance value.
Press ENTER to confirm the value.
E. The calories will flash and then press UP DOWN to set up the desired calories to be
consumed. Press ENTER to confirm the value.
G. When the target heart rate control program flash. the computer will display the users target
heart rate according to users age.
H. Press START/STOP to begin exercise.
●HEART RATE CONTROL PROGRAM :TARGET HEART RATE
The user can set any target heart rate to do the exercise.
A. Press UP DOWN to select TARGET HEART RATE program.
B. Press ENTER to confirm your choice and enter time setting window.
C. The time display will flash and then press UP DOWN to set the desired time to do the
exercise. Press ENTER to confirm the value.
D. The distance will flash and then press UP DOWN to set up the desired distance value.
Press ENTER to confirm the value.
E. The calories will flash and then press UP DOWN to set up the desired calories to be consumed.
Press ENTER to confirm the value.
F. The target heart rate will flash and then press UP DOWN to set up your target heart rate. Press
ENTER to confirm the value.
G. Press START/STOP to begin exercise.
NOTE:
During exercise the user’s heart rate value depends on resistance level and speed.
The heart rate control program is to ensure your heart rate within the preset value. When the
computer detect your current heart rate is this higher than preset it will decrease the resistance
level automatically or you may slow down exercise. If your current heart rate is lower than
preset it will increase resistance and you may speedup.
●User Profile Program:CUSTOM1~CUSTOM4
A. Press UP DOWN to select the user
B. Press ENTER to confirm your choice and enter into time setting window.
C. The time display will flash and then press UP DOWN to set up the desired time to do the
exercise. Press ENTER to confirm the value.
D. The distance will flash and then press UP DOWN to set up the desired distance value.
Press ENTER to confirm the value.
E. The calories will flash and then press UP DOWN to set up the desired calories to be consumed.
Press ENTER to confirm the value.
F. The first resistance level will flash and then press UP DOWN to set the desired load
resistance. Press ENTER to confirm. Then repeat above operation to set the resistance from 2
14

to 10.
G. Press START/STOP to begin exercise.
●Body Fat Measurement Program
A. Press UP DOWN to select BODY FAT TEST program
B. Press ENTER to confirm your choice and enter into height setting mode
C. The height display will flash and then press UP DOWN to set up your height. Press ENTER to
confirm the value.
D. The weight display will flash and then press UP DOWN to set up your weight. Press ENTER
to confirm the value.
E. The age display will flash and then press UP DOWN to set up your age Press ENTER to
confirm the value.
F. The gender display will flash and then press UP DOWN to set up your gender. Press ENTER
to confirm.
G. Press START/STOP to begin testing your body fat.
NOTE:
1. During the body fat measurement place both your palms on the contact pads. The test result
are:
FAT% BMR (Basal Metabolic Rate) BMI (Body Mass Index) BODY and body shape.
FAT%:The total body fat our body measured by percentage.
BMR:Basal Metabolic Rate (metabolism) is the energy(measured in calories) expended by the
body at rest to maintain normal bodily function.
BMI:means Body Mass Index which is used for body shape building
2. During the body fat measurement if your palms do not contact the pulse sensor well the
computer cannot receive any signal and it will display ERROR2. Press START/STOP to try
again.
3. During the test you cannot exit the test when press any button. After the test finish
Press UP DOWN to exit the body fat measurement program and switch to other program.
4. Comparison sheet of Body fat and Obese
15

3. Pulse Recovery Test
The pulse recovery test is to compare your heart rate before and after exercise. It is target to
determine your heart strength via the measuring. Please do the as below:
A. Both your hands hold the pulse sensor or via wireless transmitter belt to test the pulse (if
applicable) the computer will display your current pulse value.
B. Press RECOVERY to enter the pulse recovery test and the computer program will enter the
stop status.
C. Keep pulse detecting.
D. Time will count down from 60 seconds to 0 second.
E. When time reaches 0 the test result (F1.0−F6.0) appears on display.
F1.0=Excellent F2.0=Good F3.0=Fair F4.0=below average F5.0=No Good F6.0=Poor
F. If the computer does not detect your current heart rate first pressing RECOVERY will not enter
into pulse recovery test. During the pulse recovery test press RECOVERY to exit the test and
return to the stop status.
4. Pulse Measurement
Please place both your palms on the contact pads and the computer will show your current heart
beat rate in beats per minute (BPM) on the LCD after 3~4 seconds. During the measurement
heart icon will flash with simulative ECG showing.
Remark:During the process of pulse measurement because of the contact jamming the
measurement value may not be stable when start then it will return to normal level .The
measurement value cannot be regarded as the basis of medical treatment.
If the computer is also equipped with wireless heart rate measuring via the transmitter belt, the
hand-held pulse signal will still be detected preferentially.
■SPECIFICATIONS
Speed KM/H(M/H)﹕showing your current speed. Rang:0.0~99.9 KM/H(M/H).
Slim Healthy Fleshy Over WT Obese
Body
shape
Age/ FAT
﹪
Gender
BODY1 BODY2 BODY3 BODY4 BODY5
Male/≦30 year old <14% 14%~20% 20.1%~25% 25.1%~
35%
>35%
Male/>30 year old <17% 17%~23% 23.1%~28% 28.1%~
38%
>38%
Female/≦30 year
old
<17% 17%~24% 24.1%~30% 30.1%~
40%
>40%
Female/ >30 year
old
<20% 20%~27% 27.1%~33% 33.1%~
43%
>43%
16

RPM:showing the current rotate per minute Range:0~999.
TIME: the accumulative exercise time range:0:00~99:59.the preset time range is 5:00~
99:00.The computer will start to count down from preset time to 0:00 with average time for each
resistance level. When it reaches to zero the program will stop and computer alarm. If you do
not preset the time it will run with one minute decrement each resistance level.
DIST:the exercise accumulative distance. Range:0.0~99.9~999KM(MILE) the preset distance
range:1.0~99.0~999. When the distance reaches0 the program will stop and the
computer will alarm.
CALORIE:the exercise accumulative calories burnt. Range:0.0~99.9~999 the preset calories
range :10.0~90.0~990. When the calorie reaches 0 the program will stop and the
computer will alarm.
PULSE:showing the exercise heart rate value.
Range :30~240BPM(beat per minute)
RESISTANCE LEVEL:showing resistance level. Range﹕1~16
WATT﹕show the exercise watt
■BREAKDOWN DISPLAY
1.When the computer displays ERROR1 please check if the motor is good and if the motor wires
connect well.
2.When the computer displays ERROR2 please check if your hands contact the sensors well as
there no body fat signal detected.
17

TRAINING INSTRUCTION
To achieve a considerable improvement of your physical
resistance and your health, some aspects of how to find the most
efficient amount of training should be followed:
If you have not been physically active for a longer period of time
and also avoid health risks you should consult your general
physician before starting exercise.
INTENSITY
To achieve maximum results the right intensity has to be chosen. The
heart rate is used as guideline. As a rule of thumb, the following
formula is commonly used:
Maximum pulse rate=220-Age
While exercising the pulse rate should always be between 60%~85%
of the maximum pulse rate.
When starting to exercise, you should keep your rate at 60% of your
maximum pulse rate in the first couple of weeks. With increasing
improvement of fitness, the pulse rate should be slowly increased to
85% of your maximum pulse rate.
FAT BURING
The body starts to burn fat at approx. 60% of the maximum pulse rate.
To reach an optimum at burning rate, it is advisable to keep the pulse
rate between 60%~70% of the maximum pulse rate. The optimum
training amount consists of three workouts per week 30 minutes each.
18

Example: You are 52 years of age would like to start exercising.
Maximum pulse rate=220-52(age) =168 pulse/min
Minimum pulse rate=168x 0.6=101 pulse/min
Highest pulse rate=168x0.7=117 pulse/min
During the first week it is advisable to start with a pulse rate of 101,
afterwards increase it to 117. With increasing improvement of fitness
the training intensity should be increased to 70%~85% of your
maximum pulse rate. This can be done by increasing the resistance, a
higher frequency or longer training period.
TRAINING QRGANIZATION
Warm-up
Before every training you should warm-up for 5~10 minutes. Here
you can do some stretching and training with low resistance.
Training session
During the actual training a rate of 70%~85% of the maximum pulse
rate should be chosen. The time-length of your training session can be
calculated with the following rule of thumb:
Daily training session: approx. 10 min. per unit
2-3 x per week: approx. 30 min. per unit
1-2 x per week: approx. 60 min. per unit
19
Table of contents
Popular Elliptical Trainer manuals by other brands

Life Fitness
Life Fitness 95XE ARCTIC SILVER Brochure & specs

CARDIOSTRONG
CARDIOSTRONG EX60 Assembly and operating instructions

Pro-Form
Pro-Form 790 Hr Elliptical Manuale d'istruzioni

Pro-Form
Pro-Form PFEL94910.0 user manual

Pro-Form
Pro-Form 590e Elliptical user manual

Life Gear
Life Gear Orbi trac 28320 owner's manual