lauson AFF109 User manual

LAUSON
AFF109
1
EN
INSTRUCTION MANUAL
PEDESTAL FAN WITH REMOTE CONTROL
AFF109
Please read this manual carefully before use, and keep it for future reference.

LAUSON
AFF109
2
EN
SAFEGUARDS
When using electrical appliances, in order to reduce the risk of fire, electric shock, and/ or
injury, these basic safety precautions should always be followed:
1. The fan must be connected to a 230V AC 50Hz power supply.
2. All electrical work must only be undertaken after disconnection of the power by removing
fuses or turning off the circuit breaker, to ensure all pole isolation of the electrical supply.
3. Do not use outdoors. Installing the fan in a position where it could be exposed to water or
moisture is dangerous.
4. Do not connect the fan motor to a dimmer switch. This is may give an unsatisfactory
performance (motor hum) and cause damage to the motor.
5. Children of less than 3 years should be kept away unless continuously supervised. Children
ages from 3 years and less than 8 years shall only switch on/off the appliance provided
that it has been placed or installed in its intended normal operating position and they have
been given supervision or instruction concerning use of the appliance in a safe way and
understand the hazards involved. Children aged from 3 years and less than 8 years shall
not plug in, regulate and clean the appliance or perform user maintenance. This appliance
can be used by children aged from 8 years and above the persons with reduced physical,
sensory or mental capabilities or lack of experience and knowledge if they have been give
supervision or instruction concerning use of the appliance in a safe way and understand
the hazards involved. Children shall not play with the appliance. Cleaning and user
maintenance shall not be made by children without supervision
6. Young children should be supervised to ensure that they do not play with the appliance.
7. It is not recommended that fans and gas appliances to be operated in the same room at
the same time.
8. Do not insert anything into the fan blades whilst they are spinning. This will damage the
blades and upset the balance of the fan causing the unit to wobble.
9. Danger: You should not repair the appliance by yourself. It must be done just by qualified
specialists. Only original spare parts may be used for repair.
10. To unplug before to touch the socket.
11. Wipe with a dry cloth moistened with soap and water. Dry thoroughly. Unplug the power
before cleaning. Do not allow water inside.
12. Check the correct operation at all times. Do not leave the fan running alone in a room
with people with reduced mobility, mental disabilities, children or animals.
13. Place 150 cm as minimum away from the wall.
14. Do not face furniture curtains personal or animals. They could sour and bodily damages.
LAUSON
AFF109
3
EN
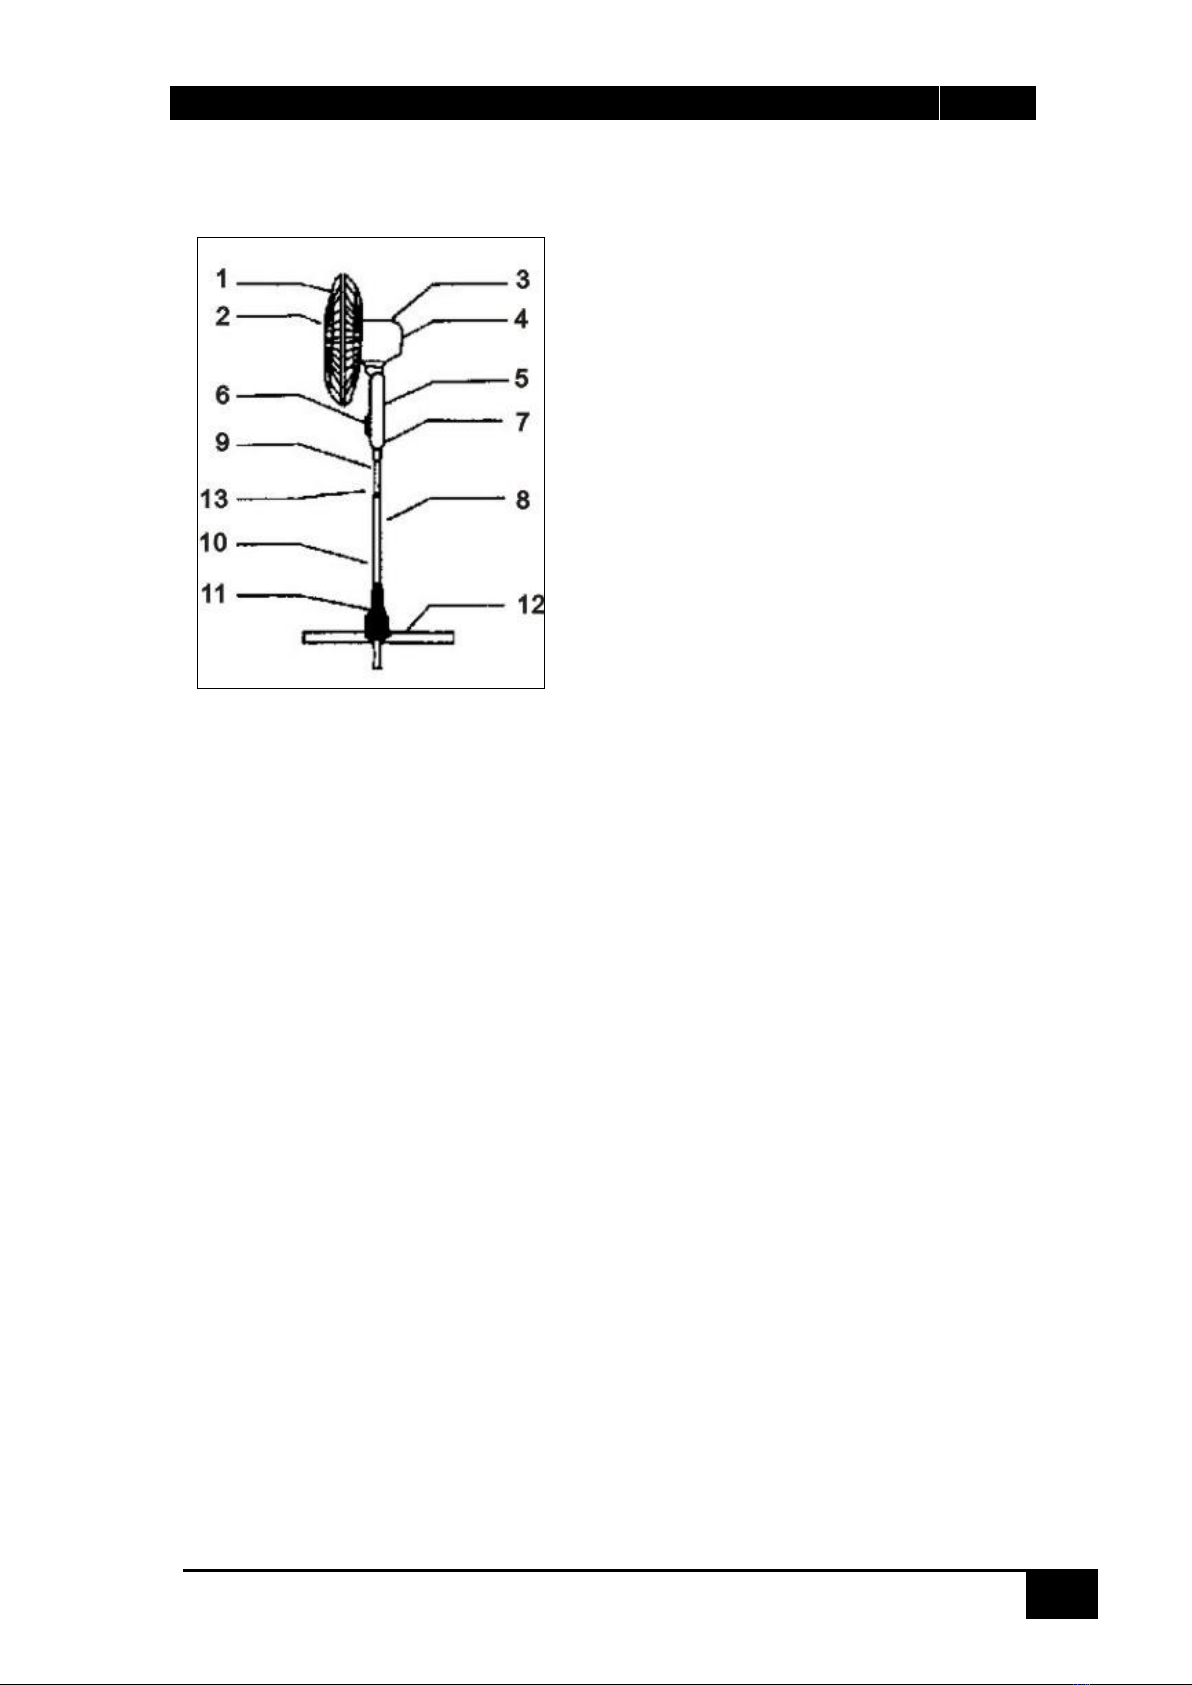
PARTS NAMES
FUNCTIONING
Speed control
Speed of a fan is controlled by a key or slider switch . Each is operated according to followings (1)
Operation of slider switch to turn on the fan simply, slide switch To any of the speed
positions (1-2-3), To turn it off .slide switch to ”O” Position.
(2) Operation of key switch
To turn on the fan, simply push any of The speed control push buttons (1-2-3), to turn it off .
Push the “o” button.
Oscillation
Push down the oscillation knob and the Fan will oscillate ,pull up the knob, the fan will not
oscillate.
Tilting adjustment
Always switch the fan off before Making a tilt adjustment, the air Flow can be adjusted upward
or Downward by simply moving the Guard up or down
Height adjustment
Loosen the height adjustment knob, then adjust the pipe to the desired. Height and the tighten
the adjustment knob
1
Guard
2
Blade
3
Oscillation knob
4
Motor
5
Switch box
6
Slider switch
7
Switch box set screw
8
Cord
9
Inner pipe
10
Outer pipe
11
Base cap
12
Cross-bar feet
13
Height adjustment knob
LAUSON
AFF109
4
EN
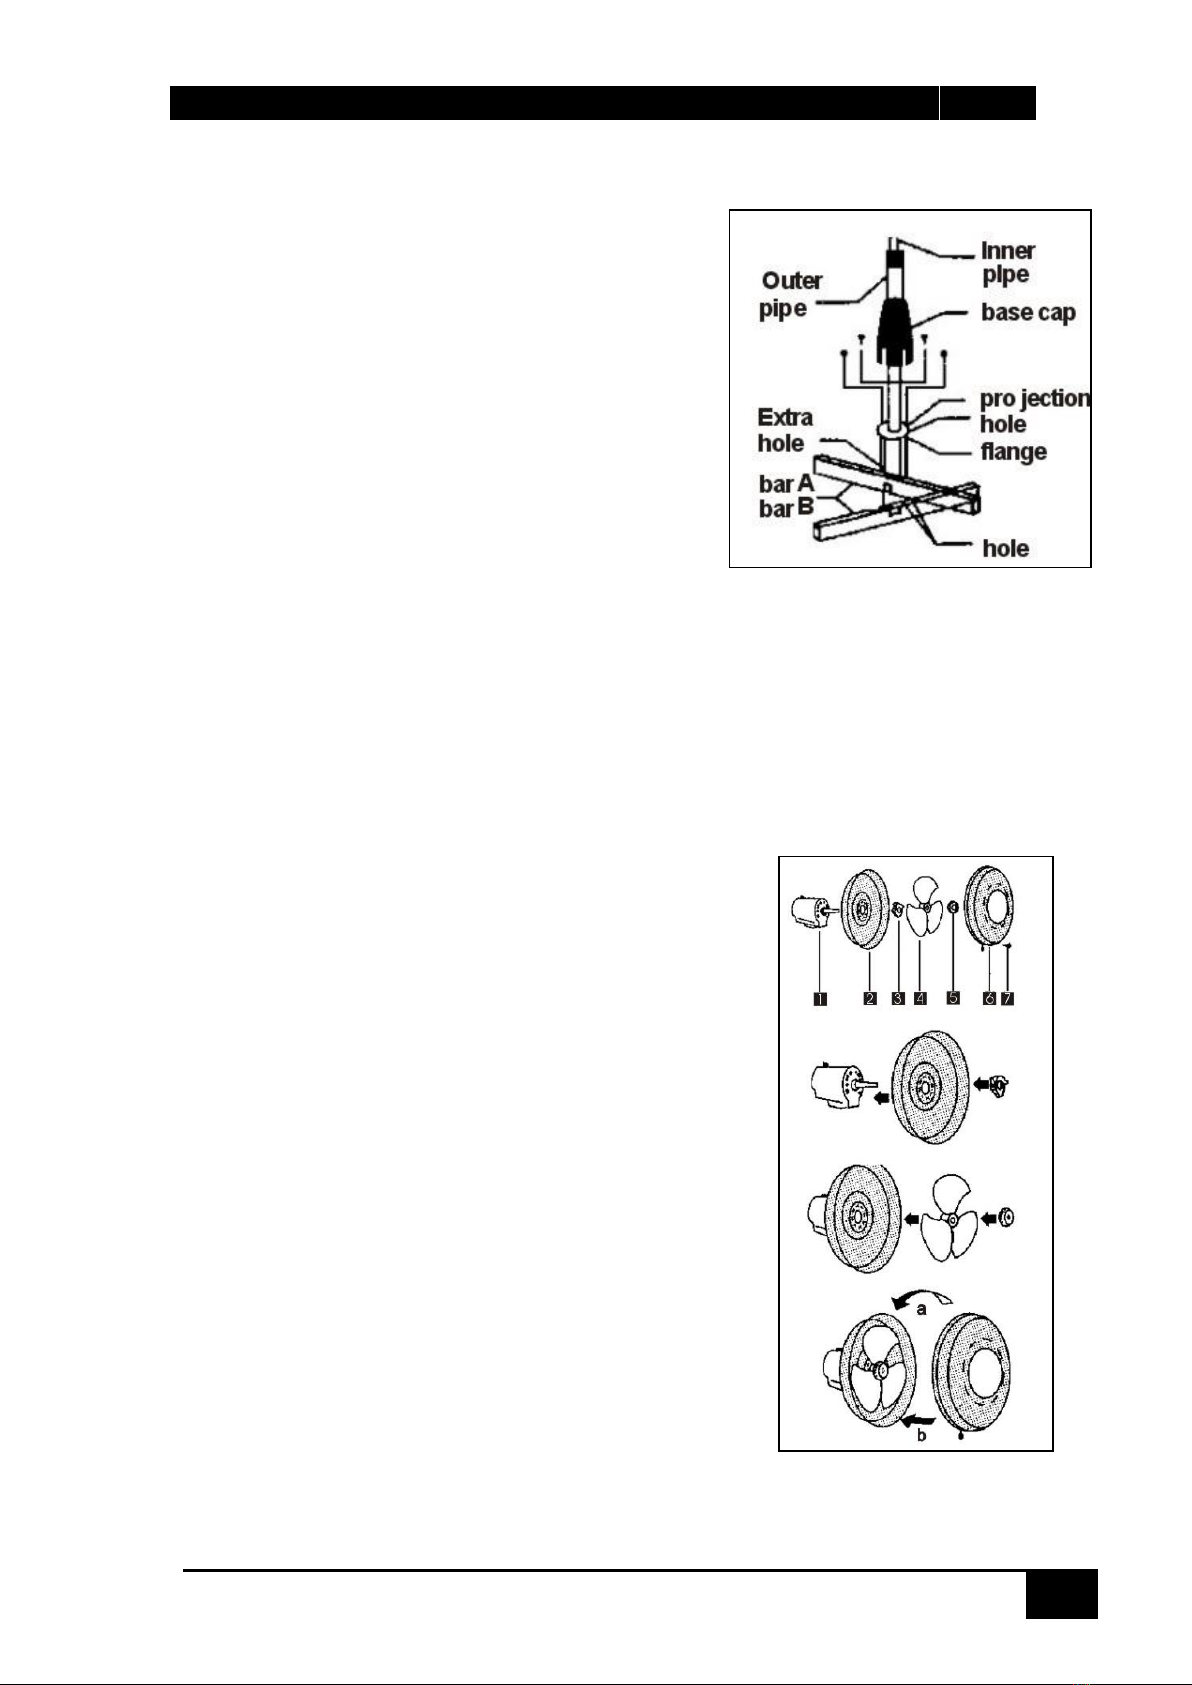
HOW TO ASSAMBLE
The only tool needed for this assembly procedure is a
screw driver
1. Assembling the cross-bar feet
First of all, loosen and remove the
Four screws from bars, next cross the bar A and bar B.
Be sure to align the four holes in the bar to the four
hole on the flange at the same time. Align the
projection on the flange with the extra hole on bar A,
then tighten the four screws and insert the base cap
down over the feet.
2. Mounting the switch box
“caution” never remove the inner pipe stopper if you remove the Inner pipe stopper service
may be necessary. Never loosen the inner pipe set screw
(1) locsen the switch box set screw by turning it to the left
(2) now place the hole in the bottom of the switch box over the inner pipe.
(3) turn the switch box set screw clockwise and tighten it firmly
MOUNTING NOSE OF THE FAN
1. Parts identification of the fan nose
1. motor
2. rear guard
3. guard lock nut
4. blade
5. blade cap
6. front guard
7. screw
2. Mounting the rear guard.
Mount the rear guard on the Motor and secure it with
the Guard
lock nut.
3. Mounting the blade
insert the blade onto the motor shaft. Tighten the blade
with
the blade cap.
4. Mounting the front guard
there are two type construtions of fan front guard, each
is assembled according to followings
5. Mounting the reticular guard
a. mounting the front guard by inserting the hook at the top side of the
front guard over the rear guard. unite them by pressing their sides in order

LAUSON
AFF109
5
EN
that the two guards are fixed in the external plastic ring.
b .lock the clip and secure it with the screw.
6. Mounting the spoke guard. hold the Front guard so that the trade mark is level and the
two projections on the front guard are centered over the Rear guard. Now push all the
safety Clips firmly into place.
GUIDE TO MAINTENANCE
Use in a dry place free of explosive humidity and water.
Unplug fan before cleaning and disassembly. Wipe away dirt with a clean cloth. Plastic
parts should be cleaned with mild soap and a damp cloth. Remove soap film
thoroughly with a clean cloth.
NOTE: Do not immerse in water. Do not allow water or any other liquid to get into unit.
Before putting the fan in storage clean thoroughly cover with plastic bag and store in a
dry place
DISPOSAL
This marking indicates that this product should not be disposed with other
household wastes throughout the EU. To prevent possible harm to the
environment or human health from uncontrolled waste disposal recycle it
responsibly to promote the sustainable reuse of material resources

LAUSON
AFF109
6
EN
WARRANTY CONDITIONS
Thank you for purchasing this product. Lauson guarantees the proper functioning of its
products for a period of 2 YEARS from the date of purchase, being responsible for any lack of
conformity that manifests within this period, including the repair of the defects or the
replacement of the product within the Union European
CLAIM PROCEDURE
The holder of the guarantee may contact the technical service by telephone at the number
(00) 34 934 536 222 or visiting our Lauson website: www.lauson.es or by going directly to the
purchasing center.
Before claiming your rights as a consumer, make sure that the product meets the following
requirements.
1. The guarantee will be valid if it is presented duly completed with the reference of the
model, serial number, date of purchase and establishment data. Being an essential
requirement that is accompanied by the purchase ticket.
2. In case of sending to repair the equipment, it must be in the same conditions
(packaging, accessories, manuals ...) in which it was purchased, except for natural
deterioration due to use. The guarantee does not cover damages caused by
transportation due to inadequate packaging.
3. Lauson reserves the right to refuse the guarantee in the event that some of the
requested information is not specified, is not legible or is damaged.
4. Damages or malfunctions caused by catastrophic causes, falls and blows due to
incorrect use by the user, as well as erroneous feeding by energy sources or parts
subject to natural wear and tear due to improper use are not covered by this
guarantee.
5. This product will lose its guarantee if it is handled by technicians or workshops
outside our company.
6. This guarantee is valid only in scope of the European community. The warranty terms
contained in this certificate do not exclude, restrict or modify the rights that legally
correspond to the buyer by application to Royal Legislative Decree 1/2007 of
November 16.
LAUSON
AFF109
1
ES
INSTRUCTION MANUAL
VENTILADOR DE PIE CON MANDO A DISTANCIA
AFF109
Lea este manual detenidamente antes de usarlo y consérvelo para futuras consultas.

LAUSON
AFF109
2
ES
INSTRUCCIONES DE SEGURIDAD
Al usar aparatos eléctricos, para reducir el riesgo de incendio, descarga eléctrica y / o lesiones,
siempre se deben seguir estas instrucciones básicas de seguridad básicas:
1. El ventilador debe estar conectado a una fuente de alimentación de 230V CA 50Hz.
2. Si se manipula el ventilador todos los trabajos eléctricos deben realizarse después de
desconectarlo de la alimentación quitando los fusibles o apagando el disyuntor, para
asegurar que todos los polos estén aislados del suministro eléctrico.
3. No usar al aire libre. Instalar el ventilador en una posición alejada el agua o la humedad, es
peligroso.
4. No conecte el motor del ventilador a un regulador de intensidad. Esto puede dar un
rendimiento insatisfactorio (zumbido del motor) y causar daños al motor.
5. Los niños menores de 3 años deben mantenerse alejados a menos que sean supervisados
continuamente. Los niños mayores de 3 años y menores de 8 años solo deben encender /
apagar el aparato siempre que se vaya a utilizar bajo un funcionamiento normal y hayan
recibido supervisión o instrucciones sobre el uso del aparato de manera segura y entienda
sobre los peligros involucrados. Los niños mayores de 3 años y menores de 8 años no
deben enchufar, regular y limpiar el aparato ni realizar el mantenimiento por parte del
usuario. Este aparato puede ser utilizado por niños a partir de 8 años de edad o más, con
personas con capacidades físicas, sensoriales o mentales reducidas o falta de experiencia y
conocimientos, si han recibido supervisión o instrucciones sobre el uso del aparato de
manera segura y comprenden los peligros involucrados. Los niños no deben jugar con el
aparato. La limpieza y el mantenimiento del usuario no deben ser realizados por niños sin
supervisión.
6. Los niños pequeños deben ser supervisados para asegurarse de que no jueguen con el
aparato.
7. No se recomienda el uso de este ventilador y aparatos de gas en la misma habitación a la
vez.
8. No inserte nada en las aspas del ventilador mientras estén girando. Esto dañará las aspas y
alterará el equilibrio del ventilador, lo que causará que se tambalee.
9. No debe reparar el aparato usted mismo. Debe ser realizado solo por especialistas
calificados. Solo se pueden usar repuestos originales para la reparación.
10. Desenchufar antes de tocar el enchufe.
11. Limpie con un paño seco humedecido con agua y jabón. Secar bien. Desconecte la
corriente antes de limpiar. No permita que entre agua.
12. Comprobar el correcto funcionamiento en todo momento. No deje el ventilador
funcionando solo en una habitación con personas con movilidad reducida, discapacidades
mentales, niños o animales.
13. Coloque 150 cm como mínimo lejos de la pared.
14. No lo coloque de cara a muebles de cortinas o animales. Podrían agrietarse o provocar
daños corporales.

LAUSON
AFF109
3
ES
PARTES DEL PRODUCTO
FUNCIONAMIENTO
Control de velocidad
Antes de insertar el enchufe de alimentación en una toma de corriente, verifique que la
frecuencia de voltaje en la placa de datos esté de acuerdo con el voltaje local.
1) Control de velocidad:
0- Indicador de apagado
1- Lento
2- Moderado
3- Rápido
Oscilación
Pulse la bóton de oscilación y el ventilador oscilará, levante el botón, el ventilador parara de
oscilar.
Ajuste de inclinación
Siempre apague el ventilador antes de realizar un ajuste de inclinación, el flujo de aire se puede
ajustar hacia arriba o hacia abajo simplemente moviendo la base superior de la rejilla hacia
arriba o hacia abajo
Ajuste de altura
Afloje la perilla de ajuste de altura, luego ajuste el tubo a la altura deseada y apriete el pomo de
ajuste para fijarlo
1
Rejilla frontal
2
Aspas
3
Botón de oscilación
4
Motor
5
Caja del interruptor
6
Botón interruptor
7
Tornillo de ajuste de la caja
8
Cable
9
Tubo interior
10
Tubo exterior
11
Tapa base
12
Pies de soporte
13
Perilla de ajuste de altura

LAUSON
AFF109
4
ES
MONTAJE
La única herramienta necesaria para este procedimiento de montaje es un destornillador.
1. En primer lugar, afloje y retire los cuatro tornillos de la barra, cercanos a la barra A y B.
Asegúrese de alinear los cuatro orificios de la barra con los
cuatro orificios al mismo tiempo. Alinee la proyección en la
brida con el orificio adicional en la barra A, luego apriete los
cuatro tornillos e inserte la tapa de la base sobre los pies.
2. Montaje de la caja de interruptores.
“Precaución” nunca retire el tapón de la tubería interior si
quita el servicio de tapón de la tubería interna puede ser
necesario. Nunca afloje el tornillo de fijación del tubo
interior
(1) coloque el tornillo de fijación de la caja de interruptores
girándolo hacia la izquierda
(2) ahora coloque el agujero en la parte inferior de la caja del
interruptor sobre el tubo interno.
(3) gire el tornillo de fijación de la caja de interruptores hacia la derecha y apriételo firmemente.
MONTAJE DEL CABEZAL
1. Identificación de las piezas del ventilador
1. Motor
2. Rejilla trasera
3. Tornillo de seguridad de la rejilla
4. Aspas
5. Tapa de las aspas
6. Rejilla frontal
7. Tornillo
2. Montaje de la rejilla trasera.
Monte la rejilla trasera en el motor y asegúrela con tornillo de
seguridad.
3. Montaje de las aspas
Inserte las aspas en el eje del motor. Apriete las aspas con la tapa
de la cuchilla.
4. Montaje de la rejilla delantera
Hay dos tipos de protección delantera, cada una se ensambla de
acuerdo con lo siguiente
5. Montaje de la protección frontal .
a) Montaje de la protección delantera insertando el gancho en la
parte superior de la protección frontal sobre la protección
trasera. Únalos presionando sus lados para que las dos rejillas queden fijadas en el anillo de
plástico externo.
b) Bloquee el clip y asegúrelo con el tornillo.
LAUSON
AFF109
5
ES
6. Montaje del protector de la rejilla.
Mantenga la rejilla frontal de manera que las marcas queden niveladas y las 2 protecciones
queden centradas. Ahora, empuje todos los clips de seguridad firmemente en su lugar
correspondiente.
GUÍA DE MANTENIMIENTO
Usar en un lugar seco, libre de humedad y agua
Desenchufe el ventilador antes de limpiarlo y desmontarlo. Limpie la suciedad con un
paño limpio. Las piezas de plástico deben limpiarse con un jabón suave y un paño
húmedo. Retire la película de jabón a fondo con un paño limpio.
NOTA: No lo sumerja en agua. No permita que el agua o cualquier otro líquido entre.
Antes de guardar el ventilador, cubra bien la cubierta con una bolsa de
plástico y guárdela en un lugar seco
DESHECHOS
Esta marca indica que este producto no debe desecharse con otros desechos domésticos en
toda la UE. Para evitar posibles daños al medio ambiente o a la salud humana por la
eliminación no controlada de desechos, recíclelo de manera responsable para promover la
reutilización sostenible de los recursos materiales.
LAUSON
AFF109
6
ES
CONDICIONES GENERALES DE GARANTÍA
Gracias por la compra de este producto. Lauson garantiza el buen funcionamiento de sus
productos durante un periodo de 2 AÑOS a partir de la fecha de compra, responsabilizándose
de cualquier falta de conformidad que se manifieste dentro de este plazo, incluyendo la
reparación de los defectos o la sustitución del producto dentro del ámbito de la Unión
Europea.
PROCEDIMIENTO DE RECLAMACIÓN
El titular de la garantía podrá dirigirse al servicio técnico por teléfono al número
(00)34 934 536 222 o visitando nuestra web Lauson: www.lauson.es o dirigiéndose
directamente
Antes de reclamar sus derechos como consumidor, asegúrese de que el producto cumple con
los siguientes requerimientos.
1. La garantía será válida si se presenta debidamente cumplimentada con la referencia
del modelo, nº de serie, fecha de compra y datos del establecimiento. Siendo
requisito imprescindible que vaya acompañada del ticket de compra.
2. En caso de enviar a reparar el equipo, este deberá estar en las mismas condiciones
(embalaje, accesorios, manuales...) en que se adquirió, salvo el deterioro natural por
el uso. La garantía no cubre daños causados en el transporte por un embalaje
inadecuado.
3. Lauson se reserva el derecho a rehusar la garantía en caso de que no se especifique
algunos de los datos solicitados, no sean legibles o estén deteriorados.
4. No están cubiertos por esta garantía los daños o averías producidos por causas
catastróficas, caídas y golpes por uso incorrecto por parte del usuario, así como la
alimentación errónea por fuentes de energía o piezas sometidas a un desgaste natural,
consecuencia de un uso indebido o inapropiado.
5. Este producto perderá su garantía en caso de ser manipulado por técnicos o talleres
ajenos a nuestra empresa.
6. Esta garantía tiene validez únicamente dentro del ámbito de la Unión Europea. Los
términos de garantía contenidos en este certificado no excluyen, restringen ni
modifican los derechos que legalmen-te corresponden al comprador por aplicación al
Real Decreto Legislativo 1 /2007 de 16 de noviembre.
Table of contents
Languages:
Other lauson Fan manuals


