LAWN STAR LSGS 2800 User manual

1
ELECTRIC GARDEN SHREDDER
OPERATING INSTRUCTIONS
MODEL: LSGS 2800

2
Thank you for purchasing the Lawn Star Garden Shredder which is one of the finest and
most advanced shredders today’s technology can produce. Before you begin using it,
please read this manual carefully and familiarise yourself with the control and the proper
use of this product to ensure you get the best possible performance from it.
SAFETY PRECAUTIONS
Read the operating instructions and act accordingly. Keep the operating instructions
for future reference.
Obey all safety instructions and warnings.
Do not allow children under the age of 16 years, nor anyone who is not familiar with
these instructions to use the garden shredder. Do not operate this appliance if under
the influence of alcohol, drugs, or medical preparations.
Children, pets and onlookers should be kept away from the work area, unless
shielded by an effective solid barrier.
Always position the shredder on level, horizontal, solid and dry surfaces so that it is
stable. Do not stretch towards the shredder.
Always wear safety goggles, protective gloves and clothing including sturdy, non-slip
footwear.
Keep body parts and loose clothing away from the cutting blades. Do not put your
hand into the hopper or the discharge chute.
Only operate this shredder once correctly and fully assembled.
Do not pull the shredder using the cable or place any stress on the cable.
Inspect your garden shredder and its supply/extension cable before each operation. If
any part is damaged or worn, repair or replace before operation. If cable becomes
damaged during use, disconnect from power supply immediately. Do not touch the
cable before disconnecting the supply.
Use only genuine Lawn Star (Pty) Ltd. replacement parts when servicing or repairing
the unit. These parts are available from your supplying dealer or service agent.
Repairs may only be performed by authorised service agents.
Switch the device off, disconnect the plug and wait for the cutting blades to come to a
complete standstill before servicing, cleaning, transportation or storage.
Disconnect the unit from the power supply when unattended or not in use. When not
in use, store the unit indoors in a dry and locked place, out of reach of children.
Mains connection: The mains voltage and the kind of current must correspond to that
specified on the specification label on the product.
WARNING : To prevent electrical shock hazards, use only extension cables suitable
for outdoor use, with splash-proof socket outlets protected by a sensitive Residual
Current Device (RCD) with tripping current of not more than 30 mA.
Extension cords may not exceed 35 m in length and must have wires with a minimum
cross-section of 1.5 mm2
Stop the motor and disconnect the plug from the mains if the shredder becomes
blocked.
Never remove any of its components and never use a damaged or incomplete
machine. Never modify any of the machine components.
Always ensure all handles and guards are fitted when using the shredder. Ensure all
screws and nuts are properly tightened before use, except the “pressure plate
adjusting screw” (Fig.10 & Fig.11) which is factory set.
Do not use your garden shredder for any jobs other than those for which it was
intended.
Do not move the machine when the motor is running.

3
Never leave the shredder unsupervised. First switch off the motor and disconnect
from the mains.
Do not force your shredder. If motor labours, feed less material into the feeder.
The shredder is exclusively intended to shred plant residues, and cuttings from
shrubs and branches. Do not insert items such as stones, glass, metal, bones, plastic
or plastic bags, roots, fabric, paper, cardboard and wire ropes etc. These items can
damage the shredder.
This gear driven shredders is not suited to shredding palm fronds.
Inspect the material to be cut and remove all debris that could be too large.
Avoid dangerous environments. Do not use the unit in poor light or in damp or wet
locations. Do not use in the rain.
Only switch off the shredder when the entire material to be shredded has been
processed inside the housing.
Do not allow the discharge chute to become stacked with debris. This blocks new
material coming down the chute.
If the blades are jammed or blocked by obstacles, switch the motor off immediately,
disconnect the plug from the main power supply and visually inspect the shredder for
damage. Note, if the shredder is damaged, repairs and servicing must only be
performed by authorised dealers and service agents. If the shredder is blocked, follow
the “CLEARING BLOCKAGES” procedure.
Note:
Frequently monitor the build up/collection of shredded material.
Do not over-fill the collection box.
Do not allow shredded material to build up and fill the inside of the shredder’s
discharge chute.
When the collection box is full, always turn the garden shredder off before emptying.
In normal use, do not switch off the garden shredder until all of the shredded material
has cleared the cutter assembly. If the garden shredder is switched off too quickly,
remaining pieces of material may clog the blade assembly and stall the motor when
the shredder is switched back on.
SAFETY FEATURES
Safety features are designed to protect you against injuries and must not be altered or
circumvented.
Hopper: The hopper funnel is designed to prevent unintentional contact with the
blades.
Overload: The overload switch turns the motor off if it is overloaded.
The shredder will only operate if the collection box (Fig.A No.6) is inserted fully in the
shredder frame and the locking-knob (Fig.A No.8) engaged in the upwards position
(Fig.9).
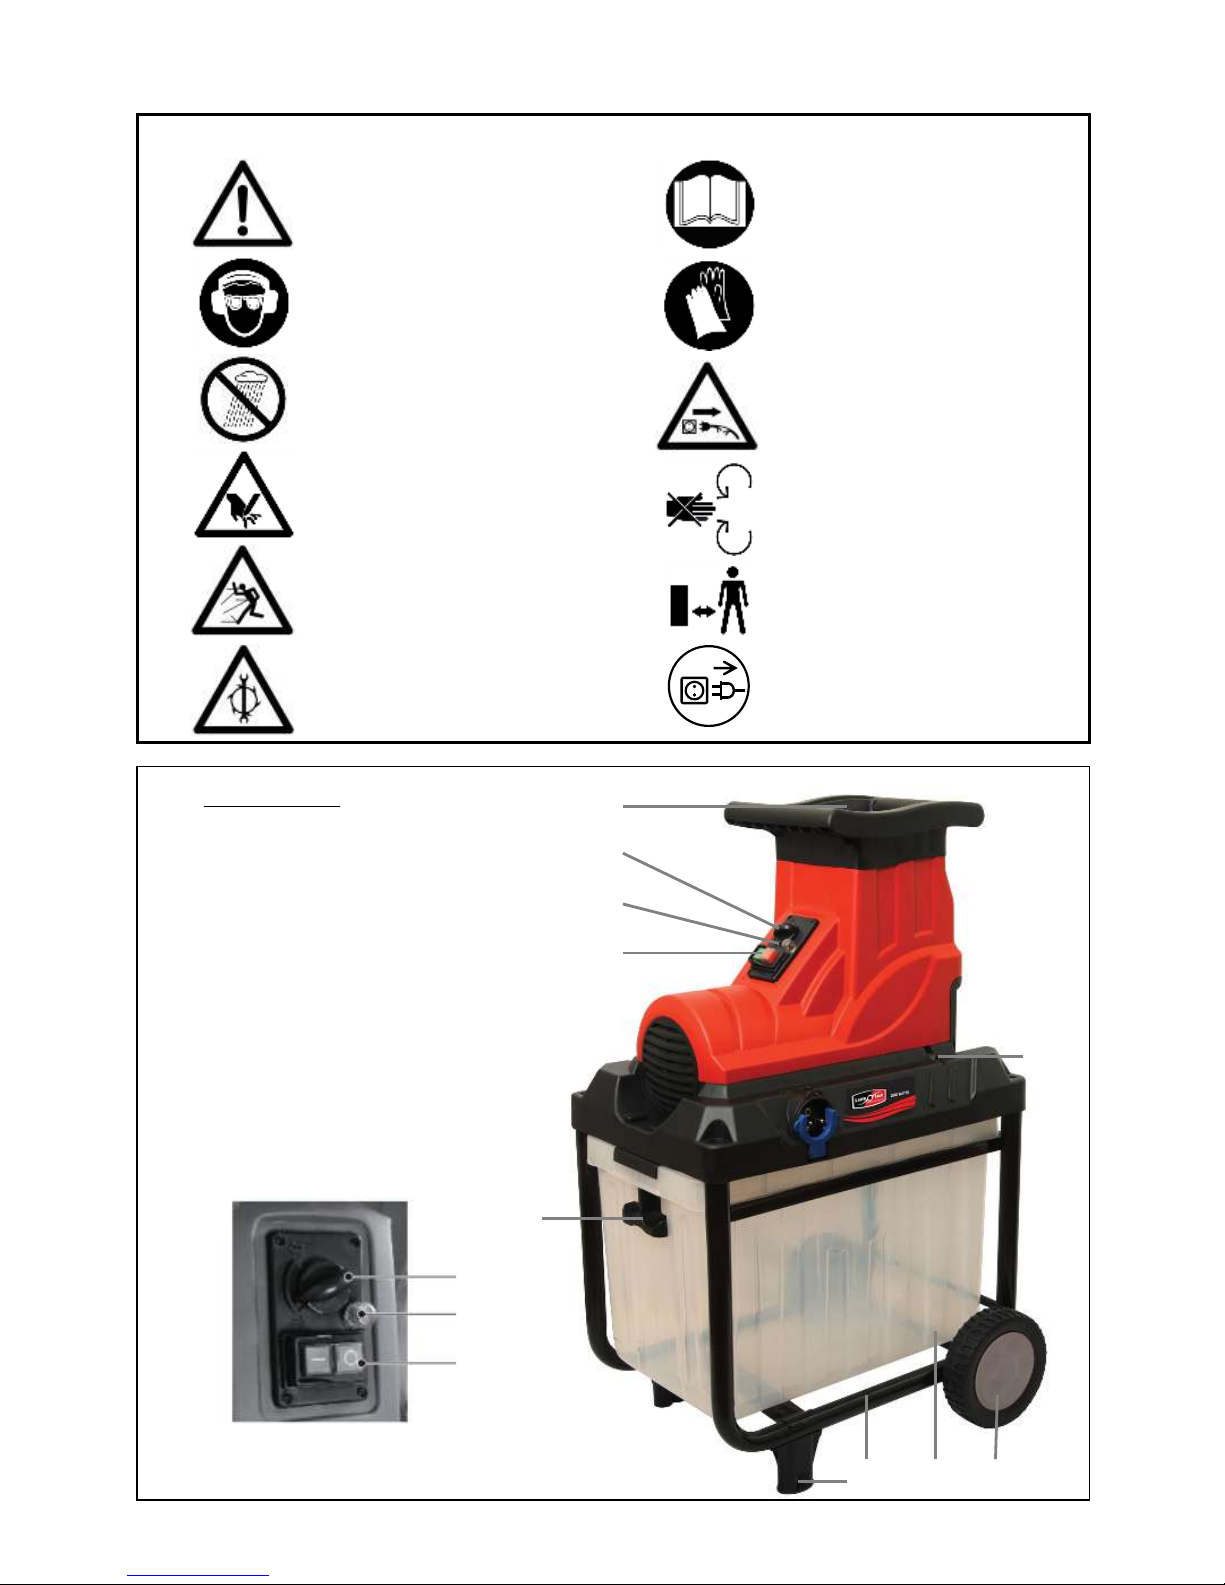
4
1
2
3
4
5
6
7
Figure A: Key
1. Inlet / feeder
2. Forward / Reverse selector
knob
3. Overload protector button
4. On/off switch
5. Frame and feet
6. Collection box
7. Wheel
8. Locking knob –collection box
9. Adjusting screw or dial –
pressure plate
8
9
2
3
4
Warning Symbols
Read operating instructions
before use
Disconnect from mains power
after use or immediately before
maintenance
Wear safety gloves
Wear ear & eye protection
Keep bystanders away from
shredder when it is in use
Warning! Do not put hands or
feet under the cover of the
shredder when it is running
The blades will continue to
rotate after the shredder has
been switched off
Do not use in rain
Disconnect from mains power
immediately if the power cord
becomes damaged
Attention! Observe the
following safety warnings
Beware of thrown or flying
objects
Beware of blades when
performing maintenance

5
Axle
tube
Axle
6

6
ASSEMBLY OF SHREDDER
Note: Assembly of the shredder requires two people.
Fitting the wheels and feet: Fig.A No.5
You may need assistance when lifting the machine out of the box and assembling.
1. Turn the frame upside down and place it on the floor (Fig. 2).
2. Position the axle tube between the two legs of the frame (Fig. 2).
3. Position the small washer (Fig.1 No.5), wheel bushes (Fig.1 No.3), wheel, big
washer (Fig.1 No.6) and nut (Fig.1 No.4) as shown in figure 1. Do this for both
wheels. Tighten both the wheel nuts using a suitable spanner. Note: The wheels
must be fitted correctly to allow the nuts to tighten on each end of the axle.
4. Push the wheel hubcaps firmly onto the wheels (Fig.4 No.2).
5. Fasten the 2 feet to the frame –each foot required 2 washers and 2 screws
(Fig.12). Push the cap on the foot.
6. Turn the assembly onto its wheels and feet (Fig.5).
Fitting the motor and gear unit: Fig 6
1. Position the upper shredder unit on the frame –ensure the inlet feeder (Figure A
No.1) is located above the end of the frame with the wheels.
2. Place the 4 washers and then fasten the screws provided (Fig.6) in the corners of
the shredder unit.
Fitting the Collection box: Fig. 7 to 9
1. Ensure the locking handle for the collection box is down (Fig.8).
2. Push the collection box in the frame under the upper shredder unit (Fig7). Ensure
the collection box is fully inserted.
3. Push the locking handle up to secure the collection box (Fig.9). The locking handle
activates a safety switch. The garden shredder can only be switched on when the
locking handle is in the upwards position.
11
Pressure
plate
10
12
Foot
Washer
Screw
Cap
Some units have been fitted with a dial
adjustment mechanism and alum key is
not required
7
Environment: “A Greener SA –More Sustainable”
To prevent damage during transport, the appliance is delivered in packaging which
consists largely of reusable material. Therefore, please make use of options in your
neighbourhood for recycling the packaging.
OPERATING INSTRUCTIONS
Preparations for use: Before starting the machine, always make sure the feed hopper is
empty. Ensure the air openings are kept clean and free from obstructions. Check all nuts
and screws are tight.
Push the collection box in the space under the shredder (Fig7). Ensure the collection
box is fully inserted and move the locking knob upwards (Fig. 9).
Attach extension cord to the plug provided on the garden shredder.
Always switch the motor on before inserting anything to be shredded
Only insert organic materials, for example branches (max. 40mm diameter), twigs,
shrubs, flower stems, leaves etc. Before starting, select branches to be cut with a
diameter of less than 40 mm. Branches that are too thick for the garden shredder
should be cut with a saw or other appropriate implement.
Examples of materials which are not suitable for mulching include: Glass, metal,
plastic bags, stones, fabric, earth-covered roots and waste that does not have a firm
consistency, e.g. kitchen waste.
Keep away from the discharge chute when starting the motor.
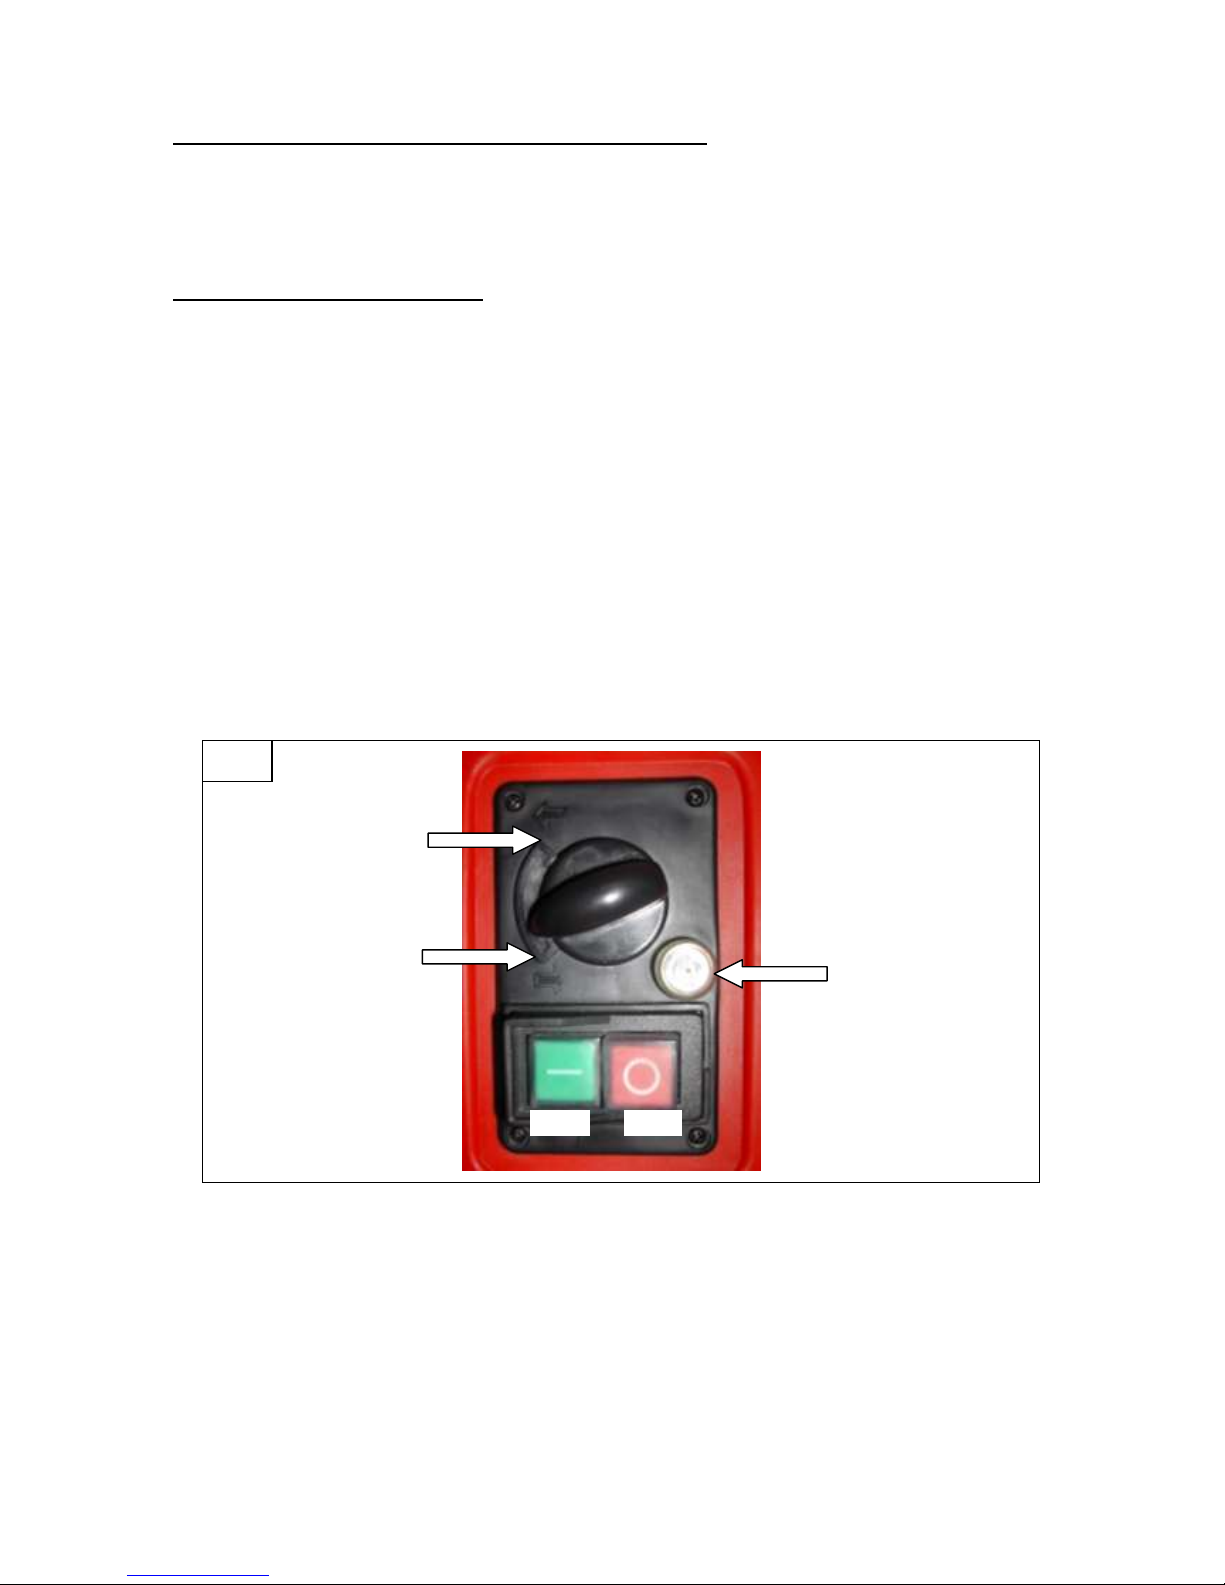
STARTING
Plug the shredder into the mains power supply
Select FORWARD rotation by turning the forward/reverse knob towards the forward
position (Fig.13).
Turn on by putting the on/off switch into the “I” position (Fig.13).
Feed material to be shredded into the hopper. Material will be automatically pulled
through the blades and emerge at the discharge opening.
Reverse position
Forward position
13
ON
OFF
Overload
protection button

8
STOPPING
Only switch off the shredder when the entire material to be shredded has been
processed inside the housing. If the garden shredder is switched off too quickly,
remaining pieces of material may clog the blade assembly and stall the motor or
damage the shredder when the shredder is switched back on.
Turn off the shredder by putting the on/off switch into the “O” position (Fig.13). The
motor continues to run and comes to a stop in a few seconds.
Warning: Do not feed in any material after the motor has been stopped.
This will get caught in the machine and can prevent restarting the shredder.
CLEARING BLOCKAGES
If the shredder becomes blocked, stop the shredder by pushing the “off” switch (Fig.13).
Turn the forward/reverse selection knob to the reverse position (Fig.13). Turn the
shredder on again by pressing the ON button. This should clear any blockages. Once the
blockage is free, switch off the shredder and turn the forward/reverse selection knob back
to the forward position, then turn the shredder back on by pushing the ON button.
OVERLOAD PROTECTION
1. The shredder is equipped with a built-in motor overload protection. In the event of
overloading, the current is broken and the main switch is turned off automatically.
2. Disconnect shredder from power supply before attempting to unblock any jams.
Note: Allow at least 5 minutes for the motor to cool down.
3. Push in the overload protection button to reset (Fig.13).
4. Connect the shredder to mains power.
5. If the cutting blades are jammed or clogged with material, turn the rotation
direction switch to the reverse position (Fig.13), before switching the shredder
back on again.
To prevent damage to the shredder do not exceed 40 mm in diameter branches.
NOTE:
1. Frequently monitor the build up/collection of shredded material.
2. Do not allow shredded material to build up and fill the inside of the shredder’s
discharge chute.
3. When the collection box is full, press the On/Off switch to turn the garden shredder
off before emptying.
4. Check all the material you want to shred carefully. Make sure it does not contain
any stones or nails as they might severely damage the shredder. Be aware of
vibrations. Heavy vibrations are caused by damaged or worn out blades.

9
STORING THE GARDEN SHREDDER AFTER USE
Store the shredder in a dry place, away from children or animals.
REPAIR AND SERVICE
Repairs and servicing must only be performed by authorised dealers and service agents.
CAUTION
Never cut during wet or damp conditions.
MAINTAINANCE AND CLEANING
Disconnect the plug and wait for the blades to come to a standstill before
carrying out any maintenance or cleaning operations.
Clean the shredder by brushing away dirt and waste residue that may be caught in
the cutter. Wipe the motor housing clean with a damp cloth or hand brush. DO NOT
use running water, solvents, strong detergents or a high pressure washer to clean the
shredder.
Lubrication: The appliance does not need any extra lubrication.
Switch the shredder off immediately if the machine starts to shake or produce
abnormal noise. Disconnect the plug and check for damage.
Damaged cutting blades must be repaired or changed by qualified service agents
only.
PRESSURE PLATE ADJUSTMENT:
WARNING
Ensure the shredder is turned on when adjusting the pressure plate.
Adjusting the pressure plate while the motor is turned off will damage the
shredder.
WARNING
Ensure the shredder is turned on when adjusting the pressure plate with
the motor running in the forward direction (figure 13 shows forward
position/direction)
WARNING: Adjusting the pressure plate should only be attempted when
deemed totally necessary. Adjusting the pressure plate too often or too far
could cause excessive wear or failure. Before adjusting the pressure plate,
always check that the pressure plate does not have excessive wear. If the
pressure plate has excessive wear, it must be replaced by an authorised
service agent.
If the shredder fails to shred material, the pressure plate can be adjusted (figure 10 &
11).
With the motor running in the forward direction, turn the adjusting screw or dial
very slowly and slightly in a clockwise direction until fine aluminium chips fall out
of the discharge opening, then stop adjusting the pressure plate. There will be an
audible noise when the pressure plate makes contact with the blades.

10
LAWN STAR ( PTY ) LTD
WARRANTY CARD
LSGS 2800
Please read carefully
This card is required for warranty repair claims. Please fill in this card and keep it in a safe place,
stapled to the original proof of purchase. The original proof of purchase (i.e. receipt, invoice,
docket, etc.) must show the original date of purchase and clearly identify the product.
WITHOUT THIS CARD AND ORIGINAL PROOF OF PURCHASE, ANY WARRANTY
BECOMES NULL AND VOID.
Make:……………………..Serial No:………..……………….Date of Purchase:………………….
Model:………………………………
PURCHASER PURCHASED FROM
NAME: NAME :
ADDRESS: ADDRESS:
PHONE : PHONE:
LIMITED DOMESTIC USE WARRANTY
Lawn Star (Pty) Ltd. guarantees this unit to be free from defects in material and workmanship. If
any such defect should become apparent during a period of
12 MONTHS
from the date of the original purchase, we undertake to repair this unit free of charge or replace
this unit with a factory reconditioned unit at our discretion. This does not prejudice your rights in
terms of the Consumer Protection Act.
Transport costs to our service centre and back to the owner, should such costs occur, will be
carried by the owner of the unit.
The repaired or replaced unit will be covered by this warranty for the remainder of the original
warranty period.
This warranty covers only the original purchaser of this unit.
This warranty becomes invalid if:
-the unit has been used commercially or for rental purposes;
-damage has been caused by misuse, abuse, accident or normal wear and tear;
-spares and accessories other than specified by Lawn Star are used with this
unit;
-the unit has been opened, altered or otherwise tampered with;
This warranty does not cover wear and tear on blades, pressure plate, collection box and
wheels.
PLEASE READ AND UNDERSTAND THE INSTRUCTION MANUAL BEFORE YOU OPERATE
THIS UNIT.

11
LAWN STAR ( PTY ) LTD.
For service and warranty repairs please contact your nearest Service
Agent listed below:
CUSTOMER CARE : 0860-LAWNSTAR
HEAD OFFICE : 98 Bofors Circle, Epping 2 South, Cape Town
PO Box 496, Parow, 7499
Tel: 021-535-5249 Fax: 021-535-4624
EASTERN CAPE: Tel: 041-365-6600 Fax: 041-365-6661
FREE STATE : Tel: 082-556-6325 Fax: 086-691-6297
GAUTENG : Tel: 011-979-0162 Fax: 011-979-0174
KZN : Tel: 031-579-4390 Fax: 031-579-4400
WEST COAST : 082-826-0316
NORTHERN CAPE: 082-826-0316
OVERBERG : 084-609-7341
NAMIBIA : Tel: 061- 232-475 Fax: 061- 242-139
BOTSWANA : +267-318-6851
ZIMBABWE : +263-4-486 192/646
For more information visit: www.lawnstar.co.za
Table of contents


