Standard Wood Fired Arch - Two Foot In Width 2018 Page:
TABLE OF CONTENTS
EQUIPMENT DESCRIPTION ................................................................................................................................................................4
DIAGRAM OF THE STANDARD WOOD FIRED ARCH ............................................................................................................................6
SETUP OF THE STANDARD WOOD FIRED ARCH..................................................................................................................................6
RECEIVING YOUR ARCH: ........................................................................................................................................................................6
SUGAR HOUSE SETUP: ...........................................................................................................................................................................6
FOUNDATION FOR THE ARCH ................................................................................................................................................................7
SETTING THE ARCH ON THE FOUNDATION:...........................................................................................................................................7
INSTALL THE FRONT DRAFT DOOR ADJUSTMENT LATCH....................................................................................................................... 8
INSULATING THE ARCH:.....................................................................................................................................................................9
General Notes................................................................................................................................................................................... 9
Cementing of Insulation Board and Bricks ...................................................................................................................................................... 11
Bricks...............................................................................................................................................................................................................11
Standard Wood Fired Arch Design..................................................................................................................................................................12
Considerations For A MAX/COMBO Flue Pan ................................................................................................................................................. 12
Insulating a Drop Flue Arch ............................................................................................................................................................12
Insulating a 2X6 Arch ...................................................................................................................................................................................... 12
Insulation Board ........................................................................................................................................................................................ 13
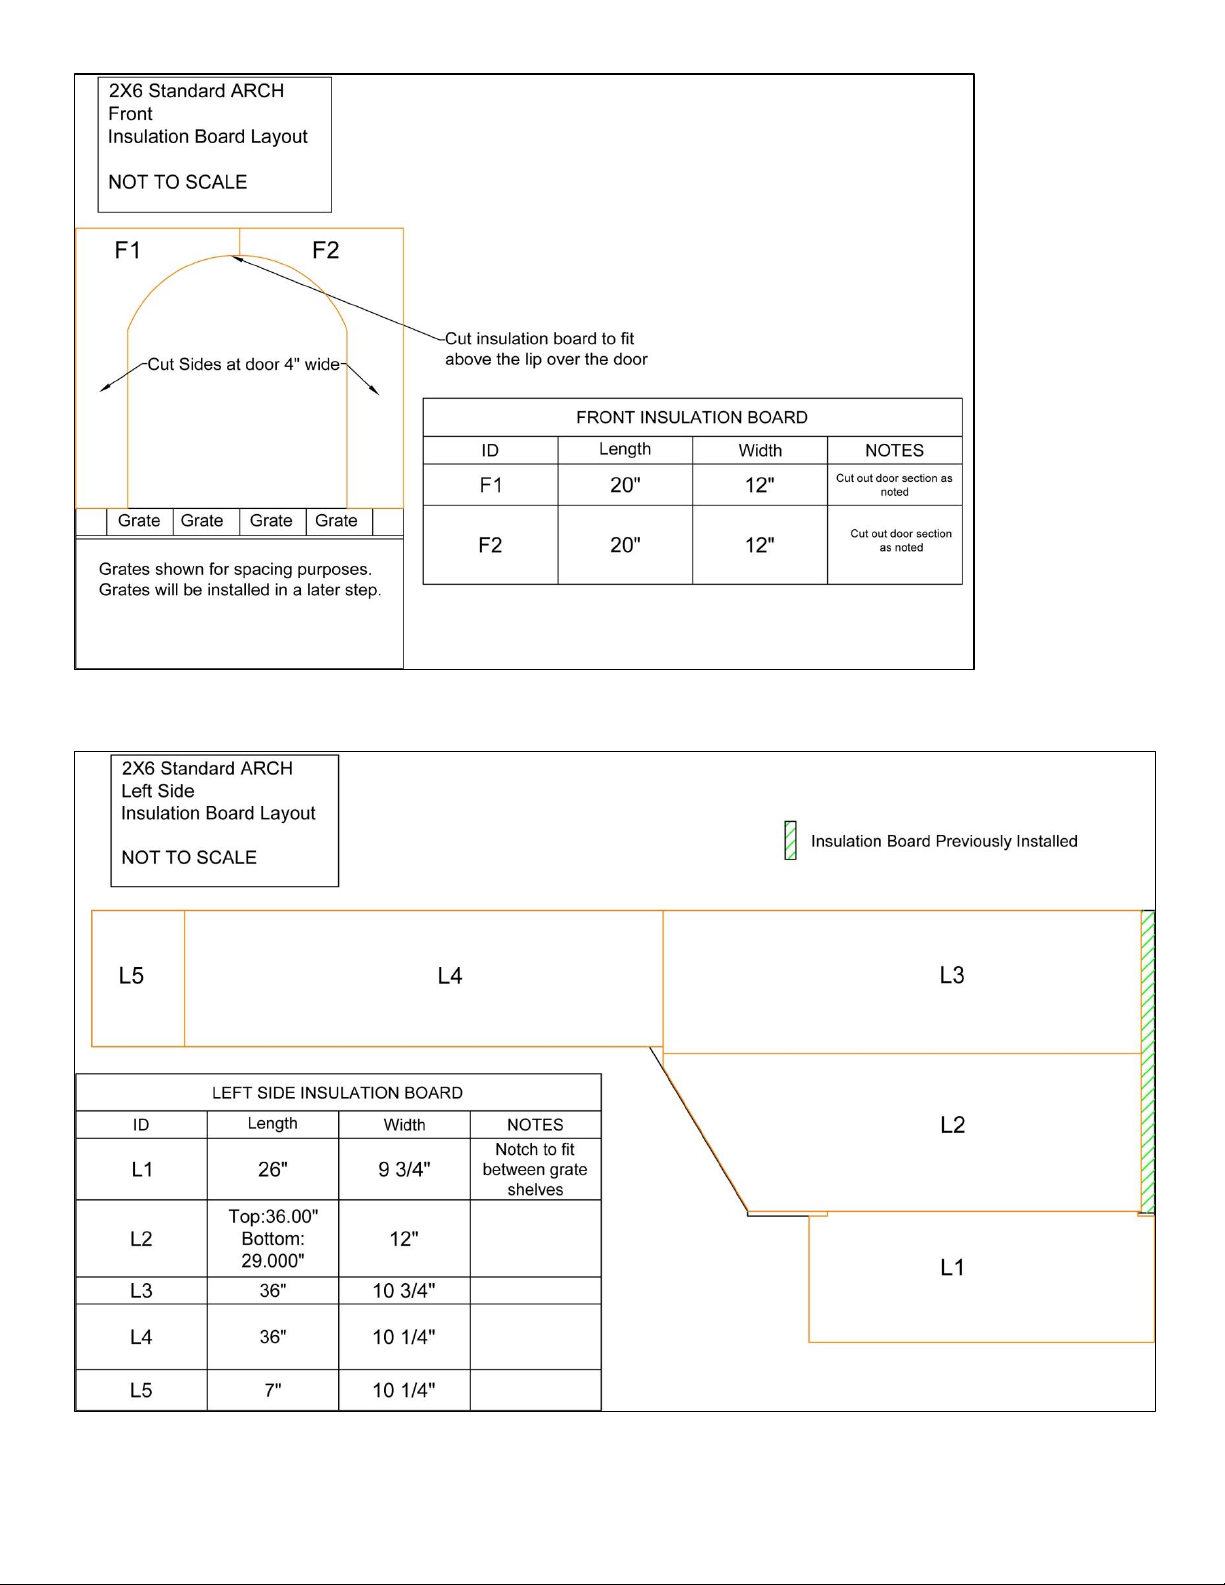
Cut Out Diagram...................................................................................................................................................................................13
Front..................................................................................................................................................................................................... 14
Left Side................................................................................................................................................................................................14
Right Side ............................................................................................................................................................................................. 15
Back...................................................................................................................................................................................................... 15
Rear Grate Shelf to Top of Incline ........................................................................................................................................................16
Ash Pit Rear .......................................................................................................................................................................................... 16
Bricking ......................................................................................................................................................................................................17
Floor behind Top of Incline .................................................................................................................................................................. 17
Back...................................................................................................................................................................................................... 17
Left Side................................................................................................................................................................................................18
Right Side ............................................................................................................................................................................................. 18
Ash Pit Rear .......................................................................................................................................................................................... 19
Install the Grates .................................................................................................................................................................................. 19
Front..................................................................................................................................................................................................... 20
Grate Shelf to Top of Incline................................................................................................................................................................. 20
Insulating a 2X8 Arch ...................................................................................................................................................................................... 21
Insulation Board ........................................................................................................................................................................................ 22
Cut Out Diagram...................................................................................................................................................................................22
Front..................................................................................................................................................................................................... 23
Left Side................................................................................................................................................................................................23
Right Side ............................................................................................................................................................................................. 24
Back...................................................................................................................................................................................................... 24
Rear Grate Shelf to Top of Incline ........................................................................................................................................................25
Ash Pit Rear .......................................................................................................................................................................................... 25
Bricking ......................................................................................................................................................................................................26
Floor behind Top of Incline .................................................................................................................................................................. 26
Back...................................................................................................................................................................................................... 26
Left Side................................................................................................................................................................................................27
Right Side ............................................................................................................................................................................................. 27
Ash Pit Rear .......................................................................................................................................................................................... 28
Install the Grates .................................................................................................................................................................................. 28
Front..................................................................................................................................................................................................... 29
Grate Shelf to Top of Incline................................................................................................................................................................. 29
Insulating a Raised Flue Arch (Not Max Combo) ............................................................................................................................30
Insulating a 2X6 Arch ...................................................................................................................................................................................... 30
Cut Out Diagram...................................................................................................................................................................................31
Left Side................................................................................................................................................................................................32
Right Side ............................................................................................................................................................................................. 33
Back...................................................................................................................................................................................................... 34
Ash Pit Rear .......................................................................................................................................................................................... 34
Front..................................................................................................................................................................................................... 32
Rear Grate Shelf to Top of Factory Baffle............................................................................................................................................. 35