Leader Fox Hasuda User manual

Electric Bicycle Operating
Instructions
The seller is obliged under the law to attach the Operating Instructions for electric bicycle LEADER FOX to each product.
MAX DRIVE
Bend
Hasuda
Vivalo
Neba

Introduction
Dear users,
please read carefully all the information regarding your E-LF product to ensure optimal functioning of your
bike. The following text containing a comprehensive description will provide you with information on all
aspects and details (including installation, setting up and general use of the display) regarding the use of
our display. This instructions document will also help you to solve potential problems and failures
What is Electric Bicycle?
Electric bicycle is a standard bicycle with added electrical motor which provides pedal assist. The motor is
activated by pedalling which is only helping you. Electric bicycle can be also set in motion by the control
button or the accelerator but only up to the maximum speed limit, i.e. 6km/h. (e.g. while walking with your
bike). The maximum speed for motor power assist is 25km/h with the tolerance of 10% (when you reach
this speed, the motor switches itself off and you pedal as you would riding a conventional bicycle). When
your battery runs ou tor if the motor is switched off, you can ride the electric bicycle the same way as a
conventional bicycle.
The properties of the electric bicycle conform to the European Standart EN 15194-1 and the electric bicycle
is in terms of Road Traffic Law viewed as a conventional bicycle i.e., you can ride in bicycle lanes, you do
not need a driving license and the use of helmet is compulsory only until the age of 18.
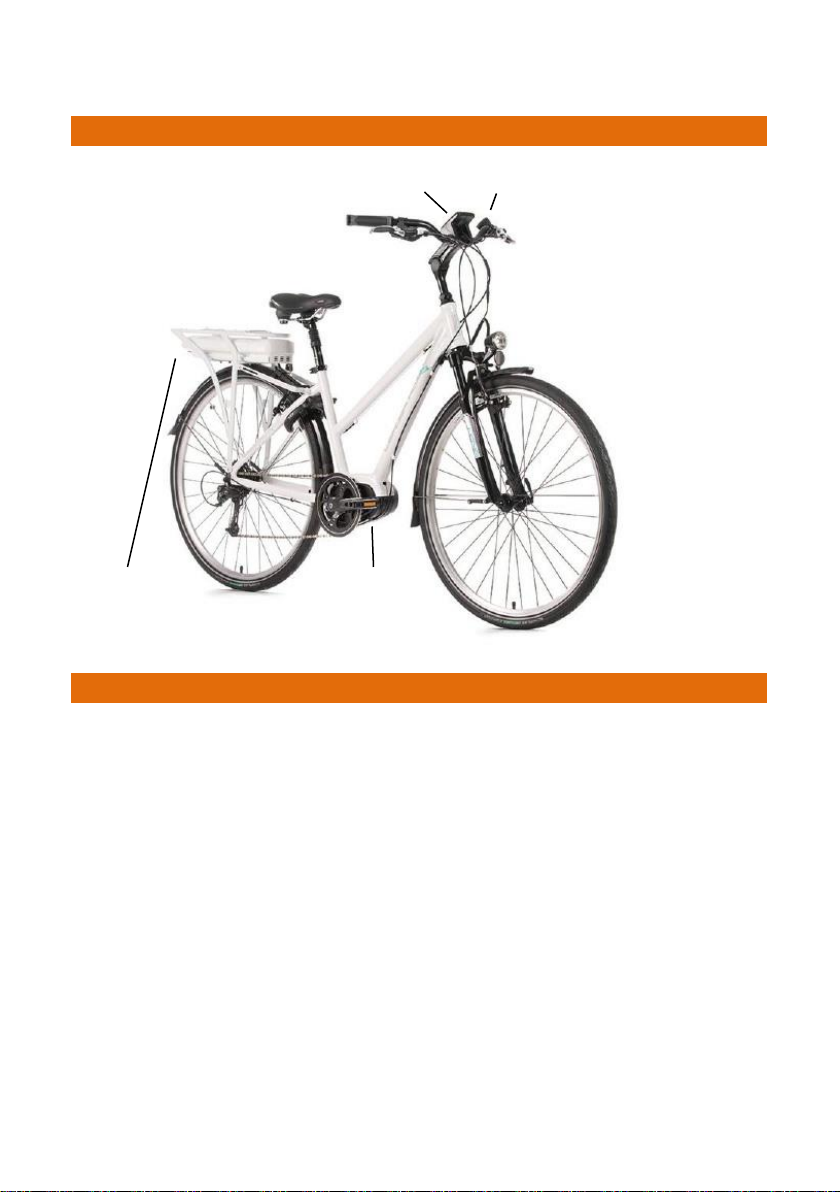
Description
Display Controller
Battery Motor
Factors influencing the electric bicycle range
1. Rolling friction of tires. LEADER FOX e-bikes are fitted with tires with low rolling resistence and increased
resistence to puncture. It is also important that the tires are inflated properly. Therefor, if the tires of your
electric bicycle are underinflated, the range will decrease.
2. Weight of the electric bicycle. The lower the weight of the electric bicycle, the greater the range.
3. Battery status. It depends on whether the battery was fully charged before your trip. It is also to be
expected that the highr the number of discharge cycles the battery has undergone, the smaller capacity it
has.
4. Route profile and surface. The range is shorter, the bigger the altitude difference, the poorer the surface
and the steeper slopes you climb.
5. Mode of riding. It depends on which riding (assistance) mode you have set.
6. Continuity of riding. The more braking and acceleration, the shorter the range.
7. Air resistence. Air resistence levels depend on whether we ride a bicycle with a low frame and sitting
upriht or whether we ride a sporty bicycles with seat set to the same height as the handlebars.
8. Wind speed. The stronger the wind we have in the back, the longer the range and vice versa.
9. Weight of the rider and load. The greater the weight, the shorter the mileage.
10. External temperature. The lower the external temperature, the lower the capacity.

Basic safety recommendations
Riding safety:
While riding, pay only as much attention to the bicycle settings and display as not to jeopardize your safety.
Before riding, check that wheels have been securely fitted in the frame and fork, since their incorrect
installation can cause serious injury.
When riding the electric bicycle, you should be fully familiar with its behaviour and control, otherwise it
could result in serious injury.
If you ride in poor visibility conditions or at night, use the lights.
Battery:
DO NOT use the battery with other devices.
DO NOT dismantle or modify the battery.
DO NOT connect positive and negative poles of the battery with a metal object.
DO NOT immerse the battery in water.
DO NOT throw battery into fire.
Charger:
DO NOT dismantle or modify the charger
DO NOT use to charge other batteries.
AVOID shocks and contact with water.
DO NOT touch the charger with wet hands.
KEEP the charger away from children and animals.
DO NOT cover the charger nor place any objects on it.
DO NOT pull the cable when disconnecting the charger, ALWAYS pull the plug.
DO NOT use the charger if it is clearly damaged.
Basic maintenance and instruction guide for the use of electric bicycle:
Always remove the battery if you are going to manipulate with the cables or replace any part of the electric
bicycle, since there is a danger of injury by electrical current.
If you feel that the electric motor or any of its parts might have gotten loose, make sure that the nuts are
properly tightened or follow further information in the user guidebook.
The chain should be regularly cleaned by cleaning agents for this purpose. Do not use alkaline or acidic
cleaners to remove rust or dirt. These cleaners will damage the chain.
Use the battery charger only for its intended purpose. If the charger or any of its parts is broken, do not use
it as this could cause injury.
Electric bicycle is not intended to be used by people with lowered physical, sensory or mental capacities or
people lacking experience and knowledge required to use the product.
Electric bicycle is not intended for use by children.
Do not attempt to repair the electric motor system, as this can cause its damage and malfunction.
The bicycle electric system is designed to be fully waterproof and can therefore be used even in harsh
weather conditions or in wet environment. You should, however, avoid its direct dipping in water.
Do not use high pressure water (WAP) to clean the bicycle. If water gets into the system, this can cause
damage or corrosion.
When transporting the bicycle on a vehicle in rainy or wet weather, remove the battery and store it in a dry

place.
Handle the bicycle carefully and avoid shocks.
To clean the battery and all the plastic parts of the system, use a well wrung out, damp cloth.
Electric set:
The system uses monitoring of torque, monitoring of speed of the pedal assist system and monitoring of
real speed of wheels.
The system uses a dual protection feedback for measuring the speed signal to ensure safety and reliability
of the system.
It has high starting torque, maximum torque of over 80 Nm, suitable especially for riding uphill.
It is highly efficient with low power consumption, long range, low noise levels, and smooth operation.
Description and scope of operation:
The motor unit works properly under the following operating conditions:
Temperature range - 20 + 55°C
Relative humidity - 15 - 95% RH
Maximum torque - ≥ 80
Weight - 3.9Kg
Noise - <55 dB
Dustproof/ waterproof - IP66
Certified - CE ROHS/ EN14766/ EN114764/ REACH
Front and rear light - DC 400mA/6V
Description of the power unit is placed on the cover and shows the following information:
MM G33.350 - name of motor unit
1401 - date of manufacture e.g.: January 2014 in this case
0001 - is so-called serial number which ranges between 0000 and 9999, 0001 is for example the serial
number
of the first manufactured motor.
36V - nominal voltage
250W - nominal motor power
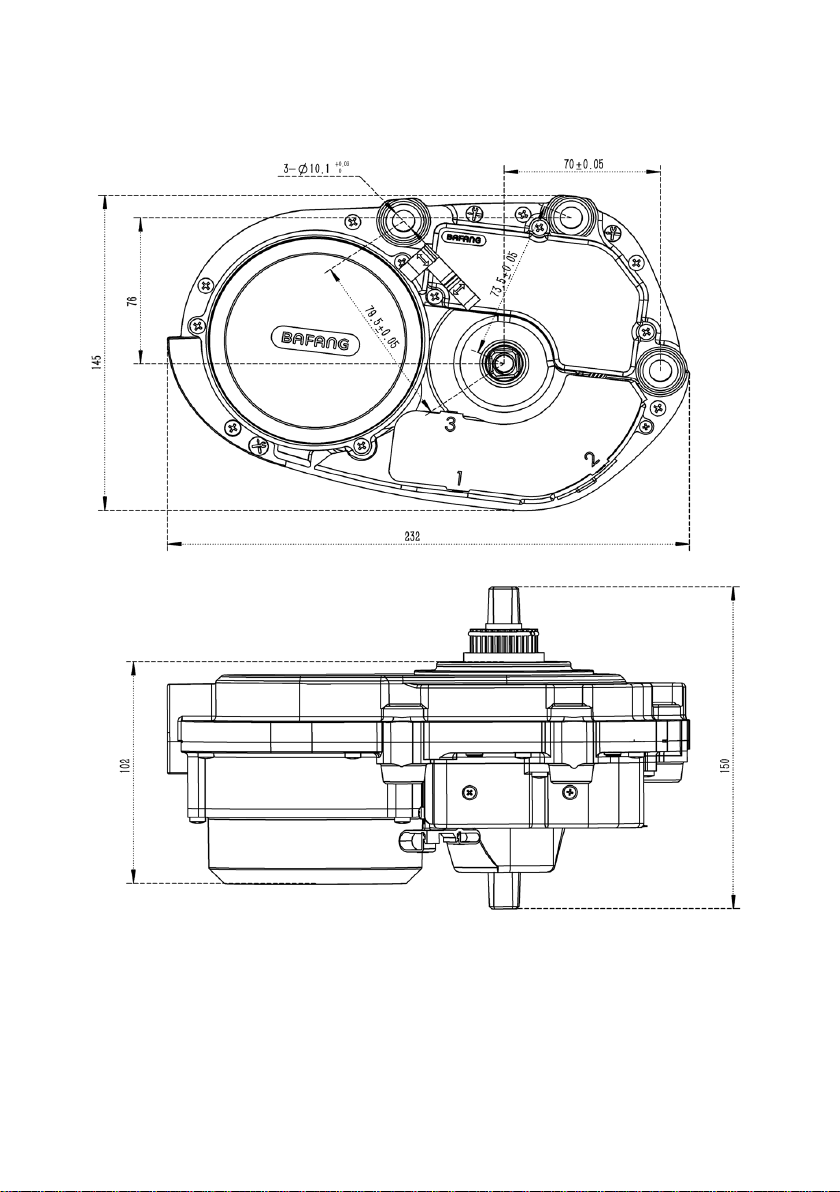
Dimensions of the power unit:

Battery
Battery charging and maintenance:
Charge the battery in a dry environment to avoid short-circuit damage.
Charge the battery to at least 60% of capacity once every 3 months even when the bicycle is not used.
Do not cover the battery or the charger.
Do not leave the battery constantly connected to the power source.
Use the charger only to charge the battery.
Do not use the battery for other appliances. It has been made specifically for this model.
Do not disassemble or modify the battery pack.
Do not throw the battery into fire or expose it to extreme temperatures.
Recharging time from zero to 100 % is 4-6 hours.
If the battery is not charged after 6 hours, disconnect the battery and abort charging. The battery may
overheat, crack or ignite.
In case of liquid from battery getting into your eyes or in contact with your skin, flush with clean water
immediately and seek medical help. Otherwise, this can result in serious injury.
Do not use the battery if it is clearly damaged, it can result in its destruction.
Do not attempt to deform or otherwise tamper with the battery.
Do not attempt to solder a direct connection of battery and cables, it could result in cracks or ignition of
the battery.
Do not use the battery near fire or source of direct heat, do not throw the battery into fire, as this can
cause cracks or ignition of the battery.
Do not expose the battery to shocks or vibration.
Do not insert metal objects into the power outlet, as this could cause short-circuit, overheating, crack or
ignition of the battery.
KEEP the charger away from children and animals.
Rear light Lock
Switch

Use the battery only in this temperature range:
Operation: -10°C - 50°C
Charging: 0°C - 40°C
Charging:
Please pay close attention to handling, charging and storage of the battery, as battery is the most
expensive part of the electric bicycle. The battery is sensitive to precise charging. Therefore, it is necessary
to charge Li-Ion rechargeable batteries using the charger supplied. Connect the charger to 220-240V power
outlet. 5A protected circuit is sufficient. The charger will automatically suspend charging when full capacity
of all cells is reached.
It is recommended to fully charge the battery after every ride. Battery charging can take 1 to 5 hours
depending on the condition of the battery cells. Charging should only be performed in indoor dry areas
(wet conditions and dripping water can damage the charger) at the temperatures of 5 to 40°C.
The charging process is indicated by red glowing LED. After the battery is charged and the charging process
is finished, green LED will light up. The battery contains a charge-monitoring indicator (when the charge
indicator button is pressed, the charge indicator will light up). If the LED on the charger turns green
immediately after the battery is connected, it is possible that the charger or the battery is faulty. Repeat
the charging process and if this does not change, please contact your seller.
Always switch off the battery when finished riding the bike.
Normal battery behaviour:
If the motor stops running smoothly and starts being “jerky”, it can indicate that battery is too low. In this
case, turn off the electric power system and continue without motor assistance as you would when riding a
conventional bicycle.
The battery may heat up and this is normal and does not indicate any defect. The battery is protected by a
temperature sensor and switches off automatically in case of excessive overheating. Wait until the battery
cools down to the normal operating temperature and then ride on.
If you feel that the total capacity of the battery has decreased, this could happen due to charging or
operation in non-ideal weather conditions. Perform 3 full charging cycles. Fully discharge the battery
during riding and then charge it to full capacity in room temperature.
If the status indicator shows that the battery is discharged, there is still minimal voltage left, which protects
the battery from damage but is not sufficient to power the electric bicycle. Charge the battery as soon as
possible. Never leave the battery in fully discharged state as this could result in damage.
Battery capacity:
When you press the battery switch, a specific number of LEDs will light up depending on the charge level.
Number of LED
Remaining capacity of battery
1
0 ~ 25%
2
26 ~ 50%
3
51 ~ 85%
4
86 ~ 100%

Information in the battery menu:
Code
Explanation
B01
Current temperature
B02
Maximum temperature
B03
Lowest temperature
B04
Total voltage
B05
Current
B06
Average current
B07
Remaining capacity
B08
Full capacity
B09
Relative charge level
B10
Absolute charge level
B11
Charge cycles
B12
The longest period without charge
B13
Time lapsed since last charge
D01
Voltage cell 1
D02…
Voltage cell 1…
Proper care of the battery prolongs its life.

LCD display
Display parameters:
Power –36V / 48V
Nominal current –10 mA
Maximum operating current –30 mA
Tripping current –< 1 uA
Operating current for switches –50 mA
Operating temperature –- 18 ~ 60 %
Waterproof mark –IP65
Material:
The body is made from PC.
The liquid crystal display is made of hardened PMMA
Overview of functions and description of signs:
Simple control of the display by 5-button external keyboard which uses bidirectional serial
communication.
Signification of speed mode:
Speed –real speed at a given moment
MAXS –maximum achieved speed
AVG –average speed

Km/Mile:
depends on user preference
Intelligent battery status indicator:
Thanks to the usage of optimal algorithm, stable indicator shows the battery level without fluctuation.
Automatic light switch:
The lights on your electric bicycle automatically switch on/off according to specific lighting conditions.
Adjustment of lights and the display backlight is possible in 5 modes.
Mileage indicator:
Maximum distance displayed on the screen in 99999. You can switch between a single riding distance
(TRIP) and the total distance travelled (TOTAL).
Display of error messages.
Walk assistant
Settings:
There are settings for different parameters e.g. mode, wheel diameter, speed limit etc.
Maintenance warning:
It can be deactivated. It depends on battery charging cycles and the distance travelled. The display
automatically records battery life and shows a warning if the number of charges exceeds the set value. The
warning also appears if the total sum of distance travelled exceeds the set value.

Description of the display:
A –maintenance warning
B –menu
C –speed display
D –Indication of speed mode
E –Error message
F –Mileage indicator
G –Level of assist
H –Walk assistant
I –Lights indicator, it is displayed only when the lights are switched on.
J –Indicator of distance measuring mode TRIP/TOTAL
K –Battery charge level –ten-step indicator.

Controller
Controller description:
A –up
B –down
C –lighting
D –switch ON/OFF
E –mode
Assembly and disassembly
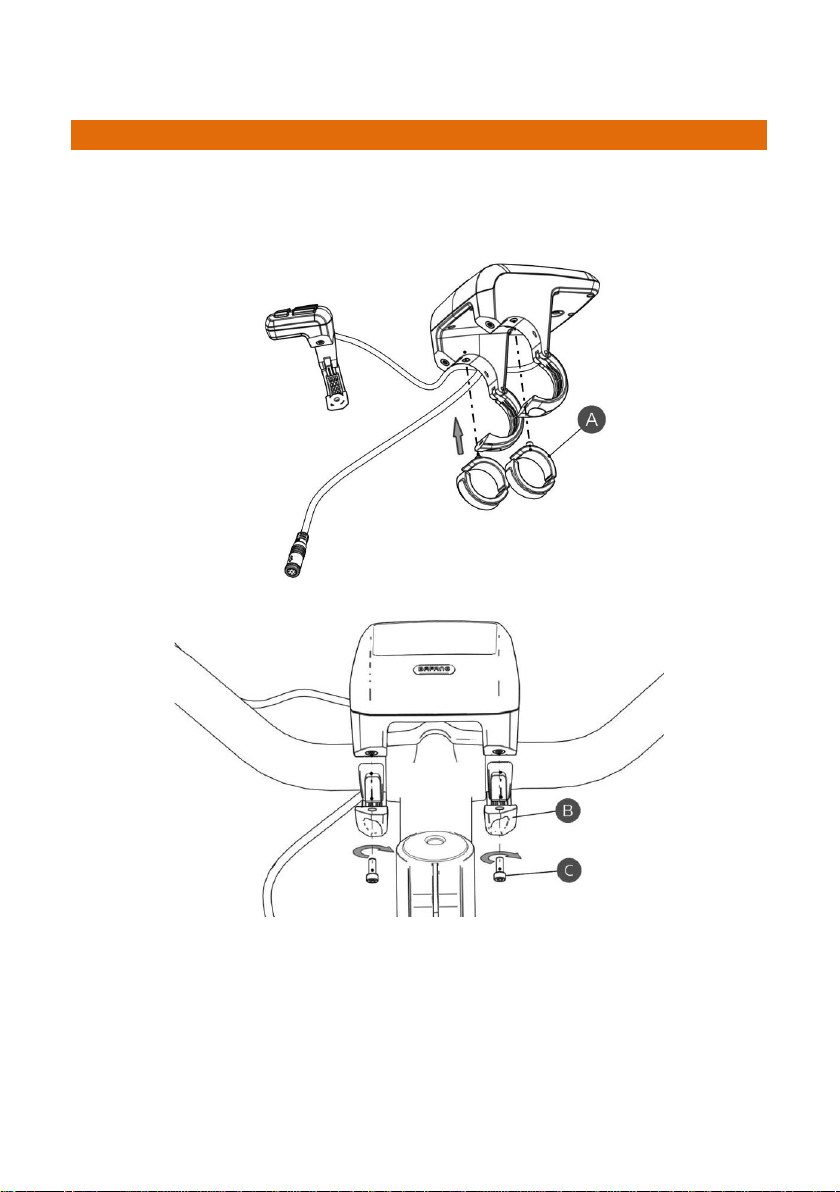
Display assembly:
Please pay attention to the tightening torque of screws. Damage caused by excessive tightening torque or
incorrect assembly / disassembly is not covered by warranty.
A –rubber retaining ring
B –display clamping jaws
C –screw with Allen head M4x8
When installing the display insert two rubber retaining rings into the display clamping jaws and put them
onto handlebars. Use an Allen wrench to tighten the screws. Set your chosen display angle and tighten the
screws. Tightening torque: 1 Nm

Controller assembly:
A –controller clamping jaw
Open the controller clamping jaw and place it on handlebars in your chosen position. Use an Allen wrench
to tighten the locking screw M3x8. Tightening torque: 1 Nm
Connecting the display:
H –display cable
h –EB-BUS cable
Connect the display cable with the EB-BUS cable, as shown on the picture.

Speed measuring sensor settings:
A –speed sensor
B –magnetic unit
C –wire spoke
D –nut for attaching the magnetic unit
Tighten the nut D by a flat screwdriver.
Tightening torque: 1.5 –2 Nm

Output Wiring Connection:
1 Red conductor: Positive pole (24 V/36 V)
2 Blue conductor: Supply cable to the controller
3 Black conductor: GND (earthing)
4 Green conductor: RxD (from the controller to the display)
5 Yellow conductor: TxD (from the display to the controller)

Controller
Turning on the electrical system of your electric bicycle:
Check the connection of electrical wiring before turning on the electrical system.
Turn on the control panel of the electric bicycle by pressing and briefly holding (1.5 seconds) the button
ON/OFF on the control panel (mounted on the handlebars). The display turns off automatically if it is not
used (the electric bicycle is stationary) for a certain period of time.
After riding the electric bicycle, switch it off in the same way.
Switch ON/OFF:
Turn on the system by pressing and holding the switch for two seconds. To turn the system off, repeat the
same procedure.
If the electric bicycle is not used for the period of 5 minutes (this can be adjusted as needed), the system
will automatically switch itself off.
Choosing the intensity of support assistant:
Press up/down button to select the desired assistance. The lowest level is 1, the highest is 5. without
assistance. The level of assistance will be indicated at the bottom of the display.
Light switch:
Press the light switch (C) to turn on display backlight and the lights. To switch the lights off, repeat the
same procedure. If the display is switched on and you are in a dark environment, the lighting will be
automatically switched on. If the lighting is switched off manually, it must also be manually switched on.
Walk mode:
Press and hold the down button (B) for two seconds and the display will show the WALK symbol.
Once the down button is released, the walk mode will be turned off. This function is used to assist while
walking and pushing the electric bicycle.
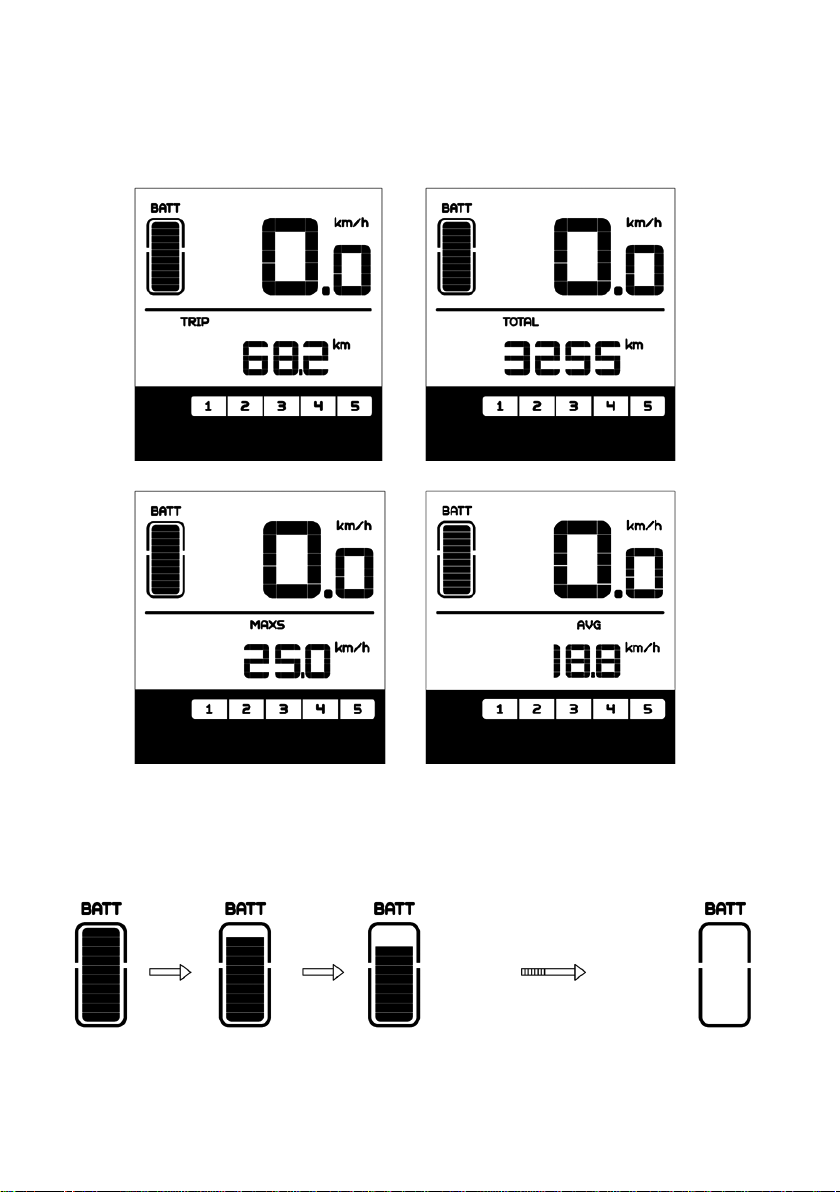
Switching from distance travelled mode to speed measurement mode:
Briefly press the mode button (E) and switch from distance to speed.M odes are switched in this order –
TRIP km –TOTAL km –MAXS km/h –AVG km/h.
Battery level status indicator:
If all the ten levels of charge indicator disappear and the battery outline starts flashing, the battery needs
to be charged immediately.

Number
of levels
Charge in
percentages
Number
of levels
Charge in
percentages
Number
of levels
Number of levels
10
≥90 %
6
50 % ≤C < 60
%
2
15 % ≤C < 25 %
9
80 % ≤C < 90 %
5
45 % ≤C < 50
%
1
15 % ≤C < 25 %
8
70 % ≤C < 80 %
4
35 % ≤C < 45
%
Blikající
obrys
C < 5 %
7
70 % ≤C < 80 %
3
25 % ≤C < 35
%
Adjustable parameters:
You can set parameters from the menu by double-pressing the mode button (E) in the interval < 0.3
seconds (to exit the menu, repeat the procedure). Use the up/down buttons to adjust the desired
parameter.
Date settings
Switch km/mile
Light sensitivity
Display backlight
Automatic switch off
Maintenance warning
Wheel radius
Turning on the electrical system of your electric bicycle:
Check the connection of electrical wiring before turning on the electrical system.
Turn on the power for the electrical system on the frame battery by pressing the switch on the side of the
battery. Backlight will come on.
Turn on the control panel of the electric bicycle by pressing and briefly holding (1.5 seconds) the button
ON/OFF on the control panel (mounted on the handlebars). The display will switch off automatically if it is
not used (the electric bicycle is not in motion) for a certain period of time (this can range between 0 ~ 7
minutes).
After riding the electric bicycle, switch it off in the same way.
Pressing and holding the up button will switch on the display backlight.
Men’s frame battery Women’s frame battery
This manual suits for next models
3
Table of contents
Other Leader Fox Bicycle manuals


