Leader Fox Ayra User manual

Electric Bicycle Operating
Instructions
Under the law, the dealer is obliged to attach the LEADER FOX Electric Bicycle Operating Instructions to every product
Ayra
Arran
Orem
Orton
E –BIKE POWER RIDE


Introduction
Dear users,
Please read carefully all the information regarding your E-LF product to ensure optimal functioning of your
e-bike. The following text containing a comprehensive description will provide you with information on all
aspects and details (including installation, setting up and general use of the display) regarding the use of
our display. This instruction document will also help you solve potential problems and failures.
What is an electric bicycle?
Electric bicycle is a conventional bicycle with an electric drive added to assist the rider. The motor function
is actuated by pedalling, which is scanned by a special sensor installed in the pedal hub. Therefore, you
have to keep pedalling on an e-bike, the motor is there only to help you. You can set an electric bicycle in
motion also using a control button or an accelerator but only up to the maximum permitted speed of 6
KMPH (e.g. for walk assistance). The maximum speed of an e-bike with motor assistance is 25 KMPH, with
a 10% tolerance (when this speed limit is reached, the motor switches off and you need to pedal just like
with a regular bicycle). When your battery runs out of power or your motor is off, you can ride your
electric bicycle as a conventional bike, without any resistance at all.
From the point of view of the Road Traffic Act, an electric bicycle whose features conform to European
standard EN 15194-1 is regarded as a regular bicycle, i.e. you can ride on bike trails, do not need a driver's
license and a helmet is mandatory only up to 18 years of age.

Description
Intelligent display with control
Motor Battery
Factors influencing the electric bicycle range
1. Rolling resistance of the tyres. Leader Fox e-bikes are fittet with tyres with low rolling resistance and
increased resistance to puncture. It is also important that the tyres are inflated properly. Therefor, if the
tyres of your electric bicycle are underinflated, the range will decrease.
2. Weight of the electric bicycle. The lower weight of the electric bicycle, the greater the range.
3. Battery status. It depends on whether the battery was fully charged before your trip. It is also to be
expected that the higher the number of discharge cycles the battery has undergone, the smaller capacity
it has.
4. Profile and surface of the track. The higher the elevation difference and the steeper hills you negotiate
and the worse surface, the shorter the range.
5. Riding mode. It depends on which of the three riding modes you have set.
6. Continuity of riding. The more braking and acceleration, the shorter the range.
7. Air resistance. For example, it depends on whether we ride a bicycle with low frame and sitting upright
or whether we ride sporty bicycle with seat set to the same height as the handlebars.
8. Wind strength. The stronger the wind we have beck, the longer the range and vice versa.
9. Weight of the rider and load. The greater the weight, the shorter the range.
10. External temperature. The lower the temperature, the less battery capacity can be used while riding.

Electric set
GX Ultimate
The system uses monitoring of torque, monitoring of speed of the pedal assist system and monitoring of real
speed of wheels.
The system uses a dual protection feedback for measuring the speed signal to ensure safety and reliabilityof
the system.
It has high starting torque, maximum torque of over 90 Nm, suitable especially for riding uphill.
It is highly efficient with low power consumption, long range, low noise levels, and smooth operation.
Description and scope of operation:
The motor unit works properly under the following operating conditions:
Temperature range - 20 to + 40 °C
Maximum torque 90 Nm
Weight –2.9 Kg
Dustproof/ waterproof-IP65
Certified-CE ROHS/ EN15194:2017
Description of the power unit is placed on the cover and shows the following information:
NUA213F –Engine model
E –assist for full suspension bikes
F –assist for hardtail bikes
29X18 –Date of manufacture, indicating i tis manufactured on October 29, 2018
0001 –Production serial number
DC36V –Rated Voltage
250 W –Rated engine power
120rpm –Rated engine rotation speed
25 km/h –Max speed

Dimensions of the power unit:

Safety instruction
Motor:
Waterproof IPX5, do not expose to high-pressure, heavy sprays of water.
Do not submerge the motor in water.
In the case of motor submersion in water, switch the unit off and stop using it.
Do not put the motor near magnetic field, it can tamper with sensors setting.
Battery:
Waterproof IPX5, do not expose to high-pressure, heavy sprays of water.
Do not submerge the battery into water.
Do not expose the battery to fire.
Do not use the battery for other appliances. It has been made specifically for this model.
Do not dismantle or modify the battery.
Do not connect the positive and negative poles of the battery.
Charger:
Do not dismantle or modify the charger.
Do not use the charger for other appliances. It has been made specifically for this model.
Do not throw the charger into fire or water.
Do not touch the charger with wet hands.
Keep the charger from animals or children.
Do not cover the charger.
Do not use the charger if it is broken
Battery
Switch and LED indication
Charging set

Battery
Battery charging and maintenance:
Charge the battery in a dry enviroment to avoid short-circuit damage.
Charge the battery to at least 60% of the capacity once every 3 months even when the bicycle is not used.
Do not cover the battery or the charger.
Do not leave the battery constantly connected to the power source.
Do not use the battery for other appliances. It has been made specifically for this model.
Do not disassemble or modify the battery pack.
Do not throw the battery into fire or expose it to extreme temperatures.
Recharging time from zero to 100% is 1-7 hours.
Drive warranty:
The warranty applies to those drive parts that are not sensitive to improper handling (pack, electronics,
charger, etc.); such parts are covered by a 24-month warranty.
The warranty does not apply to chemical parts of the battery and to capacity reduction due to normal use
(39% after the expiry of two years); those parts are covered by a 12-month warranty.
Charging:
The battery is the most expensive part of an electric bicycle; therefore, pay increased attention during
handling, charging and storage. The battery is sensitive to precise charging. Therefore, it is necessary to
charge Li-Ion rechargeable batteries using only a charger supplied by us. Connect the charger to 220-240 V
power outlet. 5A protected circuit is sufficient. The charger will automatically suspend charging when full
capacity of all cells is reached.
We recommend discharging the battery in full after each ride to ensure that your battery will be up to its
full capacity for your next ride. Charging the battery may last 1 to 5 hours depending on the condition of
the battery cells. Charge it exclusively in covered dry areas (moisture and dripping water can damage the
charger) at a temperature of 5 to 40°C.
The charging process is indicated by a red glowing LED. It will turn green when the battery is charged and
the charging process is complete. The battery contains a charge-monitoring indicator (when the charge
indicator button is pressed, the light indicator will come on).
Normal battery behaviour:
If the motor stops running smoothly and switches to intermittent operation, it could be a sign of low
battery capacity. In that case switch off the electric drive system and continue without motor assistance,
as if riding a conventional bicycle.
Battery warming is normal and does not indicate any defect. The battery is protected by a temperature
sensor and switches off automatically in case of excessive overheating. Wait until the battery cools down
to its normal operating temperature and then ride on.
If you feel your total battery capacity has dropped, it could be caused by charging or operation in
suboptimal climatic conditions. Carry out 3 full charging cycles. Fully discharge the battery while riding
and then charge to its full capacity at room temperature.

If the charge indicator shows that the battery is discharged, there is still a minimum voltage level in it
which protects it against damage but is not enough to power the electric bicycle. Recharge the battery as
soon as possible. Never leave the battery fully discharged, it could results in its damage.
In the case, that the battery will be turned on more than 30 min and bike will not be used, the battery will be
automatically switched off.
Battery si fully shutdown after 48h. After that time period you have to first activate the batter by switch
button or connect battery with charger.
Proper care of the battery prolongs its life.

LCD display
Product:
Central display Panasonic
Supplier:
Panasonic
Parameters:
Black and white display
Protocol UART
USB port 5V DC, max. 1 A
Operating temperature –10 ~ 40 °C
Storage temperature –20 ~ 50 °C
CE / IP65 water and dust proof / ROHS.
Display description
The console comprises a display unit and operation unit.

1 Assist mode select buttons
Selects the assist mode from [HIGH], [STANDARD], [ECO],[NO ASSIST] and [AUTO].
* If [AUTO] mode is not installed, [AUTO] is not indicated on thedisplay unit.
2 Night mode button
* Lights the backlight of the display unit.
When power is supplied to the head light or tail lamp from the battery on the electric bicycle, the head
lamp or tail lamp lights. Itdepends on local regulation.
3 [information] button
Switches display items such as distance travelled.
4 Bicycle mark button (Walk assistance)
Drive can be assisted up to 6 km/h when pushing the electricbicycle with a heavy load on it.
5 Battery level display
Displays the battery remaining capacity.
6 USB connection mark
Displayed when an external device (e.g. mobile phone) isconnected to the display unit for charging.
7 Assist power indicator
Displays in the form of a graph how much the rider is being assisted. The larger the number on the graph,
the more the rideris being assisted.
8 Text indication
Displays the current assist mode, etc.
9 Time display
Displays the current time.
10 Night mode indicator
Lights when the night mode button is pressed.
11 Speed indication
Displays the current travel speed.
12 Value indication
Displays distance travelled, total distance travelled, maximumspeed, etc.
13 Power button
Turns on and off the electric bicycle system.
14 Micro USB port
Used to charge an external device (e.g. mobile phone).
15 Rubber cap
Protects the Micro USB port.
16 Reset button
Used to set the total distance travelled to “0”.
17 Coin-type battery compartment
A coin-type battery is housed here for the time display of thedisplay unit.

Display Battery
Using the display unit for the first time
The display unit has a built-in coin-type battery (3 V) to maintain time display memory. Before the display unit is
shipped, the battery compartment contains a plastic plate to prevent the coin-type battery from discharging.
Before using the display unit for the first time afterpurchase, remove the plastic plate by the following
procedure.
1) Turn the lock cover on the coin-type battery compartment on the backside of the
display unitcounterclockwise with a coin, etc.
●The coin-type battery compartment opens.
2) Remove the coin-type battery and pull out the plastic plate on the minus side.
●After removing the plastic plate, dispose of it appropriately.
3) Insert the coin-type battery into the coin-type battery compartment, then turn the lock cover
clockwiseto lock the coin-type battery compartment.
4) Set the time.
Attention
●If the lock cover is not firmly locked, the display unit may not operate properly due to malfunctions such as
water seeping in.
Note
●When the time display “0:00” is blinking, this indicates that the coin-type
battery has reached the end of its service life.The procedure for replacing the
coin-type battery (part No.: CR2032X1) is the same as the steps 1) to 4).
●When the coin-type battery has reached the end of its service life, only clock functions stop.
Since liquid leakage may cause a malfunction, immediately replace the coin-type battery
that are no longer usable with a new one.Dispose of coin-type batteries that are no longer
usable in accordance with the regional recycle laws.
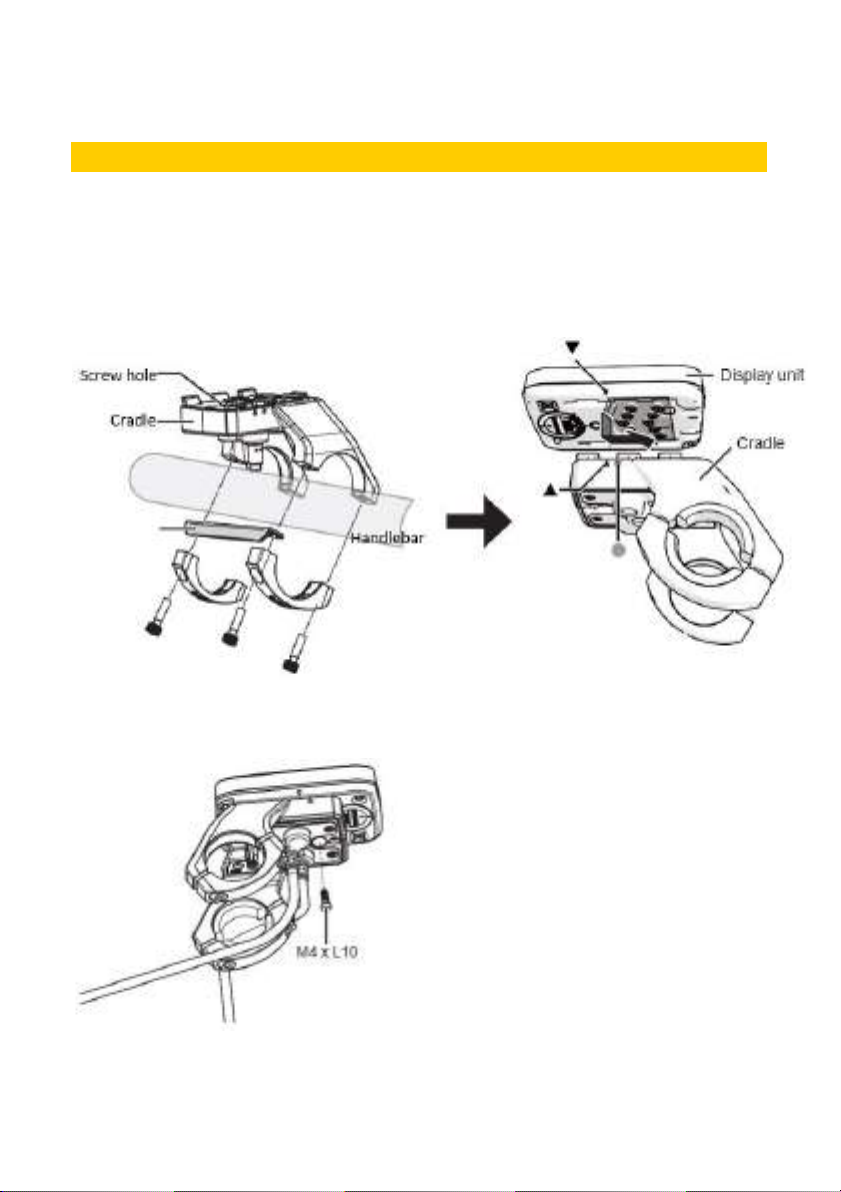
Assembly instructions
Display assembly:
Mount the display unit on the cradle with the cradle mounted on the handlebar of the electric bicycle and a
fully charged battery mounted on the electric bicycle.
Note: Before mounting the display unit, wipe the contact surface on the top of the cradle or the contact
surface on the rear of the display unit with a soft, dry cloth if it is wet or dirty.
Fixing the display unit in place. If the display unit is not to be removed, it can be fixed in place on the cradle
with M4 x L10 screw.
Please pay attention to the tightening torque of screws. Damage caused by excessive tightening torque or
incorrect assembly / disassembly is not covered by warranty.

Removing the display unit of the console
Remove the display unit from the cradle after turning the electric bicycle system off.
1) Press the power button on the display unit to turn off the electric bicycle system.
●If the electric bicycle system is already turned off, proceed to step 2).
●When the display unit is fixed in place on the cradle using the setscrew, confirm that the setscrew is
removed, and proceed to step 2).
2) Slide the display unit in the direction of the arrow in the illustration with the lock latch on the cradle
pressed down to remove the display unit.
Note
●If the display unit is removed with the electric bicycle system still turned on, the screen display goes out, and
the assist function also stops after about three seconds.
●Do not remove the display unit while you are riding.
●When mounting the removed display unit on the cradle again to use it, confirm that the display unit operates
properly.

Control
Turning on the electrical system of the e-bike:
Press the power button on the display unit. Battery level indication lamps, etc. light. When you start pedaling,
the assist function starts to work.
Attention
●Before pressing the power button, do not place your feet on the pedals of the electric bicycle.
Otherwise, this will result in a torque sensorerror or less of an assisted sensation.
Press the power button again without placing your feet on the pedals.
●While pressing the power button, do not press any other
buttons, otherwise an error may be displayed.In this case
press the power button again without your feet on the pedals.
●When the battery is being charged while still mounted on the electric bicycle, the system will not turn
on. Accordingly, the motor unit will not start.
●Do not turn on/off the power button during riding. If the assist function is not required, press the
assist mode select buttons to select[NO ASSIST].
Note
●The assist function of the electric bicycle will not work in the following cases:
–When you stop pedaling
–When a speed of 25 km/h is reached (The assist function starts to work again by pedaling at 25 km/h or
less.)
–When there is no remaining battery power
Turning off the electric bicycle system:
Press the power button on the console when the electric bicycle system is turned on.
Note
●Even if the power button is not pressed to turn off the electric bicycle system, the power automatically
turns off to save energy if the electric bicycle is not used for about ten minutes (for example, when
the electric bicycle is parked).

Assist modes:
Use the buttons on the operation unit to change the assist mode.
Five assist modes can be selected by pressing the assist mode select buttons.
Item
Description
[NO ASSIST]
No assist force. The display shows all relevant data.
[ECO]
A low assist force is provided allowing for a longer distance traveled by a single charge.
Efective assist for long range riding.
[STANDARD]
A mid assist force is provided. Default assist for any terrain.
[AUTO]
The assist
force
automaticaly changesfrom low to powerful. Optimal motor assist depending
on the rider’s input torque.
[HIGH]
Maximum motor
assist
. A powerfull assist force is provided for a comfortable ride on
slopes and carrying heavy loads
Walking assistance
This is the push-assistance function that assists you by providing drive up to 6 km/h, for example, when you are
carrying a heavy load or pushing the bike uphill.
Hold down the bicycle mark button (Walk assistance). When you release your finger from the bicycle mark
button (Walk assistance), or the electric bicycle exceeds a speed of 6 km/h, the function will not be activated.
Walk assistance speed depends on gear ratio. Lower gear ratio / slower speed, higher gear ratio/ faster speed.
Battery level display
The battery charge status indicates the remaining capacity of the battery in the electric bicycle (not
the status of coin-type battery inside thedisplay unit).
The charged state of the battery on the electric bicycle can also be checked by the battery LED.
*1 The display changes as follows when there is no longer any remaining battery power.

Trip, Average, Max. Speed, Range, Battery capacity
For the distance display and battery level, items and numerical values are displayed at Text indication
and Value indication, respectively. Items can be switched.
Item
Description
[TRIP]
Displays the distance travelled.
[AVG]
Displays the average speed.
[MAX]
Displays the maximum speed during travel so far.
[ODO]
Displays the total distance travelled.
The total distance travelled is set to “0” by holding down the reset button on the rear of the
display unit and the [information] button on the operation unit at the same time. (Fig. 2 and
3)
[RANGE]
Displays how far the electric bicycle can travel (estimated distance) on the remainingbattery
power under fixed conditions (e.g. assist mode, route profile).*1
Remaining
battery capacity
Displays the battery level.
*1 This is a rough value because the remaining battery capacity is calculated using the amount consumed.
Press the [information] button on the operation unit.
●Each press of the button switches the item.
Note
●The values for [TRIP], [AVG] and [MAX] are reset together.
●To reset, press the [information] button, display [TRIP], [AVG] or [MAX], and hold down the [information]
button until “0” is displayed.
●Gear position display - Compatible products only (A “Di2 Ready” label is affixed to the motor unit of models
compatible with SHIMANO Di2).

Display menu, parameters setting:
Basic settings such as the language displayed on the display unit, adjustment of backlight brightness and time can
be changed.
Access the basic setting menu, then change the settings as desired. In the basic setting menu, the following items
can be switched and set.
Item
Description
[LANGUAGE]
The language displayed on the display unit can be switched. The language can
be selected from thefollowing ten languages:
English, German, Dutch, French, Italian, Spanish, Finnish, Swedish, Norwegian,
Danish
[CONTRAST]
The contrast of the display unit LCD can be adjusted in ten stages.
[BRIGHTNESS]
The brightness of the backlight of the display unit LCD can be adjusted in five
stages. The brightness can be set separately for when the night mode
indicator is turned on and when it is turned off.
[UNIT]
The display unit for speed and distance can be toggled between kilometers
and miles.
[WHEEL]
The tire circumference matched to the electric bicycle currently in use can be
set.
[ODO INPUT]
The display of the total distance travelled can be changed.
[CLOCK]
The time can be adjusted.
Setting of [LANGUAGE]
1) Hold down the [information] button and the assist mode select button on the operation unit
until [LANGUAGE] is displayed at Text indication on the display unit.
2) Press the [information] button to set [LANGUAGE].
3) Press the assist mode select buttons to select the language you want to change.
●When holding down the assist mode select buttons for two seconds, the display will change fast.
4) Press the [information] button to fix the language.
5) Press the night mode button.
●The changed setting is stored in memory on the display unit.
Setting of [CONTRAST]
The contrast can be adjusted in ten stages between level 1 to level 10. At the level 1, no bar is displayed.
When the level rises by one, the number of bars also increases by one. At level 10, nine bars are
displayed.

e.g. You want to change the contrast from the level 4 to level 8.
1) Hold down the [information] button and the assist mode select button on the operation unit
until[LANGUAGE] is displayed at Text indication on the display unit.
2) Press the assist mode select buttons to select [CONTRAST] and press the [information] buttonto
set [CONTRAST].
●The screen for level 4 is displayed.
3) Press the assist mode select buttons to select the contrast you want to change. Then press the
[information] button to fix the contrast.
●The screen for level 8 is displayed.
●When holding down the assist mode select buttons for two seconds, the display will change fast.
●The set contrast is reflected on the display unit.
4) Press the night mode button.
●The changed setting is stored in memory on the display unit.
Setting of [BRIGHTNESS]
The brightness can be adjusted in five stages from OFF (no backlight), and level 1 to level 4. One bar is
displayed at level 1, three bars aredisplayed at level 2, six bars at level 3, and nine bars at level 4.
e.g. You want to change the brightness from the level 4 to level 2.
1) Hold down the [information] button and the assist mode select button on the operation unit
until[LANGUAGE] is displayed at Text indication on the display unit.
2) Press the assist mode select buttons to select [BRIGHTNESS] and press the [information] buttonto
set [BRIGHTNESS].
●The screen for level 4 is displayed.
3) Press the assist mode select buttons to select the brightness you want to change. Then press the
[information] button to fix the brightness.
●The screen for level 2 is displayed.
●When holding down the assist mode select buttons for two seconds, the display will change fast.
●The set brightness is reflected on the display unit.
4) Press the night mode button.
●The changed setting is stored in memory on the display unit.
Note
●Backlight setting has a normal mode and night mode. The corresponding backlight setting will change
depending on whether the light turnson or off.

Setting of [UNIT]
e.g. You want to change the unit display from kilometers to miles.
1) Hold down the [information] button and the assist mode select button on the operation unit
until[LANGUAGE] is displayed at Text indication on the display unit.
2) Press the assist mode select buttons to select [UNIT] and press the [information] button to set
[UNIT].
3) Press the assist mode select buttons to select the mile display. Then press the
[information]button to fix the mile display.
4) Press the night mode button.
●The changed setting is stored in memory on the display unit.
Setting of [WHEEL]
e.g. You want to change the wheel circumference to 2,200 mm.
1) Hold down the [information] button and the assist mode select button on the operation unit
until[LANGUAGE] is displayed at Text indication on the display unit.
2) Press the assist mode select buttons to select [WHEEL] and press the [information] button to
set [WHEEL].
3) Press the [information] button to select the digit to change. Then press the assist mode select buttons to
change the number.
●Each time you press the [information] button, you can select the digit in order of the thousands
place, hundreds place, tens place, andone place.
●Available setting value is between 1,000 mm to 2,499 mm.
●When holding down the assist mode select buttons for two seconds, the display will change fast.
4) Set the value of the one place. Then press the [information] button to fix the number.
5) Press the night mode button.
●The changed setting is stored in memory on the display unit.
This manual suits for next models
3
Table of contents
Other Leader Fox Bicycle manuals


