Leader Fox Neba User manual

Electric Bicycle Operating
Instructions
Under the law, the dealer is obliged to attach the LEADER FOX Electric Bicycle Operating Instructions to every
product
Lucas
Neba

Introduction
Dear users,
Please read carefully all the information regarding your E-LF product to ensure optimal functioning of your
e-bike. The following text containing a comprehensive description will provide you with information on all
aspects and details (including installation, setting up and general use of the display) regarding the use of
our display. This instruction document will also help you solve potential problems and failures.
What is an electric bicycle?
Electric bicycle is a conventional bicycle with an electric drive added to assist the rider. The motor function
is actuated by pedalling, which is scanned by a special sensor installed in the pedal hub. Therefore, you
have to keep pedalling on an e-bike, the motor is there only to help you. You can set an electric bicycle in
motion also using a control button or an accelerator but only up to the maximum permitted speed of 6
KMPH (e.g. for walk assistance). The maximum speed of an e-bike with motor assistance is 25 KMPH, with
a 10% tolerance (when this speed limit is reached, the motor switches off and you need to pedal just like
with a regular bicycle). When your battery runs out of power or your motor is off, you can ride your electric
bicycle as a conventional bike, without any resistance at all.
From the point of view of the Road Traffic Act, an electric bicycle whose features conform to European
standard EN 15194-1 is regarded as a regular bicycle, i.e. you can ride on bike trails, do not need a driver's
license and a helmet is mandatory only up to 18 years of age.

Description
Display Controller
Battery Motor
Factors influencing the electric bicycle range
1. Rolling resistance of the tyres. Leader Fox e-bikes are fittet with tyres with low rolling resistance and
increased resistance to puncture. It is also important that the tyres are inflated properly. Therefor, if the
tyres of your electric bicycle are underinflated, the range will decrease.
2. Weight of the electric bicycle. The lower weight of the electric bicycle, the greater the range.
3. Battery status. It depends on whether the battery was fully charged before your trip. It is also to be
expected that the higher the number of discharge cycles the battery has undergone, the smaller capacity it
has.
4. Profile and surface of the track. The higher the elevation difference and the steeper hills you negotiate
and the worse surface, the shorter the range.
5. Riding mode. It depends on which of the three riding modes you have set.
6. Continuity of riding. The more braking and acceleration, the shorter the range.
7. Air resistance. For example, it depends on whether we ride a bicycle with low frame and sitting upright
or whether we ride sporty bicycle with seat set to the same height as the handlebars.
8. Wind strength. The stronger the wind we have beck, the longer the range and vice versa.
9. Weight of the rider and load. The greater the weight, the shorter the range.
10. External temperature. The lower the temperature, the less battery capacity can be used while riding.

Safety instruction
Riding safety:
While riding, pay only as much attention to the bicycle settings and display as not to jeopardize your safety.
Before riding, check that wheels have been securely fitted in the frame and fork, since their incorrect
installation can cause serious injury.
When riding the electric bicycle, you should be fully familiar with its behaviour and control, otherwise it
could result in serious injury.
If you ride in poor visibility conditions or at night, use the lights.
Battery:
DO NOT use the battery with other devices.
DO NOT dismantle or modify the battery.
DO NOT connect positive and negative poles of the battery with a metal object.
DO NOT immerse the battery in water.
DO NOT throw battery into fire.
Charger:
DO NOT dismantle or modify the charger
DO NOT use to charge other batteries.
AVOID shocks and contact with water.
DO NOT touch the charger with wet hands.
KEEP the charger away from children and animals.
DO NOT cover the charger nor place any objects on it.
DO NOT pull the cable when disconnecting the charger, ALWAYS pull the plug.
DO NOT use the charger if it is clearly damaged.
Basic maintenance and instruction guide for the use of electric bicycle:
Always remove the battery if you are going to manipulate with the cables or replace any part of the electric
bicycle, since there is a danger of injury by electrical current.
If you feel that the electric motor or any of its parts might have gotten loose, make sure that the nuts are
properly tightened or follow further information in the user guidebook.
The chain should be regularly cleaned by cleaning agents for this purpose. Do not use alkaline or acidic
cleaners to remove rust or dirt. These cleaners will damage the chain.
Use the battery charger only for its intended purpose. If the charger or any of its parts is broken, do not use
it as this could cause injury.
Electric bicycle is not intended to be used by people with lowered physical, sensory or mental capacities or
people lacking experience and knowledge required to use the product.
Electric bicycle is not intended for use by children.
Do not attempt to repair the electric motor system, as this can cause its damage and malfunction.
The bicycle electric system is designed to be fully waterproof and can therefore be used even in harsh
weather conditions or in wet environment. You should, however, avoid its direct dipping in water.
Do not use high pressure water (WAP) to clean the bicycle. If water gets into the system, this can cause
damage or corrosion.
When transporting the bicycle on a vehicle in rainy or wet weather, remove the battery and store it in a dry

place.
Handle the bicycle carefully and avoid shocks.
To clean the battery and all the plastic parts of the system, use a well wrung out, damp cloth.

Electric set
Description of the power unit is placed on the cover and shows the following information:
MM G33.350 - name of motor unit
1401 - date of manufacture e.g.: January 2014 in this case
0001 - is so-called serial number which ranges between 0000 and 9999, 0001 is for example the serial
number
of the first manufactured motor.
36V - nominal voltage
250W - nominal motor power
Battery:
Do not throw the battery into fire.
Do not throw the battery into water.
Do not use the battery for other appliances. It has been made specifically for this model.
Do not dismantle or modify the battery.
Do not connect the positive and negative poles of the battery.
Charger:
Do not dismantle or modify the charger.
Do not use the charger for other appliances. It has been made specifically for this model.
Do not throw the charger into fire or water.
Do not touch the charger with wet hands.
Keep the charger from animals or children.
Do not cover the charger.
Do not use the charger if it is broken.

Dimensions of the power unit:

Battery
Battery charging and maintenance:
Charge the battery in a dry environment to avoid short-circuit damage.
Charge the battery to at least 60% of the capacity once every 3 months even when the bicycle is not used.
Do not cover the battery or the charger.
Do not leave the battery constantly connected to the power source.
Do not use the battery for other appliances. It has been made specifically for this model.
Do not disassemble or modify the battery pack.
Do not throw the battery into fire or expose it to extreme temperatures.
Recharging time from zero to 100% is 1-7 hours.
Drive warranty:
The warranty applies to those drive parts that are not sensitive to improper handling (pack, electronics,
charger, etc.); such parts are covered by a 24-month warranty.
The warranty does not apply to chemical parts of the battery and to capacity reduction due to normal use
(39% after the expiry of two years); those parts are covered by a 12-month warranty.
Charging:
The battery is the most expensive part of an electric bicycle; therefore, pay increased attention during
handling, charging and storage. The battery is sensitive to precise charging. Therefore, it is necessary to
charge Li-Ion rechargeable batteries using only a charger supplied by us. Connect the charger to 220-240 V
power outlet. 5A protected circuit is sufficient. The charger will automatically suspend charging when full
capacity of all cells is reached.
We recommend discharging the battery in full after each ride to ensure that your battery will be up to its
full capacity for your next ride. Charging the battery may last 1 to 5 hours depending on the condition of
the battery cells. Charge it exclusively in covered dry areas (moisture and dripping water can damage the
charger) at a temperature of 5 to 40°C.
The charging process is indicated by a red glowing LED. It will turn green when the battery is charged and
the charging process is complete. The battery contains a charge-monitoring indicator (when the charge
indicator button is pressed, the light indicator will come on).
Always switch off the battery when finished riding the bike.
Normal battery behaviour:
If the motor stops running smoothly and switches to intermittent operation, it could be a sign of low
battery capacity. In that case switch off the electric drive system and continue without motor assistance, as
if riding a conventional bicycle.
Battery warming is normal and does not indicate any defect. The battery is protected by a temperature
sensor and switches off automatically in case of excessive overheating. Wait until the battery cools down to
its normal operating temperature and then ride on.
If you feel your total battery capacity has dropped, it could be caused by charging or operation in

suboptimal climatic conditions. Carry out 3 full charging cycles. Fully discharge the battery while riding and
then charge to its full capacity at room temperature.
If the charge indicator shows that the battery is discharged, there is still a minimum voltage level in it
which protects it against damage but is not enough to power the electric bicycle. Recharge the battery as
soon as possible. Never leave the battery fully discharged, it could results in its damage.
Battery capacity indication:
LED diod
Capacity
1
0 ~ 25%
2
26 ~ 50%
3
51 ~ 85%
4
86 ~ 100%
Proper care of the battery prolongs its life.

LCD display
Product:
Intelligent LCD display APT TFT750C
Supplier:
Tianjin APT Development Cop., Ltd.
Electrical parameters:
Battery supply 36V
Rated operating current 40mA
Max operating current 100 mA
Off leakage current < 1 uA
Max output current to controller 150mA
Operating temperature – 20 ~ 70 °C
Storage temperature – 20 ~ 70 °C
Dimensions and materials:
High-contrast TFT colorful display.
Prodcut shell is ABS, transparent window is made with high strength Acrylic.
Can be used up to -20°C.
CE / IP65 water proof / ROHS.

TFT screen instructions:
RT Speed –indicator of speed mode (RT, MAX, AVG)
00.0 –speed
Km/h –indicator of speed unit
Power 0W –performance
11:48 PM –time
39.8V –battery capacity
1 assist –level PAS, 0 (off) 5 (max. assist)
Trip –indicator of mileage mode
0.3 km –distance
Maximal range:
Maximal range is set with fully charge battery and flat terrain and little bit of headwind. Average range is
calculated with ideal set of the assist and slightly hilly terrain.
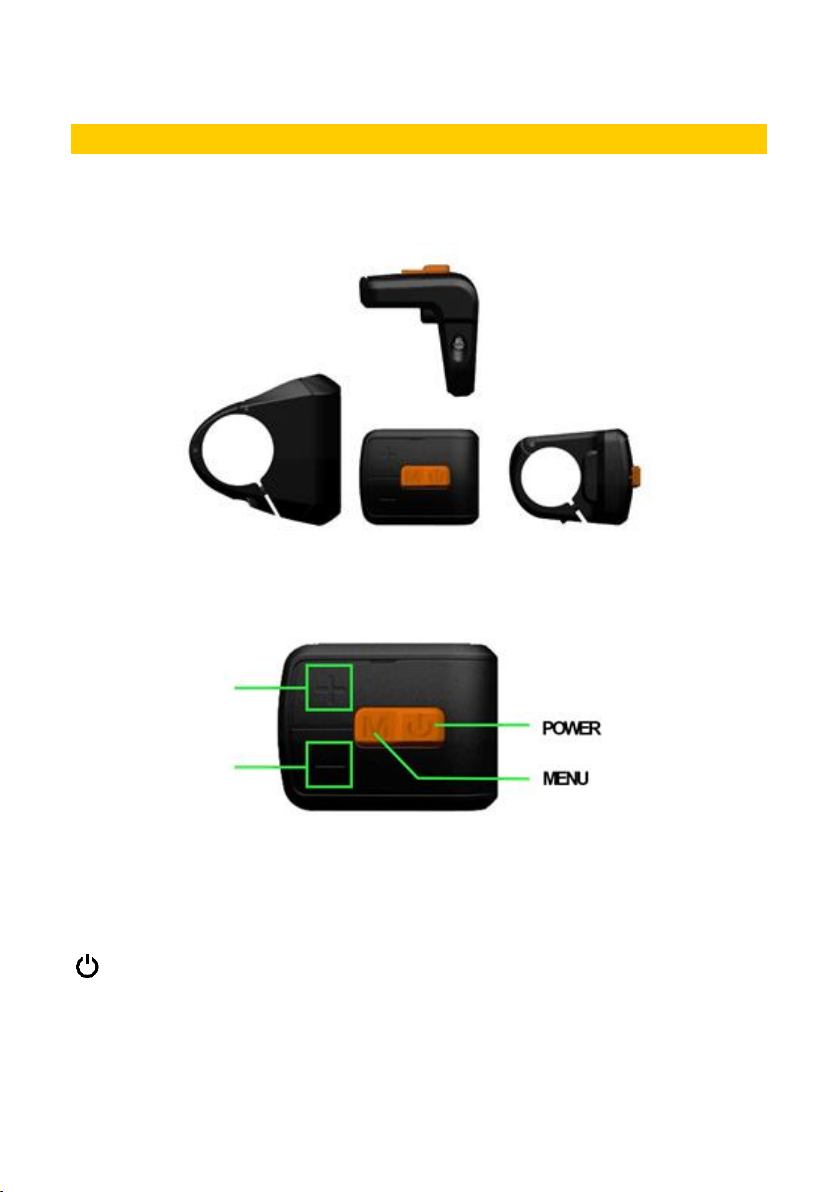
Controller
Controller description:
+ –up
- –down
–power ON/OFF
M –menu
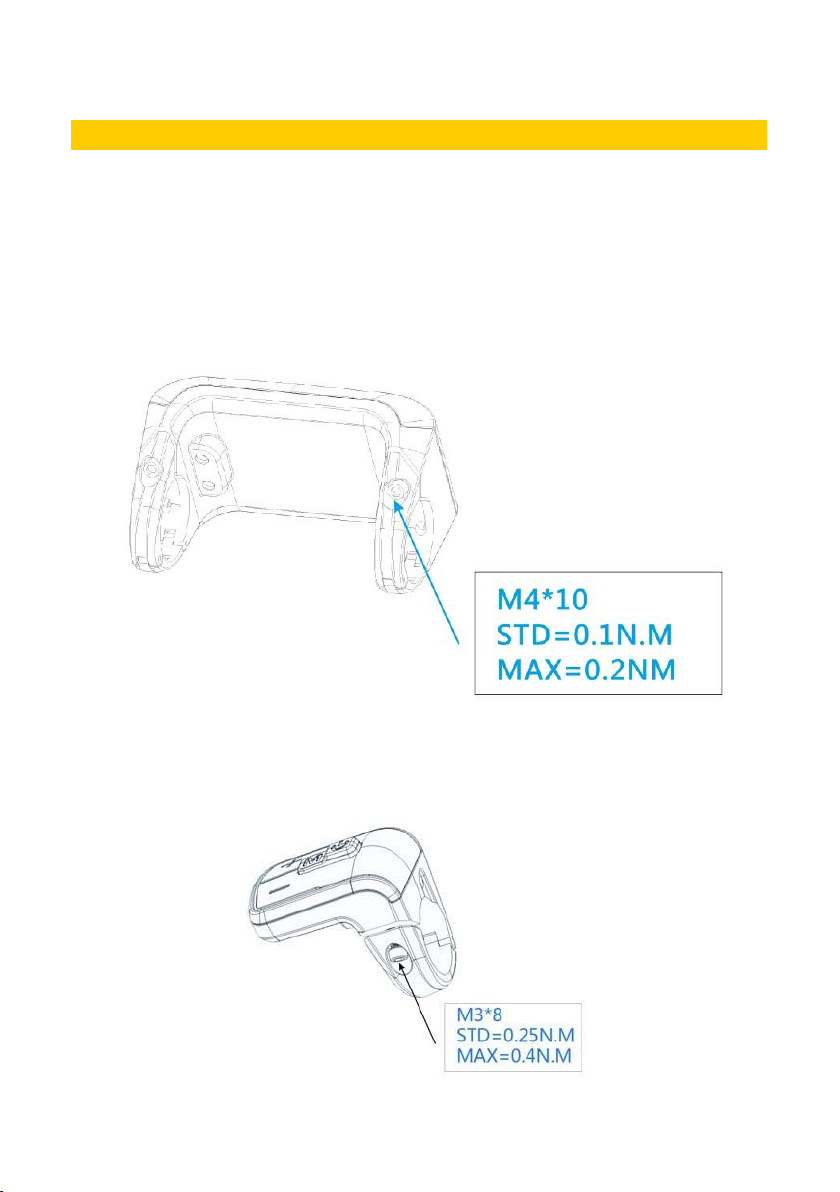
Assembly instructions
Display assembly:
Please pay attention to the tightening torque of screws. Damage caused by excessive tightening torque or
incorrect assembly / disassembly is not covered by warranty.
When installing the display insert two rubber retaining rings into the display clamping jaws and put them
onto handlebars. Use an Allen wrench to tighten the screws. Set your chosen display angle and tighten the
screws. Tightening torque: 1 Nm
Controller assembly:

A –controller clamping jaw
Open the controller clamping jaw and place it on handlebars in your chosen position. Use an Allen wrench
to tighten the locking screw M3x8. Tightening torque: 1 Nm
Speed measuring sensor settings:
A –speed sensor
B –magnetic unit
C –wire spoke
D –nut for attaching the magnetic unit

Tighten the nut D by a flat screwdriver.
Tightening torque: 1.5 –2 Nm
Connector descriptions:
1 – Red wire: Anode (24V/36V)
2 – Blue wire: Power cord to the controller
3 – Black wire: GND
4 – Green wire: RxD (controller - display)
5 – Yellow wire: TxD (display - controller)

Functional instructions
Turning on the electrical system of the e-bike:
Before switch on of the system please check electrical wiring.
Switch on power of the electrical system on battery, colored backlighting illuminates.
Switch on display with press and short hold (1,5 second) POWER button. Display will automatically turns
off if it is not used for a while. Can be set range 0 ~ 7 minutes.
After ride turns off e-bike in the same way.
Display sketches in this section are illustrative only with set Scene –digital from display settings.
Press and hold UP button for tuns on the display backlight.
For better gear change is appropriately stop pedaling for a while.
Assist level operating:
Short press UP/DOWN buttonc can change the assist level. Top assist level is 9, 0 for neutral.
Walking mode:
Press and hold DOWN button for 2 second can get into walking mode, out of the mode when release the
button.
Battery indicator:
Shows the approximate remaining battery capacity. The battery is fully charged when all LEDs illuminated.
Precise data on capacity provides indicator located directly on the battery
Speed and mileage mode switch:
Short press Menu (M) button can change the speed and mileage mode –RT Speed -> AVG Speed -> MAX
Speed - Trip->ODO-> Time

Headlight/Backlight On/Off:
Press and hold UP button for 1 second can turn on/off the headlight and the screen will switch to the
corresponding mode.
The motor does not work when battery voltage is low. Display still can keep the headlight on for a while
when e-bike is in riding.
Data cleanup:
Press and hold UP and DOWN button together for 1 second can reset several temporary data, temporary
data include AVG speed/MAX speed/Trip/Time.

Parameter setting
By press Menu (M) button (interval less than 0,3 second) can get into setting menus.
Press UP/DOWN buttons to change the parameter setting, press Menu (M) button to switch to next item.
Double press Menu (M) button will exit from menu.
Display will automatically quit menu when there is no operation for 30 seconds.
System
Press UP/DOWN button to switch between Metric/Imperial.
Brightness
Press UP/DOWN button to change the brightness of the backlight, I is darkness, IIIII is brightness.
Auto off 5min
MENU
Brightness |||||
Wheel 27 inch
...
System Metric
Scenes Digital
Start password >
Display Setting
Basic Setting
EXIT
Battery Ind Voltage
Pow Ind Digital
Clock >
Auto off 5min
MENU
Brightness |||||
Wheel 27 inch
...
System Metric
Scenes Digital
Start password >
Display Setting
Basic Setting
EXIT
Battery Ind Voltage
Pow Ind Digital
Clock >

Auto Off
Press UP/DOWN button to change the auto power off time, from 1 to 9 the number represent time
(minutes) to shutdown, default value is 5 minutes.
Scenes
Press UP/DOWN button to change the scenes, Digital/Analog.
Auto off 5min
MENU
Brightness || | ||
Wheel 27 inch
...
System Metric
Scenes Digital
Start password >
Display Setting
Basic Setting
EXIT
Battery Ind Voltage
Pow Ind Digital
Clock >
Auto off 5min
MENU
Brightness || | ||
Wheel 27 inch
...
System Metric
Scenes Analog
Start password >
Display Setting
Basic Setting
EXIT
Battery Ind Voltage
Pow Ind Digital
Clock >
Auto off 1min
MENU
Brightness | || | |
Wheel 27 inch
...
System Metric
Scenes Digital
Start password >
Display Setting
Basic Setting
EXIT
Battery Ind Voltage
Pow Ind Digital
Clock >
Auto off 9min
MENU
Brightness | || | |
Wheel 27 inch
...
System Metric
Scenes Digital
Start password >
Display Setting
Basic Setting
EXIT
Battery Ind Voltage
Pow Ind Digital
Clock >

Battery Ind
Press UP/DOWN button to change the battery indicator, Voltage/Percentahe/Off.
Accurate percentage needs communication with battery.
Power Ind
Press UP/DOWN button to change the Power indicator, Analog/Digital.
This data represent power output of the battery (not motor)
Intelligent
12:30:45
CLK
1
ASSIST
POW
38.9V
RT SPEED
25.5
Km/h
256.8
TRIP Km
RT SPEED
15 Km/h
. 5
W
389
Intelligent
12:30:45
CLK
1
ASSIST
POW
38.9V
256.8
TRIP Km
RT SPEED
15 Km/h
. 5
Intelligent
12:30:45
CLK
1
ASSIST
POW
50%
RT SPEED
25.5
Km/h
256.8
TRIP Km
RT SPEED
15 Km/h
. 5
Intelligent
12:30:45
CLK
1
ASSIST
POW
38.9V
256.8
TRIP Km
RT SPEED
15 Km/h
. 5
Intelligent
12:30:45
CLK
1
ASSIST
POW
50%
RT SPEED
25.5
Km/h
256.8
TRIP Km
RT SPEED
15 Km/h
. 5
Auto off 5min
MENU
Brightness || | | |
Wheel 27 inch
...
System Metric
Scenes Digital
Start password >
Display Setting
Basic Setting
EXIT
Battery Ind Percent
Pow Ind Digital
Clock >
Auto off 5min
MENU
Brightness || | | |
Wheel 27 inch
...
System Metric
Scenes Digital
Start password >
Display Setting
Basic Setting
EXIT
Battery Ind Voltage
Pow Ind Digital
Clock >
Auto off 5min
MENU
Brightness || | | |
Wheel 27 inch
...
System Metric
Scenes Digital
Start password >
Display Setting
Basic Setting
EXIT
Battery Ind OFF
Pow Ind Digital
Clock >
This manual suits for next models
1
Table of contents
Other Leader Fox Bicycle manuals


