leadsun AE6 Series User manual

Made in China AE6.129-A
LEADSUN Australia Pty Ltd
Address: 42 Greens Road, Dandenong South, Victoria 3175
Phone: +61 1300 281 005 Fax: +61 3 8610 0393
Email: sales@leadsun.com.au
LEADSUN Global Ltd
Address: NO.1 Pingdong 1st Rd, Nanping Science & Technology
Industrial Park, Zhuhai, China 519060.
Phone: + Fax: +86
-
756
-
2289712 86
-
756
-
8682090
Email: sales@leadsunglobal
.
com
LEADSUN INC.
Address: 1920 S. Archibald Ave. Suite I, Ontario, CA 91761
Phone: 909.476.0900 Fax: 909.466.0130
Email: [email protected]
www.leadsun.com.au
Solar Street Light
User Manual
AE6 SERIES
Solar Street Light
User Manual
6 SERIES

Product maintenance
Product recycling
In order to assure that the solar panel receive the light efficiently, please use clear water
to clean the dirt mark on the surface of the panel regularly and prohibit the use of
chemical or abradant which includes chlorobenzene.
Only manufacturer, service agent or qualified personnel can replace the light source or
other circuit components of the lighting device. Without authorization, using the third
party component to replace is prohibited or it would cause serious damage to the
product. if the user disassembles the product without authorization, warranty becomes
void.
If you need to replace the components /accessories, please go to
www.leadsun.com.au, or contact your local distributor .
The product is made of recyclable high-performance materials and components, please
don't dispose with other household garbage.
Please understand the local rules about the separate collection of electronics and
electrical products, dispose the waste products in the right way that avoids potential
negative effects to environment and human health.
Cautions
Transportation and storage
Working condition
Attention
Please read the below cautions carefully before using the AE6 series solar
street light to avoid physical injury and product failure caused by improper use.
Product protection grade Ip65
High tensile structure design can withstand level 3 typhoon (58m/s), beyond this level
might cause damage to the street light.
Working temperature range from -20°C to 60°C (charging temperature is limited within
0°C to 60°C). The product with heating function can work under -40°C to 60°C.
The product contains high capacity lithium-ion battery components, please follow the
aviation transport law. Please regard the product as the flammable and explosive
hazardous substance and store it separately from other goods.
The solar panel of the product is fragile, tier limitation is two layers. No stacking out of
limits and No press with heavy stuff.
Store the product under the temperature from 0°C to 45°C.
It should be charged every six months if the product is stored for long time. please use
the special charger to charge the product (the charger needs additional purchase) in
order to avoid battery or device damage.
12
A licensed electrician is required to install the unit with an AC power supply.
If this product contains the main power supply it must be installed by a licensed electrician.
Please ensure this light fixture is installed in accordance to local regulations.

Functional Specification
7
86
1
2
11 12
5
4
10
9
3
13
14
14
No. Component Brief description
1 Solar panel ,
To absorb solar energy and convert into electricity
2 Bird spike Motion detection
3 Charging controller Manage LED light, communication and control charging and
discharging.
4 PIR Motion sensor Adjust the brightness automatically by the motion sensor.
5 LED Illumination
6USB Type-B Port Special port for programming
7Switch button ON/OFF or Turn ON/OFF the light
8USB Type-A charging port Charging for the battery (please use 14V, 1.5A dedicated
charger)
9 X bracket Use to fasten the AE6 solar power supply system
10 Street light bracket Use to fasten the LED street light
11 Reset button Restart the gateway
12 SIM card slot Insert 4G card
13 4G Antenna Wireless network communication
14 NODE Antenna Network group communication
Standard
Gateway system
NODE system
34

Check if all the components are complete before installation, the components and quantity of
each set as follows:
Solar Panel Components:
Lighting:
LED street light
Bracket
hasp 4pcs
M8*16
screw 6pcs
M6 cap
nut 8pcs
M6 spring
washer 8pcs
X bracket
1pc
Bird spike 2pcs Self-tapping
screw 6pcs
M8*16 Screw 6pcs
2M DC
extended cable
2pcs
M8*25
screw 2pcs
Part List
Off-grid solar power supply system (Take gateway for example)
4G Antenna+ NODE Antenna
1pc each (Gateway type standard) *For EDGE
NODE Antenna
1pc (NODE terminal standard) *For EDGE
AE6 series is the latest double-sided photovoltaic module high power solar street light released by
LEADSUN, it adopts higher conversion efficiency mono-crystalline silicon double-sided solar panel,
high luminous efficiency LED, long lifespan lithium battery, infrared motion detection and self-developed
efficient controller, which is the most reliable powerful performance solar lighting solution and a future
design masterpiece provided by LEADSUN.
Overview
1. Definition of the native mode
OFF mode: The system will not work, charge or
discharge.
Transport (idle) mode: the system will power off in
an hour and goes to the OFF mode.
ON mode: the system will work normally, charging
in the daytime and discharging at night.
*
*
*
2.Start up
Daytime start-up: when the lighting condition is
sufficient (>30lx), the light will illuminate for 20
Night start-up:
*
*
OFF
mode
ON
mode
Button Switch
Short press, the
light will switch
between on and off
Transport
mode
Short press, the light
will flash then off
3. Button instructions
Short press the button, if the lighting status does not change, it is in the OFF mode.
Short press the button, if the light flash and then off, it is in transport (idle) mode;
Short press the button, if the light switch between ON and OFF directly, it is in ON mode, In
this mode, it can switch the light ON by short press the button.
Short press the button (1s) to find out the current product mode:
*
*
*
Operation instruction
6
5
Long press 5 seconds
or if no operation
for more than an hour
Long press till the
light is on or lighting
condition is sufficient
in daytime.
Long press
5 seconds
second and then turn off. The light will function
as normal from that night. If there is not
sufficient lighting using the Night start-up
mode is required
hold button down for 5 seconds
After the light goes off, if it meets the normal lighting
condition the light will function as normal from that
night.
and release, the light will turn on. Pressing the
button once will turn the light off.

Long press the button for (5s) to switch the working modes:
In the OFF mode, if the lighting condition is normal, it will start up automatically; or long
press the button 5s, if the light is ON and then OFF, the product will go into the ON mode.
In the ON mode, long press the button 5s, the light flash 3 times then off, the product will go
into the transport (idle) mode; if disconnected from the solar panel, the product will go into
the OFF mode directly;
In the Transport (Idle) mode, long press the button 5s, if the light flash one time and then off,
the product will go into the OFF mode; or without any operation after an hour, the product will
go into OFF mode automatically.
*
*
*
The product factory setting is using the light-operated switch to control the light (light-operated control
thresholds is 30lx). It lights up automatically at night and lights off at dawn. The light implements
multiple working modes switching through the intelligent battery control system, which prolong the
battery working time effectively. It ensures normal working even in the continuous rainy days.
4.
Operation instruction Product installation
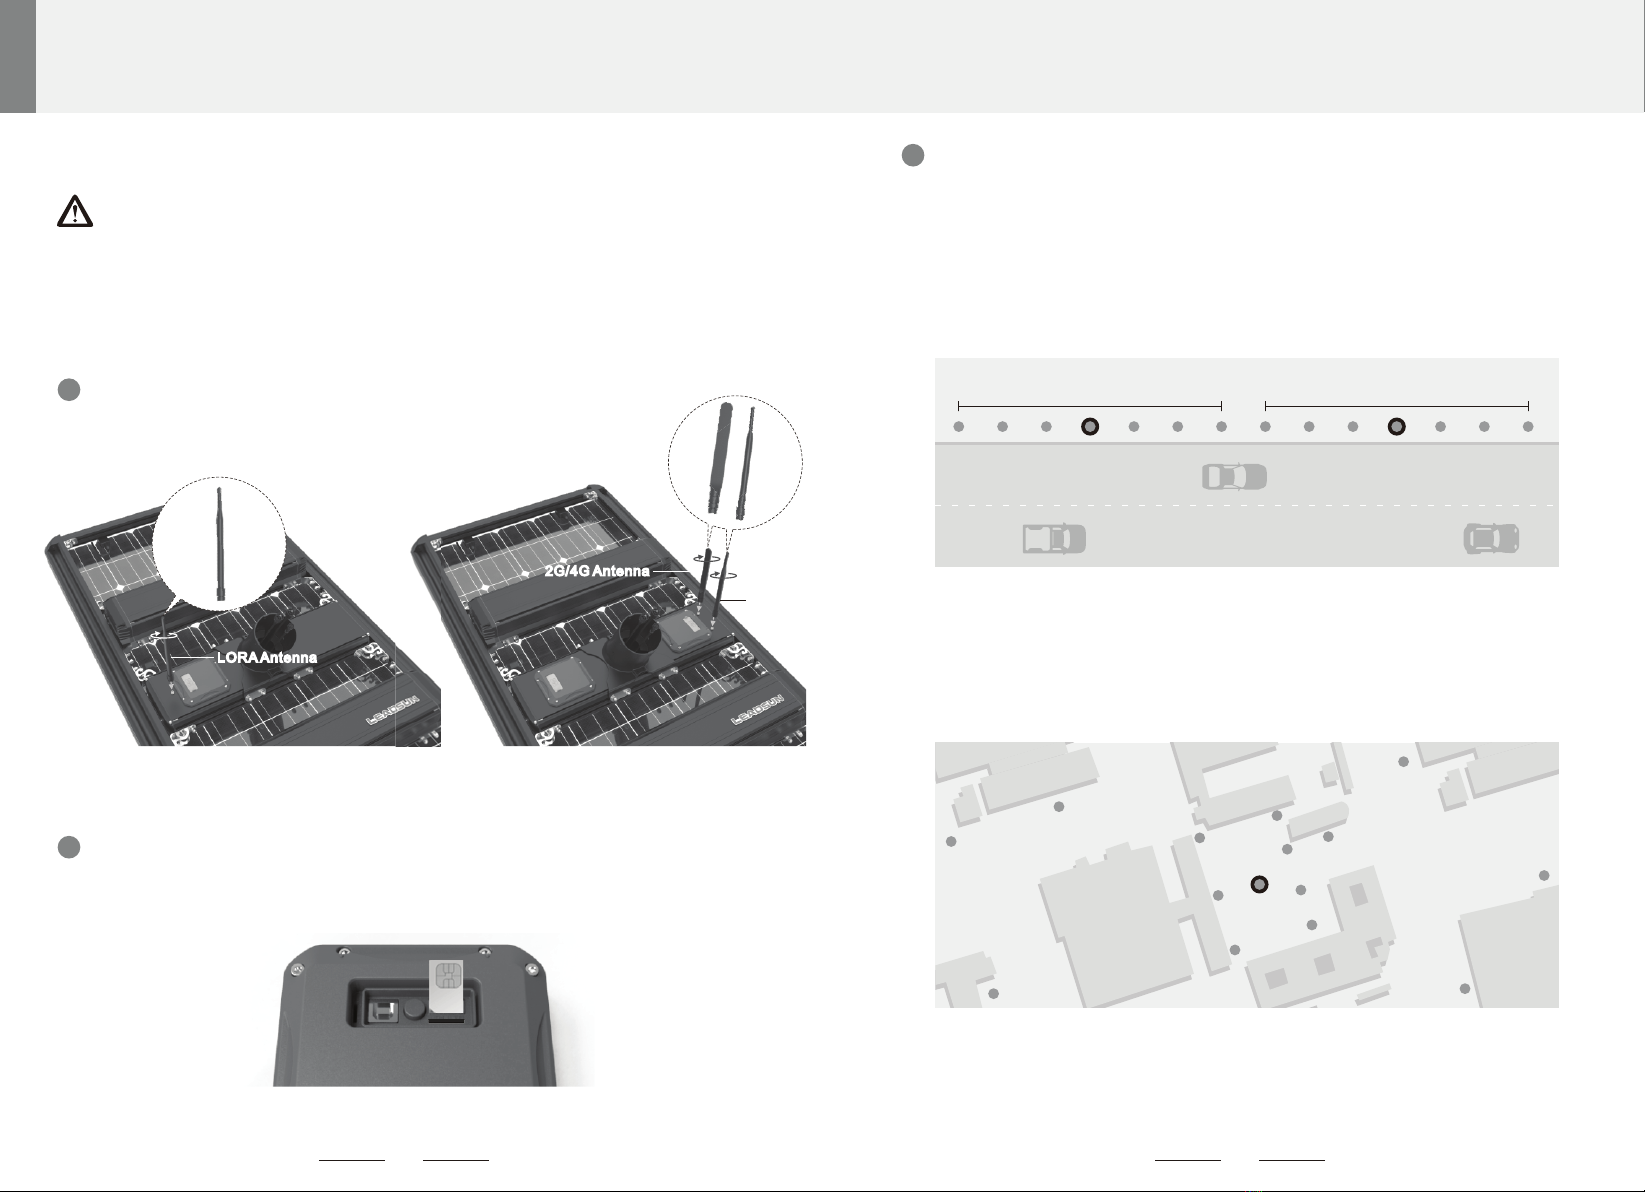
If the installation site is on the northern hemisphere, the solar panel should face to the south
and if it is on the southern hemisphere, the panel should face to the north. (See Picture 1)
1.Installation conditions
Make sure the sunlight is not blocked by any constructions or trees during the installation or it will
affect the charging and discharging efficiency of the solar power system and the operation of the
street light. (See 1.2)Picture
Picture 1
Equator
Picture 1.2
1
2
8
7
Ø76±2
Ø25
600
1
2
3
4
5
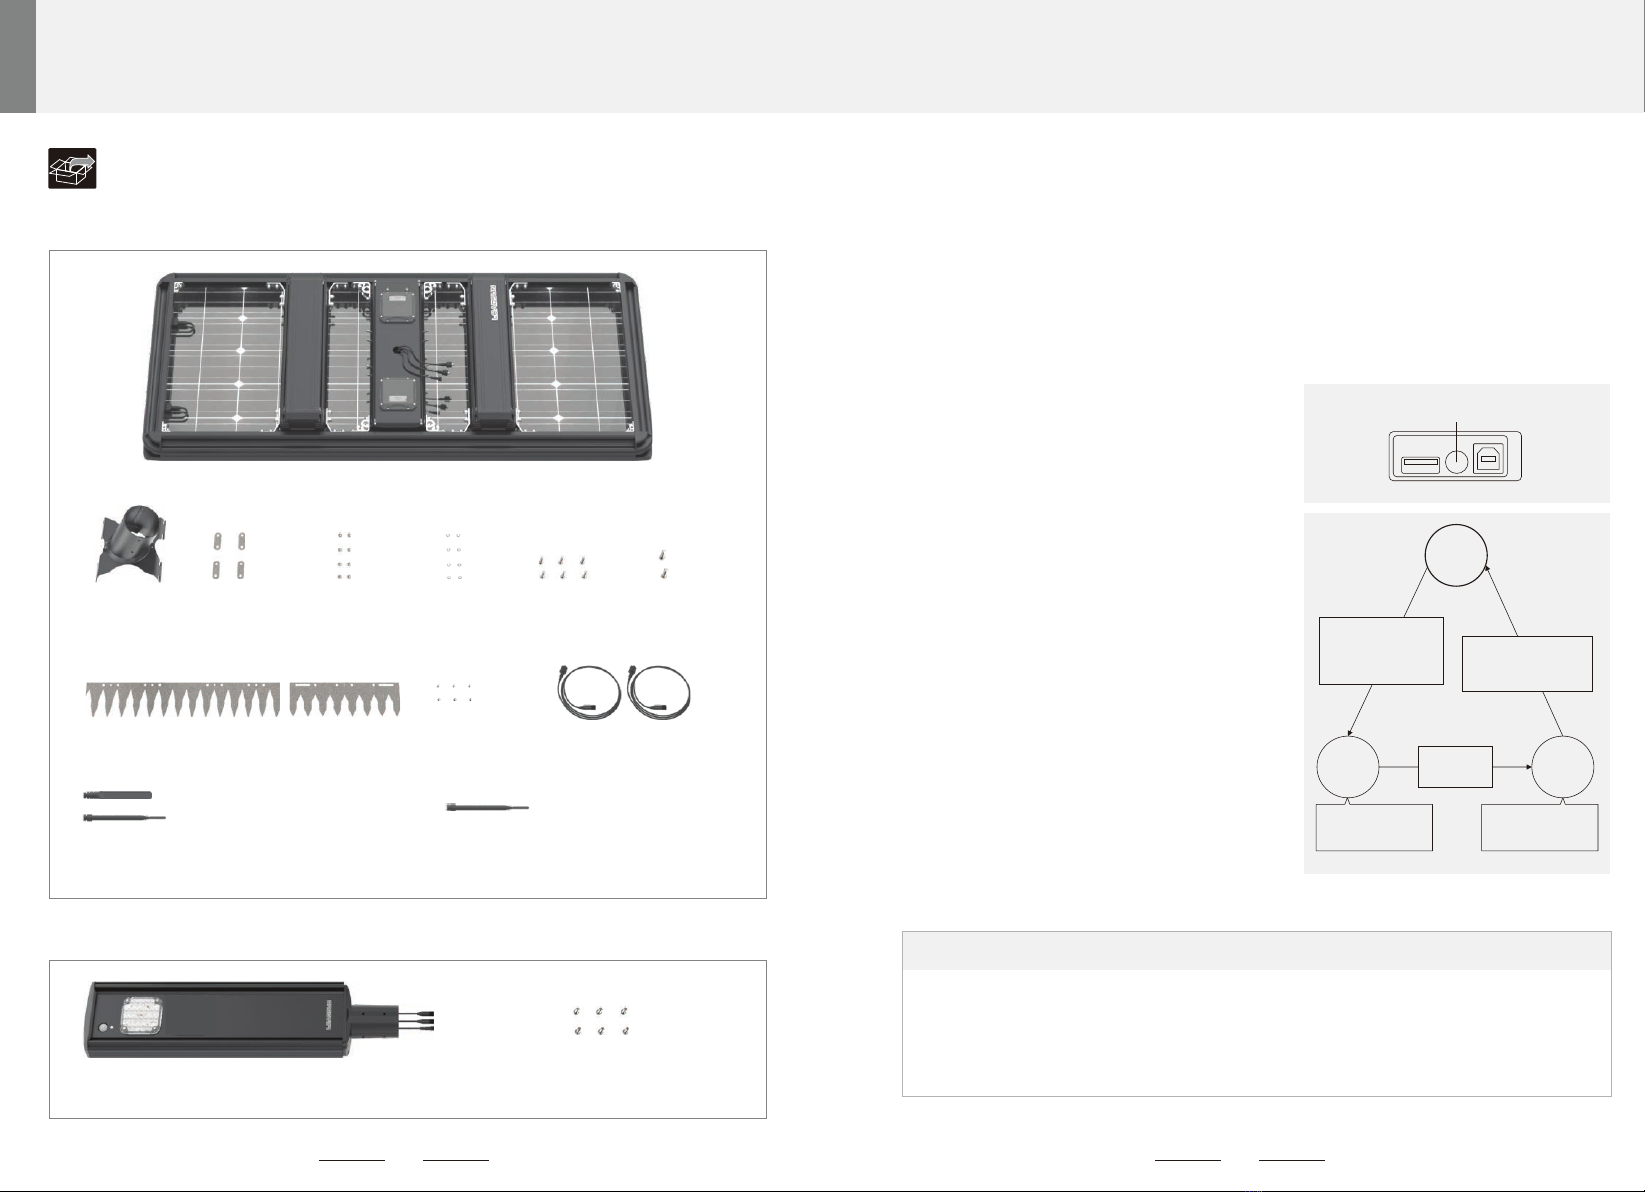
2. Split type activation and installation:
Drill holes on the pole. Firstly, determine
and mark the AE6 panel and LED light
position according to the optimum sun
radiation. Drill a Ф25mm hole approximately
600mm down from the top of the pole, where
the light is to be installed. (See Picture 2)
Attach the bracket to the AE6 unit. Thread
the cables from the hole on the bracket and set
the proper angle in which the solar panel can
obtain maximum energy from the sun (each
scale on the bracket is 6 degree). Fix the bracket
to the solar panel by fastening a M12 × 85 bolt.
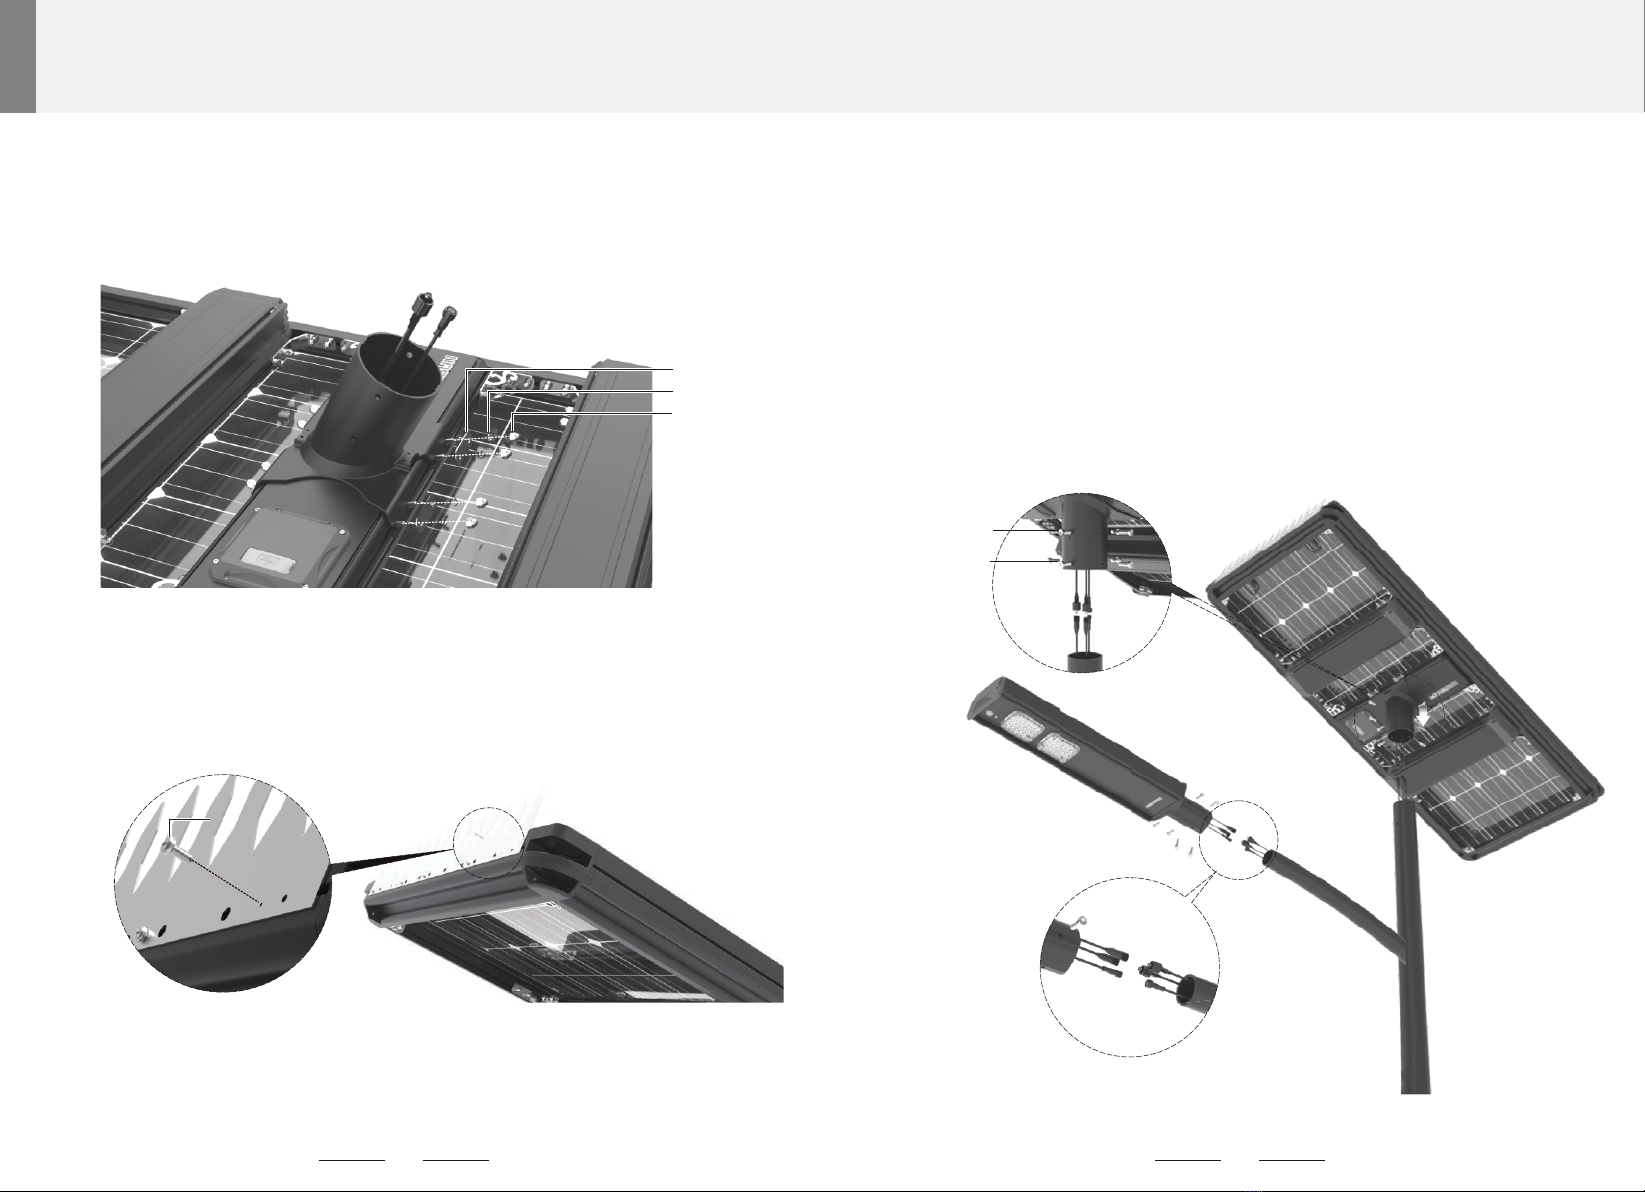
Thread 2 pieces of 2m waterproof cables through the Ф25mm hole which was made in step one
and then out from the top of the pole.
Mount the LED light: Mount the LED light onConnect the LED light with corresponding cables.
the pole by 4pcs M8 90 bolts.× The maximum torque for those M8 bolts is 14Nm. Do not surpass
this torque specification.
Mount the AE6 panel: Connect the two cables from the top of the pole to the solar panel and install
the solar panel ensuring you do not pinch any cables use 6pcs M8 x 16 screws to secure the bracket
to the pole.
Picture 2

4.Install the bird spike
Using the self-tapping screw in the accessory to fasten the bird spike on the top frame of the
solar power system. (See 4)Picture
Picture 4
Self-tapping
screw
Product installation
Connect the cantilever part to the extended cables of the LED street light and lock the connectors
in turns; Embed the LED street light bracket into the cantilever and fasten it by 6 M8*16 screw,
make sure the LED street light has installed stably on the light pole then the installation is
finished. (If you use the electric wrench, torsion should be set to 14N·m) (See Picture 5).
Connect the solar power system with the extended cables in the light pole and lock the
connectors in turns. Embed the light pole into the X bracket and use the dedicated tools to
fasten 6 M8*16mm and 2 M8*25mm screws. (If you use the electric wrench, torsion should be
set to 14N·m)(See Picture 5)
5.Install the solar power system
6.LED Street light installation
M8*16 screw
M8*25 screw
Picture 5
10
9
First put the X bracket on the installation frame at the middle of the solar power supply
system, then clip the 8 screws into the X bracket slot from the installation frame, last, use the
bracket hasp, M6 spring washer, M6 cap nut to fasten the bracket. (See 3)Picture
3. Install the X bracket
Picture 3
Bracket hasp
M6 cap nut
M6 spring washer

1. Please confirm if the 4G module in the gateway is support the data network covered by the
local carrier before installation.
2. When using the inbuilt 4G module gateway, you need to insert a SIM card which has the
data service. The data service will cause the service fee, and you need to pay the relevant
service fee to the local carrier.
Cautions:
7. Wireless system installation (Suitable for EDGE type) Application scenarios
Road installation
Linear installation is adopted on the road. It is possible to consider installing multiply
street light with several gateways if the communication sigmal may be weak.
LORA Antenna
Decentralized installation in Village/Factory/Park
In the situation of decentralized installation, the gateway system is recommended to be
installed in the center of all the street lights.
12
11
LORA Terminal antenna installation Gateway antenna intallation
Insert SIM Card
Insert the 4G SIM card into the slot according to the picture. Press the button next to it to
restart the gateway and cover the waterproof plug.
Connect the antenna to the corresponding position according to the
picture below, (Please pay attention to the difference of 4G antenna
and LORA antenna.)
Antenna installation
1
2
3
Gateway street light
120 street lights 120 street lights
The SIM card cutting edge is face down and the magnetic
stripe is away to the indicator light.
Cautions:
Each wireless street light communication distance range from 800 to 3000m. One
gateway street light can remote control 120 street lights.
Gateway street light
Product installation
LORAAntenna
2G/4G Antenna
LORA
Antenna
2G/4G Antenna

No. Problem Inspecon Soluon
1No lighng at night Check if the light is in ON mode or not. Test according to the "Buon Instrucons"
from the chapter "Operaon Instrucon" in
this manual.
Check if the solar panel is blocked by
any buildings or trees during the
dayme, which will influence the
sunlight.
Clear away the blockade or change the
street light installaon site.
Check if the solar panel is illuminated
by any other arficial light source at
night.
Move the arficial light source away or
change the light installaon site.
Check the states of each part from the
lighng according to the maintenance
guide.
Replace the damage part.
2Lighng me is
seriously
inadequate
Check if the solar panel is blocked by
any buildings or trees during the
dayme, which will influence the
sunlight.
Clear away the blockade or change the
street light installaon site.
Check if the solar panel has dirt or any
blocks covering on the surface which
might influence the sunlight.
Clean the solar panel surface.
Check if the baery pack is damage
according to the maintenance guide. Replace the damage baery pack.
3Abnormal
operaon from the
light in the normal
work mode
Replace the controller or reprogram the
controller program.
4Abnormal moon
detecon
Check if the lighng environment
temperature is same as that of human
body temperature.
If the external temperature is same as of the
human body temperature, the sensivity of
PIR moon sensor will reduce. It will return
back to normal when the external
temperature decreases.
Check if the lighng is installed too
high.
The moon detecon sensivity will
decrease when the installaon height is
over 8m. It is suggested to lower the height
or use other work modes.
Replace the broken PIR moon sensor or
controller.
Troubleshoong
Product Installaon
Soware operaon instrucon
4
With LEADSUN EDGE< you can do the following operaon:
1. Register to become a member
2. Lighng control
3. History data query
4. Working mode configuraon
5. Real-me view.
For detail instrucons, please see the "APP User Guide" under "More Funcons" in the
soware.
To use LEDSUN EDGE to control the light, visit www.leadsun.com.au and follow
the steps to Download the LEADSUN EDGE.
A. iPhone please go to the App Store searching 'LEADSUN EDGE' then click
install.
B. Android cellphone please visit www.leadsun.com.au or go to the soware
plaorms like Google Play to download and install 'LEADSUN EDGE'.
C. PC App please visit hp://47.52.88.104:8083/Home/Login
14
13
Table of contents
Other leadsun Outdoor Light manuals
Popular Outdoor Light manuals by other brands

atmosphera
atmosphera 135313 installation instructions

Onninen
Onninen Onnpark Town instruction manual

Luce Plan
Luce Plan costanza D13 manual

dentalfarm
dentalfarm SOLAR PROFESSIONAL Instruction and maintenance manual

PEWA
PEWA STEINEL L 320 wave installation instructions

LIGMAN
LIGMAN MARVIK 4 MV-30031 installation manual

Inspire
Inspire BERGEN OS1003 H2M instruction manual

nordlux
nordlux ATLON Mounting instruction

Nemo Studio
Nemo Studio PLINT BATTERY MINI Mounting instructions

Patriot Lighting
Patriot Lighting 9074 quick start guide

WE-EF
WE-EF CTY150 Installation and maintenance instructions

Inspire
Inspire MELO instruction manual