Leclerc Looms weavebird loom User manual

1
1573 Savoie
C. P. 4 Plessisville, Qc. G6L 2Y6
TEL: 819-362-7207
FAX: 819-362-2045
www.leclerclooms.com
WEAVEBIRD LOOM TROUBLE
SHOOTING GUIDE
If you have problems when starting the loom or if the loom does not work correctly (too
many jams), please follow the steps on the following checklist carefully.
Version Sept 2014

2
Check each cable to make
sure it goes around the cor-
rect pulley and through the
correct combs in its path from
the top to the bottom of the
shaft.

3
3
Poulies du haut
Contrepoids
Ressort 2.5"
Poulies du bas
Les 2 billes du haut
Les 2 billes du bas
Top pulleys
Counterweight
Spring 2.5"
Lower pulleys
The 2 Top balls
The 2 bottom balls
Guide peigne du haut Top comb guide
Fourchette du haut
Fourchette du bas
Top fork
Bottom fork
TC
LC
Guide peigne du bas Bottom comb guide
NOTE: View from the Front of the
loom with the shed completely
closed
Make sure
that all the
cables are
thread as this
instruction

4
LC
8) Lorsque tous les
câbles sont à leur place,
installer le guide du bras
du bas (LC) .
Poussez-le vers l'intérieur
du métier
Vissez les 3 vis tête
ronde #8 1" avec les ron-
delles noires,
Assurez-vous de les viss-
er dans les avant-trous.
8) When all the cables
are in place (all balls in-
side the top and bottom
guides, affix the lower
arm guide. Push the
lower comb (LC) inside
the loom and screw it in
place with the 3 round-
ed head screws #8, 1” .
Make sure to screw in
the pre-drilled holes.
7A) En installant les
câbles aux ressorts,
assurez-vous que les
bagues soient perpen-
diculaires aux métiers
pour éviter de la friction
entre ceux-ci et les poids
lors de l'ouverture.
7A) While joining the lower
cables to the counterweight,
make sure that the metal
sleeves are perpendicular
to the loom, so they will not
rub on the counterweight
while opening and closing
the shed.
The flat eye connector (F)
cables have to be install on
shafts 29 to 32 on a 32s
loom

5
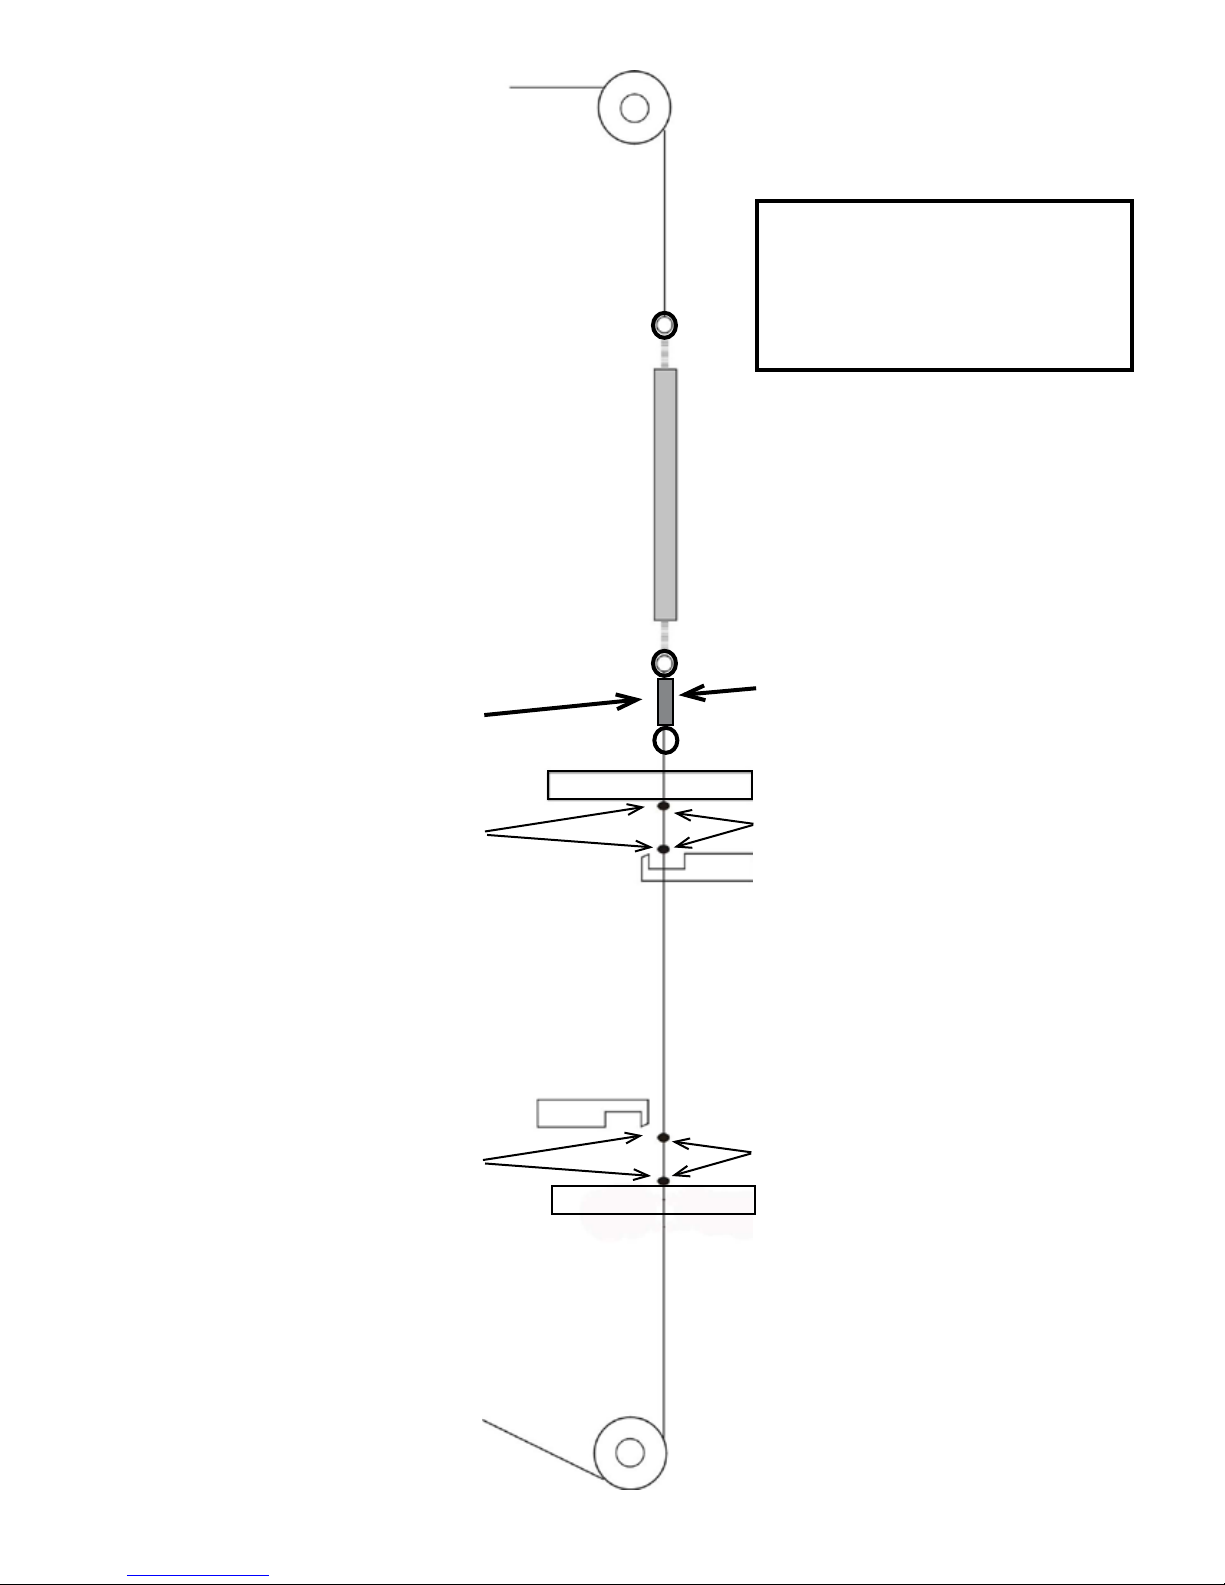
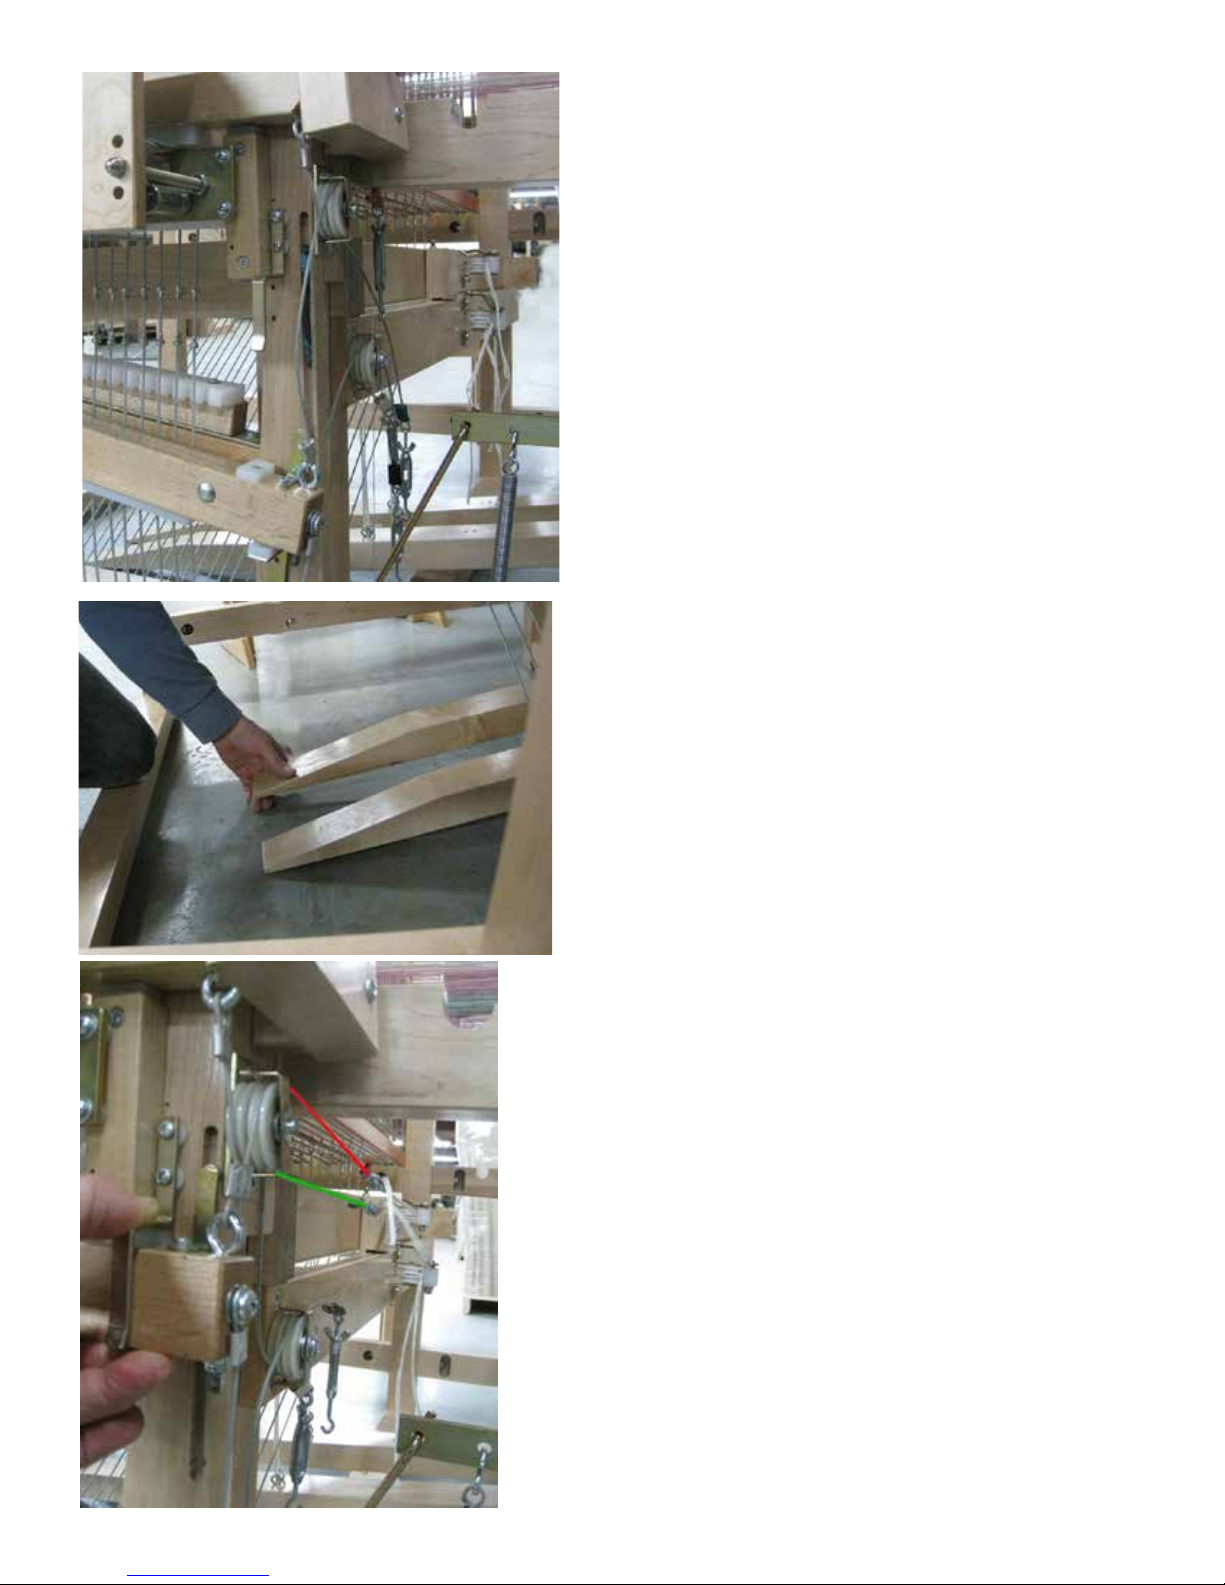
- Make sure that the left treadle is com-
pletely down.
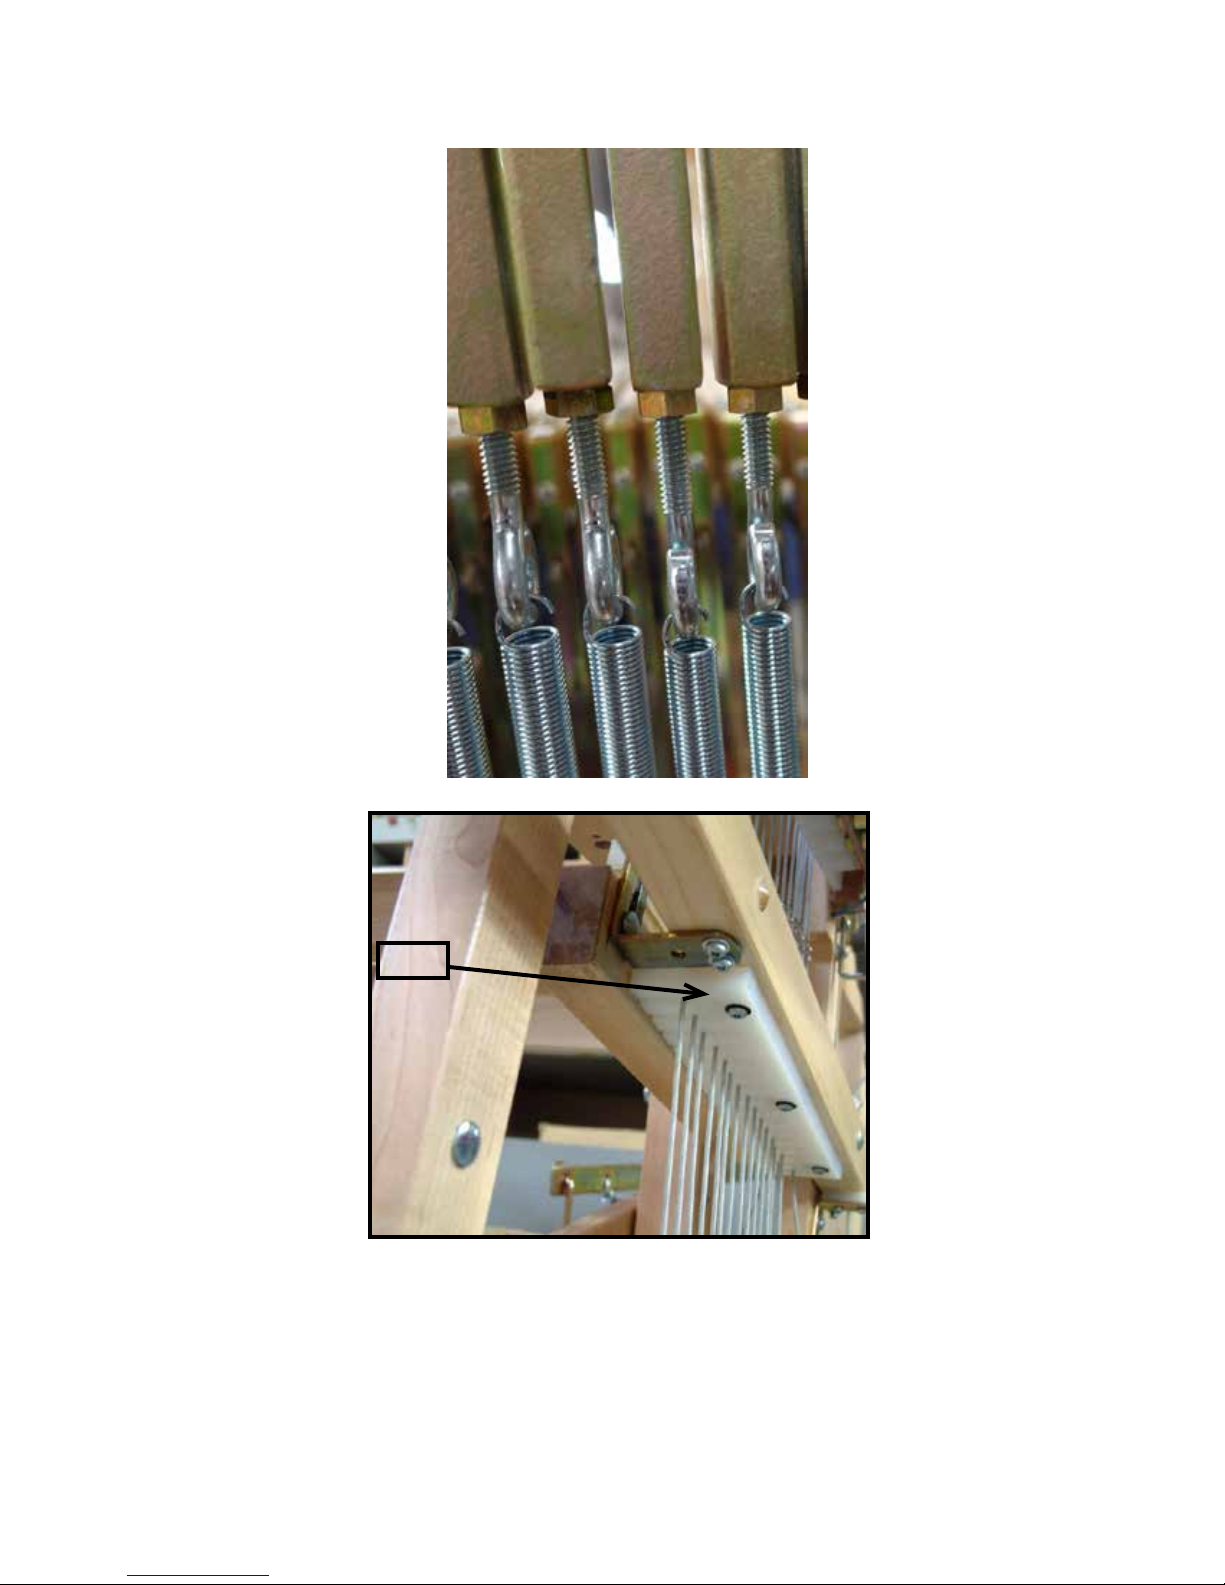
- Connect the spring to the eyebolt
- adjust the eyebolt height so the distance
between the top of the cable and the bottom
of the spring is approx 3/8" with the weight
at the lowest position.
- Connect the spring to the bottom cable
by stretching the spring a little.
The bottom cable should now be straight
and have a small amount of tension on it.
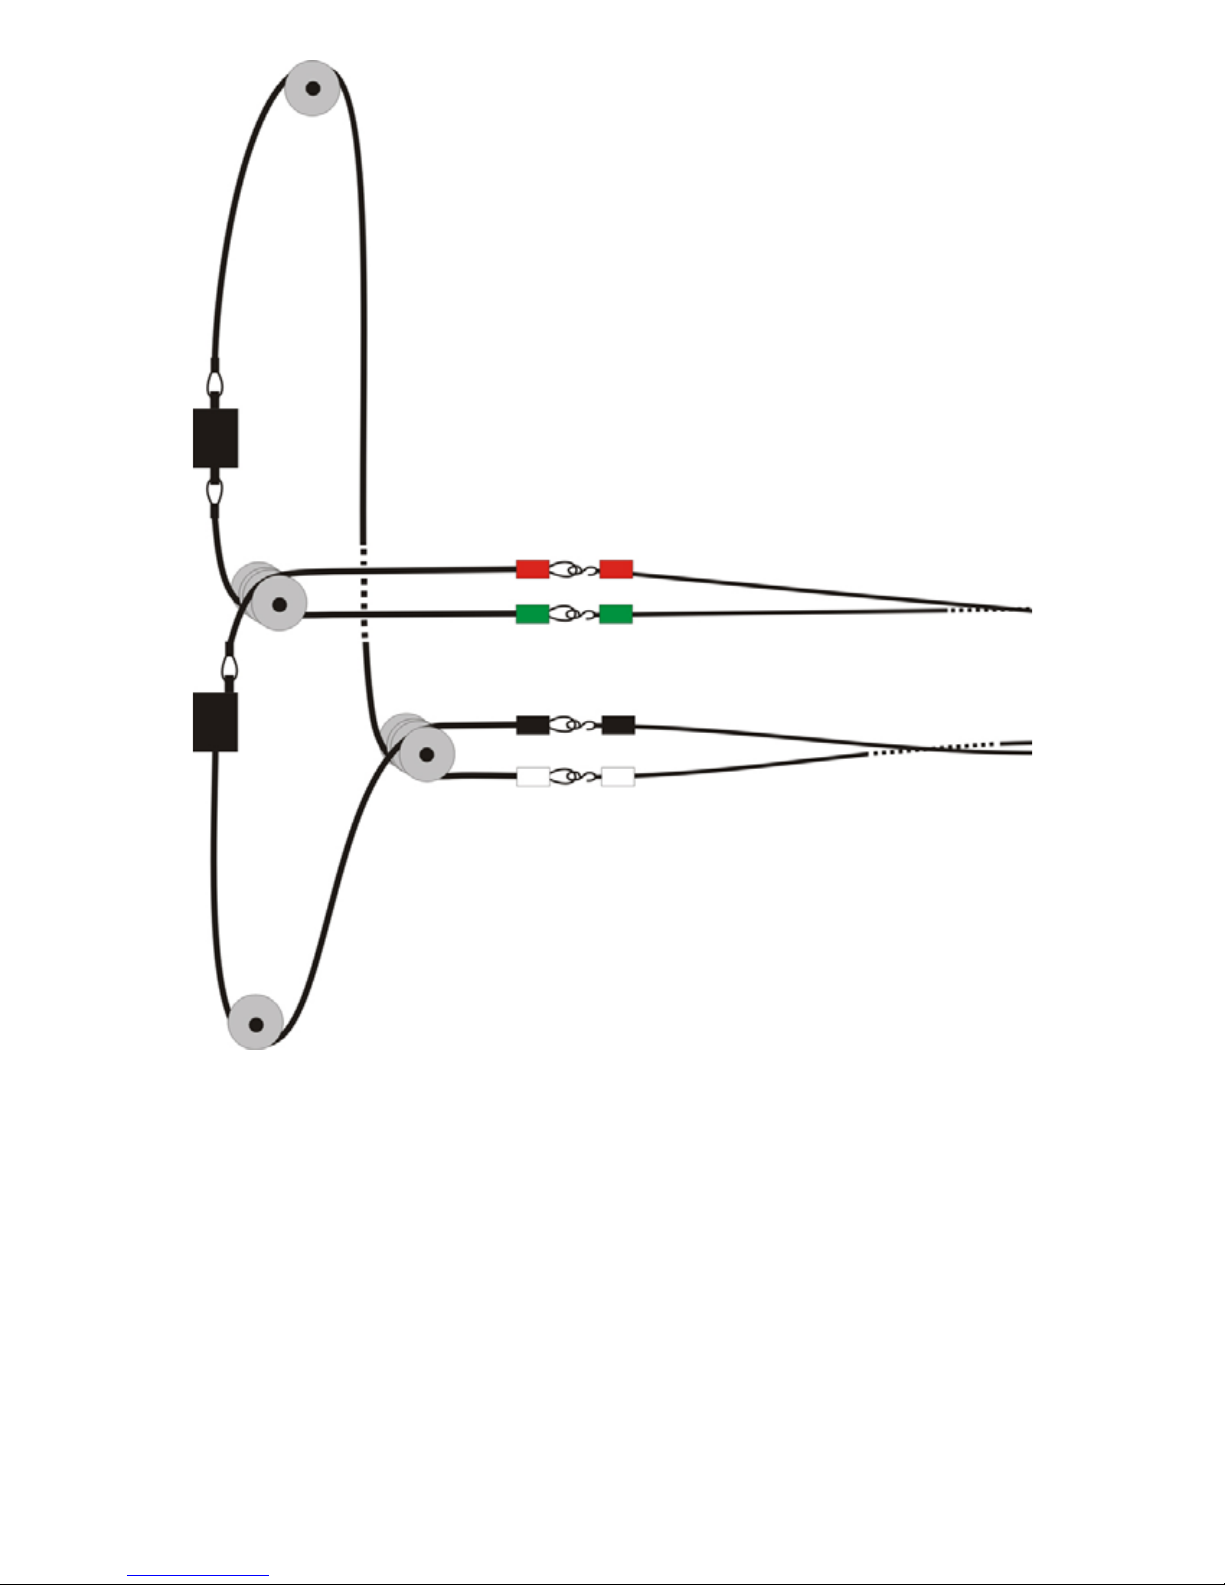
CABLE TENSION ADJUSTMENT
for the lower cables with springs
"If necessary"
1/8"
Ajustement de la tension sur les ressorts.
"Si nécessaire"
- Assurez-vous que la pédale de gauche soit bien enfoncée
- Joindre le ressort à l'oeillet
- Ajuster l'oeillet pour avoir environ 3/8" entre l'extrémité du
câble du bas et le bas du ressort
- Joindre le câble du bas au ressort en étirant un peu le res-
sort. Le cable du bas doit maintenant être droit et avoir une
petite tension.

6
LC
ML
9) Utiliser 2 vis à tête ronde
#6, 3/8” pour fixer la latte de
métal (ML)qui ferme le peigne
du haut (LC)
9) Using 2 rounded head small screws
#6, 3/8”, affix the flat metal lock (ML) to
the top comb guide (LC).
Visser la ferrure du bloc
avant de l'unité solenoide
avec une vis tête ronde
(S) #12, 1"
Assurez-vous de les visser
dans les avant-trous.
Affix the front solenoids
unit block with one
round head screw (S)
#12, 1"
Make sure to screw in
the pre-drilled holes.
Assurez-vous que
les 4 espaceurs de
nylon blanc qui ont
été collés en usine
sont toujours en
place.
Make sure that
the 4 nylon white
spacers which have
been glued in our
shop are still in
place.
S

7
The TOP arm (A1) is guided in its cycle by a slot. IT IS VERY IMPORTANT when
you open the shed with the right Treadle that this arm goes all the way to the top
before depressing the left Treadle to close the shed.
(Each Treadle must be depressed individually fully to the bottom).
Going half way may cause serious damage to the system.
Make sure the arm follows the groove in its cycle up and down, A1
A1
UP
DOWN

8
Make sure the treadle cables are
installed properly and in the groove of
each pulley.
The Red and Green loop cords start
at the left treadle of the loom (stand-
ing in the front of the loom)
the Black and White loop cords start
at the right treadle and are opening
the shed.
For this loom to work
properly, the action of
the selecting arms must
operate as follows:
1) The arms have to open up to the guides(U)
2) The top arm has to follow the groove of the
guide board (G), following the inside groove on
the way up and the outside groove on the way
down.
3) The arms have to close completely.
The length of the loop cords have been tested
before shipping.
It is possible that after a while you will have to
shorten them especially if the treadles touch
the floor.
A1
A2
A1
A2
UU

9
Adjusting the treadle cords
without the black marks or
checking if the black marks are
at the right place.
2 or 3 persons are needed to make this
adjustment.
Hold the left treadle app. 1" from the
oor or place a block of 1" under it.
Hold the bottom arm in the closed posi-
tion (all the way to the nylon stopper)
Connect the red and green
cables,adjusting them with the turn-
buckle that the tension is close to equal
while the arms are closed.
See next page for other drawing and
picture.

10
10
13)
Joindre
les
cordes
à mail-
lons aux
ridoirs
des
câbles d'acier recouvert
de nylon. Joindre aux
marques noir des cordes à
maillons.
Ces ridoirs servent à ajust-
er avec précision le mou-
vement des bras.
10
Attach the S hooks of the turnbuckle on the
metal cables to where the loop cords are marked
in black.
The length of the loop cords tested and markes
at the factory prior to shipping.
Note:
All the treadle system pulleys have to be lubricat-
ed using a silicone based lubricant 2 or 3 times a
year depending on usage.
(The 3-In-One professional lubricant has been
used on this loom before shipping)

11
While keeping the left treadle
down, lift and hold the right treadle
at 10" from the oor.
Connect the black and
white cords while making
sure that both arms are
completely closed.

12
Push down the right treadle.
Check that both arms open
completely all the way to the
nylon stopper.
If like in this picture the arm
does not touch the nylon stop-
per, make the necessary adjust-
ment in the loop cords or in the
turnbuckles to have this opti-
mum open shed.
In this picture, the black cable
will have to be shotened a little.
This picture show a correct adjust-
ment but now make sure the right
treadle is app. 1" from the oor.
If not; change the length of the black
and white cables (same correction)
without changing the arms adjust-
ment.
Before starting weaving, make sure
that all loopcords are in the groove
of the pulleys.

13
PROBLEM WITH THE SOLENOIDS NOT
MOVING BACK AND OR THE PATTERN NOT
SWITCHING WHEN THE SHED CLOSES.
1) Push down the right treadle in order to com-
pletely open both arms
2) Unscrew the magnet bracket
3) Note that the magnet which is probably glued
to the bracket has a small red dot. This indicates
the right side which will face the sensors.
Both the magnet and the sensors will work only
on one side.
The default side for the magnet is the one with
the red mark.
The default side for both sensors is the one with
very small white writing at the end.
4) Take both sensors out of the groove. Save the
Handi-Tak
5) Start the software and power the Interface box.
6) Start a plain weave pattern. As soon as the rst series of the solenoids is activated, take the
magnet bracket in your hand and pass it in front of each sensor until the solenoids move back.
Note which sensors worked and not which of that sensor worked.
THIS SENSOR WILL HAVE TO BE INSTALLED IN THE GROOVE AT THE LOWER MARK.
7) Pass the magnet in front of the other sensor.
This action will switch the pattern and a new series of solenoids will be activated.
THIS SENSOR WILL HAVE TO BE INSTALLED IN THE GROOVE AT THE UPPER MARK.
Note: approximately 1 minute after the solenoid selection is made, the solenoids will move back by
themselves to avoid overheating.
As soon as the selection is made, the shed should open (magnet passes in front of the lower sensor)
If the complete sequence works, re-install the sensors in the groove (at the black marks) and the
magnet to its original place.
Check that the magnet passes in front of both sensors.
Start weaving.
Any problems at any stage of this instruction have to be reported to info@leclerclooms.com with
the complete explanation referring to this instruction steps.
Magnet bracket

14
With the left treadle depressed, make sure that all the cables are inside the
grooves of the top fork.
The upper pair of balls is shown in the correct position above.

15
Before you run the self test with Proweave, or with Weavelec, make sure
that all the solenoid plungers are at rest touching the black pad.

16
With the left treadle depressed, check that all the cables are aligned properly in front
of the BOTTOM fork nylon grooves
A good way to test this is to start the self test.
You do not need the computer to do this test.
Turn the Black box off.
Ask somebody else to keep the left treadle down.
Push the red (white) bottom on the black box and hold it in while turning the black box
on again.
The self test will start automatically.
While the self test is running, check that all cables (one by one) go OUT of the top
fork and IN the bottom fork.
If they do, the aligment is ok.
IF NOT, CALL OR EMAIL TO LECLERC LOOMS FOR MORE INFORMATION.

17
If the lower fork balls on no 1 and 2 are too high to be inserted in the fork, it
is because the lower fork and comb unit is too low.
Loosen the autolock nut and raise the unit until all the balls are all under the
fork as the picture in the previous page.
If the nut is a square nut, contact us to upgrade it to the autolock nut.
FU
N
When the shed is close (left treadle down)
the ball of shaft no 1 should be just under
the lower fork

18
2 persons are needed to test the unit.
One depressing the treadles, the other one checking Cables and Ball position.
1) Depress the left treadle.
2) Check that all balls are above the top fork as in this picture.
3) Make sure that both arms are completely closed (and both of them are
touching or almost touching the nylon stoppers).

19
Depress the left treadle. Start the Software and the first pattern selection (Plain
Weave)
All the even or un-even solenoids have to extend fully as in this picture.
If one or a few solenoids are not fully extended, that means that the tension on that
Cable is too high.
If you want to confirm if it is a tension problem, try to extend the plunger fully by hand.
If you cannot then it may be something else.
If one or a few solenoids are extending slower than the others, this is another indica-
tion that the tension on those solenoids (cables) are too high.
It is very important that you repeat this step a number of times to see if there is a
problem.

20
When all the solenoids are in the fully extended position, check if the balls of
a cable are out of the top fork and into the bottom fork.
This is very important, is the balls of a cable pushed have the top ball still in
the upper fork, you will not be able to make the lift (JAM)
Report this situation to us with pictures supporting the explanation.
TOP FORK
BOTTOM FORK
Table of contents
Other Leclerc Looms Other manuals
Popular Other manuals by other brands

RapidLED
RapidLED Coralife BioCube 29 Aurora Array Retrofit Retrofit Guide

SAFERA
SAFERA Airis Stove Guard user manual

Carl Martin
Carl Martin DeLayla XL Short instruction manual

ALBA-KRAPF
ALBA-KRAPF COLIBRI Assembly instructions

Southwire
Southwire Shoreline Reels RL5 installation instructions

Lava
Lava Spark 285 user manual