Ledah 220 User manual

www.
LedahMachines
.com.au
INSTRUCTION MANUAL
Before operating this unit
please read and follow
all instructions.
FOR YOUR SAFETY
- Product is not intended for use by children.(product is not a toy) Keep children and pets away from letter
folding machine.
- Don’t overload manual feed paper folder : Load a maximum of 3 sheets at a time.
- Avoid touching the paper feeding slot with hands.
- Never insert hands or fingers into the paper feeding slot.
- Avoid hair touching the paper feeding slot .
- Keep hair/face away from the paper feeding slot.
- Keep aerosol products away from letter folding machine. Do not use flammable, petroleum-based or
aerosol cleaners on or near this product. Some agents may combust causing serious injury.
- Avoid clothing touching the paper feeding slot.
- Keep personal and loose objects (jewelry, ties, etc.) away from paper feeding slot.
- Operate this letter folding machine with an 8-15 minutes on, and a 20-30 minutes off cycle.
- In order to prevent accidents, always unplug the unit and make sure the Master Control Switch is in the OFF
position while not in use.
- Do not operate the unit with a damaged power supply cord.

SAFETY PRECAUTIONS
1. Your safety as well as the safety of others is important to LEDAH. In this manual as well as on the product
are important safety instructions. Please read and retain these instructions.
2. Read all instructions before use. Save these instructions for later use.
3. Follow all warnings and instructions marked on the product.
4. Unplug this product from the wall outlet before cleaning. If needed, the housing can be cleaned with a
cloth, dampened with a mild soap and water solution.
5. Folder should never be placed near or over a radiator, heat register or water.
6. Do not rest anything on the power cord. Do not place machine where people may walk on the cord.
7. If an extension cord is used, make sure that the total ampere ratings of the products plugged into
the extension cord do not exceed the extension cord’s ampere rating and/or does not exceed 15
amperes.
8. Do not alter the unit or power cord in any way. Do not operate the unit if it or the power cord appears
damaged in any way.
9. Do not service this product yourself. Opening/removing covers may expose you to dangerous voltage
points or other risks, and will void manufacturer’s warranty. Unplug product from outlet and refer
servicing to qualified service personnel.
10. Keep out of reach of children and pets.
11. This folder should be operated only with an operator in attendance.
12. BE SURE THE ON/OFF MASTER CONTROL SWITCH (AT THE BACK OF THE UNIT) IS IN THE “OFF” POSITION
BEFORE PLUGGING IN THE FOLDER.
INSTALLATION:
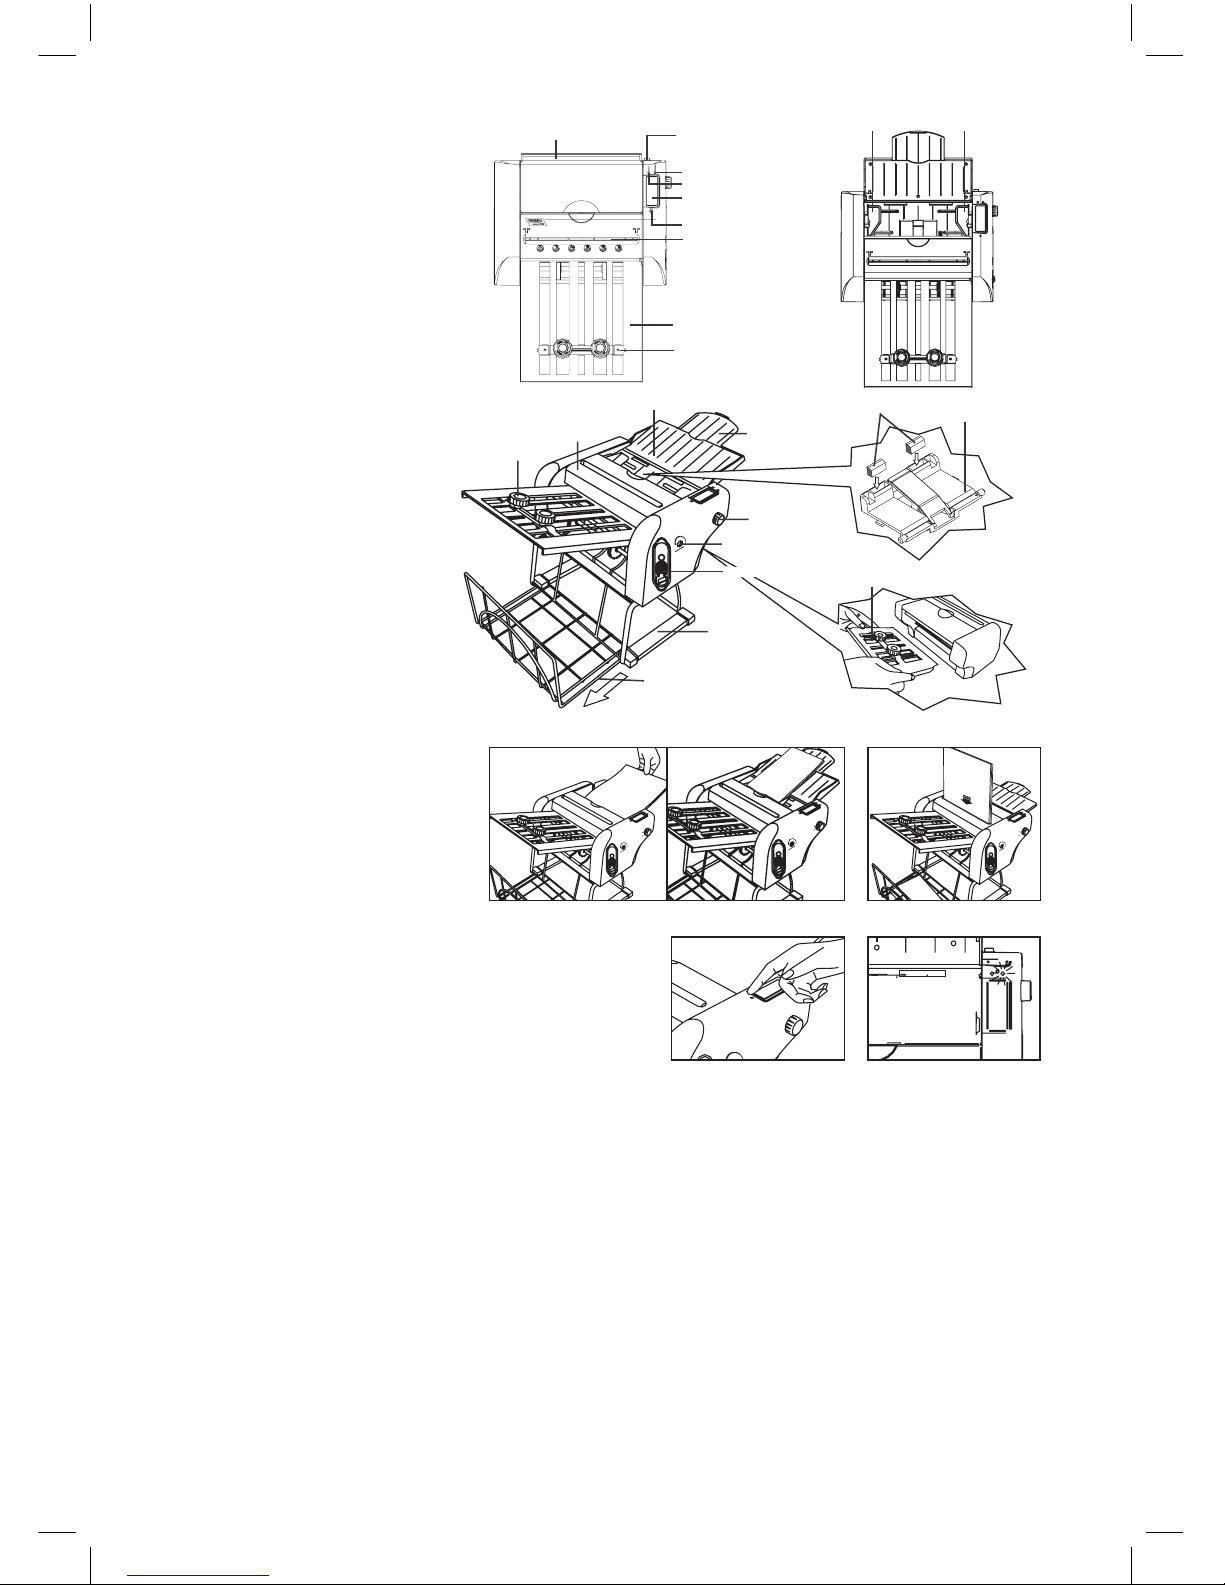
1. Carefully unpack the machine and inspect all contents for any possible
damage due to shipping. Place the metal basket on a flat, level work
surface and place the folder on top of it.
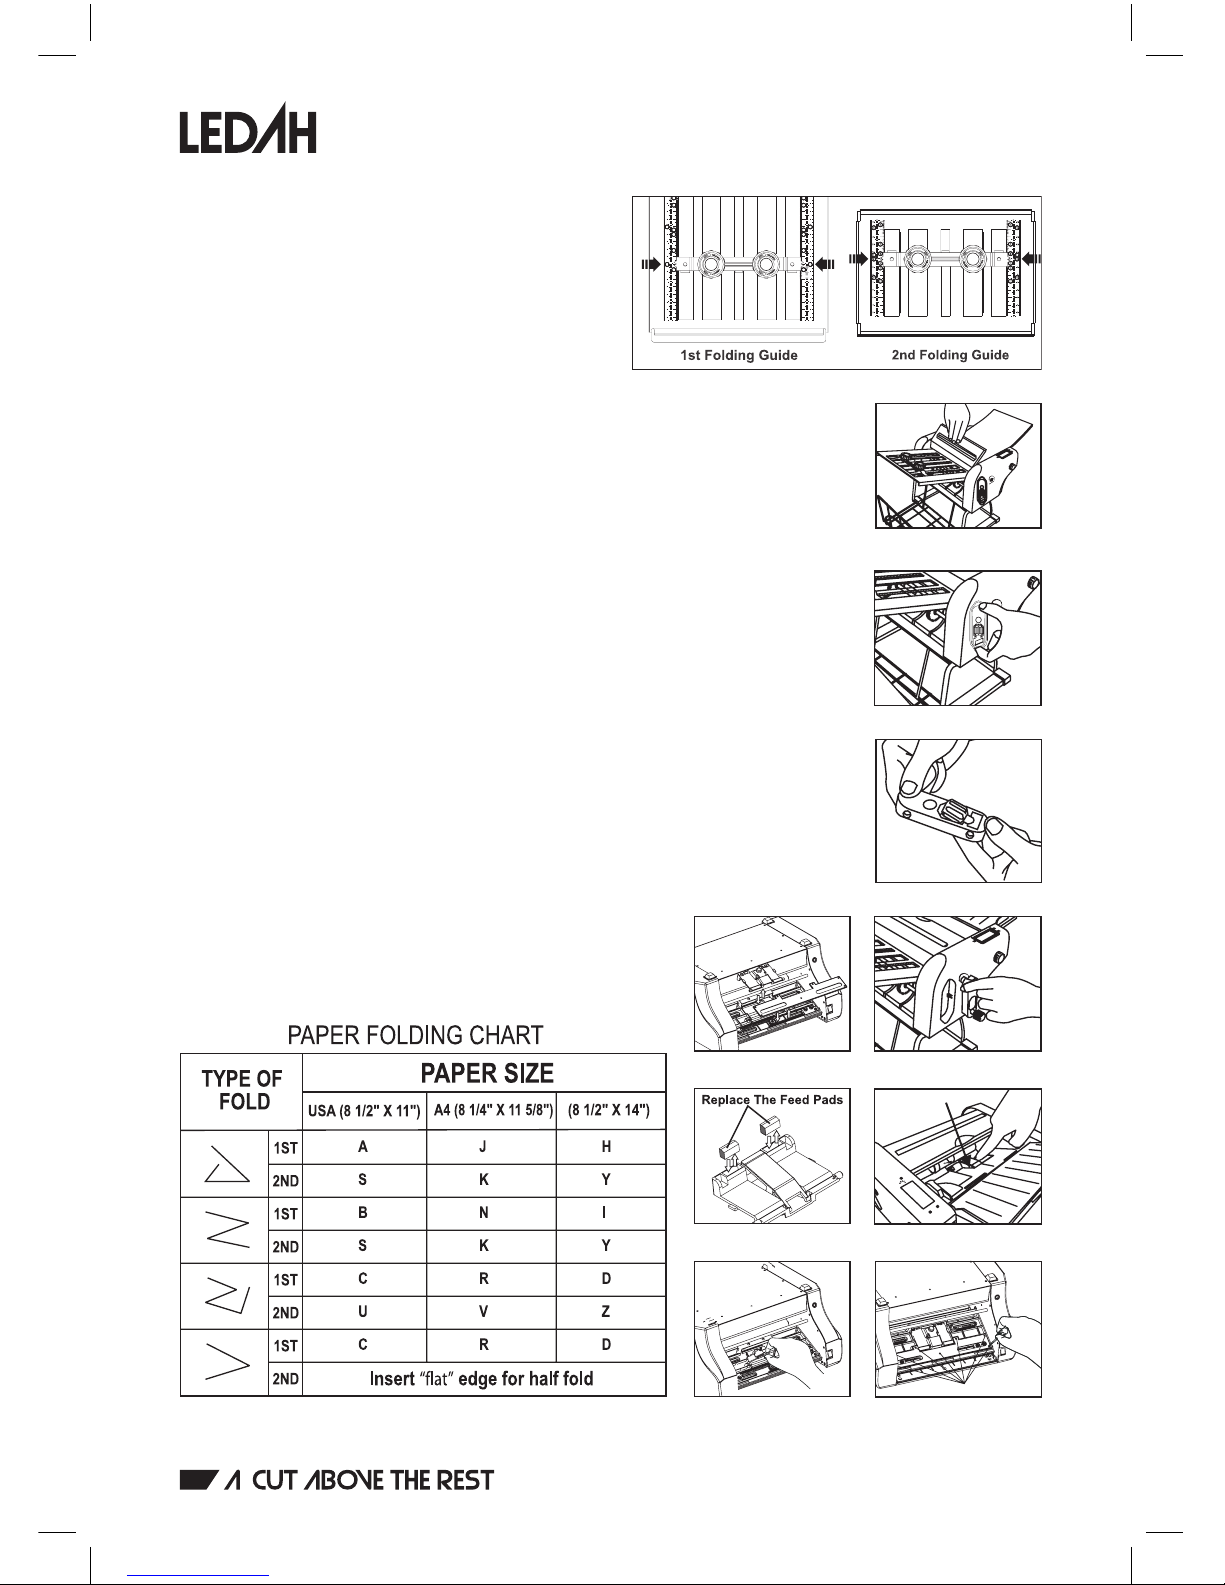
2. Insert the folding guides:
- Step 1) The long guide (1st Folding Guide) is inserted in the front of the
machine. It’s placement is indicated on the inner sides of the front of the
folder. The guide must be inserted so that the “C” shape ends fit firmly onto
the silver cylinders. (Fig. 1)
- Step 2) The smaller guide (2nd Folding Guide) is inserted in the back of
the unit. The guide must be inserted so that the “C” shape ends fit firmly
onto the silver cylinders. (Fig. 2), and the bottom of that tray fits down on
top of the thin silver bar. There is a cut out on the bottom of the tray for this.
This can be tricky to insert properly so take your time.
3. Open the paper loading tray and pull out its small tray.
4. Put the metal basket on the table/platform and put the unit on the metal
basket firmly.
Then pull out the metal paper catch. (Fig. 3)
5. Connect the AC adapter with the unit. Then plug the AC adapter to the
power source and put the master control switch in the “ON” position. The
green power LED light will illuminate and the unit is now ready to be used.
FEATURES:
1. Loading capacity: Paper loading tray holds up to 80 sheets of 80gsm paper.
2. Folding speed: Up to 60 sheets of 80gsm paper per minute.
3. Manual feed capacity: Max. 3 sheets at a time.
4. Folding styles: 4 popular folding styles.
5. LED light: Power/Overheat LED light.
6. 4 digit LED Sheet Counter Display and Speed Adjuster.
7. Power:100-240v/50-60Hz AC adapter.

www.
LedahMachines
.com.au
OPERATION
1. Auto Feed:
1) Maximum 80 sheets
loaded at a time.(80gsm).
Automatically feeds 1
sheet at a time.
2) Line up stack of papers
well, and push the papers
into the Paper Loading Tray
Slot. (Fig. A)
3) The infrared sensor
inside the auto feed slot
will detect the papers (this
may take a few seconds)
and pull the papers into
the unit one after another
automatically.
2. Manual Feed:
1) Maximum 3 sheets at a
time.(80gsm).
2) Line up the paper(s) (if 2
or 3 sheets) into the manual
feed slot and release
paper(s) to fall freely into
the slot. (Fig. B)
3) The infrared sensor inside the
manual feed slot will detect the
paper(s) (this may take a few
seconds) and pull the paper(s)
into the unit.
3. The folded paper(s) will come
out from the exit, then fall into
the metal basket.
4. Remove the folded paper(s) from the metal basket.
5. During folding, the 4 digit LED sheet counter display will
show the number of folded sheets. The data can be
cleared by pushing the “RESET” switch. (Fig. C)
6. The unit may automatically stop folding and the
Overheat LED will illuminate. If the unit overheats, let it
cool down. After the unit cools down, the Overheat LED will
turn off and the unit is ready to work. ( Fig. D)
7. If you want to slow down or speed up the folding speed, just rotate the Speed Adjuster to achieve the
desired speed.
8. To change the unit’s folding style, please see the Paper Folding Chart:
1) Find the paper size and folding style that you want.
2) Refer to the Paper Folding Chart for the relative setting method.
3) Loosen the knobs of the 1st and 2nd Folding Guides and adjust them as the Paper Folding Chart
indicates.
4) Then tighten the knobs.
(ie) If you want to fold A4 paper to a “Z” folding style, then loosen the 1st Folding Guide’s knobs and
set the panel to “N” position. Also loosen the 2nd Folding Guide’s knobs and set the panel to the “K”
position. Then tighten the knobs and put these two Folding Guides back to their position. The unit will
fold A4 papers as “Z” style. (Fig. E)
Speed Adjuster
Jamming Reverse Hole
Small Tray
Knobs
Jamming
Release Cover
Metal Basket
Metal Paper Catch
Manual Feed Slot
4-digit LED Sheet
Counter Display
1st Folding Guide
Panel - 1
ON/OFF Master
Control Switch
2nd Folding Guide
Reset Switch
Step 3
Step 1
Step 2
2nd Folding Guide
Auto Feed Paper Loading Tray Feed Pads
Jamming Handle
Left limit board Right limit board
Power
Overheat
Lower Internal Paper
Loading Tray
Fig.A Fig.B
Fig.C Fig.D

IN CASE OF PAPER JAM:
If paper becomes jammed, you can fix with either or
both of the below methods:
Note: Turn off and unplug the unit before below
operation. It is suggested to remember the folded
quantity shown in the 4-digit LED Sheet Counter
Display before preforming the below 2 methods.
1. Method 1: Open the Jam Release cover and
remove the jammed paper, then close the Jam Release cover. (Fig. F)result.
2. Method 2: Take out the Jam Handle (Fig. G) and unfold it (Fig. H ), then insert it
into the Jam Reverse Hole and turn the Jamming Handle counterclockwise (Fig.
I) to reverse the paper out. Then remove the paper and put the Jamming Handle
back to its original position.
FEED PADS:
Over use and time, the feed pads tend to wear, papers don’t feed as well and so
these should be replaced with new ones as needed. Please see the below diagram.
1. Please remove the lower internal paper loading tray by using a screwdriver to 7
screws and take this part of the tray out. (Fig. J, K and L)
2. Pop out the black rectangular feed pads with a butter knife and replace with
new ones. Notice the angle on the surface of these so as to replace the new
ones in the same fashion. Replace by peeling the double sided tape off the
new ones and pressing them back in their area. Replace tray and screws into the
machine. (Fig. M and N)
Important Note:
The Second Folding Guide, located in the back of the machine, can be used to
make half folds AND other folds, by inserting one end or the other end in first. To do
a half fold, insert the end with a flat edge where the paper would be blocked, not
making a second fold. To do all other folds, insert the end where you see a slit, where
the paper would go in and pop out with a second fold.
This chart is also found on the unit.
REMARKS: 1.) IST IS THE LONGER FOLDING GUIDE
2.) 2ND IS THE SHORTER FOLDING GUIDE
B
3
2
9
7
8
6
5
4
3
1
N
C
I
7
9
18
17
6
5
4
16
R
14
13
12
11
F
D
A
3
2
1
N
C
9
7
B
3
6
5
4
I
F
D
A
9
18
17
7
16
14
6
R
13
12
11
5
4
Guide paper activities block
Take off the seven screws
Fig.E
Fig.F
Fig.H
Fig.IFig.L
Fig.JFig.M
Fig.KFig.N
Fig.G
Table of contents
Other Ledah Folding Machine manuals