manuals.online logo
Brands
  1. Home
  2. •
  3. Brands
  4. •
  5. LEDOLUX
  6. •
  7. Outdoor Light
  8. •
  9. LEDOLUX AREA LED SPORT User manual

LEDOLUX AREA LED SPORT User manual

PL: Instrukcja obsługi EN: Instruction manual DE: Bedienungsanleitung
NAPIĘCIE ZASILANIA NOMINAL VOLTAGE STROMVERSORGUNG
220 - 240V ~
CZĘSTOTLIWOŚĆ FREQUENCY FREQUENZ
50 / 60Hz
TEMPERATURA BARWOWA COLOUR TEMPERATURE LICHTFARBE
4000K
SKUTECZNOŚĆ ŚWIETLNA LUMINOUS EFFICACY LICHTAUSBEUTE
150lm/W
ROZSYŁ ŚWIATŁA BEAM ANGLE LICHTVERTEILUNG
TYP1 / TYP2 / TYP3
TEMPERATURA PRACY OPERATING TEMPERATURE BETRIEBSTEMPERATUR
-25°C ÷+65°C
WYSOKOŚĆ MONTAŻU MOUNTING HEIGHT EINBAUHÖHE
5 -20m
1
AREA LED SPORT
Powierzchnia
wiatrowa*
L
W
H
Waga
100W
0,106m
2
332mm
320mm
95mm
6.3kg
150W
0,106m
2
332mm
320mm
95mm
6.3kg
200W
0,106m
2
332mm
320mm
95mm
6.6kg
300W
0,178m
2
555mm
320mm
95mm
11.0kg
400W
0,178m
2
555mm
320mm
95mm
11.0kg
UWAGA NOTE ACHTUNG
Kostka zaciskowa nie jest dostarczana.
Instalacja musi być wykonana przez
osobę wykwalifikowaną. W przypadku
wątpliwości na temat instalacji lub
użytkowania oprawy LED, należy
skonsultować się z producentem.
Terminal block is not supplied.
Installation must be performed by a
qualified person.
In case of doubts as to
the installation
or use of the LED
luminaire, consult
manufacturer.
Klemmenblock wird nicht mitgeliefert.
Die Installation muss von einer
qualifizierten Person durchgeführt
werden. Bei Zweifeln bezüglich der
Installation oder Verwendung der LED
-
Leuchte wenden Sie sich an den
Hersteller.
Wymień oprawę po wystąpieniu awarii.
Próba samodzielnej naprawy powoduje
utratę gwarancji.
Replace the luminaire after a failure.
Self
-repair shall void the warranty.
Bitte ersetzen Sie die Leuchte nach einer
Fehlfunktion. Wenn Sie versuchen, die
Leuchte selbst zu reparieren, erlischt die
Garantie.
Ten produkt zawiera źródło światła o
klasie efektywności energetycznej
C.
This product contains a light source with
energy efficiency class
C.
Dieses Produkt enthält eine Lichtquelle
mit Energieeffizienzklasse
C.
Przechowywać oprawę w chłodnym,
suchym i czystym otoczeniu. Nie wkładaj
do wody ani ognia.
Keep the luminaire in a cool, dry and
clean environment. Keep away from
water and fire.
Lagern Sie die Leuchte in einer kühlen,
trockenen und sauberen Umgebung.
Nicht in Wasser oder Feuer legen.
Przed przystąpieniem do montażu,
bezwzględnie odłączyć zasilanie w
obwodzie. Włączyć zasilanie po
podłączeniu i zabezpieczeniu wszystkich
opraw w obwodzie
Make sure you disconnect the power
supply before installation.
Turn on the
power after connecting and securing all
luminaires in the circuit.
Trennen Sie vor der Montage unbedingt
die Stromversorgung im Stromkreis ab.
Schalten Sie die Stromversorgung nach
dem Anschluss und Sicherung aller
Leuchten im Stromkreis ein.
Źródło światła zastosowane w tej
oprawie oświetleniowej powinno być
wymieniane wyłącznie przez producenta
lub jego przedstawiciela serwisowego,
lub podobnie wykwalifikowaną osobę.
The light source used in this luminaire
should only be replaced by the
manufacturer or their service
representative, or a similarly qualified
person.
Die in dieser Leuchte verwendete
Lichtquelle sollte nur vom Hersteller oder
seinem Servicemitarbeiter oder einer
ähnlich qualifizierten Person
ausgetauscht werden.
Chroń oczy, w tym celu unikaj
spoglądania w punkt świetlny przez długi
okres czasu.
Protect your eyes, avoid looking at the
light for a long period of time
.
Schützen Sie Ihre Augen, vermeiden Sie
lange Zeit auf den Lichtpunkt zu schauen.
Zanieczyszczenia osiadające na oprawie
w wyniku normalnego użytkowania
oprawy, należy zmywać wilgotną
szmatką, nie stosować agresywnych
środków lub metod czyszczących.
Dirtiness
that settle down on the
luminaire
due to normal operation shall
be
cleaned with a damp cloth. Do not
use
invasive cleaners or cleaning
methods
.
Verschmutzungen
, die sich auf die
Leuchte
im Gebrauch absetzen, können
mit
einfeuchten Tuch entfernt werden.
Verwenden Sie keine invasiven
Reinigungsmittel oder
Reinigungsmethoden.
ZASTOSOWANIA APPLICATION ANWENDUNG
▪Obiekty sportowe
▪Parkingi
▪Tereny zewnętrzne
▪Sport facilities
▪Parking areas
▪Exterior areas
▪Sportanlagen
▪Parkplätze
▪Außenanlagen
Ledolux Poland Sp. z o.o.
Ul. Innowacyjna 1
36-060 Głogów Małopolski
POLSKA
E-mail: [email protected]
Tel: +48 696 966 622
Data: 02.03.2023
Zastrzegamy sobie prawo zmian konstrukcyjnych w oprawach oświetleniowych.
We reserve the right to make design changes to luminaires.
Wir behalten und das Recht vor, Konstruktionsänderungen an Leuchten durchzuführen.
4
*These data refer to the worst case at indicated angle.
Montaż na regulowanym uchwycie na słup | Installation on an
adjustable extension arm | Montage auf einem einstellbaren Auslege
Podłączenie przewodów zasilających | Connecting the power cable | Stromkabel anschließen
Podłączenie przewodów sterujących | Connecting the dimming cable | Dimmkabel anschließen
1-10V
3
Montaż na regulowanym uchwycie | Mounting on an adjustable bracket
| Montage auf einer verstellbaren Stütze
2
8mm
25mm
8mm
25mm
LBrązowy | Brown | Braun
PE Zielono-Żółty | Green-yellow | Grün-Gelb
NNiebieski | Blue | Blau
Zamontuj uchwyt montażowy do oprawy kluczem imbusowym (6mm, 8Nm). Ustaw odpowiedni kąt
odchylenia. Zablokuj pozycję za pomocą śruby kontrującej (10mm, 5Nm) i skręć uchwyt kluczem
imbusowym (6mm, 8Nm). Podłącz oprawę do zasilania, zgodnie z oznaczeniami przewodów. Zachowaj
wodoszczelność połączenia, stosuj mufy o stopniu szczelności min. IP66. Zamontuj oprawę na
słupie/wysięgniku.
Attach the mounting bracket to the luminaire with hex key (6mm, 8Nm). Set the correct monunting
angle. Lock the position with the counter screw (10mm, 5Nm) and tighten the holder with the hex key
(6mm, 8Nm). Connect the luminaire according to the wire markings. Keep the connection watertight,
use couplings with ingress protection rating min. IP66. Mount the luminaire on the pole / boom.
Befestigen Sie die Montagehalterung mit einem Innensechskantschlüssel (6mm, 8Nm) an der Leuchte.
Stellen Sie den richtigen Montagewinkel ein. Fixieren Sie die Position mit der Konterschraube (4mm,
2Nm) und ziehen Sie die Halterung mit dem Inbusschlüssel fest (6mm, 8Nm). Schließen Sie die Leuchte
gemäß den Kabelmarkierungen an. Verbindung wasserdicht halten, Kupplungen mit Schutzart min. IP66.
Montieren Sie die Leuchte am Mast / Ausleger.
Ustaw odpowiedni kąt odchylenia. Zablokuj pozycję za pomocą śruby
kontrującej kluczem imbusowym (4mm, 2Nm) i skręć uchwyt kluczem
imbusowym (6mm, 8Nm). Podłącz oprawę do zasilania, zgodnie z
oznaczeniami przewodów. Zachowaj wodoszczelność połączenia,
stosuj mufy o stopniu szczelności min. IP66.
Set the correct monunting angle . Lock the position with the counter
screw, hex key (4mm, 2Nm) and tighten the holder with the hex key
(6mm, 8Nm). Connect the luminaire according to the wire markings.
Keep the connection watertight, use couplings with ingress protection
rating min. IP66.
Stellen Sie den richtigen Montagewinkel ein. Fixieren Sie die Position
mit der Konterschraube, Inbusschlüssel fest (4mm, 2Nm) und ziehen
Sie die Halterung mit dem Inbusschlüssel fest (6mm, 8Nm).
Schließen Sie die Leuchte gemäß den Kabelmarkierungen an.
Verbindung wasserdicht halten, Kupplungen mit Schutzart min. IP66.
+Czarny | Black | Schwarz
―Szary | Gray | Grau
Przed przystąpieniem do montażu, bezwzględnie odłączyć zasilanie
w obwodzie. OFF
Make sure you disconnect the power supply before installation.
Trennen Sie immer die Stromversorgung vom Stromkreis, bevor Sie
mit der Montage beginnen.
Przygotuj powierzchnię montażową, nawierć otwory. Zamontuj oprawę za pomocą śrub montażowych
(brak zestawie), kluczem imbusowym (6mm, 8Nm).
Prepare the mounting surface, drill holes. Mount the luminaire with the mounting screws (not included)
with hex key (6mm, 8Nm).
Bereiten Sie die Montagefläche, Bohrungen. Montieren Sie die Leuchte mit den Befestigungsschrauben
(nicht enthalten), mit dem Inbusschlüssel fest (6mm, 8Nm).
ø45÷60mm
Średnica montażowa:
Mounting diameter:
Montagedurchmesser:
Gdy nie ma sterowania oświetleniem, zabezpiecz kable
sterujące -rozdziel i zaizoluj każdy.
When no dimming, secure dimming cables - separate
and isolate each one.
Wenn nicht gedimmt wird, sichern Sie die Dimmkabel -
trennen und isolieren Sie jedes einzelne.
BRAK W ZESTAWIE | NOT INCLUDED | NICHT ENTHALTEN
Stosować złącze kablowe IP68
Ilość zacisków: 3
Napięcie znamionowe: max. 250V
Przyłączalność: 0.75-2.50mm2
BRAK W ZESTAWIE
| NOT INCLUDED |
NICHT ENTHALTEN
Śruby
montażowe
8mm
Mounting screws
8mm
Befestigungssch
rauben
8mm

Other LEDOLUX Outdoor Light manuals

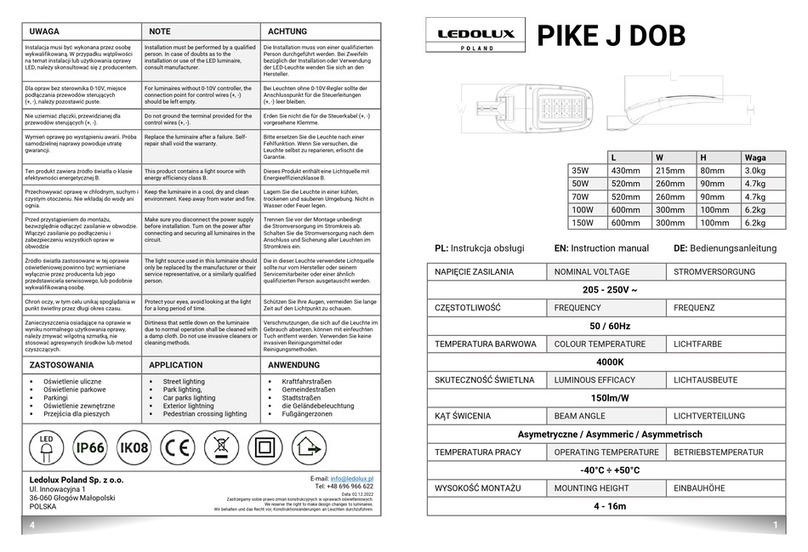
LEDOLUX PIKE J DOB User manual

LEDOLUX

LEDOLUX PIKE J DOB User manual

LEDOLUX HERMES LOG N+ User manual

LEDOLUX

LEDOLUX HERMES LOG N+ User manual

LEDOLUX PIKE J DOB User manual

LEDOLUX

LEDOLUX PIKE J DOB User manual

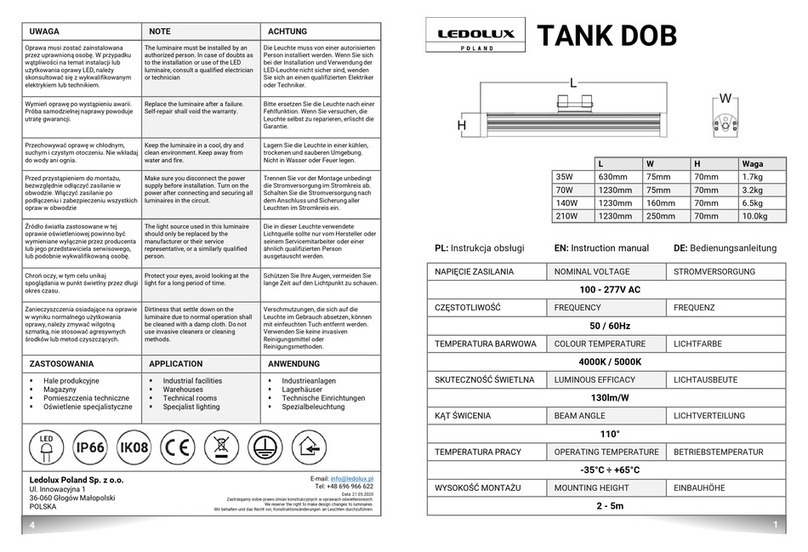
LEDOLUX TANK DOB 35W User manual

LEDOLUX

LEDOLUX TANK DOB 35W User manual

LEDOLUX PIKE J DOB User manual

LEDOLUX

LEDOLUX PIKE J DOB User manual

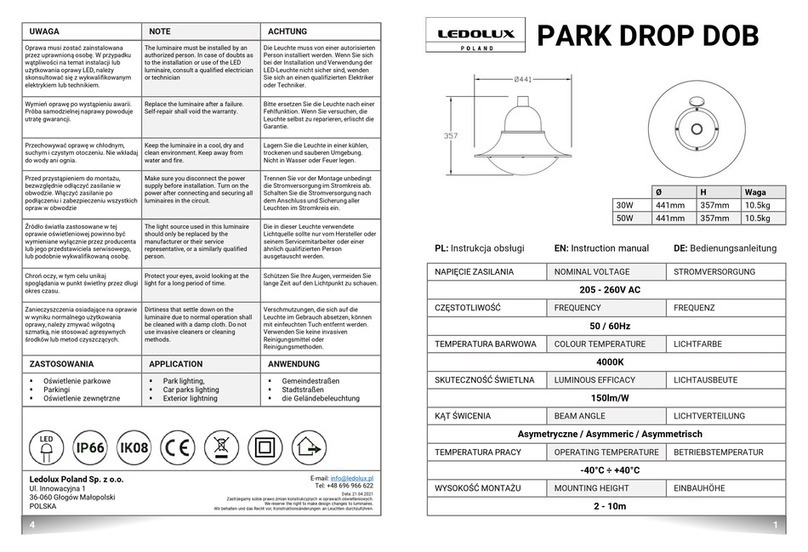
LEDOLUX PARK DROP DOB User manual

LEDOLUX

LEDOLUX PARK DROP DOB User manual

LEDOLUX PARK DROP DOB User manual

LEDOLUX

LEDOLUX PARK DROP DOB User manual

Popular Outdoor Light manuals by other brands

Quoizel TF6150MBK installation guide

Quoizel

Quoizel TF6150MBK installation guide

Quoizel HAZ9009EK installation guide

Quoizel

Quoizel HAZ9009EK installation guide

LIGMAN AA-20660 Installation and service manual

LIGMAN

LIGMAN AA-20660 Installation and service manual

Meyer 8 730 1 Series Mounting instructions

Meyer

Meyer 8 730 1 Series Mounting instructions

Megaman FONDA instruction manual

Megaman

Megaman FONDA instruction manual

Reality Leuchten R46205506 quick start guide

Reality Leuchten

Reality Leuchten R46205506 quick start guide

LUTEC KIRA user manual

LUTEC

LUTEC KIRA user manual

Linea Light 83571 Mounting instructions

Linea Light

Linea Light 83571 Mounting instructions

Sygonix SY-4715528 operating instructions

Sygonix

Sygonix SY-4715528 operating instructions

Maretti BUONY ROUND 14.6345.04 quick start guide

Maretti

Maretti BUONY ROUND 14.6345.04 quick start guide

LIGMAN ODESSA 5 installation manual

LIGMAN

LIGMAN ODESSA 5 installation manual

LED Group Robus RMA01040-01 quick guide

LED Group

LED Group Robus RMA01040-01 quick guide

Visual Comfort Rega Assembly instructions

Visual Comfort

Visual Comfort Rega Assembly instructions

ClassiCon Sandra Lindner, 2006 instructions

ClassiCon

ClassiCon Sandra Lindner, 2006 instructions

Kartell Bourgie manual

Kartell

Kartell Bourgie manual

Hoselink L510 user manual

Hoselink

Hoselink L510 user manual

Nave 5269361 manual

Nave

Nave 5269361 manual

Digital Watchdog NightWatch DW-ILWLIPM quick start guide

Digital Watchdog

Digital Watchdog NightWatch DW-ILWLIPM quick start guide

manuals.online logo
manuals.online logoBrands
  • About & Mission
  • Contact us
  • Privacy Policy
  • Terms and Conditions

Copyright 2025 Manuals.Online. All Rights Reserved.