manuals.online logo
Brands
  1. Home
  2. •
  3. Brands
  4. •
  5. LEDOLUX
  6. •
  7. Outdoor Light
  8. •
  9. LEDOLUX PIKE J DOB User manual

LEDOLUX PIKE J DOB User manual

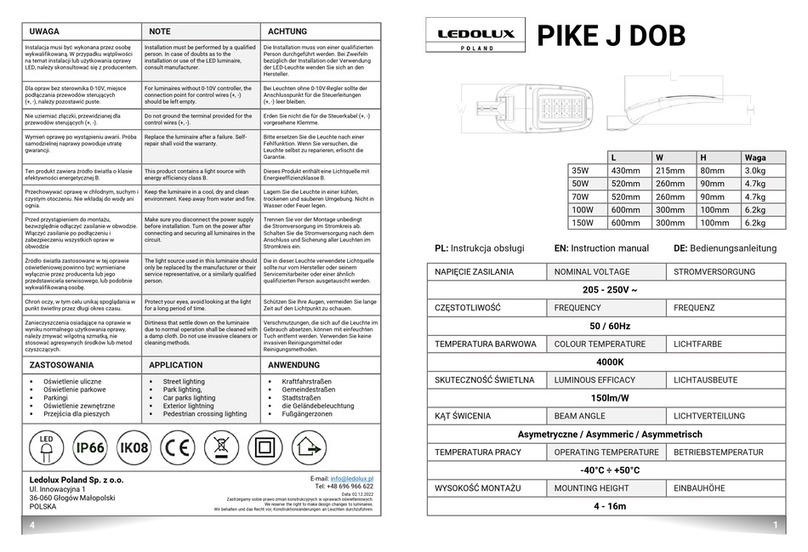
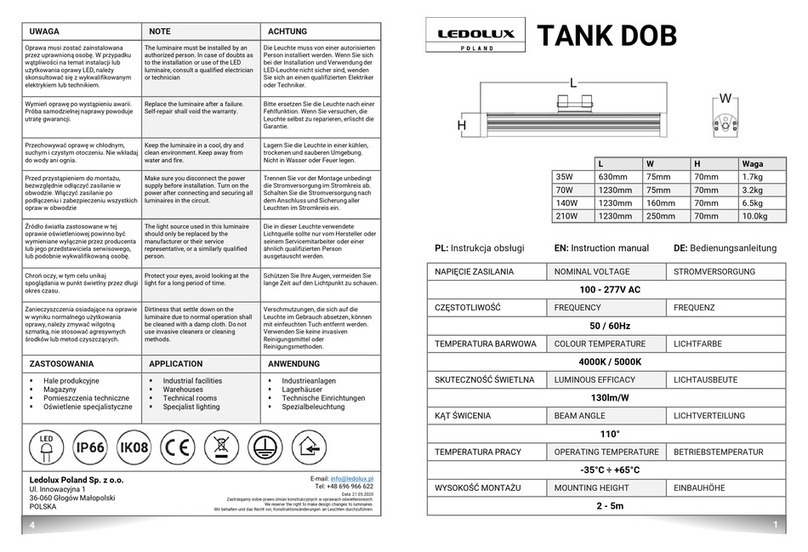
PL: Instrukcja obsługi EN: Instruction manual DE: Bedienungsanleitung
NAPIĘCIE ZASILANIA NOMINAL VOLTAGE STROMVERSORGUNG
85 - 265V AC
CZĘSTOTLIWOŚĆ FREQUENCY FREQUENZ
50 / 60Hz
TEMPERATURA BARWOWA COLOUR TEMPERATURE LICHTFARBE
4000K
SKUTECZNOŚĆ ŚWIETLNA LUMINOUS EFFICACY LICHTAUSBEUTE
150lm/W
KĄT ŚWICENIA BEAM ANGLE LICHTVERTEILUNG
Asymetryczne / Asymmeric / Asymmetrisch
TEMPERATURA PRACY OPERATING TEMPERATURE BETRIEBSTEMPERATUR
-40°C ÷+50°C
WYSOKOŚĆ MONTAŻU MOUNTING HEIGHT EINBAUHÖHE
4 -14m
1
PIKE J DOB
L
W
H
Waga
35W
430mm
215mm
80mm
3.0kg
50W
520mm
260mm
90mm
4.7kg
70W
520mm
260mm
90mm
4.7kg
100W
600mm
300mm
100mm
6.2kg
150W
600mm
300mm
100mm
6.2kg
UWAGA NOTE ACHTUNG
Oprawa musi zostać zainstalowana
przez uprawnioną osobę. W przypadku
wątpliwości na temat instalacji lub
użytkowania oprawy LED, należy
skonsultować się z wykwalifikowanym
elektrykiem lub technikiem.
The luminaire must be installed by an
authorized person.
In case of doubts as
to the installation
or use of the LED
luminaire, consult a qualified electrician
or technician
Die Leuchte muss von einer autorisierten
Person installiert werden. Wenn Sie sich
bei der Installation und Verwendung der
LED
-Leuchte nicht sicher sind, wenden
Sie sich an einen qualifizierten Elektriker
oder Techniker.
Wymień oprawę po wystąpieniu awarii.
Próba samodzielnej naprawy powoduje
utratę gwarancji.
Replace the luminaire after a failure.
Self
-repair shall void the warranty.
Bitte ersetzen Sie die Leuchte nach einer
Fehlfunktion. Wenn Sie versuchen, die
Leuchte selbst zu reparieren, erlischt die
Garantie.
Przechowywać oprawę w chłodnym,
suchym i czystym otoczeniu. Nie wkładaj
do wody ani ognia.
Keep the luminaire in a cool, dry and
clean environment. Keep away from
water and fire.
Lagern Sie die Leuchte in einer kühlen,
trockenen und sauberen Umgebung.
Nicht in Wasser oder Feuer legen.
Przed przystąpieniem do montażu,
bezwzględnie odłączyć zasilanie w
obwodzie. Włączyć zasilanie po
podłączeniu i zabezpieczeniu wszystkich
opraw w obwodzie
Make sure you disconnect the power
supply before installation.
Turn on the
power after connecting and securing all
luminaires in the circuit.
Trennen Sie vor der Montage unbedingt
die Stromversorgung im Stromkreis ab.
Schalten Sie die Stromversorgung nach
dem Anschluss und Sicherung aller
Leuchten im Stromkreis ein.
Źródło światła zastosowane w tej
oprawie oświetleniowej powinno być
wymieniane wyłącznie przez producenta
lub jego przedstawiciela serwisowego,
lub podobnie wykwalifikowaną osobę.
The light source used in this luminaire
should only be replaced by the
manufacturer or their service
representative, or a similarly qualified
person.
Die in dieser Leuchte verwendete
Lichtquelle sollte nur vom Hersteller oder
seinem Servicemitarbeiter oder einer
ähnlich qualifizierten Person
ausgetauscht werden.
Chroń oczy, w tym celu unikaj
spoglądania w punkt świetlny przez długi
okres czasu.
Protect your eyes, avoid looking at the
light for a long period of time
.
Schützen Sie Ihre Augen, vermeiden Sie
lange Zeit auf den Lichtpunkt zu schauen.
Zanieczyszczenia osiadające na oprawie
w wyniku normalnego użytkowania
oprawy, należy zmywać wilgotną
szmatką, nie stosować agresywnych
środków lub metod czyszczących.
Dirtiness
that settle down on the
luminaire
due to normal operation shall
be
cleaned with a damp cloth. Do not
use
invasive cleaners or cleaning
methods
.
Verschmutzungen
, die sich auf die
Leuchte
im Gebrauch absetzen, können
mit
einfeuchten Tuch entfernt werden.
Verwenden Sie keine invasiven
Reinigungsmittel oder
Reinigungsmethoden.
ZASTOSOWANIA APPLICATION ANWENDUNG
▪Oświetlenie uliczne
▪Oświetlenie parkowe
▪Parkingi
▪Oświetlenie zewnętrzne
▪Przejścia dla pieszych
▪Street lighting
▪Park lighting,
▪Car parks lighting
▪Exterior lightning
▪Pedestrian crossing lighting
▪Kraftfahrstraßen
▪Gemeindestraßen
▪Stadtstraßen
▪die Geländebeleuchtung
▪Fußgängerzonen
Ledolux Poland Sp. z o.o.
Ul. Innowacyjna 1
36-060 Głogów Małopolski
POLSKA
E-mail: [email protected]
Tel: +48 696 966 622
Data: 21.05.2020
Zastrzegamy sobie prawo zmian konstrukcyjnych w oprawach oświetleniowych.
We reserve the right to make design changes to luminaires.
Wir behalten und das Recht vor, Konstruktionsänderungen an Leuchten durchzuführen.
4
2B.
3.
3
1.
2A.
2
Przed przystąpieniem do montażu, bezwzględnie odłączyć
zasilanie w obwodzie.
Doprowadzić do oprawy przewód zasilający (2x1.5mm). Połączyć przewód wyprowadzony z oprawy z
przewodem zasilającym wg oznaczeń zamieszczonych poniżej.
Klasa II: brak wyprowadzenia przewodu PE.
Ustawić mocowanie ze względu na sposób montażu, używając klucza inbusowego (6mm, 4Nm).
Ustawić odpowiednio kąt nachylenia oprawy regulując śrubami przy uchwycie montażowym za
pomocą klucza inbusowego (6mm, 4Nm).
Osadzić lampę na słupie lub wysięgniku zabezpieczając śrubami mocującymi za pomocą klucza
inbusowego (6mm, 4Nm) oraz klucza płaskiego (13mm, 4Nm).
8mm
120mm
8mm
120mm
LBrązowy | Brown | Braun
PE Zielono-Żółty | Green-yellow | Grün-Gelb
NNiebieski | Blue | Blau
+Czarny | Black | Schwarz
―Biały | White | Weiß
Make sure you disconnect the power supply before installation.
Trennen Sie immer die Stromversorgung vom Stromkreis, bevor
Sie mit der Montage beginnen.
OFF
Zdemontować przewód wyprowadzony z oprawy. Doprowadzić przewód zasilający do wewnątrz
oprawy – przewód 2x1.5mm (3x1.5mm dla I klasy izolacji). Podłączyć przewód zasilający do
zacisku nożowego M29 wg oznaczeń zamieszczonych poniżej.
Klasa II: brak wyprowadzenia przewodu PE.
Bring the power cord (2x1.5mm) to the luminaire. Connect the luminaire wire to the power cord as
indicated below.
No PE cord for protection class II.
Führen Sie das Netzkabel (2x1,5mm) zur Leuchte. Verbinden Sie das Leuchtenkabel mit dem
Stromkabel gemäß den Markierungen unten.
Für die Klasse II kein PE-Kabel.
Ilość zacisków | Number of terminals |
Klemmenanzahl: 3
Napięcie znamionowe | Rated voltage |
Nennspannung: 450V
Prąd znamionowy | Rated current |
Nennstrom: 16A
Znamionowa przyłączalność | Rated
connecting capacity | Nennanschluss:
1.5-4mm2
LBrązowy | Brown | Braun
PE Zielono-Żółty | Green-yellow |
Grün-Gelb
NNiebieski | Blue | Blau
+Czarny | Black | Schwarz
―Biały | White | Weiß
Remove the luminaire wire. Place the power cord inside the luminaire - 2x1.5mm cord (3x1.5mm
for class I insulation). Connect the power cord to the blade terminal as specified below.
No PE cord for protection class II.
Entfernen Sie das Kabel, das aus der Leuchte rausgeführt wurde. Führen Sie das Stromkabel in das
Innere der Leuchte - 2x1, 5mm Kabel (3x1, 5 mm für Isolationsklasse I). Schließen Sie das
Netzkabel gemäß den folgenden Markierungen an die Messerklemme an.
Für die Klasse II kein PE-Kabel.
Set up the mounting according to the mounting method using a hex wrench (6mm, 4Nm).
Adjust the angle of inclination of the luminaire by adjusting the screws at the mounting bracket
with a hex key (6mm, 4Nm).
Place the lamp on the pole or the extension arm by securing it with the fixing screws by means
of a hex wrench (6mm, 4Nm) and a flat wrench (13mm, 4Nm).
Stellen Sie die Befestigung gemäß der Montagemethode mit einem Inbusschlüssel (6mm, 4Nm)
ein.
Stellen Sie den Neigungswinkel der Leuchte entsprechend ein, indem Sie die Schrauben an der
Montagehalterung mit einem Inbusschlüssel (6mm, 4Nm) einstellen.
Montieren Sie die Lampe an einer Säule oder einem Ausleger und befestigen Sie sie mit einem
Inbusschlüssel (6mm, 4Nm) und einem Flachschlüssel (13mm, 4Nm) mit Schrauben.
Montaż na słupie | Mounting on a pole |
Montage auf einer Säulenhalterung Montaż na słupie | Mounting on an extension
arm | Montage auf einem Ausleger

Other LEDOLUX Outdoor Light manuals

LEDOLUX PIKE J DOB User manual

LEDOLUX

LEDOLUX PIKE J DOB User manual

LEDOLUX TANK DOB 35W User manual

LEDOLUX

LEDOLUX TANK DOB 35W User manual

LEDOLUX AREA LED SPORT User manual

LEDOLUX

LEDOLUX AREA LED SPORT User manual

LEDOLUX PARK DROP DOB User manual

LEDOLUX

LEDOLUX PARK DROP DOB User manual

LEDOLUX PIKE J DOB User manual

LEDOLUX

LEDOLUX PIKE J DOB User manual

LEDOLUX HERMES LOG N+ User manual

LEDOLUX

LEDOLUX HERMES LOG N+ User manual

LEDOLUX PARK DROP DOB User manual

LEDOLUX

LEDOLUX PARK DROP DOB User manual

Popular Outdoor Light manuals by other brands

Augenti LIGHTING ORION D installation instructions

Augenti LIGHTING

Augenti LIGHTING ORION D installation instructions

Green Brook LEDAF27 6W Black Trim Installation & operating instructions

Green Brook

Green Brook LEDAF27 6W Black Trim Installation & operating instructions

M-Elec ML-MSL8-W manual

M-Elec

M-Elec ML-MSL8-W manual

HAMPTON BAY NEWBERRY LDO1601AX-01/CP Use and care guide

HAMPTON BAY

HAMPTON BAY NEWBERRY LDO1601AX-01/CP Use and care guide

AOK AOK-75WiP Installation instruction

AOK

AOK AOK-75WiP Installation instruction

HAMPTON BAY 560-293 instruction manual

HAMPTON BAY

HAMPTON BAY 560-293 instruction manual

Power Fist 8670697 user manual

Power Fist

Power Fist 8670697 user manual

NewGarden MYKONOS HANG Assembly and maintenance manual

NewGarden

NewGarden MYKONOS HANG Assembly and maintenance manual

Delta Light GENIE 200 LED quick start guide

Delta Light

Delta Light GENIE 200 LED quick start guide

ledscom LC-L-214 manual

ledscom

ledscom LC-L-214 manual

MaxiCosi ILARIA instruction manual

MaxiCosi

MaxiCosi ILARIA instruction manual

HAMPTON BAY 594-817 instruction manual

HAMPTON BAY

HAMPTON BAY 594-817 instruction manual

easymaxx 1447 instructions

easymaxx

easymaxx 1447 instructions

NewGarden PEPITA SOBREMURO quick start guide

NewGarden

NewGarden PEPITA SOBREMURO quick start guide

Chef-Master HED492 instruction manual

Chef-Master

Chef-Master HED492 instruction manual

NewGarden LOLA SLIM 30 quick start guide

NewGarden

NewGarden LOLA SLIM 30 quick start guide

Delta Light WANT-IT S X Installation instruction

Delta Light

Delta Light WANT-IT S X Installation instruction

HAMPTON BAY SP-4756 installation manual

HAMPTON BAY

HAMPTON BAY SP-4756 installation manual

manuals.online logo
manuals.online logoBrands
  • About & Mission
  • Contact us
  • Privacy Policy
  • Terms and Conditions

Copyright 2025 Manuals.Online. All Rights Reserved.