LegalTek LX Fusion User manual

!
USER GUIDE
LEGALTEK LXFUSION (LXF)
1080P HIGH DEFINITION INTERVIEW RECORDING SYSTEM
!
!
Sony G Lens Optics… Unmatched Image Quality
Exclusive Time/Date Watermark…H.264 File Capture
Simple Touchscreen Control…Wireless or Direct File Transfer
Video Conversion Software…Create Multiple DVDs Rapidly
“Your High Definition Interview Recording Solution…

LEGALTEK LXFUSION (LXF)
1080P HIGH DEFINITION INTERVIEW RECORDING SYSTEM
!
LX FUSION is a robust, cost effective portable HD video
recording system. Unbelievably light, thin and well balanced,
its intuitive design and compact size make it the go to recorder
for most interview scenarios. The recorder is remarkably easy
to use. Simply tap the image capture button to begin and end
recordings. If wireless transfer is enabled, the recorder will
begin file transfer when the system is in range of the home
network.
The 1080p recorder features Sony’s new, next generation 12.2 M-pixel Exmor image sensor, which takes
in more light, provides more detail, exhibits better contrast and color balance than any other.
The camera is fitted with the pinnacle of Sony lens technology, the professional-quality G Lens.
Engineered for superior optical performance, Sony G lenses deliver brilliant, accurate color reproduction
and sharp, amazingly detailed images. Low light performance is off the charts and second to none. The
camera captures both still images and video.
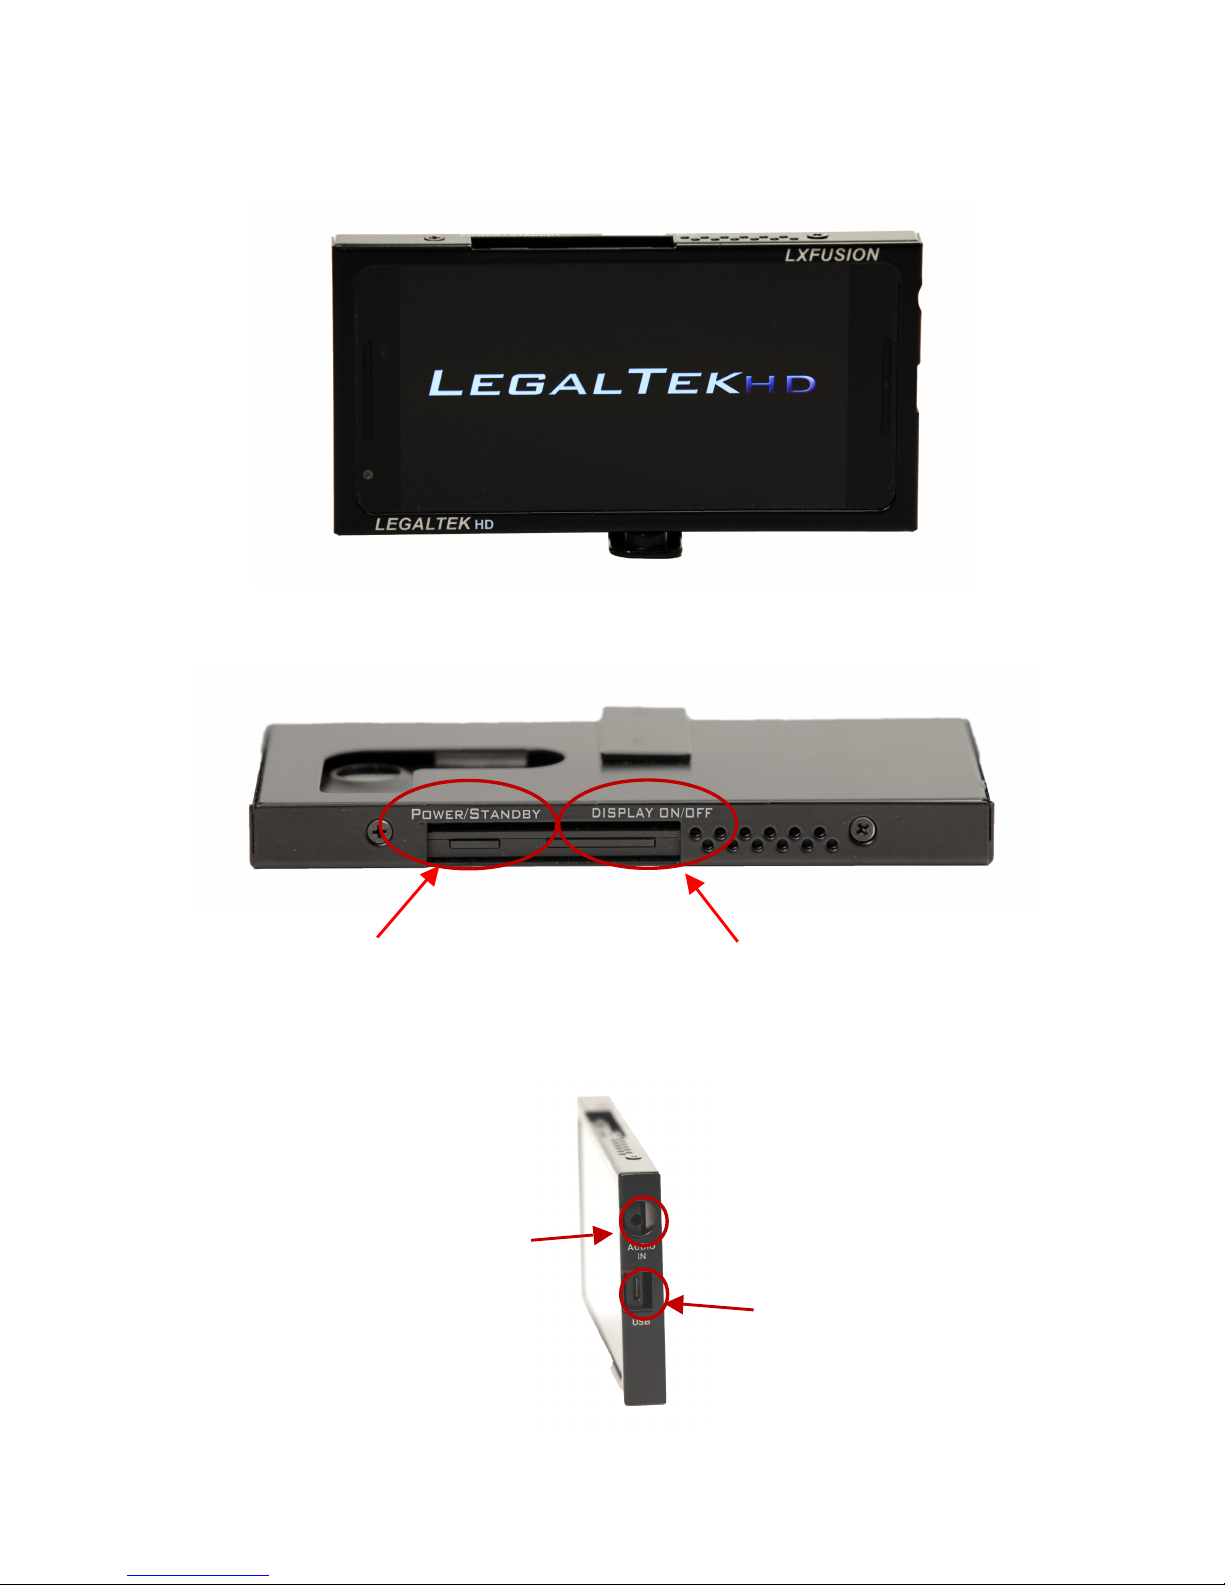
A large 5.2-inch touch screen display controls all functions. Fitted with a gorilla glass screen protector, the
display is impressively bright with minimum reflection, accurate colors and perfect white balance. Inside
sits 32GB of internal storage and a 1.8GHz hexa-core 64-bit processor for great performance.
Both recording and image quality is scalable. The resulting smaller file size makes archival storage
affordable. Content is captured as industry standard MP4 files to ensure that recordings can be played by
the viewer’s choice of application.
Legaltek’s proprietary file import and processing software is included with the system. The application
allows users to quickly transfer files to a computer with the supplied mini USB cable or automatically via
our ultrafast, secure HD Wireless Transfer Service. Exclusive frame watermarking provides a visual
time/date/user overlay for both reference and authentication of recorded files.
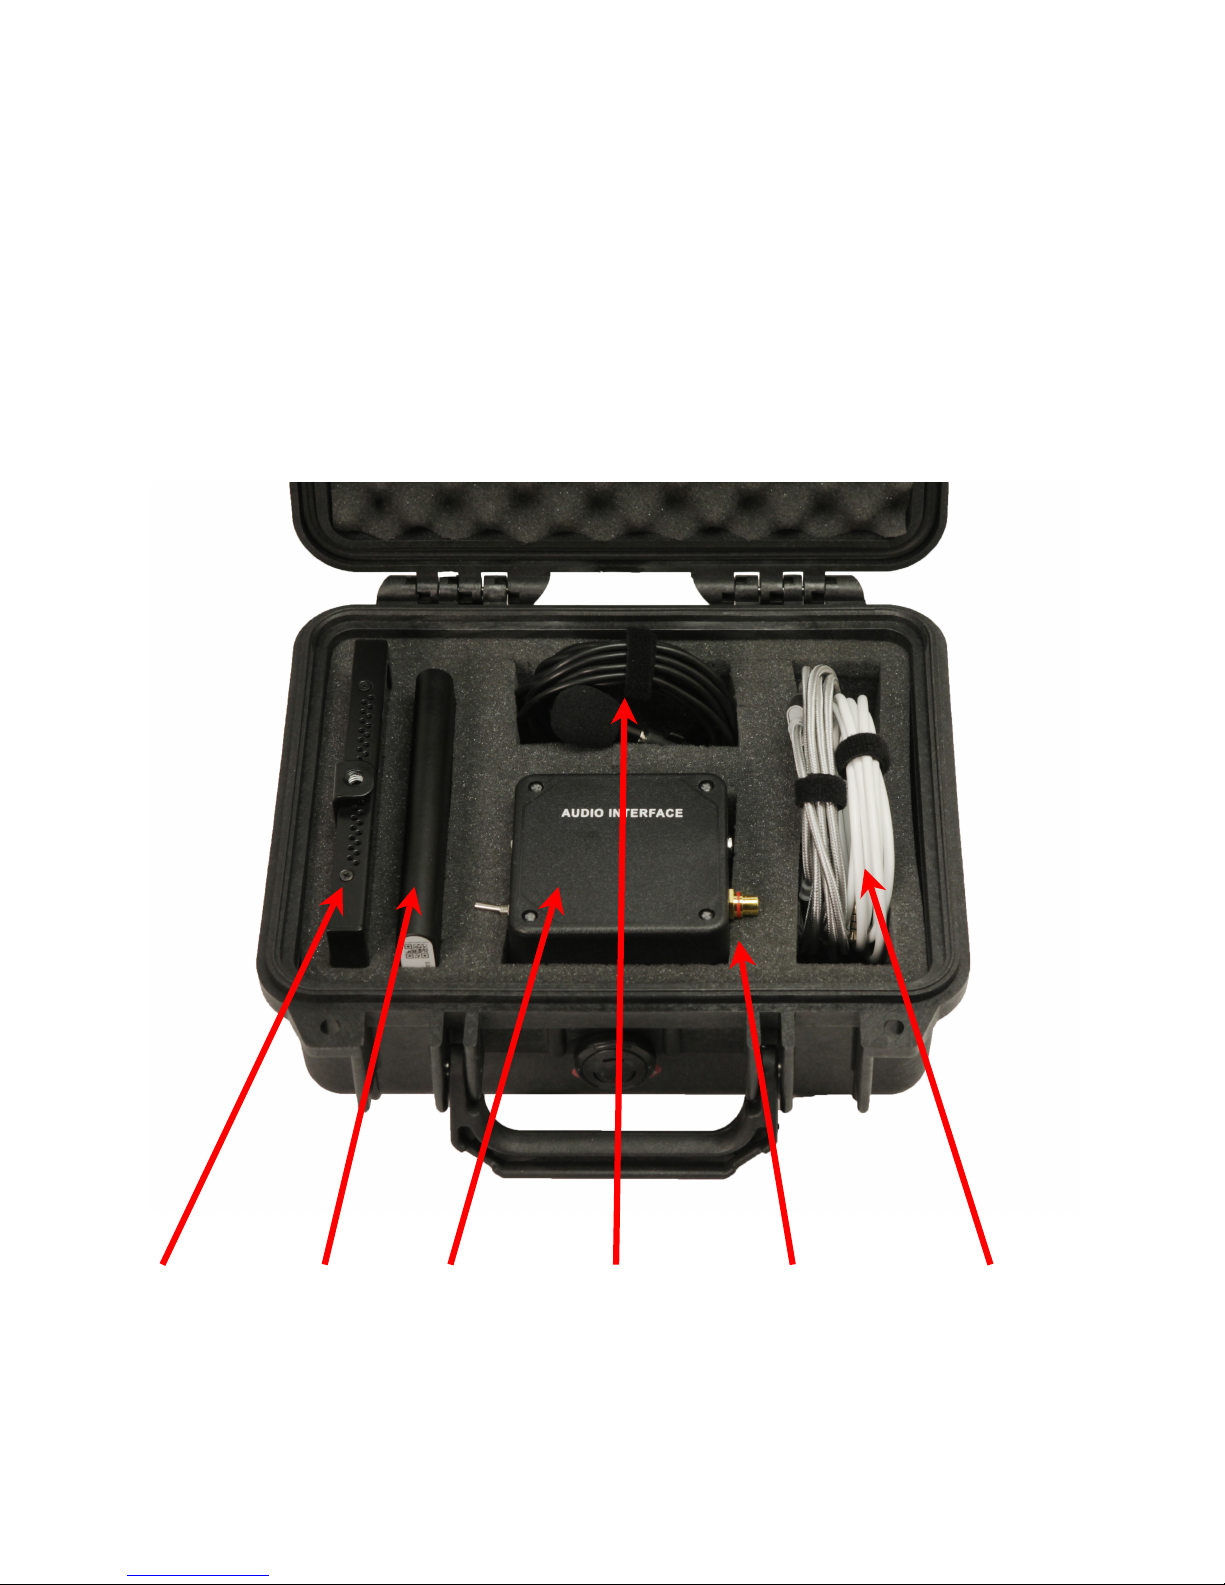
The HD Video Recording Kit is shipped with a tripod, high gain microphone, power supply and carrying
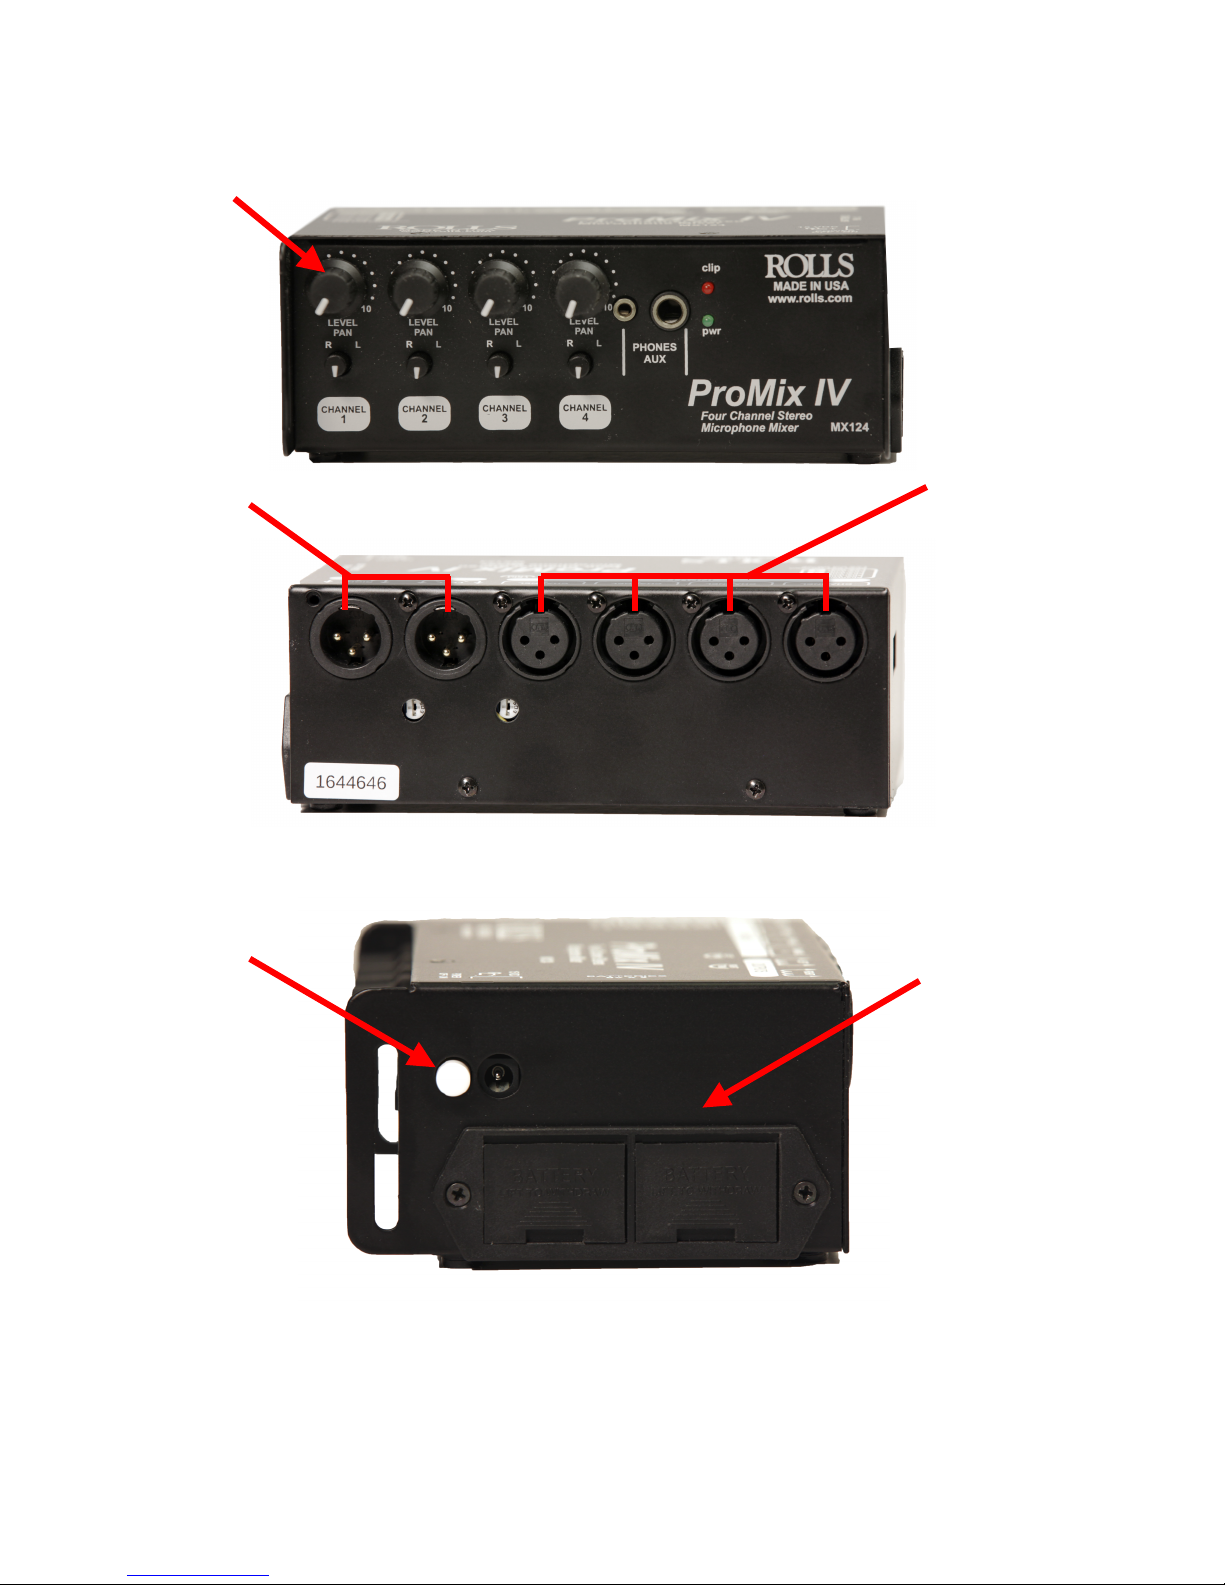
case, while the HD Deposition/Conference Video Recording Kit includes a multi-channel audio mixer, four
omni-directional lapel or conference condenser microphones and balanced XLR microphone cables.
The LX FUSION is a perfect solution for Interviews, Conditional Examinations, Intake/Booking, Crisis
Centers and Military Applications.
Wireless or Direct File Transfer…File Import and Processing Software Included
Frame Watermarking…Permanent Time/Date/User Overlay…Audio Mixer and Microphone Options
“A Perfect Solution for Police, Government and Child Advocacy/Crisis Centers”
LEGALTEKHD
!!

3!
!
Table of Contents
!
!
About Us / Introduction.………………………………………………………………………….......
4
System Case Layouts.……………………………………………………………………………….
!!5
Hardware Overview.………………………………………………………………………………….
!!7
System Interconnect and Power Up………………………………………………………………..
12
Start Up / Configuration……………………………………………………………………………...
13
Home Screen………………………………………………………………………………………….
14
View Captured Videos……………………………………………………………………………….
15
Settings & Information……………………………………………………………………………….
16
General Information…………………………………….………………………………………..
17
Transfer…………………………………………………………………………………………...
18
Networking………………………………………………………………………………………..
18
Camera……………………………………………………………………………………………
22
Advanced Options……………………………………………………………….……………….
23
Device Information………………………….……………………………………………………
24
Recording Video………………………………………………………………………………………
25
Taking a Snapshot……………………………………………………………………………………
26
Software Installation………………………………………………………………………………….
27
Software Activation…………………………………………………………………………………...
28
Software Deactivation………………………………………………………………………………..
29
LXHD File Importer (Time/Date Overlay)…………….…………………………………………….
31
File Import and Processing…………………………………………………….……….……….
31
Application Settings…………………………………………………………….……….……….
32
LXHD Wireless Video Transporter (Wireless File Transfer).…………………………………….
33
Wireless Transfer Service……………………………….………………………………………
33
Devices……………………………………………………………………………………………
34
Application Settings……..……………………………………………………….………………
35
Transferring Content-Wireless File Transfer………………………………………………….
36
LXHD File Transporter (Hardwire USB)…………………………………………….……………..
37
USB Transfer Services………………………..………………………………….……………..
37
Application Settings……………………………………………………………………………...
38
Specifications…………………………………………………………………………………………
39

4!
!
About Us
Legaltek is a unique group of engineers, technical professionals, established equipment
providers and manufacturers that create products and offer services based on the
requirements of our core customers, government, law enforcement and the legal
community. Through research, innovation and purpose driven design, Legaltek merges
future-forward technology with accepted standards and methodology, to develop
specialty equipment that is simple to use and reasonably priced.
Legaltek has become an established technical resource by providing assistance with
equipment selection, system design and audio/video laboratory services.
Welcome to the leading edge of law enforcement technology.
Introduction
Thank you for purchasing your new LX Fusion portable, High Definition Recording
System. Focused application engineering has resulted in a versatile, simple to use
product that will provide years of maintenance free service. The LXF represents a new
standard in digital interview recording systems specifically designed for interviews,
depositions, meetings and military in-field applications.
Intuitive and easy to use, the LX Fusion requires little or no training or support to
operate. Simple touch controls initiate recording, while files may be collected
automatically via Legaltek’s wireless file transporter or by direct USB connection.
The LX Fusion records up to full 1080p HD video in the universally compatible
H.264/MPEG-4 format which equals up to 50% smaller file size. Files may be exported
in any format. Simple drag and drop tools make burning multiple DVDs as easy as 1-2-
3. Files can be exported in any format. Legaltek equipment can be easily self-installed
and is essentially maintenance free.
!
!
!

5!
!
System Unpacking
Legaltek ships the LX Fusion digital video recording system in a water tight, crush-proof,
and dust-proof ballistic nylon case featuring a custom cut foam insert. Please save this
container should you need to store or transport the equipment safely.
Please refer to the illustration below to identify the storage configuration of the recorder
and supplied accessories.
LX Fusion HD Video Recording Kit
!
!
!
!
Recorder!
Audio!
Interface!
Camera!
Microphone!
Power!Bank!
AC!Mains!!
Adapter!&!Cable!
USB!&!Audio!!
Cables!

6!
!
Mixer!Power!Adapter!
Microphone!
Windscreens!
And!!
Lapel!Clips!
(Under!the!Interface)!
LX Fusion HD Deposition/Conference Video Recording Kit
!
!
!
!
!
! !
!
!
!
!
!
!
!
!
!
!
!
!
!
!
!
!
!
!
Recorder!
Audio!
Interface!
Power!!
Bank!
USB!&!Audio!Cables!
XLR!Audio!Cables!
Condenser!
Microphones!
Microphone!Mixer!

7!
!
Hardware Overview
!
!!!!LX FUSION Control Display
!
!
!
!
!
!
LX FUSION Control Buttons (Top of Recorder)
!
!
!
!
!
!
!
LX FUSION Ports (Right Side of Recorder)
Power/Standby!
Toggle!Preview!(Brightness!0)!
3.5mm!Audio!Input!
USB-C!
Connector!

8!
!
Power Bank
!
!
!
!
!
!
!
!
!
!
!
!
!
Power Bank
I/O Ports and Charge Indicator
The fully charged Power Bank is capable of supporting about 20 hours of camera
operation. Note: To quickly recharge the Power Bank, attach the high-current AC
adapter via the supplied USB to Micro USB cable. When in use, the Power Bank, Audio
Interface and AC adapter should be placed in the supplied black protective pouch on or
near the tripod.
!
!
AC Mains Adapter
!
Charge!Indicator!
Micro!USB!Port!
(Wall!Charger)!
Black!
USB!Port!
(Audio!Interface)!
Blue!!
USB!Port!
(HD!Recorder)!
!

9!
!
Camera
Microphone
!
AUDIO INTERFACE
!
!
!
!
!
!
!
!
!
!
!
!
!
!
!
!
!
!
!
!
INTERCONNECT CABLES
!
!!!!!!!!!!!!!!!!!!!!!!!!!!!!!!!!!!!!!!!!!!!!!!!!!!!!!!!!!!!!!!!!!!!!!!!!!!!!!!!!!!!!!!!!!!!!!!!!!!!!!!!!!!!!!!!!!!!!!!!!!!!!!!!!! !!
USB Power Cable! ! !!!!!!!!!!Audio Interconnect Cable!!

10!
!
Microphone!
Input!Level!
Controls!
Microphone!Inputs!1-4!
Audio!Outputs!1-2!
Batteries!
Power!Switch!
Field!Audio!Kit!
!
!
!
!
!
!
!
!
!
! ! ! !!Microphone Input Level Controls
!
!
!
!
!
!
!
Microphone Input / Audio Output Connections
!
!
!
!
!
!
!
!
!
!
Power Switch / Battery Compartment
!
!

11!
!
!
!
!
!
!
!
!
!
!
!
!
Lapel Microphone
!
!
!
!
!
!
!
!
!
XLR Microphone Cable
!
!
!
!
!
!
!
!
XLR-RCA Audio Output Cable

12!
!
System Interconnect and Power Up
LX Fusion HD Video Recording Kit
1) Remove the LX Fusion recorder, audio interface, power bank and cables from
the transport case.
2) Attach the recorder to the tripod plate and secure the plate to the tripod.
3) Connect the silver USB power cable to the Recorder USB C jack and to the blue
USB port on the Power Bank.
4) Locate the white 1/8” audio cable. Connect the four-section plug to the recorder
“Audio In” jack and the two-section plug to the “Audio Out” jack on the Audio
Interface.
5) Connect the black USB A Audio Interface power cable to the black USB port on
the Power Bank.
6) Place the microphone module on the table near the subject. Connect the
microphone cable to the “Camera Microphone” jack on the Audio Interface. Set
the “Source Select” switch to the “Camera Mic” position.
7) Power up the Audio Interface and the LX Fusion recorder then proceed to the
next page.
LX Fusion HD Deposition/Conference Video Recording Kit
1) Repeat steps 1-5 above.
2) Locate the Microphone Mixer and power supply, audio output cable, lapel or
conference microphones and microphone extension cables.
3) Connect the power supply cable to the DC in jack on the mixer’s right side, just
behind the “Power” button, and the transformer to an AC mains source.
4) Locate the Microphone Mixer audio output cable. Connect the XLR F plug to the
Microphone Mixer left or right “Output” jack and the RCA plug to the “Microphone
Mixer” jack on the Audio Interface. Set the “Source Select” switch to the
“Microphone Mixer” position.
5) Locate the 25’ XLR microphone extension cables. Connect the XLR M plugs into
Microphone Mixer “Inputs” jacks.
6) Connect the XLR F plugs into the black Microphone Power Modules.
7) Attach the Microphones to the subjects with the provided lapel clips. The tiny
microphone windscreens should be used in breezy locations. Conference
microphones may be placed on the table within 2’ to 3’ of the subjects.
8) Power up the Microphone Mixer, Audio Interface and LX Fusion recorder and
proceed to the next page.
Note: The Microphone Mixer “Level” controls should normally be set between
positions 5-10, while the “Pan” controls should remain in the 6 o’clock position.
The recorder automatic gain feature will assist in maintaining uniform record
volume levels.

13!
!
Start Up / Configuration
When the LX FUSION (LXF) recorder is first powered on, the start-up screen (Figure 1)
will appear. Once the device is fully booted, the System Configuration menu will appear
(Figure 2). The “Subject Name”, “Case ID” and “Interview Location” can be entered,
then touch “OK” to proceed to the home screen.
!
Figure 1: Start-up Screen
!
Figure 2: System Configuration Menu
!

14!
!
Home Screen
The device Home Screen (Figure 3) is displayed once the recorder has been
successfully powered up. This screen contains buttons to capture a snapshot, edit
settings, playback recorded video, and initiate new recordings. In addition, the home
screen displays useful information such the date and time, available disk space and the
camera preview.
!
!
!
Figure 3: Home Screen
!
!
!
!
!
!
!

15!
!
View Captured Videos
To view captured video files, touch the “View Captured Videos” icon on the home
screen, and then the “Folder” icon illustrated in (Figure 4). A list of available captured
files will appear on the display (Figure 5).
!
Figure 4: View Captured Video
!
Figure 5: List of Available Videos for Playback

16!
!
Settings & Information
To access the recorder “Settings & Information”, touch the “Settings” icon on the home
screen. The following screen will appear as illustrated in (Figure 6).
!
Figure 6: Setting & Information
The “Settings and Information” screen allows access to all user options (Figures 7-22).
!

17!
!
Figure 7: General Information Options
!
Figure 8 General Information Options
!
Figure 9: File Transfer Options
Select “Transfer” then “Network Configuration” to modify the system network settings.
Selecting this option will bring up a network selection menu as shown in (Figure 10).

18!
!
!
Figure 10: Network Selection
Select the desired network. If a static network is not needed, enter the password for the
network, touch connect, and skip to (Figure 15). If a static network is needed, enter the
password for the network and select “Advanced Options”.
!

19!
!
Figure 11: Network Credentials
Selecting advanced options will bring up the screen shown in (Figure 12). Scroll down
and change the IP setting from “DHCP”to “Static” as shown in (Figure 13).
!
Figure 12: Advanced Networking Options
!
!

20!
!
Figure 13: IP Settings
Changing the IP Settings to “Static” and scrolling down will lead to the screens shown in
(Figure 14 and 15). The IP address, gateway, network prefix length, and DNS servers
will need to be set here. After filling in the required information touch “Connect”.
!
Figure 14: Static IP Settings (1)
!
Figure 15: Static IP Settings (2)
Table of contents
Other LegalTek Recording Equipment manuals