Keysight 82357B User manual

Keysight 82357B
USB/GPIB Interface
User’s Guide

Keysight 82357B User’s Guide 11
Table of Contents
Safety Summary . . . . . . . . . . . . . . . . . . . . . . . . . . . . . . . . . . . . . . . . . . . .5
Safety Notices . . . . . . . . . . . . . . . . . . . . . . . . . . . . . . . . . . . . . . . . . . . . . .5
Safety Symbols . . . . . . . . . . . . . . . . . . . . . . . . . . . . . . . . . . . . . . . . . . . . .6
Regulatory Markings . . . . . . . . . . . . . . . . . . . . . . . . . . . . . . . . . . . . . . . . .7
General Safety Information . . . . . . . . . . . . . . . . . . . . . . . . . . . . . . . . . . . .8
Waste Electrical and Electronic Equipment (WEEE) Directive
2002/96/EC . . . . . . . . . . . . . . . . . . . . . . . . . . . . . . . . . . . . . . . . . . . . .9
Product category: . . . . . . . . . . . . . . . . . . . . . . . . . . . . . . . . . . . . . . . .9
Sales and Technical Support . . . . . . . . . . . . . . . . . . . . . . . . . . . . . . . . . .9
Environmental Conditions . . . . . . . . . . . . . . . . . . . . . . . . . . . . . . . . . . .10
General Maintenance . . . . . . . . . . . . . . . . . . . . . . . . . . . . . . . . . . . . . . .10
1 Installing the Keysight 82357B
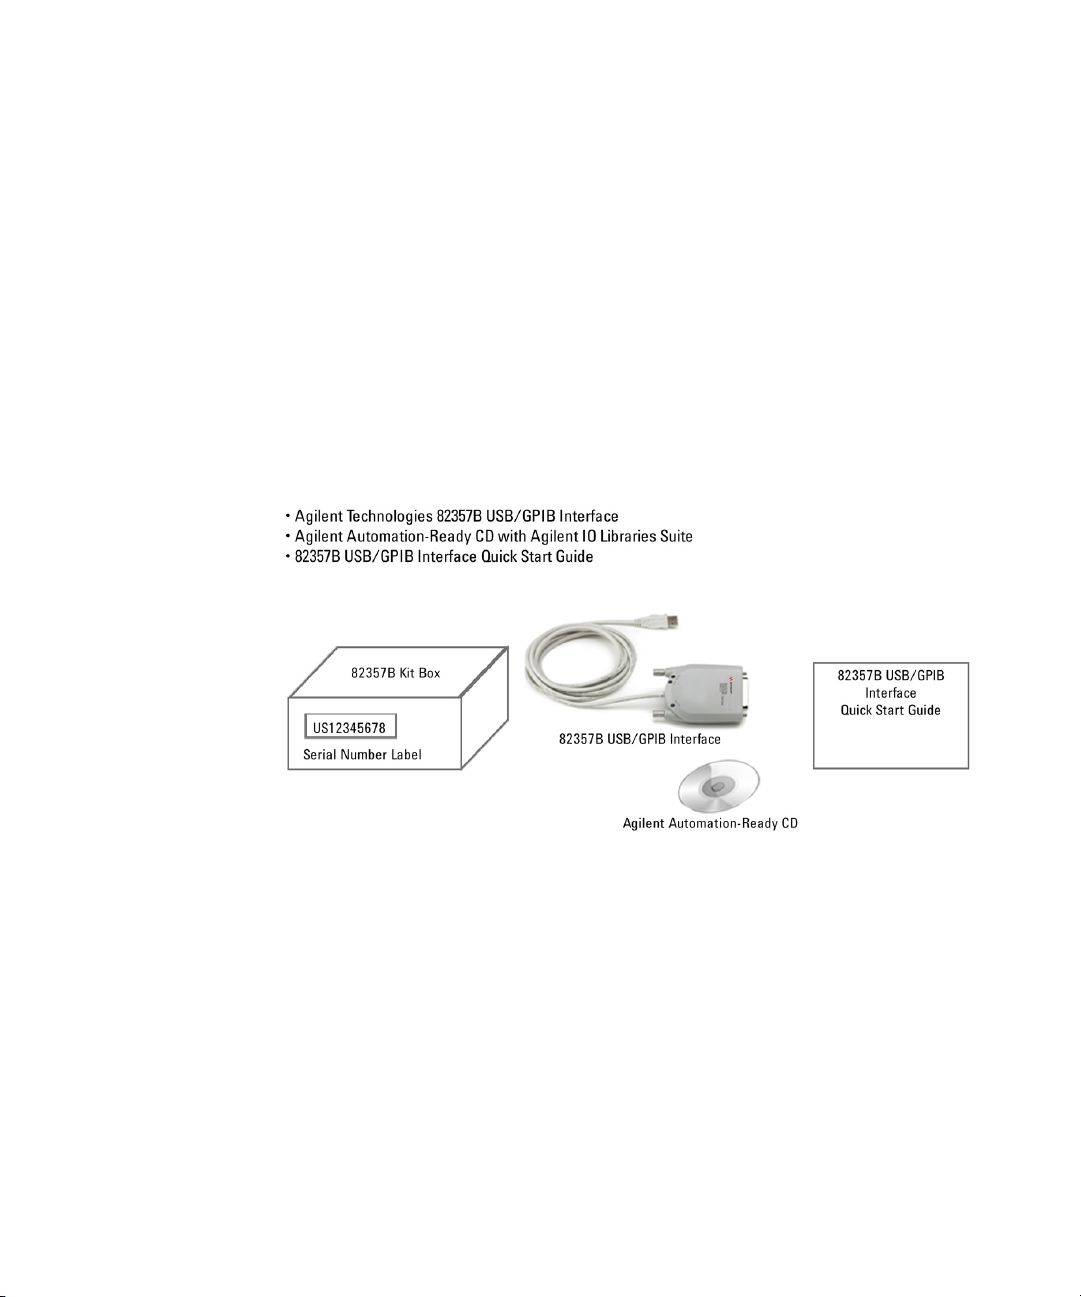
Step 1: Checking Your Shipment . . . . . . . . . . . . . . . . . . . . . . . . . . . . . .16
Step 2: Installing Keysight IO Libraries Suite . . . . . . . . . . . . . . . . . . . . .17
Step 3: Connecting the 82357B . . . . . . . . . . . . . . . . . . . . . . . . . . . . . . .19
82357B hardware description . . . . . . . . . . . . . . . . . . . . . . . . . . . . . .19
Connecting the 82357B to your PC . . . . . . . . . . . . . . . . . . . . . . . . . .20
Connecting the 82357B to a USB hub . . . . . . . . . . . . . . . . . . . . . . .21
Step 4: Connecting GPIB Instruments . . . . . . . . . . . . . . . . . . . . . . . . . .23
Connecting a single GPIB instrument . . . . . . . . . . . . . . . . . . . . . . . .23
Connecting multiple GPIB instruments . . . . . . . . . . . . . . . . . . . . . . .24
Step 5: Programming via the 82357B . . . . . . . . . . . . . . . . . . . . . . . . . .25
Establishing instrument communication . . . . . . . . . . . . . . . . . . . . . .25
Programming GPIB instruments . . . . . . . . . . . . . . . . . . . . . . . . . . . .27
2 Using the Keysight 82357B
Initial 82357B Operating States . . . . . . . . . . . . . . . . . . . . . . . . . . . . . . .32
Introduction to 82357B operating modes . . . . . . . . . . . . . . . . . . . . .33
Single 82357B operation . . . . . . . . . . . . . . . . . . . . . . . . . . . . . . . . . .34

12 Keysight 82357B User’s Guide
Multiple 82357B operation . . . . . . . . . . . . . . . . . . . . . . . . . . . . . . . . 35
SRQ operation . . . . . . . . . . . . . . . . . . . . . . . . . . . . . . . . . . . . . . . . . . 35
Setting Configuration Parameters . . . . . . . . . . . . . . . . . . . . . . . . . . . . . 36
Changing configuration parameters . . . . . . . . . . . . . . . . . . . . . . . . . 36
Changing modes of operation . . . . . . . . . . . . . . . . . . . . . . . . . . . . . . 37
Setting timeout floor values . . . . . . . . . . . . . . . . . . . . . . . . . . . . . . . 38
Setting 82357B high-performance operation . . . . . . . . . . . . . . . . . 39
3 Troubleshooting the Keysight 82357B
Troubleshooting Flowchart . . . . . . . . . . . . . . . . . . . . . . . . . . . . . . . . . . 42
Observe the LED states . . . . . . . . . . . . . . . . . . . . . . . . . . . . . . . . . . . 42
Hardware Checks . . . . . . . . . . . . . . . . . . . . . . . . . . . . . . . . . . . . . . . . . . 44
Check USB cables, USB interface, host PC . . . . . . . . . . . . . . . . . . . 44
Check Device Manager . . . . . . . . . . . . . . . . . . . . . . . . . . . . . . . . . . . 45
Software Installation Checks . . . . . . . . . . . . . . . . . . . . . . . . . . . . . . . . . 46
Check suspend/resume operation . . . . . . . . . . . . . . . . . . . . . . . . . . 46
Verify Keysight IO Libraries Suite installation . . . . . . . . . . . . . . . . . . 46
Software Configuration Checks . . . . . . . . . . . . . . . . . . . . . . . . . . . . . . . 48
Checking IO Control operation . . . . . . . . . . . . . . . . . . . . . . . . . . . . . 48
Check USB scanner . . . . . . . . . . . . . . . . . . . . . . . . . . . . . . . . . . . . . . 49
Service and Support Information . . . . . . . . . . . . . . . . . . . . . . . . . . . . . . 50
Contacting Keysight . . . . . . . . . . . . . . . . . . . . . . . . . . . . . . . . . . . . . 50
4 Product Specifications

Keysight 82357B User’s Guide 13
List of Figures
Figure 1-1 Contents of Keysight 82357B USB/GPIB Interface . . .16
Figure 1-2 IO icon on the Windows taskbar notification area . . .18
Figure 1-3 82357B Hardware Features . . . . . . . . . . . . . . . . . . . . .19
Figure 1-4 Connecting the 82357B to Your PC . . . . . . . . . . . . . . .20
Figure 1-5 Connecting the 82357B to a USB Hub . . . . . . . . . . . .21
Figure 1-6 Connection from Single GPIB Instrument to the GPIB
Port . . . . . . . . . . . . . . . . . . . . . . . . . . . . . . . . . . . . .23
Figure 1-7 Typical Way of Connecting Three GPIB instruments
to an 82357B . . . . . . . . . . . . . . . . . . . . . . . . . . . . . .24
Figure 1-8 Keysight Interactive IO . . . . . . . . . . . . . . . . . . . . . . . . .26
Figure 1-9 Typical System Installation - 82357B USB/GPIB
Interface . . . . . . . . . . . . . . . . . . . . . . . . . . . . . . . . . .29
Figure 2-1 Sequence of Initial Operating States . . . . . . . . . . . . . .32
Figure 2-2 Keysight 82357B (High Speed) Interface - USB/GPIB 37
Figure 3-1 Troubleshooting Flowchart . . . . . . . . . . . . . . . . . . . . .43
Figure 3-2 IO icon on the Windows taskbar notification area . . .47

14 Keysight 82357B User’s Guide
THIS PAGE HAS BEEN INTENTIONALLY LEFT BLANK.

Keysight 82357B USB/GPIB Interface
User’s Guide
15
1 Installing the Keysight
82357B
This chapter shows a suggested five-step process to install the 82357B and the
Keysight IO Libraries Suite, to connect the 82357B to your PC and to program
GPIB instruments via the 82357B.

1 Installing the Keysight 82357B
16 Keysight 82357B User’s Guide
Step 1: Checking Your Shipment
Your 82357B USB/GPIB Interface shipment should include the items shown in
Figure 1-1. If any item is missing or damaged, keep the shipping materials and
contact Keysight Technologies. See “Contacting Keysight” on page 50 later in this
guide for addresses and telephone numbers.
As you check the shipment items, verify that the 82357B serial number at the
bottom of the 82357B matches the serial number shown on the serial number
label of the 82357B Kit Box and on the 82357B Certificate of Calibration. If the
Serial Numbers do not match, contact Keysight. If all Serial Numbers match, you
may want to record the Serial Number for future reference.
Figure 1-1 Contents of Keysight 82357B USB/GPIB Interface

Installing the Keysight 82357B 1
Keysight 82357B User’s Guide 17
Step 2: Installing Keysight IO Libraries Suite
This section describes how to install the Keysight IO Libraries Suite on your PC.
The Keysight IO Libraries Suite is a collection of libraries and utilities that gives
you the ability to use your instruments from instrument control software.
You should install the Keysight IO Libraries Suite as your first step before installing
the hardware because it installs the necessary software and drivers to control your
instruments.
If possible, always use the most recent version of the Keysight IO Libraries Suite.
This version supports the newest interfaces and operating systems, and has the
most advanced features.
1Verify that your PC meets the minimum system requirements. Refer to the IO
Libraries Web page at www.keysight.com/find/iosuite or the IO Libraries
Suite Readme.
2Close all applications on your computer. Insert the Keysight
Automation-Ready CD in your CD-ROM drive or download and install the IO
Libraries software from www.keysight.com/find/iosuite.
3Follow the instructions as prompted during the installation. You can select
either a Typical or a Custom installation:
–Typical - In most cases, you can select the Typical installation which
installs the IO Libraries Suite using the recommended settings.
–Custom - Select the Custom installation to:
aInstall the IO Libraries Suite in another directory (for 32-bit operating
systems only).
bSave disk space by not installing interface manuals.
cUse Keysight 32- bit VISA with another vendor's VISA on the same PC in
side- by- side mode. Details on side- by- side mode are available at
www.keysight.com/find/side-by-side-install or in the IO Libraries Suite
help.
NOTE
You must have Administrator privileges to install Keysight IO Libraries Suite
Connection Expert.

1 Installing the Keysight 82357B
18 Keysight 82357B User’s Guide
4After the IO Libraries suite is successfully installed, you will see the IO icon on
the Windows taskbar notification area.
Figure 1-2 IO icon on the Windows taskbar notification area

Installing the Keysight 82357B 1
Keysight 82357B User’s Guide 19
Step 3: Connecting the 82357B
After the Keysight IO Libraries Suite software has been installed, you can connect
the 82357B to any USB port on your PC or you can connect the 82357B via
standard USB hubs.
82357B hardware description
The Keysight 82357B provides a direct interface connection from your PC USB
port to GPIB instruments. The 82357B includes an attached USB cable that is
USB 2.0 compliant. This cable is shielded and the connector is specified for up to
1,500 insertions. An 82357B can be directly connected to a single GPIB
instrument or up to 14 GPIB instruments via GPIB cables. Up to four 82357B
converters may be connected to your PC via standard USB hubs.
Figure 1-3 82357B Hardware Features
NOTE
If the Keysight IO Libraries Suite software have not been installed on your PC,
STOP. Install the libraries (see Step 2: Installing Keysight IO Libraries Suite).
Green ACCESS LED
USB Cable
(Connect to USB port)
Red FAIL LED
Green READY LED
GPIB Connector
(Connect up to
14 GPIB instruments)

1 Installing the Keysight 82357B
20 Keysight 82357B User’s Guide
Connecting the 82357B to your PC
This section shows steps to connect the 82357B to a USB port on your PC or to
your PC via a USB Hub.
1ConnecttoaUSBPort.Make sure the PC is ON and plug the 82357B USB
cable into any available USB port on your PC. Do not connect the 82357B to
GPIB instruments at this time.
Figure 1-4 Connecting the 82357B to Your PC
2 Observe the LEDs. Observe the LEDs on the 82357B for at least 10 seconds.
See Chapter 2, “Using the Keysight 82357B” for a description of the normal
LED sequence during an initial installation of the 82357B.
aInitially, only the red FAIL LED should be ON. After a few seconds, all three
LEDs should be ON. When all three LEDs are ON, this shows that the
82357B has been successfully installed.
bIf all three LEDs are not ON after 10 seconds and all Windows
Plug-and-Play Manager activity has ceased, STOP. See Chapter 3,
“Troubleshooting the Keysight 82357B” for diagnostics information.

Installing the Keysight 82357B 1
Keysight 82357B User’s Guide 21
Connecting the 82357B to a USB hub
This section shows steps to connect the 82357B to a USB port on your PC via a
standard USB hub.
1Plug the power adapter into the hub and into an electrical outlet. Make sure
the hub is operating in self-powered mode. Figure 1-5 shows a 4-port
self-powered USB hub with two 82357B USB/GPIB Interfaces connected.
2Make sure your PC is ON. Connect the USB cable of the USB hub to any
available USB port on your PC.
3Plug at least one 82357B USB/GPIB Interface into the port of the USB hub. It
is not necessary to connect GPIB instruments to any 82357B at this time.
Figure 1-5 Connecting the 82357B to a USB Hub
NOTE
Any USB hub used with the 82357B MUST be self-powered (must not be
bus-powered or powered from the USB bus). Also, be sure to check the
applicable USB hub documentation for hub operating parameters, such as
power requirements and maximum length of USB cables.

1 Installing the Keysight 82357B
22 Keysight 82357B User’s Guide
4Observe the LEDs on the 82357B for at least 10 seconds. See Chapter 2,
“Using the Keysight 82357B” for a description of the normal LED sequence
during an initial installation of the 82357B.
aInitially, only the red FAIL LED should be ON. After a few seconds, all three
LEDs should be ON. When all three LEDs are ON, this shows that the
82357B has been successfully installed.
bIf all three LEDs are not ON after 10 seconds and all Windows
Plug-and-Play Manager activity has ceased, STOP. See Chapter 3,
“Troubleshooting the Keysight 82357B” for diagnostics information.
NOTE
For Windows Vista, Windows 7, and Windows 8, there will be no Windows Plug
and Play Manager Sequence because once 82357B is initially plugged into a
USB port it will automatically install the driver.

Installing the Keysight 82357B 1
Keysight 82357B User’s Guide 23
Step 4: Connecting GPIB Instruments
After the 82357B has been installed, the next step is to connect GPIB instruments
to the 82357B. This step includes:
– Connecting a Single GPIB instrument OR ...
– Connecting Multiple GPIB Instruments
Connecting a single GPIB instrument
Figure 1-6 shows connection from a single GPIB instrument to the GPIB port on
an 82357B. When you have made the connection for your system, go to Step 5:
Programming via the 82357B. You may want to record the primary GPIB address
of the attached instrument for future programming use.
Figure 1-6 Connection from Single GPIB Instrument to the GPIB Port
CAUTION
To avoid damage to the connectors, only finger-tighten the connectors.

1 Installing the Keysight 82357B
24 Keysight 82357B User’s Guide
Connecting multiple GPIB instruments
Figure 1-7 shows a typical way to connect three GPIB instruments to an 82357B.
When you have made the connections for your system, go to Step 5:
Programming via the 82357B. You may want to record the primary GPIB address
of each attached instrument for future programming use.
Figure 1-7 Typical Way of Connecting Three GPIB instruments to an 82357B
NOTE
Although Figure 1-7 shows the connection from 82357B to GPIB Instrument 1,
the connection can be to any GPIB instrument in the system. Be sure to first
connect the GPIB cable to the GPIB instrument and then “piggy-back” the
82357B GPIB connector to the GPIB cable.
*To minimize stress on the connector
mountings, stack no more than three
cable connector blocks.

Installing the Keysight 82357B 1
Keysight 82357B User’s Guide 25
Step 5: Programming via the 82357B
After you have connected your GPIB instrument(s) to the 82357B, the next step is
to establish communication between your PC and the instruments using
Interactive IO. After communication has been established, you can begin
programming the instruments using VISA, VISA COM, or SICL.
Establishing instrument communication
When the Keysight IO Libraries Suite is installed on your PC, an IO utility called
Interactive IO is also installed. You can use Interactive IO to verify communication
between your PC and the connected GPIB instrument(s). This section shows you
how to use Interactive IO to verify instrument communication.
1Click the IO icon on the Windows taskbar notification area.
2Right-click the instrument and click Send Commands To This Instrument to
display the Interactive IO window. For information on Interactive IO, click Help.
3*IDN?is the default command. Click Send & Read to send the identification
query to the instrument and display its reply in the Interactive IO window.
4To send other commands, click Commands> to select from a list of common
commands, or type a command into the Command: field. If you experience
timeout errors for some commands, click Options to change the timeout value.
NOTE
Once your GPIB interface has been configured in Connection Expert, if you can
see the attached GPIB instrument(s) in the Connection Expert explorer and see
their IDN string information in the detail pane then communication has been
verified. Interactive IO allows you to manually verify communication and send
specific commands to your instruments.

Installing the Keysight 82357B 1
Keysight 82357B User’s Guide 27
Programming GPIB instruments
This section provides an introduction to programming GPIB instruments via the
82357B USB/GPIB interface using the Keysight VISA, VISA COM, and SICL IO
Libraries. You can program in various languages/applications, including Visual
Basic, Visual C++, Keysight VEE, and National Instruments LabVIEW.
See the applicable user’s guide(s), such as the Visual Basic User’s Guide, for
programming guidelines. You can also find additional programming examples
using various IO Libraries and instrument drivers in the instrument user’s guide.
After the 82357B is successfully installed, the interface acts as a transparent
interface for programming GPIB instruments.
For information on programming using Keysight VISA, see the Keysight VISA
User’s Guide. For information on VISA COM and for function references for VISA,
VISA COM, and SICL, see the IO Libraries Suite Online Help.
Accessing VISA and SICL manuals
You can access .pdf copies of the Keysight VISA User’s Guide and the Keysight
SICL User’s Guide for Windows from the IO icon on the Windows taskbar. Adobe
Reader is required to view these manuals.
To access the Keysight VISA User’s Guide, click the IO icon then click
Documentation > VISA Users Guide. To access the Keysight SICL User’s Guide for
Windows, click the IO icon then click Documentation > SICL Users Guide. To
access VISA COM information, and function references for VISA, VISA COM, and
SICL, click the IO icon, then click Help Topics.

1 Installing the Keysight 82357B
28 Keysight 82357B User’s Guide
Introduction to IO interface configuration
An IO interface consists of a hardware interface and a software interface. The
Connection Expert utility is used to associate a unique software interface ID with a
hardware interface.
The Keysight IO Libraries Suite uses an Interface ID or Logical Unit (LU) Number
to identify an interface. This information is passed in the parameter string of the
viOpen function call in a VISA program or in the iopen function call in an SICL
program.
The Connection Expert assigns an Interface ID and Logical Unit (LU) Number to
the interface hardware, as well as other necessary configurations. Typically, the
LU Number is automatically assigned and you can ignore its setting. The LU
Number is used internally as a unique identifier. When the IO interface is
configured, you can use Keysight VISA, VISA COM, or SICL to program assigned
instruments.
Example: IO interface configuration
For example, the GPIB interface system in the Figure 1-9 consists of a Windows
PC, an 82357B USB/GPIB interface, and three GPIB instruments with GPIB
primary addresses of 3, 4, and 5, respectively. The instruments are connected via
GPIB cables.
For this system, the Connection Expert utility has assigned a VISA name of
“GPIB1” and a SICL name of “gpib1”. With these names assigned to the
interfaces, the VISA/SICL addressing is as shown in Figure 1-9.
Since unique names have been assigned by the Connection Expert, you can use
the VISA viOpen command or the SICL iopen command to open the IO paths to
the GPIB instruments as shown in the figure.

Installing the Keysight 82357B 1
Keysight 82357B User’s Guide 29
Figure 1-9 Typical System Installation - 82357B USB/GPIB Interface
Other manuals for 82357B
2
Table of contents
Other Keysight Recording Equipment manuals
Popular Recording Equipment manuals by other brands

Meinberg
Meinberg microSync RX800/AD10DC20 Technical reference

Attero Tech
Attero Tech unA4O AES67 user manual

Fractal
Fractal AXE-FX II owner's manual

Marantz professional
Marantz professional AVS user guide

AMX
AMX 16-Channel Custom Panel Interface AXP-CPI16 Operation/reference guide

Ashly
Ashly GQX-1502 operating manual