LegalTek LXMONARCH User manual

QUICK START GUIDE
LEGALTEK LXMONARCH (LXM)
1080P HIGH DEFINITION INTERVIEW RECORDING SYSTEM
Simple Button Control…Single or Dual Cameras
Local/Network H.264 File Capture…Removable Memory
Time/Date Watermark…Create Multiple DVDs Rapidly
“Your High Definition Interview Recording Solution…”

2

3
Table of Contents
Introduction………………………………………………………………………...…... 4
Room Configuration Guide……………………………………………………...…. 5-6
Hardware Overview………………………………………………….…...……….. 7-12
Component Interconnection Diagrams………..…………………...……………13-14
Installation:
Hardware Interconnection ..…………………………………………………….……15
Camera Installation……………………………………………………………………16
Microphone Installation……………………………………………………….………17
System Initialize:
Initial Adjustments ...………………………………………………………………… 18
Settings……….……………………..…………………………………………………19
Recording ...………………………………………………………….………………. 20
System Errors ...…………………………………………………………...………… 20
Using the Reset Button……………………………………………………………… 21
File Viewing……………………………………………………………………….…...22
File Conversion and DVD Creation…………………………..……………………. 22
Support…………………………………………………..………………….…...…… 22
Downloads……………………………………………………………………………. 23

4
About Us
Legaltek is a unique group of engineers, technical professionals, established
equipment providers and manufacturers, that create products and offer services
based on the needs and requirements of our core customers, government, law
enforcement and the legal community.
Through research, innovation and purpose driven design, Legaltek merges
future-forward technology with accepted standards and methodology, to develop
specialty equipment that is reasonably priced and simple to use.
Legaltek has become an established technical resource by providing assistance
with equipment selection, system design and audio/video laboratory services.
Welcome to the leading edge of law enforcement technology.
Introduction
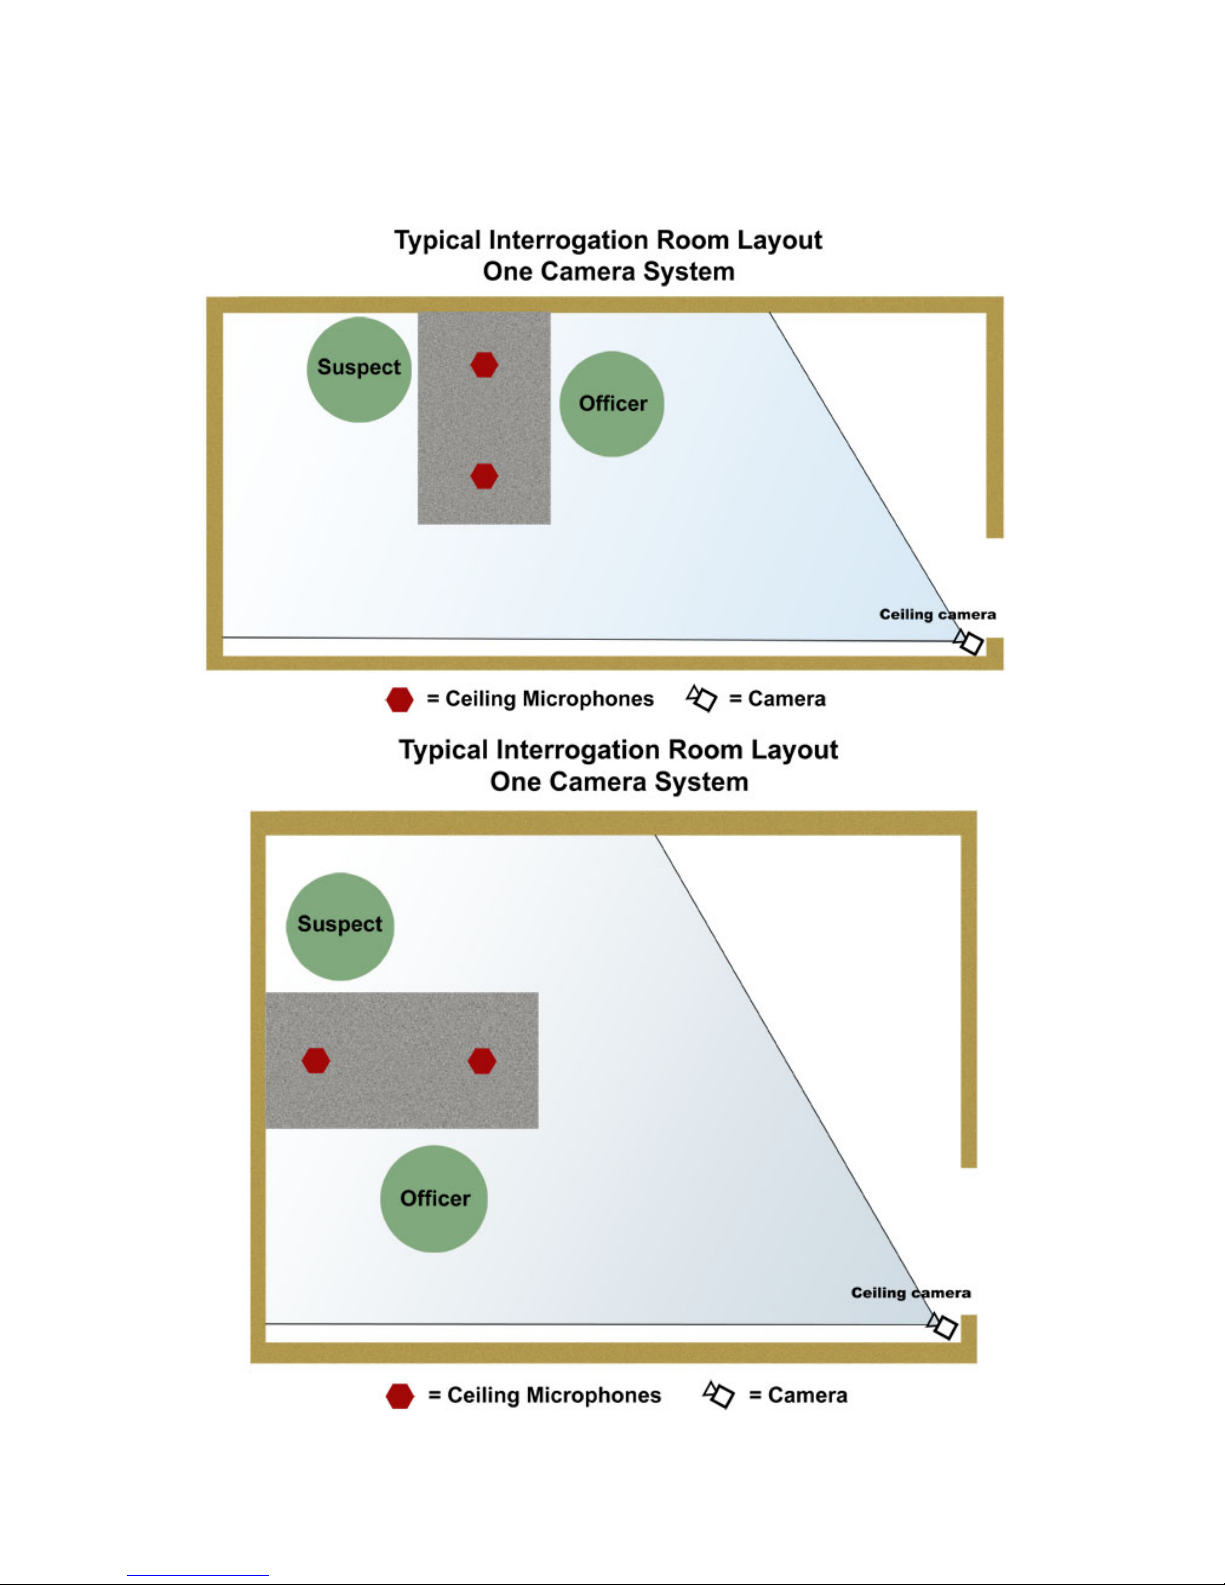
The LX Monarch (LXM) turnkey, “hardware based” high definition recording
solution provides the most reliable and secure way for law enforcement to collect
and archive custodial interviews. By targeting both removable non-volatile solid-
state memory and a network storage location simultaneously, the possibility of
critical data loss due to system malfunction or catastrophic hard drive failure is
virtually eliminated.
Intuitive and easy to use, the LXM requires little or no training or support to
operate. Simple button controls initiate recording. Officers are free to focus on
the purpose of the interview…the gathering and correlation of information to
develop a criminal case for prosecution.
LXM records high definition video in the universally compatible H.264/MPEG-4
format which equals up to 50% smaller file size. Simple drag and drop tools
make burning multiple DVDs as easy as 1-2-3. Legaltek equipment can be easily
self-installed and is essentially maintenance free.
LX systems are shipped as a complete kit, pre-programmed at the factory for
optimum performance as a stand-alone recorder. Should you choose to connect
the recorder to a network or perform a software update, please defer to a
qualified IT specialist.
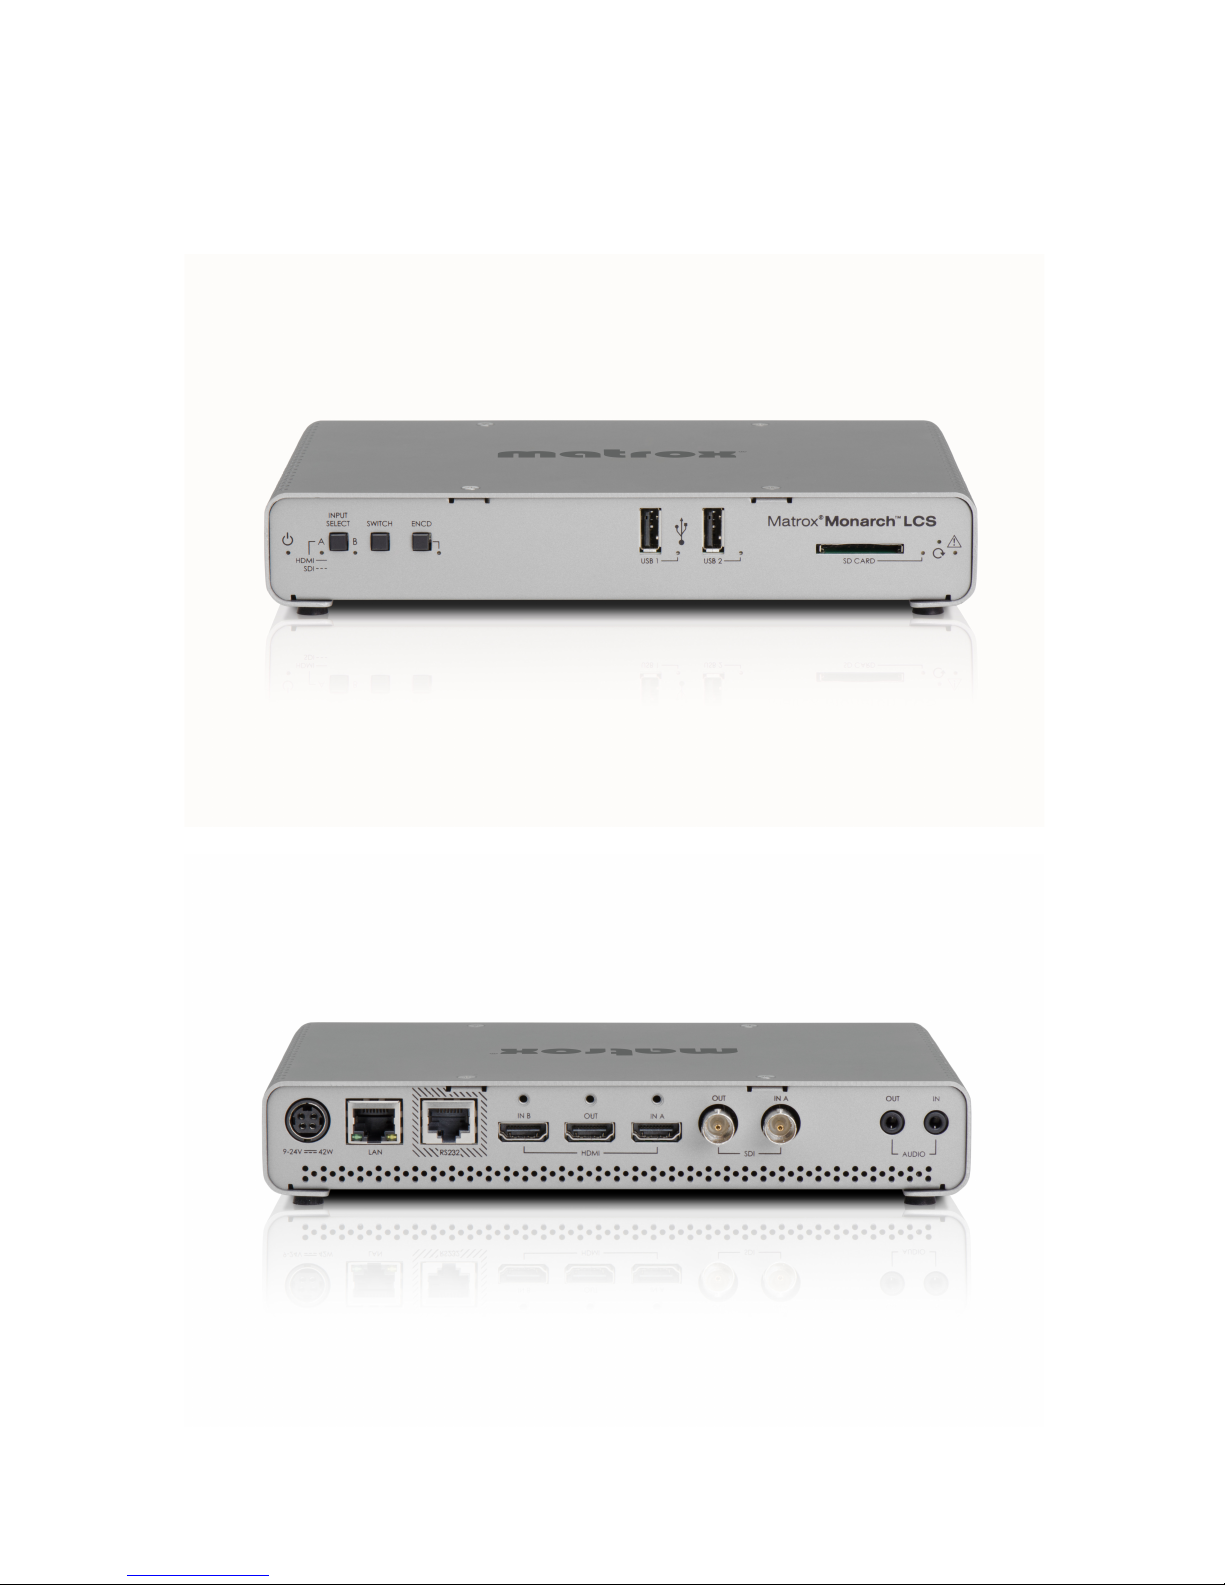
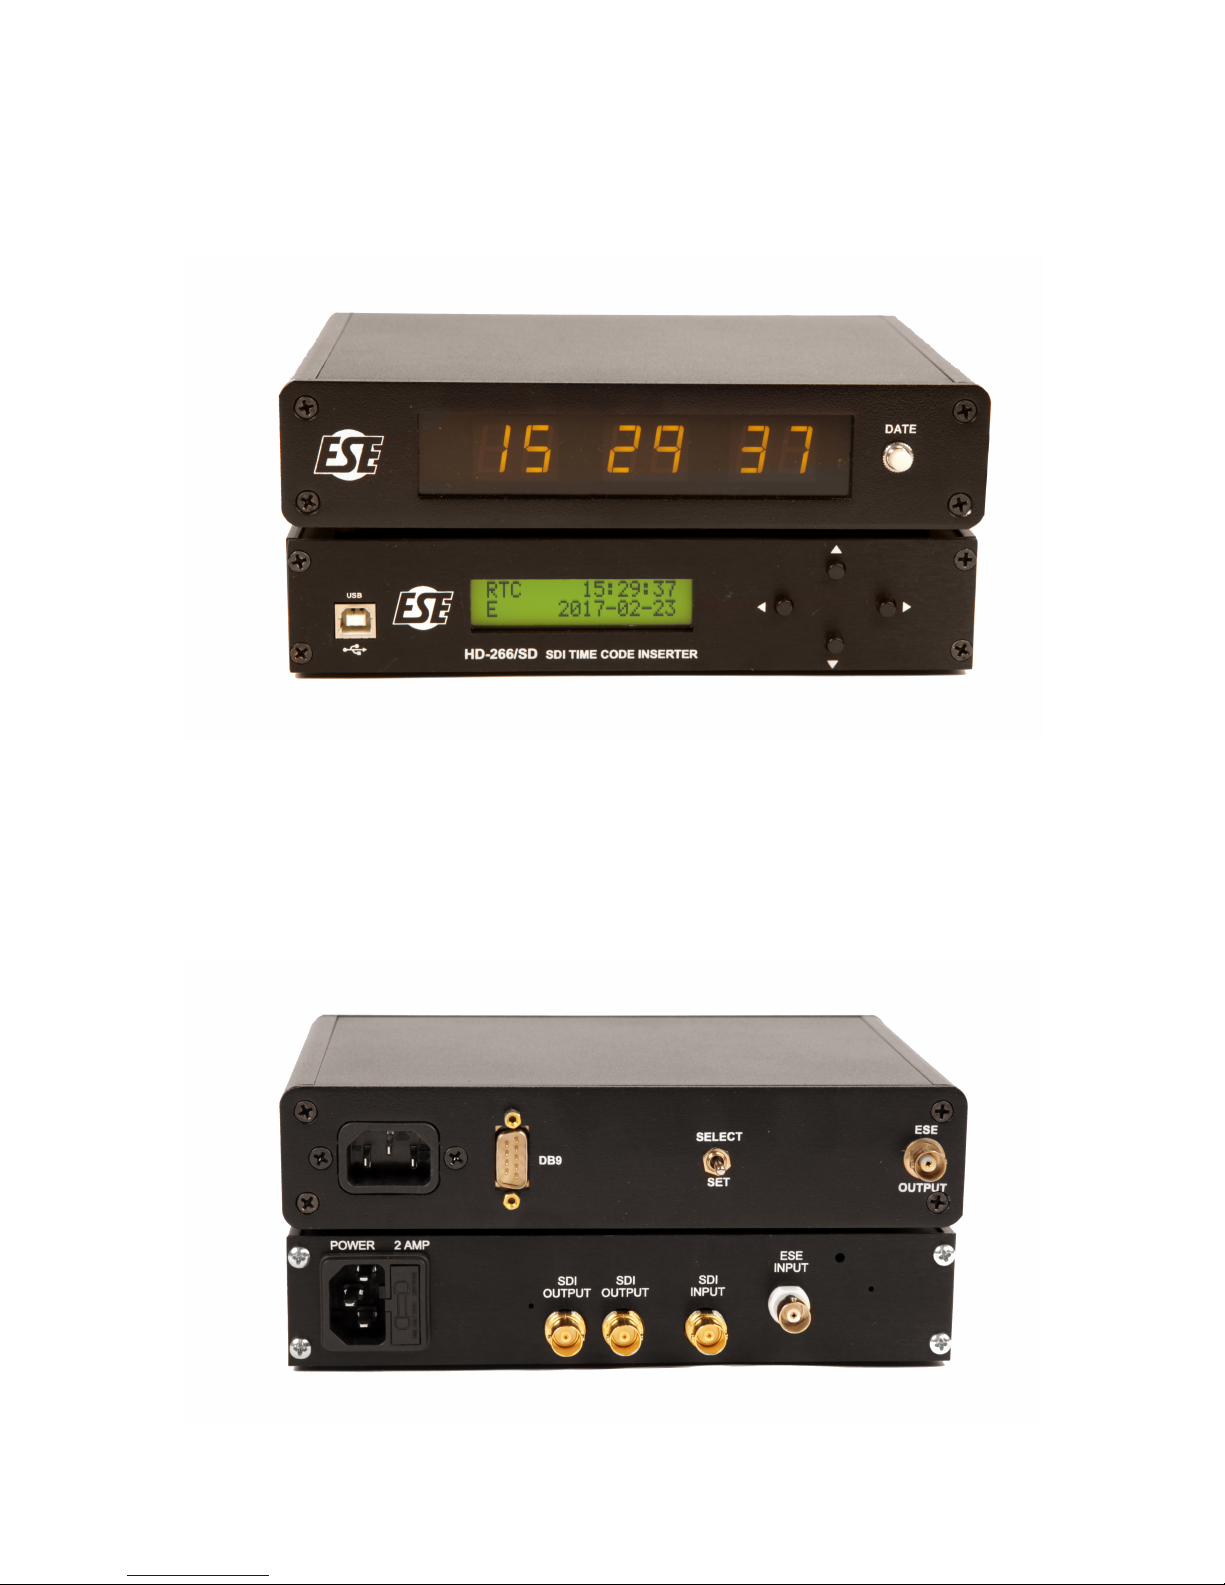
This user guide will familiarize you with the system components, their
interconnection and the initial system set-up. Please refer to the resource section
of this guide for technical support, access to software, comprehensive manuals
and advanced feature optimization.

5
Room Configuration Guide

6

7
Hardware Overview
LXMonarch (HDX) Hardware
(Front View)
(Rear View)

8
LXMonarch (LCS) Hardware
(Front View)
(Rear View)

9
LXM Master Clock and Time/Date Inserter
(Front View)
(Rear View)

10
HD High Definition LED Monitor HDMI Cable
Bose Powered Speaker System Sony Studio Headphones

11
SDI to HDMI Micro Converter BNC Interconnect Cable
BNC/DC Camera Installation Cable UPS Power Supply

12
PZM Microphone Balanced XLR Microphone Cables
Stereo Microphone Preamplifier/Processor 1/8” RCA Stereo Cable

13

14

15
Installation
This Quick Start Guide is intended assist you with the initial installation and set-
up of your LXMonarch HD recording system. Comprehensive user guides,
software downloads, development tools and product registration are available
directly from the factory. This material can be accessed through links provided in
the resource section of this guide.
Please review the Room Configuration Guide on pages 5 and 6 will assist with
camera and microphone placement, the Hardware Overview on pages 7 thru 12
for component and cable identification and the Component Interface Diagrams
on pages 13 and 14 for system component interconnection.
Hardware Interconnection
Position the equipment on a flat surface in a temperature controlled environment,
adjacent to the interview room. Place the powered speakers on each side of the
LED monitor, with the recorder positioned centrally in the foreground. The master
clock can be placed on top of the SDI time/date inserter to the side of the system,
while the audio processor and UPS behind and out of the way.
System Power:
Connect the supplied multi-outlet power strip to a battery backup outlet on the
UPS, and the UPS to a 120V AC mains outlet. The recorder, master clock,
time/date inserter, (LCS users: SDI/HDMI Converter), audio processor and
camera power supplies should be connected to the power strip and battery
backup outlets, while the LED monitor and speakers may be connected to the
surge protected outlets. In the event of a significant power interruption, all critical
components will continue to function until recording is safely ended.
Component Interconnect:
HDMI: Connect an HDMI cable from HDMI OUT on the recorder to HDMI IN on
the LX LED monitor. (Monarch LCS users: Connect a second HDMI cable from
the SDI/HDMI Micro Converter to HDMI IN Bon the recorder).
BNC:Connect the 3’ BNC cable from the ESE OUTPUT on the Master Clock to
the ESE INPUT on the SDI Time Code Inserter. Connect the 6’ BNC cable from
the SDI OUTPUT on the SDI Time Code Inserter to SDI IN on the recorder
(Monarch LCS users: to SDI IN A).
AUDIO:Connect the 1/8” RCA stereo cable from RCA L/R Line Out on the audio
processor to AUDIO IN on the recorder. Connect the 1/8” stereo cable (supplied
with the powered speakers) from AUDIO OUT on the recorder to FROM
COMPUTER on the rear of the right speaker. Connect the attached 1/8” stereo
cable from the left speaker to the TO LEFT SPEAKER jack on the right speaker.

16
Camera Installation
It is important that cameras be adjusted and positioned correctly before
permanent installation.
To simplify this step, first route the camera BNC/DC Cable from the equipment
area, through the wall and across the ceiling to the approximate camera
mounting location in the interview room. Office IT personnel will be able to assist
with this step.
The HD camera module will have a group of three connectors as illustrated
below. Legaltek Fire Sensor ceiling enclosures may feature two cameras. In this
configuration there will be two groups of connectors, one for each image sensor.
Connect the BNC video connector from the
camera installation cable to the silver
Camera HD Video Output connector. (The
yellow BNC connector provides a standard
definition composite video output signal for
use with a field installation monitor). Insert
the 2.1mm power plug from the camera
installation cable into the red (sometimes
black) Camera DC IN connector.
In the equipment room, connect the BNC
video connector from the camera installation cable to the SDI INPUT jack on the
rear of the SDI Time Code Inserter. ** If you are installing the second camera for
the Monarch LCS system, connect the BNC video cable to the SDI IN jack on the
SDI to HDMI Micro Converter.
Connect the camera power adapter to a battery backup output of the UPS and
the adapter’s 2.1mm power plug into the female power connector on the camera
installation cable.
Temporarily position the camera for the desired angle of view. This can be
achieved either by connecting a composite video field installation monitor to the
camera’s yellow BNC pigtail, or by viewing the camera’s HD video feed on the LX
LCD monitor after the system has been powered up. Once positioned, mark the
screw holes on the camera mounting plate and secure the camera with the
provided mounting hardware.
Legaltek specialty cameras are factory adjusted for optimal performance under
normal lighting conditions. However, they may be adjusted electronically via the
rear joystick control to accommodate various environments. Please refer to the
guide provided with each camera. Only a qualified technician should perform
these adjustments.

17
Microphone Installation
First, route the Balanced XLR Microphone Cables from the equipment area,
through the wall and across the ceiling to the approximate microphone mounting
location in the interview room. ** Make sure the female connectors are above
the ceiling and the male ends at the equipment location. Again, office IT
personnel will be able to assist with this step.
Mount the PZM Microphone modules by carefully drilling a ¾” hole in the tile or
plaster, taking care not to damage the immediate surrounding surface.
With the supplied Allen wrench, loosen the
setscrew on the machined retaining ring and
carefully slide it off. Place the microphone body
through the mounting hole, slide on the
retaining ring above the surface and secure the
setscrew. Connect the female XLR Microphone
connector to the microphone then replace the
ceiling tiles.
At the equipment location, connect the male XLR Microphone Cable to the DUAL
MICROPHONE PREAMPLIFIER LEFT MIC INPUT and RIGHT MIC INPUT as
illustrated below.
Depress the PHANTOM
button on the rear panel
which provides power to the
active electronics in the
microphone elements.
On the front panel depress
the COMPRESSOR button
on to enable the audio
processing circuitry. This
feature enhances the intelligibility of soft spoken subjects, prevents distortion
from loud speech and makes the recorder relatively insensitive to mechanical
vibrations such as table and floor thumps and clothing noise. Initially adjust the
Left and Right Level controls to the position in the illustration.

18
System Initialize
LX Monarch recording systems are designed for continuous duty in temperature
controlled environments. The LED monitor and Bose speaker system may be
powered off when not in use.
Depress the power buttons on the UPS, the LED monitor and the Bose speakers.
Monarch HDX:
Once the recorder boots up, all front panel LEDs will be off except: Power
(Green), Input Select SDI (Green), Encoder 1 (Solid Red) and SD CARD (Solid
Red).
Monarch LCS:
Once the recorder boots up, all front panel LEDs will be off except: Power
(Green), Input Selection A (Flashing Green), Encode (Solid Blue) and SD Card
(Solid Red)
Initial Adjustments
Audio:
Power up the Bose speaker system and set the volume midway. With reference
speech in the interview room, adjust the Microphone Preamplifier Input Level
controls clockwise until the desired input volume is reached. Output Level
indicators may begin to flash Red on voice peaks. Adjust the speaker volume
control to a comfortable listening level. Headphones may be connected to the
jack on the right speaker for private or critical listening.
Video:
Position the camera by connecting a composite video field installation monitor to
the camera’s yellow BNC pigtail, or by viewing the camera’s HD video feed on
the system’s LCD monitor. Once positioned, secure the camera with the provided
mounting hardware.
SDI Time Code Inserter:
The SDI Time Code Inserter has been adjusted by the factory to provide a
discreet transparent white, time/date reference overlay in the lower left corner of
the recorded image. Should you wish to adjust the format, position or size of the
display please refer to the comprehensive factory manual provided with the
inserter.
Master Clock:
Use the momentary toggle switch on the rear panel of the Master Clock to set the
system reference time and date. Simply toggle the switch up to select the
segment of the time or date to be programmed, then toggle the switch down to
adjust the setting.

19
Settings
LX Monarch recorders are pre-configured at the factory for optimum local stand-
alone performance. HDX devices are factory programmed to record full screen,
while the dual camera LCS is programmed for side-by-side recording.
You may customize device settings with a computer or via the office LAN with
Command Center. Command Center is web-based application that allows you to
configure Monarch settings, and control streaming and recording sessions. Links
to these utilities can be found in the resource section of this guide. *** Only a
qualified IT specialist should institute these operations.
Internal Clock:
The internal clock has been factory programmed for the user specified time zone
and is protected by a battery back up.
Recorded files are identified by file name, the start date/time of the recording
session and a three-digit number that increments when file segmentation occurs.
For example, a recording that is segmented into three (3) files will result in the
following:
- File 1 - [2015-12-01_13-30-45]-000.mov/mp4
- File 1 - [2015-12-01_13-30-45]-001.mov/mp4
- File 1 - [2015-12-01_13-30-45]-002.mov/mp4
The date/time in the filename only changes when you manually stop a recording
and then start a new one, in which case it will be the start date/time of the first file
in the new sequence.
Recording File Size and Duration:
The target video data rate has been set at the factory for 3500kb/sec or about
2GB/hr. Recording is set to the maximum file duration of 4 hours and 50 minutes.
The recording will automatically stop when the duration limit is reached and a
new file will be simultaneously created. Recording will continue until the SD
media has reached capacity.
Recording Media:
LX Monarch is set by the factory to target the SD card for local recording.
Because of its superior write speed, Class 10 media is recommended. *** Media
must be formatted NTFS.
The included 32GB SD card will yield about 16 hours of recording capacity at
factory configuration. Please refer to the Recording File Sizes and Duration chart
in the product manual for the approximate correlation of data rate, file size and
recording duration.

20
Recording
LX Monarch HDX:
To initiate local recording, press the ENCD 1 button. Both the ENCD 1 and SD
CARD red LEDs will begin to flash, indicating that recording is in progress.
To end the recording, press the ENCD 1 button again. Both the ENCD 1 and SD
CARD LED’s will stop flashing and return to continuous red, indicating that
recording has terminated and files have been finalized.
LX Monarch LCS:
To initiate local recording, press the ENCD button. The ENCD blue LED will
begin to flash. The SD CARD red LED will also begin to flash, indicating that
recording is in progress.
To end the recording, press the ENCD 1 button again. The ENCD 1 LED will
return to continuous blue, while the SD CARD LED will return to continuous red.
Remarks
• When a recording is ended, it may take a few seconds to finalize. The USB/SD
card LED will continue to flash during the finalization process. To avoid corrupted
video files, do not remove the USB device or SD card when its LED is flashing.
• When local memory reaches capacity, an error will be indicated.
System Errors
The flashing yellow LED indicates that a device error has occurred. The error
may indicate the loss of input video signal; local memory has reached capacity or
is absent, there has been a power or streaming interruption, device temperature
is beyond operational range or a physical disconnection of the network cable
(when applicable). *** An error will not be reported if the audio input is lost. If this
occurs, the stream and/or recording will continue, but will not contain audio.
Once the issue has been resolved, the recorder may be reset locally by
instituting a manual reboot or via the Command Center if the recorder is
connected to the network.
Table of contents
Other LegalTek Recording Equipment manuals