Legamaster ETX Series User manual

USER MANUAL
ETX series
Version 2.0
ENGLISH |DEUTSCH |FRANÇAIS |NEDERLANDS |ESPAÑOL

2
TABLE OF CONTENTS
LANGUAGES
ETX-SERIES – USER MANUAL – ENGLISH
GB ENGLISH 2
DE GERMAN DEUTSCH 29
FR FRENCH FRANÇAIS 56
NL DUTCH NEDERLANDS 83
ES SPANISH ESPAÑOL 110
1. Important Information ...................................................................................................... 3
1.1. Use ..............................................................................................................................................3
1.2. Exemptions ..................................................................................................................................3
2. Safety Instructions............................................................................................................. 4
2.1. Safety Precautions........................................................................................................................4
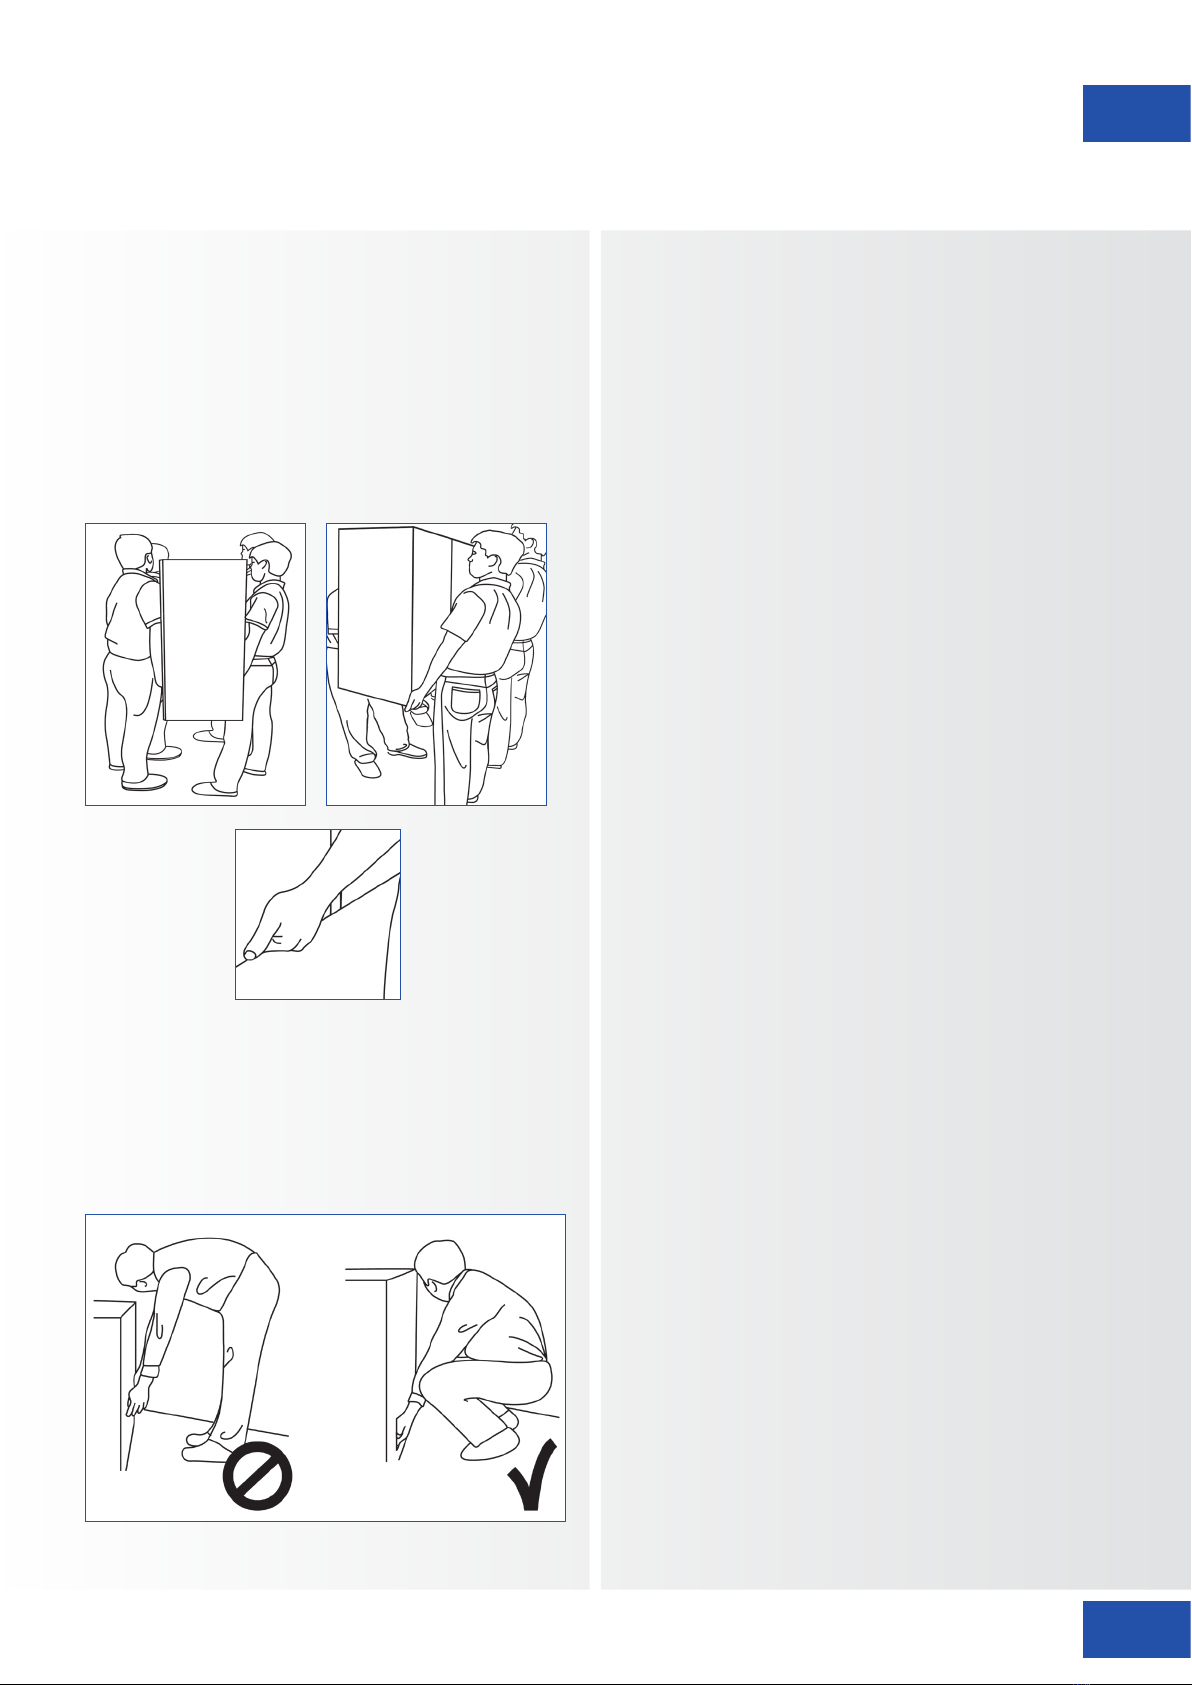
2.2. Moving and Carrying Notice.........................................................................................................5
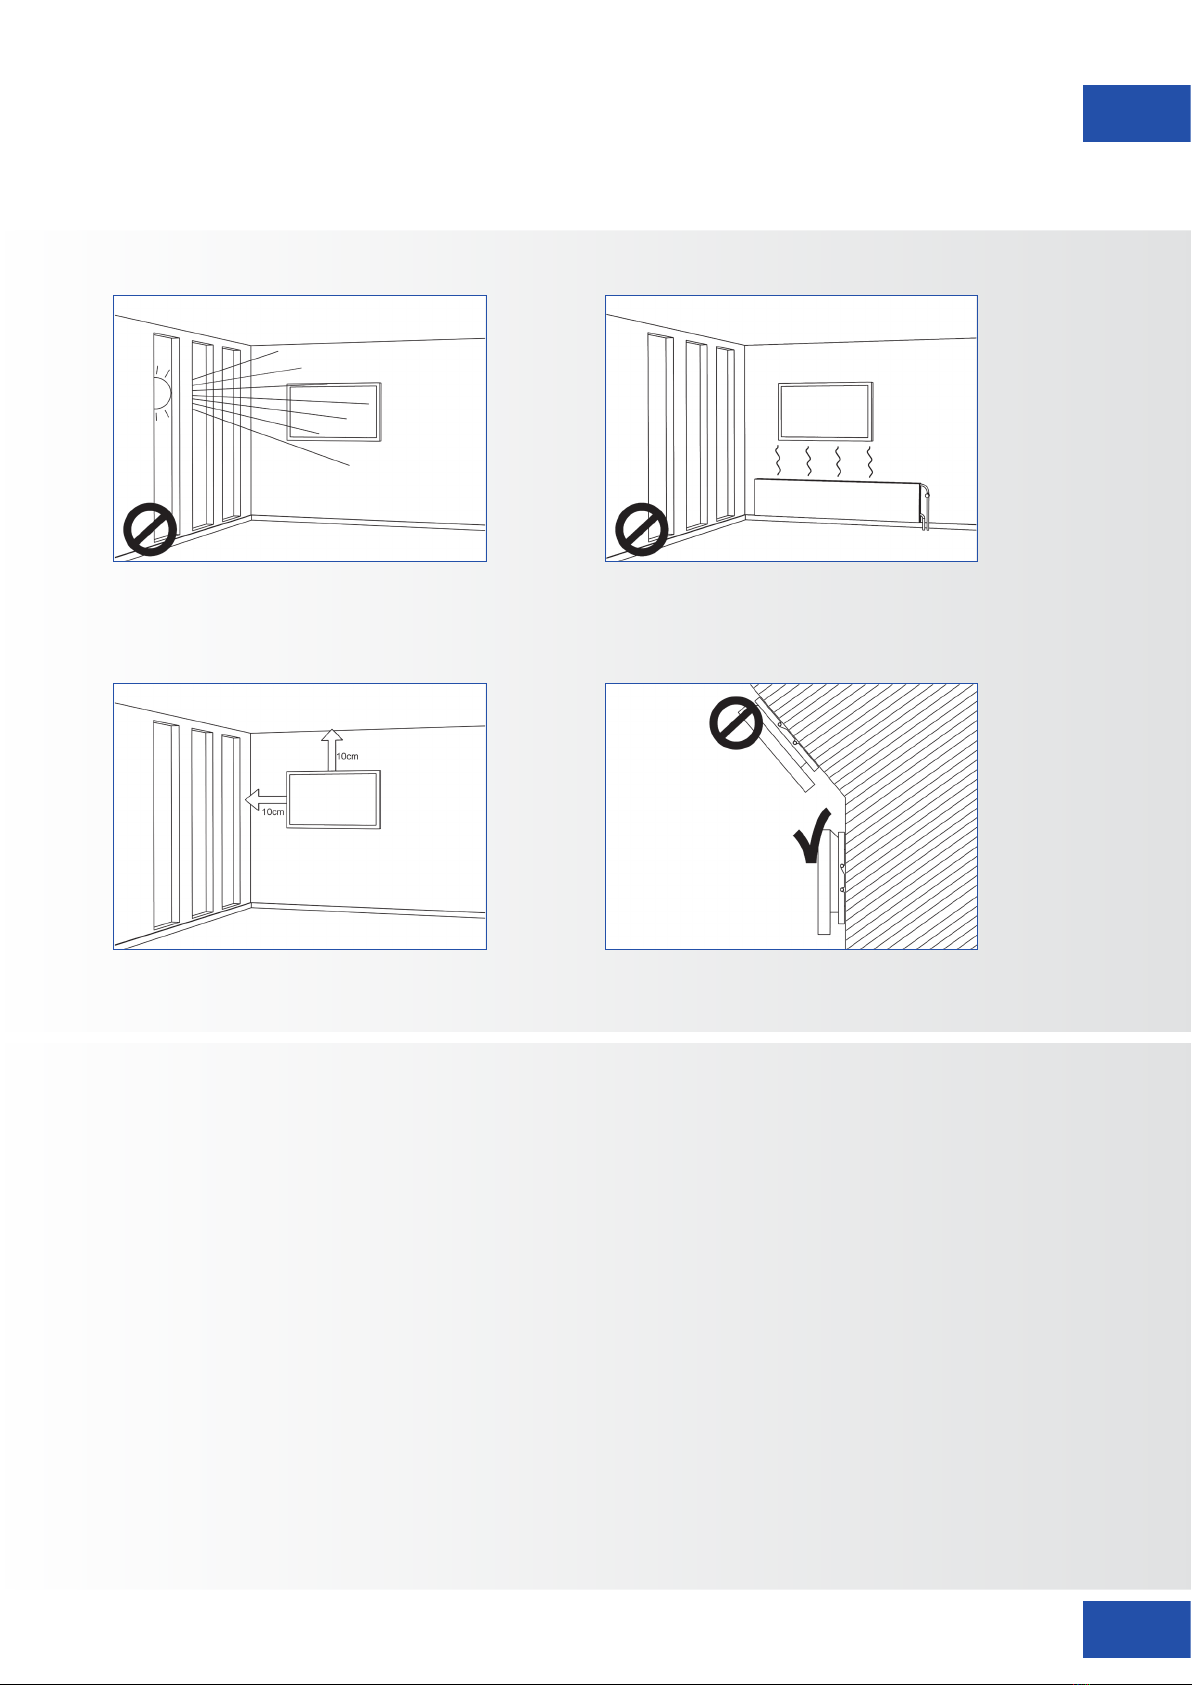
2.3. Installation ...................................................................................................................................5
2.4. Wall Mount Safety Notice.............................................................................................................6
2.5. Recommended Use ......................................................................................................................7
2.6. Cleaning ......................................................................................................................................8
3. Package Contents............................................................................................................. 8
3.1. Unpacking....................................................................................................................................8
3.2. Included Accessory.......................................................................................................................9
4. Installation........................................................................................................................ 9
4.1. Environment State........................................................................................................................9
4.2. General overview of the screen...................................................................................................10
4.3. Control Panel .............................................................................................................................11
4.4. In- and output connector table...................................................................................................11
4.5. Remote Control..........................................................................................................................12
5. Operations...................................................................................................................... 13
5.1. Turning the Display On and Off .................................................................................................. 13
5.2. Adjusting the Volume and Input Source.......................................................................................13
5.3. Add a label to an input source.................................................................................................... 13
6. OSD (On-Screen Display) Controls ................................................................................... 14
6.1. Navigation Bar............................................................................................................................14
6.2. Using the annotation tool........................................................................................................... 15
6.3. Settings Menu............................................................................................................................ 15
7. Touch Operation ............................................................................................................. 17
8. Specifications.................................................................................................................. 18
9. Supported Timings.......................................................................................................... 19
10. Serial Commands.......................................................................................................... 20
10.1. Serial Communications.............................................................................................................20
10.2. RS-232 Connection and Port Configuration..............................................................................20
10.3. Command and Response Format..............................................................................................20
10.4. Command and Response Examples ..........................................................................................21
10.5. Serial Command List................................................................................................................. 21
11. Troubleshooting............................................................................................................ 25
12. Compliance .................................................................................................................. 25
13. Appendix...................................................................................................................... 26
13.1. Dimensions ..............................................................................................................................26

3
WARNING:
TO PREVENT FIRE OR SHOCK HAZARDS, DO NOT EXPOSE THIS UNIT TO RAIN OR MOISTURE.
ALSO, DO NOT USE THIS UNIT‘S POLARIZED PLUG WITH AN EXTENSION CORD RECEPTABLE OR
OTHER OUTLETS UNLESS THE PRONGS CAN BE FULLY INSERTED.
REFRAIN FROM OPENING THE E-SCREENS HOUSING AS THERE ARE HIGH VOLTAGE COMPONENTS
INSIDE.
CAUTION:
TO REDUCE THE RISK OF ELECTRIC SHOCK, MAKE SURE POWER CORD IS UNPLUGGED
FROM WALL SOCKET. TO FULLY DISENGAGE THE POWER TO THE UNIT, PLEASE DISCONNECT
THE POWER CORD FROM THE AC OUTLET. DO NOT REMOVE COVER (OR BACK). NO USER
SERVICEABLE PARTS INSIDE. REFER SERVICING TO QUALIFIED SERVICE
IMPORTANT INFORMATION
1. IMPORTANT INFORMATION
1.1. USE 1.2. EXEMPTIONS
• Transport the product upright with proper
packaging. Avoid placing the product face up or
down. Handle with care!
• Do not send a static (non-moving) image to the
e-screen, it may cause image ‘burn-in’ or image
retention.
• “Burn in” and/or image retention is not covered
under warranty.
• Make sure to change the image on the e-screen
periodically. It is recommended to turn off the
e-screen for at least 6 hours after 16 hours of
usage in a 24 hour period to help avoid image
retention.
• This product isn’t warranted for any damage
caused by natural disaster (such as earthquake,
thunder, etc.), fire, acts by third parties,
accidents, owner’s intentional misuse and fault,
or use in other improper conditions.
• This product isn’t warranted for incidental
damages (such as profit loss or interruption in
business, modification or erasure of record data,
etc.) caused by use or inability to use of this
product.
• This product isn’t warranted for any damage
caused by inappropriate operation, or from not
following the user manual.
• This product isn’t warranted for any damage
caused by misuse or malfunction through
simultaneous use of this product and the
connected equipment or software.
• This product isn’t warranted for any damage
caused by neglect of the installation
instructions.
• This product isn’t warranted for any damage
caused by improper installation.
• This product isn’t warranted for any damage
caused by disassembly, modification or repair by
non-authorized service centers or people.
ETX-SERIES – USER MANUAL – ENGLISH

4
SAFETY INSTRUCTIONS
2. SAFETY INSTRUCTIONS 2.1. SAFETY PRECAUTIONS
Before using this e-screen, please read this user
manual thoroughly to help protect against property
damage and to ensure your personal safety and the
safety of others.
• Read and follow all instructions and safety-
warnings found in this manual.
• For installation or adjustment, please follow the
instructions in this manual and refer all servicing
to qualified service personnel.
If smoke or a peculiar smell comes from the
e-Screen, remove the power plug from the
outlet immediately.
Failure to do so may result in fire or electrical shock.
Contact your dealer for inspection.
If the e-Screen has been turned on but there
is no picture, remove the power plug from the
outlet immediately.
Failure to do so may result in fire or electrical shock.
Contact your dealer for inspection.
If water is spilled or objects are dropped inside
the e-Screen, remove the power plug from the
outlet immediately.
Failure to do so may result in fire or electrical shock.
Contact your dealer for inspection.
If the e-Screen is dropped or the e-screen‘s
housing is damaged, remove the power plug
from the outlet immediately.
Failure to do so may result in fire or electrical shock.
Contact your dealer for inspection.
If the power cord or plug is damaged or
becomes hot, turn off the main power switch
of the e-Screen, make sure the power plug has
cooled down and remove the power plug from
the outlet.
If the e-Screen is still used in this condition, it may
cause fire or electrical shock. Contact your dealer for
replacement.
ETX-SERIES – USER MANUAL – ENGLISH

5
SAFETY INSTRUCTIONS
Carrying the product:
This product is heavy; please follow proper lifting
techniques, as pictured below. Failure to do so may
cause injury.
2.2. MOVING AND CARRYING
NOTICE
Moving the product:
Moving the product requires at least four people.
Attempting to move the product with fewer people may
result in damage to the display or in serious injury of
the people handling the screen. When moving a display
in its shipping carton, lift the carton using the white
handles.
2.3. INSTALLATION
Don‘t install in a high-temperature
environment.
If the e-screen is used in high-temperatures or in
direct sunlight, it may cause the housing of the
product or other parts to become distorted or
damaged, resulting in overheating or electrical
shock.
Don‘t install in a high-humidity
environment.
This may cause overheating or electrical shock.
Don‘t install near any heat sources such as
radiators, heat registers, stoves, or other
apparatus that produce heat.
This may cause fire or electrical shock.
Don‘t overload outlets or cables beyond
electrical capacity.
Don‘t use extension cords as it may cause fire or
electrical shock.
Don‘t insert the power plug into an outlet
other than 100~240V AC.
This may cause fire or electrical shock.
• Don’t use a damaged power plug or worn
outlet.
• Don’t insert an improper power plug it may
cause fire or electric shock.
Don‘t place the e-screen on an unstable
shelf or surface.
The e-screen may fall, causing injury. Please
install on a horizontal, stable, level surface.
Don‘t place objects on the e-screen.
• If the e-screen is covered or the vents are
blocked, the display could overheat and
cause a fire.
• If objects or liquids get inside the e-screen,
this may cause fire or electrical shock.
• Do not put heavy objects on the e-screen as
they may fall, causing injury.
• Please keep a 10 cm minimum distance
between e-screen, wall and/or other objects
to ensure sufficient ventilation.
ETX-SERIES – USER MANUAL – ENGLISH

6
SAFETY INSTRUCTIONS
Don‘t move the e-screen when it is connected
to the power cord and AV cables.
• When moving the e-screen, make sure to
remove all cables first.
• When unpacking or carrying the e-screen,
at least 4 people are needed. Make sure the
e-screen is carried upright.
2.4. WALL MOUNT SAFETY NOTICE
1. Please make sure the bracket is mounted on a solid surface.
2. After mounting the screen, do not pull, push or shake the screen.
• Transport the e-screen upright. Avoid placing the
e-screen face up or down.
• Handle the e-screen gently. Do not drop.
ETX-SERIES – USER MANUAL – ENGLISH

7
SAFETY INSTRUCTIONS
3. Do not install screens in direct sunlight, humid conditions or high temperatures.
4.
2.5. RECOMMENDED USE
If you encounter a problem during installation,
please contact your supplier for assistance.
Don’t repair or open the e-screen by yourself.
Failure to do so may result in fire or electrical shock.
Contact your dealer for inspection.
Protect and correctly use the power cord/plug.
• Don‘t pinch the power cord/plug between hard
surfaces.
• Don‘t step on the power cord/plug.
• Before inserting the power plug into the wall
outlet, connect the power cord to the display.
• Using an e-screen with a damaged or non-
original powercord can damage the screen,
cause fires or electrical shocks.
Using extension cords (not recommended)
If an extension cord must be used, ensure the voltage
rating exceeds the max power consumption of the
display. If the voltage rating is less than the display, it
will cause the extension cord to overheat.
Do not operate the screen during thunder or
lightning.
Remove the powerplug from the power outlet.
Don’t use any kind of liquid on the e-screen.
• If liquid is spilled on the e-screen, remove the power
plug from the wall socket and ask qualified service
personnel to check the product.
• If liquid gets on e-screens glass plate, clean it with a
dry and soft cloth immediately.
• Don’t use any chemicals on the e-screen.
• If metal or liquids get into the e-screen, it may cause
a fire or an electrical shock.
ETX-SERIES – USER MANUAL – ENGLISH

8
SAFETY INSTRUCTIONS / PACKAGE CONTENTS
Precautions with the remote control batteries
• Please only use approved AAA type batteries.
• Please be sure to insert batteries by matching the +
and -.
• Don’t recharge, heat, disassemble, short or throw
batteries into a fire.
• Don’t mix a new battery with a used one.
• Don’t mix different types of batteries together (only
use the specified type).
2.6. CLEANING
Remove the power plug from the power
outlet before cleaning.
Failure to do so may result in electrical shock or
damage.
Cleaning the surface of the e-screen
• When the surface of the e-screen becomes dirty,
wipe the surface lightly with a soft clean cloth.
• If the surface requires additional cleaning, lightly
moisten the cloth.
• Do not to let any kind of liquid enter the e-screen as
it may cause electrical shock or damage.
• Do not clean the e-screen with alcohol, solvents or
ammonia, as this could damage the e-screen.
Don’t install or remove the power plug with
wet hands.
This may cause an electrical shock.
If the e-screen will not be used for a long
period of time, unplug the display.
Preventing to do so may cause premature wear of
electrical components or fire.
Handle the e-screen with care, prevent glass
breakage.
• If the glass of the e-screen is broken, liquids may
escape. Please don‘t touch the liquid.
• If these liquids come into contact with skin
or eyes, immediately wash it away with clean
water and consult a medical professional.
3. PACKAGE CONTENTS
• The e-Screen is packed using cushions to protect
the product during shipping.
• Before unpacking, prepare a stable, level, and
clean surface near a wall outlet.
• Set the box in an upright position and open
from the top of the box before removing the
top cushions.
3.1. UNPACKING • Step 1: Remove the white handle and cut the
banding
• Step 2: Remove the top cushion and take the
accessory bag out.
Item Description Quantity
1Display 1
2Carton 1
3EPE Cushion Bottom 2
4Poly Bag 1
5Carton Lock 8
6Accessory Bag 1
ETX-SERIES – USER MANUAL – ENGLISH

9
PACKAGE CONTENTS / INSTALLATION
3.2. INCLUDED ACCESSORY
4. INSTALLATION
When operating the screen, ambient room conditions
should not exceed the following:
4.1. ENVIRONMENT STATE
• Operating temperature: -5˚C to 45˚C
(41˚F to 104˚F)
• Humidity: less than 90% RH (Max)
Item
IR Remote Control (Batteries Included)
HDMI Cable
USB Type B to A
Power Cord
VGA Cable
USB drive with user manual
2 x High precision stylus
ETX-SERIES – USER MANUAL – ENGLISH

10
12 11 913
14 10
1
2
4
3
5
6
7
8
“I“ is power on
“O” is power off
Main power –
Switch
AC In socket
Optional
EasyFix Soundbar bracket
INSTALLATION
4.2. GENERAL OVERVIEW OF THE SCREEN
ETX-SERIES – USER MANUAL – ENGLISH
IR receiver
+ status LED
Ambient light
sensor
16 15
17
OPS slot
Android module
slot

11
INSTALLATION
4.3. CONTROL PANEL
4.4. IN- AND OUTPUT CONNECTOR TABLE
1
Power
Connects the e-screen to a power outlet using the supplied power-cable.
2
USB 2.0
USB-A 2.0 port for connecting devices using a usb cable. Also used as
service port.
3
HDMI out
Can be used to connect the e-screen to an external monitor.
4-5
HDMI 1, 2
HDCP-compliant digital video inputs for connecting HDMI sources.
6
HDMI (ARC)
HDCP-compliant digital video input for ARC enabled devices
7
DisplayPort
DisplayPort 1.2, 1.1a and DisplayPort-HDCP 1.1 compliant, SD/HD input for
connecting SDTV, EDTV or HDTV component video sources.
8
VGA (D-Sub 15 pin)
Connects components that have RGB or component output jacks,
such as a personal computer
9
PC Audio In
Connects the audio output from a personal computer
10
Ethernet
An RJ-45 connector for interfacing with a PC or home theater
automation/control system via a Cat 5 cable.
2135467 8 109 11 12 13 14 15 16 17 18
11
Touch USB 2
A standard, Type B USB port for the touch functionality of the display.
Linked to HDMI 2 and VGA in Auto setting.
12
Touch USB 1
A standard, Type B USB port for the touch functionality of the display.
Automatically links to HDMI 1 and DisplayPort
13
SPDIF
Connects external, powered digital speakers or audio receiver/amplifier.
14
Audio Out
Connects external, powered speakers or an external audio
receiver/amplifier.
15
RS-232C
A female, 9-pin D-sub connector for interfacing with a PC or control
system.
16-18
USB 2.0
USB-A 2.0 port for connecting devices using a USB cable
ETX-SERIES – USER MANUAL – ENGLISH
Control pad table
Volume Up
Volume Down
Settings
Home
Back
Source
On/Off

12
INSTALLATION
4.5. REMOTE CONTROL
4.51. Changing the Remote Control Battery
1. Remove the battery cover:
On the backside of the remotecontrol, slide
down the battery cover.
2. Insert batteries:
use two AAA batteries and insert them
according to the plus and minus indicators in
the remote control.
3. Close the battery cover
by sliding it back into place.
I. Discard batteries according the local waist reduction
and recovery regulations.
II. Do not keep used, empty batteries in the remote
control. They can leak and result in damages to the
remote control.
III. Only use batteries according to the instructions
and regulations found in this manual and to
the instructions and regulations set forth by the
batteries‘ manufacturer.
CAUTION
About the remote control
• Don’t drop, shake or bump.
• Avoid moist conditions, liquids, high-temperatures
and/or exposure to direct sunlight.
• Don‘t dismantle.
ETX-SERIES – USER MANUAL – ENGLISH
Label Description
Turn the display on and off
Back / return to previous menu
Navigational buttons
Select / confirm (when in menu) or Freeze screen
(when not navigating menu‘s)
Menu
Home
Source selection menu
Volume down
Mute
Volume Up

13
OPERATIONS
5. OPERATIONS
Turning the display on
1. Connect the e-screens AC-in socket to an AC power outlet using the supplied power cable.
2. Set the AC switch to „l“. The screen is now in standby mode. Waint untill the status led lights up red.
3. Press the power button on the control pad, alternatively you can use can use the power button on the
remote control
Turning the e-screen off
With the Power on, press the power button on the control pad or remote control. A warning message will
appear. To turn off power completely, turn the AC switch to „O“ or disconnect the AC power cord from the
power outlet.
Adjusting the Volume
1. Using the remote or control panel, press the VOLUME- or VOLUME+ to increase or decrease the volume.
Selecting the input source
1. Press the SOURCE button on the control pad or on the remote control. The screen will display available sources.
2. Select a source by touching the icon displayed on screen. Alternatively, use the remotes directional buttons < >
to cycle through available sources and use the OK button to select a source.
3. If the e-screen cannot find a source, a “No signal” message will appear.
5.1. TURNING THE DISPLAY ON AND OFF
5.2. ADJUSTING THE VOLUME AND INPUT SOURCE
5.3. ADD A LABEL TO AN INPUT SOURCE
Note:
If there is no signal input for a period of time, the e-screen will automatically go into power saving (sleep)
mode.
ETX-SERIES – USER MANUAL – ENGLISH
To indicate what type of equipment, device or connection is linked to an input, a label can be added. Please refer
to the Edit Input setting in the ‚Lock‘ menu in chapter 6.

14
OSD (ON-SCREEN DISPLAY) CONTROLS
ETX-SERIES – USER MANUAL – ENGLISH
6.1. NAVIGATION BAR
To display the navigation bar, slide-up from the bottom of the screen, using 2 fingers. On the bottom of the
screen, the navigation bar will appear, showing below icons:
SOURCE, touching this icon will show available sources
SETTINGS, touching this icon will guide you to the settings-menu of the screen (see 6.2)
BACKLIGHT MUTE, touching this icon will mute the screen
PREVIOUS SCREEN (Android). With an Android module connected and used as source, touching this icon
will navigate to the previous screen
HOME (Android). With an android module connected, touching this button will send you to the android
homepage, even when another source is currently displayed on screen.
OPEN APPLICATIONS (Android). With an Android module connected an being used as source, touching
this button will show all active applications.
ANNOTATION TOOL. Touching this icon will open the annotation tool. With this tool, annotations can be
made and erased. A screenshots can be made when a USB-drive is inserted in a USB-connector on the
e-screen itself. (see chapter 6.3)
VOLUME. Touching this icon will show a volume slider that can be used to adjust the volume.
BRIGHTNESS. Touching this icon will show a slider that can be used to adjust the screens brightness.
6. OSD (ON-SCREEN DISPLAY) CONTROLS
The ETX-series of e-screens features a Navigation Bar to easily navigate through the various options the ETX has
to offer, as well as the possibility to control all the settings by using the touch functionality of the screens.

15
OSD (ON-SCREEN DISPLAY) CONTROLS
ETX-SERIES – USER MANUAL – ENGLISH
To display the on-screen settings-menu, press SETTINGS / MENU on the control pad or remote control.
To select a sub-menu, touch the corresponding icon on the bottom of the screen, or use the directional arrows
on the remote to select the menu, and OK to select it.
Touch the item on screen to change it‘s setting. Alternatively, use the remotes directional buttons (up and down
arrow!) to highlight a menu-item and the < > directional buttons to change it‘s setting.
The OSD menus are arranged hierarchically, as shown in the following table. Depending on the selected input
source and signal characteristics, some menu options may not be available.
6.3. SETTINGS MENU
6.2. USING THE ANNOTATION TOOL
With the annotation tool, it is possible to draw and
write on the screen, regardless of the source used.
Annotations can be saved to a USB drive.
To open the annotation tool, first open the
navigation bar by swiping up from the bottom of
the screen using 2 fingers. From the navigation bar,
choose the ‘pencil’ icon to open the annotation
tool.
The annotation tool opens to the right side of the
screen:
—Drag & drop: reposition the toolbar
—Pen: choose color and thickness of the pen
—Eraser: choose eraser size
—Screenshot: makes a screenshot. *
—Erase all annotations
—Undo last step
—Exit: closes the annotation bar
*Note: When using the android module, screenshots are
saved in the Android picture library, accessible through
the File Manager. When no Android module is used,
screenshots can only be saved when a USB-drive is
inserted in one of the e-screens USB slots.

16
Main Menu Sub Menu Value
Picture
Picture Mode Writing/Dynamic/Standard/Soft/User/Game
Contrast 0~100
Brightness 0~100
Hue 0~100
Sharpness 0~100
Saturation 0~100
Backlight 0~100
Energy Save Mode Off/Auto/Save1/Sav2
Screen
Clock 0~100
Phase 0~100
H-Position 0~100
V-Position 0~100
Auto Adjust Click to do
Color Temperature Warm/Normal/Cool/User
Red 0~2048
Green 0~2048
Blue 0~2048
Zoom 16:9/4:3/P2P/Just Scan/Zoom
OverScan Off/On
Sound
Sound Mode Standard/Music/Movie/Sports/User
Bass 0~100
Treble 0~100
Balance 0~100
AVC Off/On
Surround Off/On
SPDIF Output On/Off
SPDIF Mode RAW/PCM
SPDIF Volume 0~100
Alone
Settings
Source Auto Switch Off/On
Color Range Auto/0~255/16~235
HDMI EDID Ver. EDID 1.4/EDID 2.0
HDMI_ARC Off/On
HDMI Out 1080P/2160P
Menu Timeout 5s/10s/15s/20s/30s/Always
Date/Time Display current date & time
Off Time
Hour 0~23
Minute 0~59
Period Off/Once/Everyday/MonToFri/SatToSun
On Time
Hour 0~23
Minute 0~59
Period Off/Once/Everyday/MonToFri/SatToSun
Sleep Time Off/10mins/20mins/30mins/60mins/90mins/120mins/180mins/240mins
Lock
Lock Touch Off/On
Lock IR Off/On
Lock Keypad Off/On
Set Password
Old Password 4 digits
New Password 4 digits
Confirm Password 4 digits
Change Logo
Power On Source Memory/HDMI1/HDMI2/HDMI3/OPS/DP/VGA
Power On Volume Memory/Settings
Volume Settings 0~100
VGA Audio To Default/HDMI1/HDMI2/HDMI3
Edit Input
Source HDMI1/HDMI2/HDMI3/DP/VGA
Source Enable On/Off
Label Edit the label of the source
Reset Reset the labels to defaults
System ID 000~255
TouchOut1 To Default/HDMI1/HDMI2/HDMI3/DP/VGA
TouchOut2 To Default/HDMI1/HDMI2/HDMI3/DP/VGA
Restore to Default
OSD (ON-SCREEN DISPLAY) CONTROLS
ETX-SERIES – USER MANUAL – ENGLISH

17
TOUCH OPERATION
7. TOUCH OPERATION
To be able to control various (enabled) sources using the e-screens touch-functionality, a dedicated connection
between the e-screen and the source is needed using a (supplied) USB cable:
1. Connect the source with the screen using a video cable (VGA / HDMi / Displayport)
2. Use the supplied USB cable to connect the source with the screen, using the USB-A connector for the source
and the USB-B connector with the screen.
3. Turn both the screen and the source on. It may take up to 5 seconds for touch to become active.
ETX-SERIES – USER MANUAL – ENGLISH

18 ETX-SERIES – USER MANUAL – ENGLISH
SPECIFICATIONS
8. SPECIFICATIONS
PRODUCT SPECIFICATIONS ETX-6510UHD ETX-7510UHD ETX-8610UHD
PANEL
Screen Size 65" (64.53") 75" (74.52") 86" (85.6")
Panel Technology TFT LCD
Display Resolution 3840 x 2160
Brightness (Typical) 350 cd / m2
Contrast (Typical) 1200 : 1
Response Time 9 ms 6 ms 8 ms
Frame Rate 60 Hz
Viewing Angle (H / V) 178° / 178°
Display Colors 1.07B (10-bit)
Backlight Type Direct LED
TOUCH
Detection Method High Precision Advanced Infrared
Avalilable Touch Points 32 Points (4 Points with Φ3 mm)
Response Time (Typical) <= 10 ms
Minimum Response Size >= Φ 3 mm
Touch Resolution 32768 x 32768 (with Driver) / 7680 x 4320 (without Driver)
CONNECTIVITY
Input Connectors USB-A 2.0 x 3, HDMI x 3, HDMI ARC, DisplayPort 1.2, VGA, 3.5mm audio jack, LAN RJ45, RS232
Output Connectors HDMI, USB-B x 2, SPDIF, 3.5mm audio jack
SOUND
Audio Power Output (RMS) 15 W x 2 / 8 Ω + 15 W / 6 Ω
MECHANICAL
Dimension of Product (W x H x D) 1527 x 903 x 110 mm 1748.5 x 1027.5 x 110 mm 1993 x 1163.5 x 110 mm
VESA® Hole Pitch (W x H) 600 x 400 mm, M8 Screw
Front Glass 4mm Tempered Anti-Glare
POWER
Power Supply AC 100-240 V 50 / 60 Hz
Power Consumption (in Operation) 170 W 290 W 370 W
Power Consumption (in Standby) <= 0.5 W
ECO Sensor Yes
ENVIRONMENTAL
Operation Temperature 0 - 40 °C
Storage Temperature -20 - 60 °C
Operation Humidity 20 - 80 %RH (No Condensation)
Storage Humidity 10 - 90 %RH
SUPPLIED ACCESSORIES
Accessories remote, HDMI cable 5m, USB cable 5m, VGA cable 3m, stylus
PRODUCT LOGISTICS
Dimension of Package Carton (W x H x D) 1637 x 1038 x 225 mm 1866 x 1170 x 231 mm 2118 x 1324 x 290 mm
Weight of Package Carton (Gross) 65 kg 79 kg 112 kg
Weight of Product 55 kg 67 kg 100 kg
Product SAP / EAN / KEA 867842000 / 8713797088640 /
7-803110-65
867843000 / 8713797088657 /
7-803110-75
867844000 / 8713797088664 /
7-803110-86

19
ETX-SERIES – USER MANUAL – ENGLISH
SUPPORTED TIMINGS
9. SUPPORTED TIMINGS
Timing fH (kHz) fV (Hz) Dot clock (MHz) Note
1720×[email protected] Hz 31.47 70.08 28.32 IBM
2*640×[email protected] Hz 31.47 60.00 25.18 Industry
2*640×480@60 Hz 31.50 60.00 25.20 Industry
3640×480@72 Hz 37.90 72.00 31.50 VESA
4640×480@75 Hz 37.50 75.00 31.50 VESA
5800×600@56 Hz 35.16 56.25 36.00 VESA
6*800×600@60 Hz 37.90 60.32 40.00 VESA
7800×600@72 Hz 46.90 72.19 49.50 VESA
8800×600@75 Hz 48.08 75.00 50.00 VESA
9*1024×768@60 Hz 48.40 60.00 65.00 VESA
10 1024×768@70 Hz 56.50 70.00 75.00 VESA
11 1024×768@75 Hz 60.00 75.00 78.75 VESA
13 1280×720@60 Hz 44.44 59.98 64.00 CVT
14 *1280×1024@60 Hz 63.98 60.02 108.00 VESA
15 1600×1200@60 Hz 75 60.00 162.00 VESA
16 1920×1080@60 Hz 74.6 60.00 193.25 CVT
Timing fH (kHz) fV (Hz) Dot clock (MHz) Note
1720×[email protected] Hz 31.47 70.08 28.32 IBM
2640×480@60 Hz 31.50 60.00 25.20 Industry
3800×600@60 Hz 37.90 60.32 40.00 VESA
41024×768@60 Hz 48.40 60.00 65.00 VESA
61280×960@60 Hz 60.00 60.00 108.00 VESA
7*1280×1024@60 Hz 63.98 60.02 108.00 VESA
81280×720p@50 Hz 37.50 60.00 74.25 ETA
91280×720p@60 Hz 45.00 60.00 74.25 ETA
10 1920×1080i@50 Hz 28.125 60.00 74.25 ETA
11 1920×1080i@60 Hz 33.75 60.00 74.25 ETA
12 1920×1080p@50 Hz 56.25 60.00 148.50 ETA
13 1920×1080p@60 Hz 67.50 60.00 148.50 ETA
14 3840×[email protected] Hz 67.4325 29.97 296.703 CVT
15 3840×2160@30 Hz 67.5 30 297 VESA
16 3840×2160@25 Hz 56.25 25 297 VESA
17 3840×[email protected] Hz 53.955 23.98 296.703 CVT
18 3840×2160@24 Hz 54 24 297
19 3840×2160@50 Hz 112.5 50 594
20 3840×2160@60 Hz 135 60 594
Timing on VGA input
Timing on HDMI & DP input

20 ETX-SERIES – USER MANUAL – ENGLISH
SERIAL COMMANDS
10.3. COMMAND AND RESPONSE FORMAT
RS232 Command format:
NAME: START COMMAND ID VALUE END
EX: A9 11 00 01 8A
- The Device ID Can be set in the ‚lock‘ menu of
the screen.
- If ID 00 is used in the command, it is seen as
a ‚broadcast‘ command (Screens will always
accepted the command)
RS232 return from screen
The screen will return an acknowledgment or a
non-acknowledgement in the following format:
NAME: START ACK ID COMMAND VALUE END
BYTE: 1byte 1byte 1byte 1byte 1byte 1 byte
EX: A9 xx 00 11 ERR 8A
where:
- Command accepted: xx= 41, the returned ‚value‘
will be same as the sent Value.
- Command not Accepted: xx= 4E, the ‚value‘ (Err) will
show as follows:
- 01 = Invalid command
- 02 = Invalid data value
- FF = Unknown error
10. SERIAL COMMANDS
10.1. SERIAL COMMUNICATIONS
10.2. RS-232 CONNECTION AND PORT CONFIGURATION
The display uses a simple text-based control protocol to take requests from control devices and to provide
responses to such devices. This section describes how to send control messages over a serial link between the
display and an automation/control system or a PC running a terminal emulation program such as Windows®
HyperTerminal or Tera Term.
Connect your control system or PC to the RS-232 input of the display.
Configure the RS-232 controller or PC serial port as follows: Baud rate: 115200, 8bit, non parity, 1 stop bit.
Other manuals for ETX Series
1
This manual suits for next models
3
Table of contents
Languages:
Other Legamaster Monitor manuals