Leggero Enso User manual

1
DEUTSCH
www.leggero.ch
Wichtig
Vor Gebrauch sorgfältig lesen
Aufbewahren für späteres Nachschlagen
Important
Lire avec attention avant utilisation
Conserver pour référence future
Importante
Leggere attentamente prima dell'uso
Conservare per riferimento futuro
Important
Read carefully before use
Keep for future reference
Enso
Enso
Weitere Sprachen und Informationen unter: www.leggero.ch
More languages and informations under: www.leggero.ch
Autres langues et informations sous: www.leggero.ch

2
Gefahr
Das Signalwort bezeichnet eine Gefährdung mit einem hohen Risikograd, die, wenn sie nicht
vermieden wird, den Tod oder eine schwere Verletzung zur Folge hat.
Warnung
Das Signalwort bezeichnet eine Gefährdung mit einem mittleren Risikograd, die, wenn sie nicht
vermieden wird, den Tod oder eine schwere Verletzung zur Folge haben kann.
Vorsicht
Das Signalwort bezeichnet eine Gefährdung mit einem niedrigen Risikograd, die, wenn sie nicht
vermieden wird, eine geringfügige oder mässige Verletzung zur Folge haben kann.
Danger
Ce terme signale une situation dangereuse à niveau de risque élevé qui, si elle n’est pas évitée,
entraîne la mort ou des blessures graves.
Avertissement
Ce terme signale une situation dangereuse à niveau de risque moyen qui, si elle n’est pas évitée,
peut entraîner la mort ou des blessures graves.
Attention
Ce terme signale une situation dangereuse à niveau de risque faible qui, si elle n’est pas évitée,
entraîne des blessures légères ou moyennement graves.
Pericolo
Questa espressione indica una situazione di minaccia con un elevato grado di rischio che,
se non viene evitata, ha come conseguenza gravi lesioni o la morte.
Attenzione
Questa espressione indica una situazione di minaccia con un medio grado di rischio che,
se non viene evitata, potrebbe avere come conseguenza gravi lesioni o la morte.
Cautela
Questa espressione indica una situazione di minaccia con un basso grado di rischio che,
se non viene evitata, ha come conseguenza lievi o modeste lesioni.
Danger
This signal word indicates a hazard with a high level of risk which, if not avoided,
will result in serious injury or death.
Warning
This signal word indicates a hazard with a medium level of risk which, if not avoided,
may result in serious injury or death.
Caution
This signal word indicates a hazard with a low level of risk which, if not avoided, will result
in minor or moderate injury.
Prüfkriterien unter: www.leggero.ch/sicherheit
Critères du contrôle sur : www.leggero.de/sicherheit
Criteri della revisione su:
Audit criteria under:
ISO 3864-2:2008

51
Enso
ENGLISH
Enso User’s manual

5252
Your new 2016 bicycle trailer 10.38011.0003/4
General information
The Leggero Enso bicycle trailer is a high-quality children’s trailer designed in accordance with all the
latest research into ergonomics and optimal safety.
Leggero Enso: Table of contents
4.3.1 Fastening safety harnesses 60
4.3.2 Safety flag 60
4.3.3 Handlebar 61
4.3.4 Securing loop 61
4.4 Folding up the trailer 61
4.5 Fitting the drawbar 62
4.6 Removing the drawbar 62
4.7 Pushchair wheels 63
4.7.1 Folding out the pushchair wheels 63
4.7.2 Folding in the pushchair wheels 63
4.8 Parking brake 64
4.8.1 Readjusting the brakes 64
4.9 Cover 64
4.9.1 Opening the cover 64
4.9.2 Closing the cover 64
4.10 Rain cover 65
4.11 Rear compartment 65
4.12 Coupling and uncoupling 65
5 Various settings 66
5.1 Safety harnesses 66
5.2 Suspension 66
5.3 Settings for the KS-290 shock-absorbing strut 66
5.4 Setting the disc brakes 66
BT*: Bicycle trailer
PC*: Pushchair
1 Your new bicycle trailer 52
1.1 Components 53
1.2 Modes 54
1.2.1 As a bicycle trailer 54
1.2.2 As a pushchair 54
2 Safety information 54
2.1 Proper use as a BT* 54
2.2 Warnings 55
2.3 Proper use as a PC* 55
2.4 Maintaining reliable operation 56
2.5 Additional equipment 56
2.6 What kind of vehicles are suitable
for towing the trailer? 56
2.7 Bicycle handling when towing a trailer 56
2.8 Safety checklist 56
2.9 Cover 57
2.10 Maintenance and care 57
2.11 Factors that increase wear 57
2.12 Spare parts 58
3 Parts included with the product and assembly 58
Assembly 58
4 Use 58
4.1 Fitting the wheels 58
4.1.1 Removing the wheels 58
4.2 Unfolding the trailer 59
4.3 Adjusting the safety harnesses 60

53
ENGLISH
1.1 Components
Suspension
Left-hand and right-hand wheels synchronised for stable roadholding when cornering. Adjustable suspen-
sion with rebound damping to prevent jerky rebounding of the suspension and effectively absorb shocks.
Brakes
Mechanical disc brakes with 140 mm disc diameter.
Left-hand and right-hand sides synchronised by means of a brake effort proportioning system integrated in
the brake handle. The brake lever has a parking function to prevent the carriage from rolling away when it
is set up as a pushchair.
“Syncro Lock” folding mechanism
Safety lock that can be released simply by pressing the operating elements on the left and right simultane-
ously when you wish to fold up the trailer.
“Quick Stroller” pushchair wheel unit
Pushchair wheels that can be used when you are travelling on foot, allowing you to convert the trailer into
a pushchair in no time at all.
Combi cover
Integrated rain cover that can be quickly pulled over the trailer in the event of rain, and quickly put back
again when it stops.
Handlebar
Height-adjustable handlebar that can be raised or lowered using quick releases and is rigidly connected to
the trailer to allow precise steering.
Pocket for small items
Transparent, water-resistant pocket for storing mobile phones and other small items. When your mobile
phone is stored in the small-item pocket, you can use it to play music into the inside of the trailer.
Rear compartment
Robust yet compact, foldable rear compartment with closure strap for securing the contents.
Seat unit
Generously proportioned seat with good lateral support and adjustable headrest that also adapts the five-
point harness system to the child’s shoulder height when it is adjusted.
1 Disc brake
2Suspension
3Shock absorber
4Pocket for small items
5Adjustable handlebar
6 Parking brake
7 Rain cover
8 Cover (to prevent water spray/
loose objects entering)
1 Drawbar
2Parking brake
3 Rear compartment
4 Shock absorber
5 Disc brake
6Suspension
7 Impact guard
1
2
4
57
9
12
3
10
11
8
9 Drawbar
10 Impact guard
11 Syncro Lock folding mechanism
12 Quick Stroller pushchair wheel
1
2
4
5
3
6
7
6

54
1.2 Modes
The Leggero Enso is a folding pushchair with suspension. It can be used in either of two configurations:
1.2.1 As a bicycle trailer
When the drawbar is fitted and the pushchair wheels are folded in, the Leggero Enso is a sporty sin-
gle-seater trailer.
1.2.2 As a pushchair
When the pushchair wheels are folded out, the Leggero Enso becomes a practical pushchair/buggy thanks
to the integrated handlebar and brake. The drawbar can easily be stowed on the pushchair.
BRÜGGLI INDUSTRIE
Leggero
Hofstrasse 3+5 · CH
-8590 Romanshorn
T
el +41 71 466 95 95
Fax +41 71 466 95 96 www.leggero.com
Type:
8
kg
kg kg
17 2
MAX. LOAD
75°-90°
!
NO
MODIFICATION
3-8
kg
WEIGHT
16.7
kg
STVZO
40 kg
MAX.
WARNING
NEVER LEAVE YOUR CHILD
UNATTENDED
ALWAYS USE
THE SAFETY BELT
AVVISO
NON LASCIARE MAI IL BAMBINO
SENZA SORVEGLIANZA
SEMPRE ALLACIARE LE
CINTURE DI SICUREZZA
MISE EN GARDE
NE LAISSEZ JAMAIS VOTRE
ENFANT SANS SURVEILLANCE
UTILISEZ TOUJOURS LES
CEINTURES DE SECURITE
WARNUNG
LASSEN SIE IHR KIND NIE
UNBEAUFSICHTIGT
VERWENDEN SIE IMMER DAS
RÜCKHALTESYSTEM
0–1
YEAR
0–6
MONTHS
WARNING
• The person towing the trailer must be at least 16 years old.
• Using the trailer with a motorised vehicle – with the exception of e-bikes travelling no
faster than 25km/h – is forbidden.
• The Leggero Enso may only be coupled to the bicycle using the coupling supplied, or
using a coupling provided by the manufacturer.
• To keep the risk of accidents and injury as low as possible, children must always be
strapped in.
• Adjust the height-adjustable safety harnesses depending on the child’s size.
• We strongly recommend that the child wears a safety helmet (comply with local
regulations).
• Do not transport children less than 1 year old in the trailer
• Never leave children unsupervised in the trailer
• To ensure that the roll-over protection is effective, the child carried in the trailer must
have sufficient headroom. When wearing the safety helmet, the child’s head must not
be any higher than the mark on the backrest.
• In particularly sunny weather, if the cover is closed, the inside of the trailer may
become very hot, which can be dangerous for children.
• Only use e-bikes travelling no faster than 25 km/h
• Proceed in accordance with the information in the manual provided by the bicycle
manufacturer.
• To tow the trailer, only use bicycles that do not have any technical faults and that
comply with the local regulations
2 Warnings
General regulations
Comply with the statutory regulations and recommendations pertaining to the use of bicycle trailers, and
the transportation of children and cargo in them, that apply in the country in which the bicycle trailer is
used.
Lighting:
Comply with national regulations. In addition, if you are intending to take the trailer on any trips or journeys
that cross national borders, find out what local regulations apply in each of the countries you will be
travelling in.
0–1
YEAR
2.1 Safety information
Important: Keep the manual in case you need to consult it at a later date
Store this user’s manual in a place that is accessible to all users at all times. Read this user’s manual care-
fully from beginning to end. It contains information that you will need in order to use your bicycle trailer
safely, and will help to prevent accidents and faults from occurring.
When using the carriage as a pushchair, some of the instructions and rules may not apply. See the relevant
section in this regard.
• You can find the most important information on the product label on the trailer floor in front of the seat.
• There is a link to a video tutorial at www.leggero.ch.

55
ENGLISH
WARNING
Weight loading/stepping on important parts of the trailer. The following elements may be
stepped on/loaded with a maximum weight of 17 kg when the trailer is stationary:
• Left-hand and right-hand deflector tubes
• Drawbar
• Impact guard entrance edge (tube)
• Relatively high loads may permanently damage these parts and compromise the safety
of the trailer.
• The parts mentioned must not be loaded when the trailer is moving.
WARNING
The trailer’s maximum weight of 40 kg must NOT be exceeded. In accordance with
StVZO [German Road Traffic Licensing Regulations], the maximum permissible total
weight of unbraked trailers is 40 kg.
WARNING
• Ensure that all locking mechanisms are locked before use
• To avoid injury, ensure that your child is not in the vicinity when you are folding and
unfolding the pushchair.
• Do not allow your child to play with the pushchair.
• Always use the restraint system.
• This seat unit is not suitable for children under 6 months.
• Ensure that the parking brake is on when placing your child in the seat and when
taking them out of the seat.
• This product is designed for children up to 3 years.
• This product is not suitable for jogging or skating.
2.3 Proper use: As a pushchair
The manufacturer authorises the transportation of:
• One child over the age of 6 months
• One child weighing up to 17 kg
• One child under the age of 3 years
• Loads of up to 8 kg in the rear compartment
• Soft objects in the footwell up to 2 kg
Additional uses:
• A safety baby seat is available as a separate accessory for children under 6 months
• A separate jogger set is available
0–6
MONTHS
8
kg
kg kg
17 2
MAX. LOAD
3-8
kg
2.2 Proper use: As a bicycle trailer
The trailer is not designed for off-road use and must not be used on off-road mountain bike trails.
The manufacturer shall accept no liability in the event of accidents or faults of any kind resulting from
improper use.
The trailer must not be improperly used or modified after purchase and no attachments of any kind must
be fitted to the trailer unless expressly permitted by the manufacturer. Parts that were screwed on by the
manufacturer may only be removed or replaced by the factory or an authorised specialist.
The manufacturer authorises the transportation of:
• One child whose height when wearing the safety helmet does not exceed the mark on the backrest
• One child weighing up to 17 kg
• Children up to 7 years of age
• Loads of up to 8 kg in the rear compartment
• Soft objects in the footwell up to 2 kg.
Drawbar:
• No additional loads must be attached to the drawbar.
• The drawbar must exert a downward load of no more than 8 kg on the bicycle’s coupling.
• At the maximum load described in the rule above, a weight of 4 to 5 kg is exerted
Jogger set:
• This accessory has been developed by the manufacturer and is suitable for jogging and skating.
The jogger set is not included in the scope of certification.

56
WARNING
The cover included with the product must be fitted and closed when the carriage is being
used as a bicycle trailer.
2.7 Cover
• The fabric will change colour over time. It may turn a few shades darker.
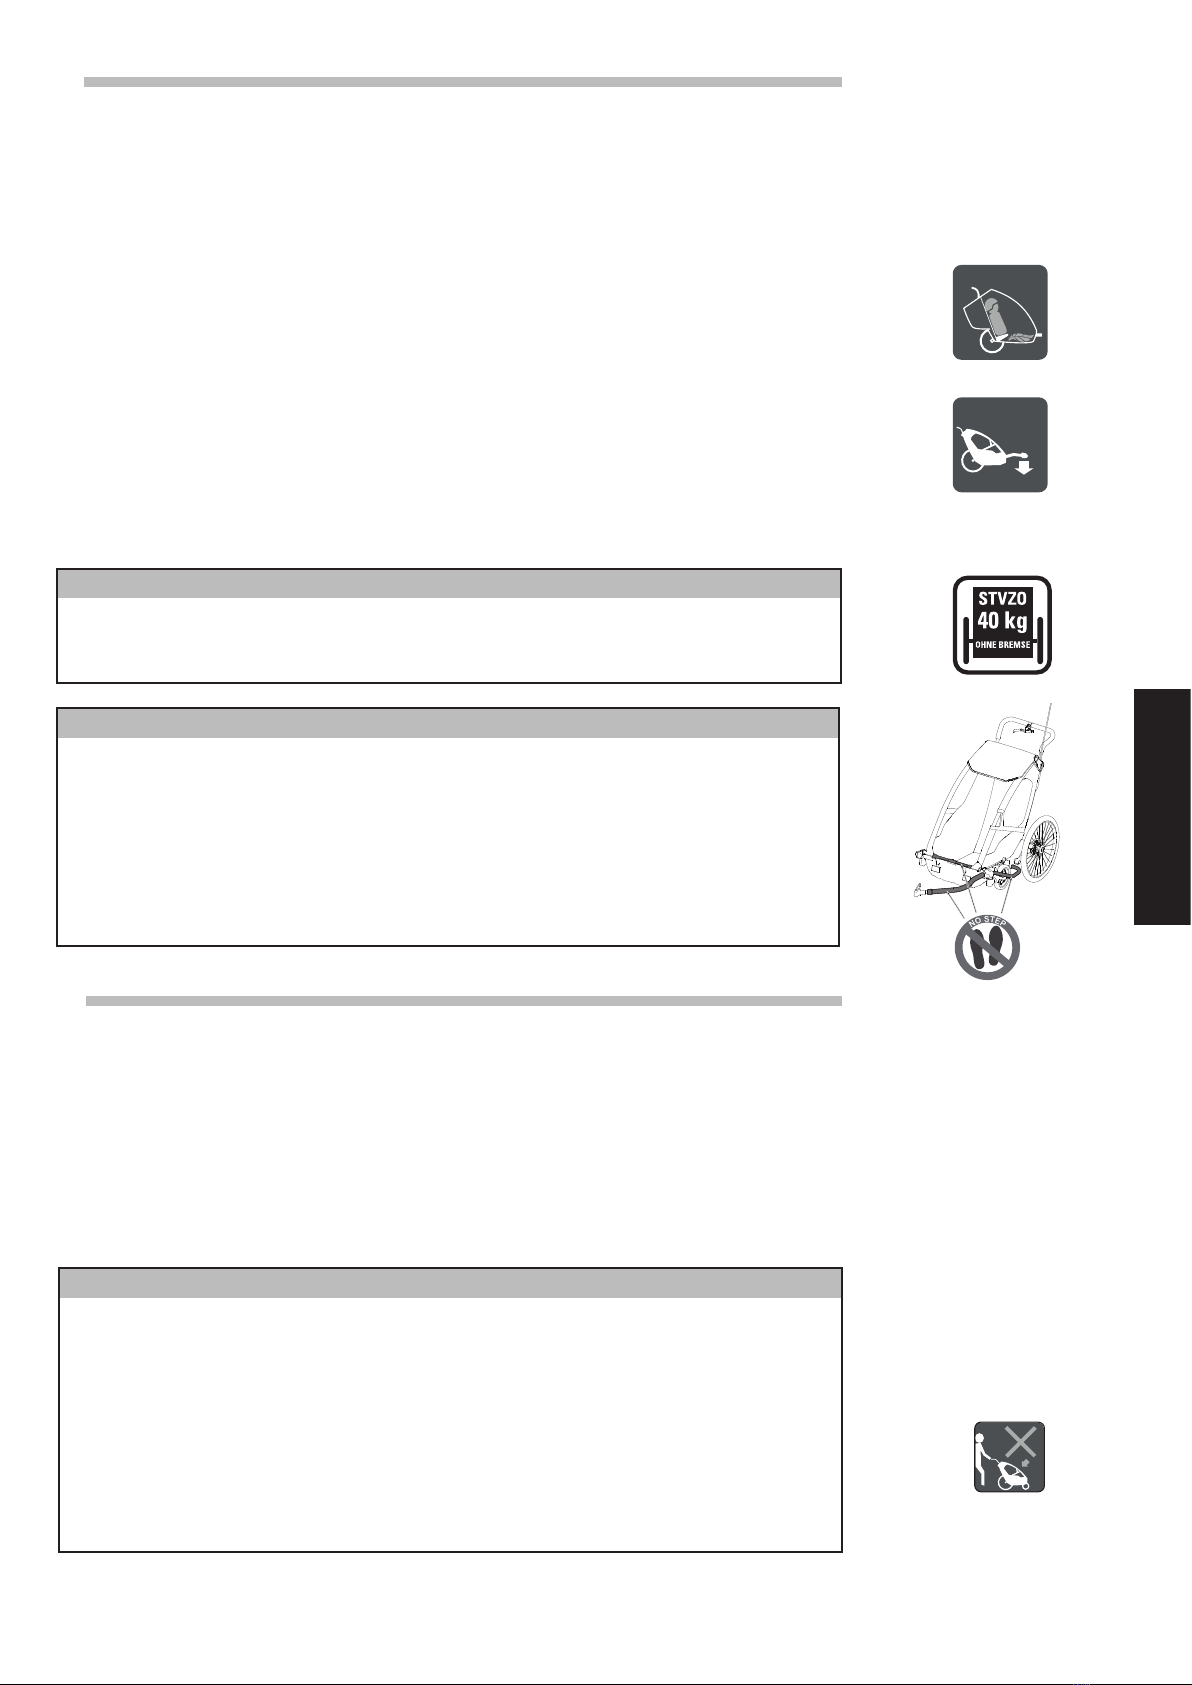
2.4 What kind of vehicles are suitable for towing the trailer?
Using the trailer with a motorised vehicle – with the exception of e-bikes travelling no faster than 25 km/h –
is forbidden.
To prevent water from splashing up and loose objects from getting into the trailer, fit splash guards/
mudguards to the bicycle.
We recommend fitting rear-view mirrors to the bicycle.
The towing bicycle must have both a front and a rear brake.
The coupling must be fitted no higher than 400 mm above the ground.
2.5 Bicycle handling when towing a trailer
The trailer is not designed for off-road use and must not be used on off-road mountain bike trails.
Bicycles towing a trailer behave differently when braking and cornering. Before using the trailer in traffic,
take it to a suitable off-road location and familiarise yourself with the differences in the way the bicycle
handles when towing the trailer.
Take note, in particular, of the fact that the braking distance is increased by having the
trailer attached.
To prevent the trailer from swinging out or overturning, it is important to make adjustments to the way you
cycle. It is important to adjust your speed, particularly on unmade roads or paths.
Avoid taking the trailer on very steep roads or paths.
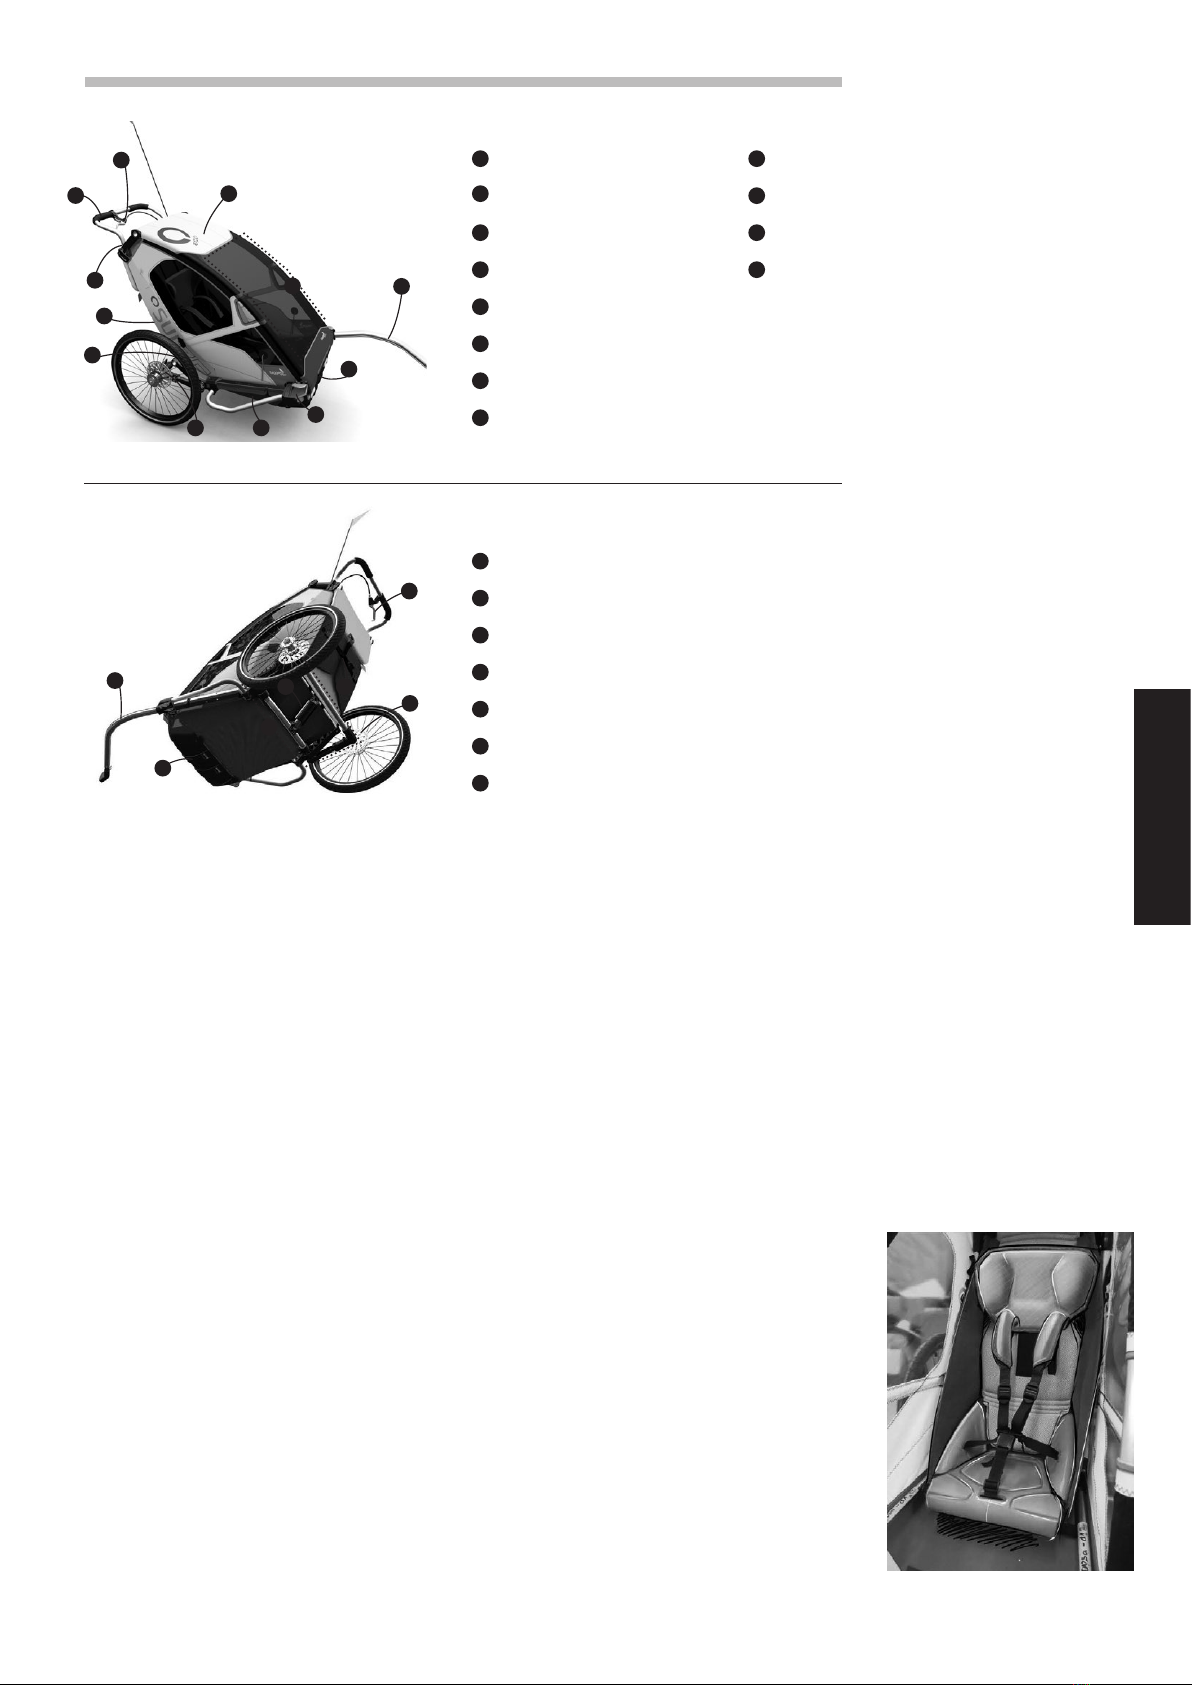
2.6 Safety checklist
Before using your trailer for the first time, please re-read the general safety information (see 2.2).
Carefully read through the information on the components that are fitted to the trailer (brakes, shock
absorber, etc.).
Whenever you wish to use the carriage as a bicycle trailer, always check the following:
• Are the stop bolts for the wheels seated securely and correctly?
• Is the folding mechanism securely engaged ON BOTH SIDES?
• Is the trailer coupling correctly fitted?
• Has the drawbar been correctly secured using the securing strap and pin?
• Recommended tyre pressure: 3 bar
• Have you complied with the maximum permissible loading of 17 kg on the seat, 8 kg in the rear
compartment and 2 kg in the footwell?
• Is the suspension correctly adjusted for the load it is carrying?
• Is the bicycle free from technical faults (particularly brakes, steering and tyres)?
• Is the child correctly and securely strapped in?
• Are you and the child wearing safety helmets?
• Is the safety flag fitted?
• Are your lights and reflectors correctly fitted?
• Are the pushchair wheels properly folded in?
Every month:
• Check the drawbar, coupling and flexible connection shank for damage, scoring or loose fastenings
• Check the frame rods and parts for damage, cracks or loose fastenings
• Check the tyres for wear and cracks
• Check the rims for distortion and cracks
• Check the brake pads for wear, and replace them if necessary
(see 5.4)
• Check the tension of the brake cables and check them for corrosion; if necessary, readjust them or
replace them
• Check the cover, fabric-covered sections, child seat and harness system for cracks, signs of wear and
missing or damaged parts
• Check that the suspension is working correctly (use the handlebar to compress the shock absorber in
order to check that its stroke is unobstructed); if it is not working correctly, contact the manufacturer
• Check the wheel bearings and ball lock pins for wear and corrosion
Factors which have the effect of increasing wear
Factors affecting wear
Load due to: Passengers x xx x x xx xx
Luggage x xxxxx x x xx xx
Riding style Abruptness of acceleration and braking x x x x xx x x
Fast cornering x x xxx xxx xxx x x
Weather effects UV light xx1x xx2xx1x xx2
Damp xx3xx xx x x x
Dirt xx xx xx xx xxxx
Temperature x6x x6x6x xx
Salty air x x xx x xxx xx xxxxx
Contact with saltwater xx xx xx xx xx xx xxx
Roads gritted with salt xx xx xx xx xx xx xxx
Storage x3x3x3x3
Components
Cover
Seat
Fabric linings
Windows
Wheels, hubs and spokes
Tyres5
Trailer towbar and hitch
Plastic parts
Aluminium parts
Factors affecting wear
Load due to: Passengers x x
Luggage x x
Riding style Abruptness of acceleration and braking x x
Fast cornering x x
Weather effects UV light xx1x x
Damp xx3xx
Dirt xx xx
Temperature x6x x
Salty air x x
Contact with saltwater xx xx
Roads gritted with salt xx xx
Storage x3x3
Components
Cover
Seat
x: Moderate effect on wear
xx: Marked effect on wear
xxx: Substantial effect on wear
1Avoid exposure to strong sunlight wherever possible
2Avoid long periods of exposure to sunlight wherever possible
3To prevent mould formation, only pack away dry
4Hanging up the items will prevent any wear
5Regularly check the air pressure
6Cold: at temperatures under 0° Celsius the material becomes
brittle and may even break under certain circumstances
x xx x x xx xx
x xxxxx x x xx xx
Abruptness of acceleration and braking x x x x xx x x
x x xxx xxx xxx x x
xx1x xx2xx1x xx2
xx3xx xx x x x
xx xx xx xx xxxx
x6x x6x6x xx
x x xx x xxx xx xxxxx
xx xx xx xx xx xx xxx
x3x3x3x3
Cover
Seat
Fabric linings
Windows
Wheels, hubs and spokes
Tyres5
Trailer towbar and hitch
Plastic parts
Aluminium parts
1Avoid exposure to strong sunlight wherever possible
2Avoid long periods of exposure to sunlight wherever possible
3To prevent mould formation, only pack away dry
4Hanging up the items will prevent any wear
5Regularly check the air pressure
6Cold: at temperatures under 0° Celsius the material becomes
brittle and may even break under certain circumstances

57
ENGLISH
2.9 Additional equipment
Only use genuine Leggero accessories
A wide range of accessories is available for the Leggero Enso. Find out what accessories are available
from your dealer or contact the manufacturer directly, or alternatively visit the website at www.leggero.ch.
You can also request a list of all the accessories that are currently available.
Separate couplings are available as accessories for use with additional bicycles.
NO
MODIFICATION
2.8 Maintenance and care
Maintenance: All joints and moving parts are maintenance-free.
Please note: If you lubricate any of the parts, only use silicone-based oils.
Care: Combi cover: Washable at temperatures of up to 40 °C. To clean the combi cover, just use soapy
water and a soft cloth or sponge. The seat cushions can be removed to facilitate cleaning.
The brake cables can be readjusted and the brake pads can be replaced if they are badly worn; to do this,
refer to the separate manual provided by the manufacturer (see 4.8.1/5.4)
You can also find important information on maintenance and care on the product page at www.leggero.ch.
Please note
To prevent damage to the materials, never use
abrasive cleaning products or cleaning products containing solvents such as acetone, toluene, etc.
WARNING
• NEVER modify structural parts on your trailer
• Risk of breakage: NEVER bend back deformed or bent aluminium parts.
• Plastic parts may become brittle as a result of exposure to the weather and to UV
radiation. The better protected the trailer is from these factors, the longer its service
life will be.
• Replace cracked or damaged parts (or have someone else replace them) immediately
• We recommend replacing the coupling’s polyurethane joint every five years.
• Have any badly corroded steel parts replaced immediately.
2.10 Factors that increase wear
Maintaining reliable operation
To ensure that the product operates reliably even after years of use, it is important to comply with the
following instructions:
• Have the trailer checked regularly (at least every three years) by a specialist workshop.
• Aluminium parts are susceptible to deformation and cracking. Have any bent aluminium parts replaced
immediately.
Factors which have the effect of increasing wear
Factors affecting wear
Load due to: Passengers x xx x x xx xx
Luggage x xxxxx x x xx xx
Riding style Abruptness of acceleration and braking x x x x xx x x
Fast cornering x x xxx xxx xxx x x
Weather effects UV light xx1x xx2xx1x xx2
Damp xx3xx xx x x x
Dirt xx xx xx xx xxxx
Temperature x6x x6x6x xx
Salty air x x xx x xxx xx xxxxx
Contact with saltwater xx xx xx xx xx xx xxx
Roads gritted with salt xx xx xx xx xx xx xxx
Storage x3x3x3x3
Components
Cover
Seat
Fabric linings
Windows
Wheels, hubs and spokes
Tyres5
Trailer towbar and hitch
Plastic parts
Aluminium parts
Factors affecting wear
Load due to: Passengers x x
Luggage x x
Riding style Abruptness of acceleration and braking x x
Fast cornering x x
Weather effects UV light xx1x x
Damp xx3xx
Dirt xx xx
Temperature x6x x
Salty air x x
Contact with saltwater xx xx
Roads gritted with salt xx xx
Storage x3x3
Components
Cover
Seat
x: Moderate effect on wear
xx: Marked effect on wear
xxx: Substantial effect on wear
1Avoid exposure to strong sunlight wherever possible
2Avoid long periods of exposure to sunlight wherever possible
3To prevent mould formation, only pack away dry
4Hanging up the items will prevent any wear
5Regularly check the air pressure
6Cold: at temperatures under 0° Celsius the material becomes
brittle and may even break under certain circumstances
x xx x x xx xx
x xxxxx x x xx xx
Abruptness of acceleration and braking x x x x xx x x
x x xxx xxx xxx x x
xx1x xx2xx1x xx2
xx3xx xx x x x
xx xx xx xx xxxx
x6x x6x6x xx
x x xx x xxx xx xxxxx
xx xx xx xx xx xx xxx
x3x3x3x3
Cover
Seat
Fabric linings
Windows
Wheels, hubs and spokes
Tyres5
Trailer towbar and hitch
Plastic parts
Aluminium parts
1A
void exposure to strong sunlight wherever possible
2A
void long periods of exposure to sunlight wherever possible
3To
prevent mould formation, only pack away dry
4
Hanging up the items will prevent any wear
5
Regularly check the air pressure
6
Cold: at temperatures under 0° Celsius the material becomes
brittle and may even break under certain circumstances

58
3 Parts included with the product and assembly
Parts included with the product
• Trailer (folded)
• Drawbar
• Wheels (left-hand wheel/right-hand wheel
marked)
• 2 ball lock pins with an orange cap
• Handlebar
• Flag
• 1 red rear light
• Nabecco Uni 12
• User’s manual
Assembly
• Take all the parts out of the packaging and check that they are all there.
• Slot the wheels into the wheel mounts with the help of the ball lock pin (see 4.1).
• Unfold the trailer (see 4.2 “Unfolding the trailer”).
• Fit the handlebar and secure it in place (see 4.3.3. “Handlebar”).
• Fit the red rear light on the left-hand side (direction of travel) of the handlebar (see 4.3.3).
• Fit the safety flag (see 4.3.2 “Safety flag”).
• Fit the drawbar (see 4.5 “Fitting the drawbar”).
• Adjust the height of the headrest (see 4.3 “Adjusting the safety harnesses”).
• Adjust the suspension spring pre-load depending on the load that the trailer is to carry (see 5.2 “Suspension”).
• Before using the trailer for the first time, run through the safety checklist (see 2.6 "Safety checklist”).
4 Use
2.11 Spare parts
• Combi cover
• Seat cushion/head cushion
• Syncro Lock operating buttons
• Spare clips for securing pushchair wheels (fork clip set)
• Pushchair wheel unit
• Flag
• Wheel I/wheel II (left/right)
• Shock absorber
• Handlebar
4.1 Fitting the wheels
Fit the wheels as follows: (Left-hand and right-hand wheels)
• Take the ball lock pins and wheels out of the packaging.
• Push each wheel onto the centre of the brake.
• Push in the ball lock pins until they lock into place.
• Check that the wheels are securely in place.
4.1.1 Removing the wheels
You can remove the wheels in the opposite order:
• The wheels can be removed from the trailer to save even more space when storing it.
• Press the button in the centre of the hub and pull out the axle at the same time.
• Pull the wheel out towards the back (contrary to the direction of travel).
PLEASE NOTE
• Spare parts are available so you can keep your trailer in perfect working order.
• Only use genuine parts from the manufacturer.

59
ENGLISH
4.2 Unfolding the trailer
The Syncro Lock system is equipped with a safety mechanism and can only be opened or closed if both
elements are being operated correctly at the same time.
1Take hold of the Syncro Lock elements.
2Pull the Syncro Lock elements forward; the carriage will tilt forwards and the front tray will make
contact with the ground.
3Pull the Syncro Lock elements further forward and the carriage will start to unfold. As it does this, the
cover fabric will become tensioned so you will need to use a little force.
Continue swinging the elements open until they come to rest on the impact guard.
4Take hold of both the black Syncro Lock elements and at the same time push them down until they
engage in the front tray.
Check that BOTH Syncro Lock elements are properly attached to the front tray:
There should not be a gap between the Syncro Lock elements and the front tray.
5The operating buttons must be horizontal.
The Syncro Lock element must
lock in place securely
The indicator window must be
blank
The operating button must be
horizontal
The operating button must not
be pointing down
The orange slider must NOT be
visible in the indicator window
There must not be a gap
between the Syncro Lock and
the impact guard
Syncro
Lock Syncro Lock
1 2 3 4 5
Push down in both places at the same time and make sure that the elements lock into place properly – if
they do engage properly, you should be able to hear them click into place

60
4.3 Adjusting the safety harnesses
To keep the risk of accidents and injury as low as possible, children must always be strapped in.
HARNESS ANGLE:
To ensure that your child is as safe as possible, the harnesses should run horizontally across their shoulders
(or at an angle of no more than 15°), as shown in the illustration.
To achieve this, you will need to adjust the height of the shoulder harnesses: The harnesses are connected to
the headrest.
• Detach the headrest by pulling it away from the velcro on the back section. The headrest can now be moved
up or down, along with the shoulder harness.
• Secure the rests again at the correct height. The harness angle is crucial.
The headrest must not be secured any higher than the maximum height. Look for the mark on the seat to guide you.
Check that the tightness of the safety harnesses is correct. The harness should be relatively tight but should still
sit comfortably on the body. To achieve this, you can adjust the width of the harness at both ends.
To ensure that the roll-over protection is effective, children carried in the trailer must have sufficient headroom
(recommendation: At least 5 cm). When wearing the safety helmet, the child’s head must not be any higher than
the “max.” mark on the seat.
We strongly recommend that the child wears a safety helmet (comply with local regulations).
4.3.1 Fastening safety harnesses
• Make sure that the harnesses are positioned correctly. The harnesses must run over the shoulders and
legs. The harness buckle must be positioned between the legs.
• Connect the left- and right-hand latch plates to one another.
• Insert the connected latch plates into the harness buckle. This is the only way to ensure that the har-
ness buckle is securely fastened. You will be able to clearly hear the latch plates lock into place.
• Check that the harnesses are sitting tightly and that the harness buckle is securely fastened.
4.3.2 Safety flag
• Insert the end of the safety flag into the opening provided. The flag should protrude from the left-hand
side in the direction of travel. Ensure that the flag is securely in place by pushing it down once more.
1
1 2 3 4 5
2
3
4
5

61
ENGLISH
4.4 Folding up the trailer
The Syncro Lock system can only be opened when the two orange buttons are pressed at the same time.
This safety mechanism means that the folding mechanism can only be activated when using both hands.
• Ensure that the pushchair wheels are folded in
(see. 4.7.2 “Folding in the pushchair wheels”).
• Press the orange operating buttons on both Syncro Lock elements AT THE SAME TIME > the folding
mechanism is now released.
• By moving the black Syncro Lock elements upwards, the carriage will start to fold in. Hold the front tray
using your knee.
• Completely fold up the trailer and secure the left-hand (when seen in the direction of travel) Syncro Lock
element using the loop; this prevents the trailer from folding out inadvertently when being transported.
• In this position, the trailer can be rolled as a folded package.
• To reduce the storage volume further, the wheels can be removed (see 4.1.1).
+
Locking button
Quick release
CAUTION
Risk of tipping: Do not add any extra weight to the handlebar.
!
Fitting the rear light
Directly below the bend, pointing backwards
Securing the handlebar at a particular height
setting:
Close the quick releases on both sides again
4.3.3 Handlebar
Fitting:
• Open up the quick releases on both sides of the trailer.
• Insert the handlebar into the slots provided.
• Push the locking buttons on both sides and insert the handlebar in the direction indicated.
• The handlebar will click into the highest possible position, which prevents it from being pulled out.
• Fit the rear light directly behind the bend in the handlebar (rear light certified in accordance with StVZO
[German Road Traffic Licensing Regulations]).
Adjusting the height:
The handlebar can be lowered further and adjusted:
• To do this, open up the two quick releases.
• Push in the two locking buttons (located at the quick-release levers).
• Push the handlebar down and set it at the required height.
• Close the two quick releases.
Readjusting:
• If the quick releases ever lose tension, you can use the nuts on the inside to readjust the tension.
• Carefully retighten them only to the point at which the desired clamping tightness is achieved again
when the quick releases are closed.
4.3.4 Securing loop
• On the right-hand side of the trailer, there is an elastic securing loop near the handlebar.
• When the trailer is folded up, this elastic securing loop is stretched over the Synchro Lock elements to
prevent the trailer from unfolding itself.
• The same elastic loop can be used to secure the drawbar to the side of the carriage when it is being
used as a pushchair. To do this, see 4.6 “Removing the drawbar”.

62
Stop bolt
Drawbar
4.5 Fitting the drawbar
• If the lock pin is already inserted, this must first be removed
• The drawbar has a stop bolt that must be pressed lightly to insert it.
• Fully insert the drawbar until it engages. Ensure that you hear the stop bolt click into place.
Check that it is fitted correctly by pulling backwards on the drawbar.
• If the drawbar is correctly engaged, the lock pin must now be fitted. If the lock pin cannot be positioned
correctly, the drawbar is not properly engaged.
• The safety label must be completely inserted into the slot.
Rastbolzen
Deichsel
WARNING
Before you pull away, the drawbar must always be positioned correctly and secured fully.
If the red warning marker is visible, the drawbar is not fitted correctly.
4.6 Removing the drawbar
1Remove the lock pin by pulling it upwards.
2Push in the stop bolt using the button on the orange operating element.
3Keep the stop bolt pressed in, and simultaneously remove the drawbar by pulling it forwards.
Stowing the drawbar
• Attach the drawbar with coupling to the strut, just as on the bicycle coupling.
• Close the coupling.
• Secure the upper end of the coupling using the strap.
1
2
3

63
ENGLISH
CAUTION
Risk of trapping fingers. Do not fold out the wheels by hand, and keep hands and fingers away from the
closing area.
CAUTION
When the carriage is being used as a trailer, the front wheels must always be folded in when the trailer is
in motion.
Both wheels must always be either folded in or folded out.
4.7 Pushchair wheels
The front wheels (pushchair wheels) can be folded in or out for use in the various modes. (If the carriage is
only to be used as a bicycle trailer, the wheels can also be completely removed.)
4.7.1 Folding out the pushchair wheels
• Tip the trailer back sufficiently.
• Using your foot, push the wheel out of the catch.
• The wheel engages in the front position with an audible “click”.
• Press the release button and tilt the wheels backwards.
• Click the wheels into place.
4.7.2 Folding in the pushchair wheels
• Ensure that the fork points forward.
Please note:
Pull the trailer backwards briefly so that the wheels align themselves automatically.

64
4.8.1 Readjusting the brakes
The braking system is set to a standard setting at the factory. Before first use, this brake setting must be
checked to ensure that it is sufficiently effective when the parking brake is engaged.
If, due to strain or wear and tear, the effectiveness of the parking brake worsens over time, the brake
tension can be increased again.
• To do this, release the tension on the brake lever.
• Undo the lock nut on the cable(s) concerned.
• Slightly unscrew the adjusting screw from the handle; the more this is unscrewed, the higher the
tension on the brake cable.
• Apply the parking brake and test its effectiveness.
• If required, continue to turn the adjusting screw.
• Screw the lock nut back to secure the adjusting screw in the desired position.
4.9 Cover
4.9.1 Opening the cover
• Hold the handle on the bottom of the cover and pull downwards so that it releases from the hooks
Unfold the cover upwards.
4.8 Parking brake
For use as a pushchair, the carriage is fitted with a hand brake that can also be locked to prevent the
carriage from rolling away.
To apply the brake:
To apply the parking brake, pull the brake lever and then push in the locking button. The brake lever can
now be released, and the brake remains locked.
To release the brake:
To release the parking brake, pull the brake lever. The locking button is released and the carriage can roll
freely.
WARNING
If the brake pads becomes worn, the brake may no longer prevent the carriage from
rolling away, despite the brake lever being fully engaged.
Therefore, before every use, the parking brake must be checked to ensure it is working
properly by pushing the carriage whilst the parking brake is engaged. If the braking is
insufficient, the brake cable must be readjusted or the brake pads replaced. To do this,
see the relevant section, 5.4
WARNING
When the carriage is being used as a bicycle trailer, the cover must be closed when the
carriage is in motion.
4.9.2 Closing the cover
• Hold the handle on the cover and pull downwards.
• Clip the cover onto the two hooks on the impact guard.
Adjuster screw
Lock nut

65
ENGLISH
4.10 Rain cover
The carriage has an integrated rain cover under the roof hood. This can be tucked away into the upper
hood. The rain cover is fixed in position at the bottom using press studs.
When not in use, the rain cover must be tucked away under the roof hood.
4.11 Rear compartment
The carriage has a rear compartment so that cargo can be conveniently transported.
The rear compartment must carry no more than 8 kg so that the carriage’s centre of gravity is not shifted
too far back.
The rear compartment has a lashing strap. By pulling downwards on this strap, the load can be prevent-
ed from moving around. This is particularly important when riding, to ensure that the trailer is in a stable
position.
To loosen the strap, pull the tab downwards. When not in use, the rear compartment can be folded away.
To do this, fold the upper bar downwards and tighten the lashing strap
Uncoupling
• Undo the catch mechanism.
• Open the coupling (see above).
• Pull the coupling housing to one side.
• Close the coupling again.
Please note: To avoid damage, store the trailer only with the coupling closed.
4.12 Coupling and uncoupling
Coupling
• Open the coupling lever. Using your thumb, push the shorter lever upwards and fully flip it forwards.
• Slide the coupling sideways over the towing part on the coupling plate.
• Close the coupling. Flip the longer lever backwards and then press down until the coupling snaps into
place.
• Caution: The coupling lever must be fully snapped into place.
• Check that it is held in place by pulling against it sideways.
• Loop the straps for the catch mechanism around the bicycle frame and secure them with the clamping
buckle.
Caution: For safety reasons, always fit the catch mechanism.

66
5 Various settings
The Leggero Enso has various adjustable elements. For maximum safety and optimal performance, the
settings must always be correct.
5.1 Safety harnesses
Before every journey, safety harnesses must be adjusted to fit the passenger in accordance with 4.3/4.3.1,
if they are not already correctly adjusted.
5.2 Suspension
The suspension spring pre-load can be adapted to the weight of the carriage and its load. The suspension
can only function as described if it is optimally adjusted.
5.3 Settings for the KS-290 shock-absorbing strut
The screw spacing on the up-ended trailer is 150mm. This length can be easily determined using a calliper
or a yard stick.
If the carriage is set correctly when loaded (incl. child), the screw spacing should be approx. 141 mm.
If this value is not achieved, the spring pre-load must be adjusted.
The spring pre-load length can also be determined by re-measuring.
This distance must be between 30 and 35 mm.
5.4 Setting the disc brakes
The manufacturer’s original instructions are enclosed. Further information can be found in section 2.8,
“Maintenance and care”, and on the product page at www.leggero.ch
Centre of the screw: 141 mm
(when loaded)

68
10.52000.0024.0/01.17
Brüggli GmbH
Turmstrasse 11
D-78467 Konstanz
T +49 7531 9113993
F +49 7531 9113995
www.leggero.de
Brüggli Industrie
Hofstrasse 3 + 5
CH-8590 Romanshorn
T +41 71 466 95 95
F +41 71 466 95 96
www.leggero.ch
Table of contents
Other Leggero Bicycle Accessories manuals