LEMAX 05698 User manual

05698
V.02
P. 3
P. 7
P.11
P.15
P.19
P.23
Operating Instructions. . . . . . . . . . . . .
Mode d'emploi . . . . . . . . . . . . . . .
Instrucciones de uso . . . . . . . . . . . . .
Bedienungsanweisungen . . . . . . . . . . . .
Gebruiksaanwijzing . . . . . . . . . . . . . .
Istruzioni operative . . . . . . . . . . . . . .

P. 1
THICKET FALLS CABIN, WITH 4.5V ADAPTOR
•THIS PRODUCT IS USED AS CHRISTMAS DECORATION, NOT A HUMIDIFIER.
•THIS IS NOT ATOY. THEREFORE NOT SUITABLE FOR CHILDREN. KEEP OUT OF
REACH OF CHILDREN.
•WARNING ! NOT SUITABLE FOR CHILDREN UNDER 36 MONTHS DUE TO SMALL
REMOVABLE PARTS.
•THE EXTERNAL FLEXIBLE CABLE OR CORD OFTHIS LUMINAIRE CANNOT BE
REPLACED, IF THE CORD IS DAMAGED,THE LUMINAIRE SHALL BE DESTROYED.
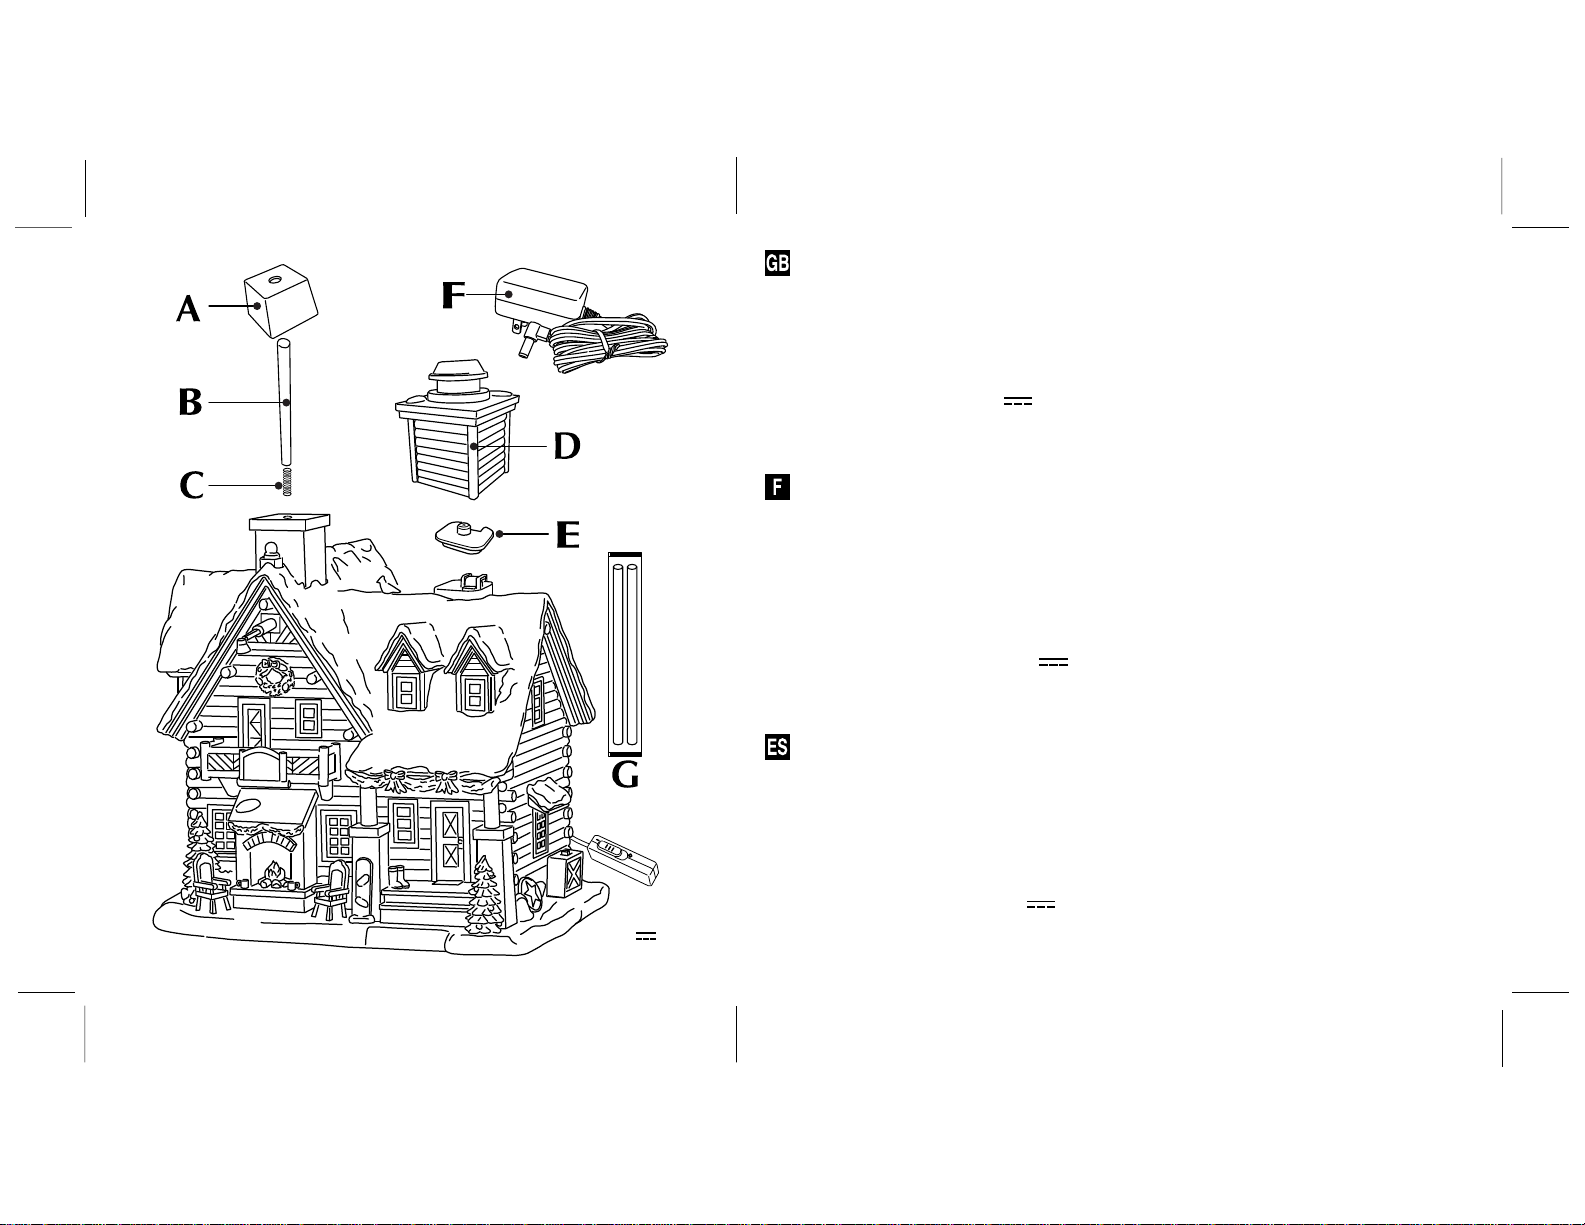
•RATEDVOLTAGE: 4.5V
•LED: 3V, 0.020 A
•LED IS NON-REPLACEABLE
•FOR INDOOR USE ONLY.
CHALET DETHICKET FALLS AVEC ADAPTATEUR 4,5V
•CE PRODUIT DOIT SERVIR DE DÉCORATION DE NOËL ET N'EST PAS UN
HUMIDIFICATEUR.
•CECI N'EST PAS UN JOUET, ET NE CONVIENT DONC PAS AUX ENFANTS. CONSERVER
HORS DE PORTÉE DES ENFANTS.
•AVERTISSEMENT ! NE CONVIENT PAS AUX ENFANTS DE MOINS DE 36 MOIS EN
RAISON DE LA PRÉSENCE DE PETITES PIÈCES AMOVIBLES.
•LE CÂBLE OU CORDON FLEXIBLE EXTERNE DE CE LUMINAIRE NE PEUT ÊTRE
REMPLACER. SI LE CORDON EST ENDOMMAGÉ, LE LUMINAIRE DEVRA ÊTRE
DÉTRUIT.
•TENSION NOMINAL : 4,5V
•DEL : 3V , 0,02 AMP
•LA LUMIÈRE DEL EST IRREMPLAÇABLE.
•POUR UN USAGE À L'INTÉRIEUR SEULEMENT.
CABAÑA DETHICKET FALLS, CON ADAPTADOR DE 4,5V
•ESTE PRODUCTO SE USA COMO DECORACIÓN NAVIDEÑA, NO COMO
HUMIDIFICADOR.
•ESTO NO ES UN JUGUETE, POR LO QUE NO ES ADECUADO PARA NIÑOS.
MANTENER FUERA DEL ALCANCE DE LOS NIÑOS.
•¡PRECAUCIÓN! NO ES ADECUADO PARA NIÑOS MENORES DE 36 MESES POR LAS
PEQUEÑAS PIEZAS EXTRAÍBLES.
•EL CABLE O CORDÓN FLEXIBLE EXTERNO DE ESTA LUMINARIA NO PUEDE SER
REEMPLAZADO, SI EL CORDÓN ESTÁ DAÑADO, LA LUMINARIA SERÁ DESTRUIDA.
•VOLTAJE NOMINAL: 4.5V
•LED: 3V, 0.020 A
•El LED NO ES REEMPLAZABLE
•SÓLO PARA USO EN INTERIORES.
4.5V 0.260 A

INDEX P.3
P.4
P.4
P.4
P.5
P.5
P.5
P.6
CONTENTS . . . . . . . . . . . . . . . .
OPERATING INSTRUCTIONS . . . . . . . . .
• Setting up the product . . . . . . . . . . . .
• Filling the water tank with water. . . . . . . . .
•Turning on the product . . . . . . . . . . . .
•Turning on and turning off smoke. . . . . . . . .
• Refilling the water tank. . . . . . . . . . . .
• Replacing the wick . . . . . . . . . . . . .
CONTENTS :
This operation manual is compatible with other smoking products. The appearance of
accessories varies depending on the design but they are of same functions.
Smoke Function Mechanism x 1
Wick - inside the chimney x 1
Spring - inside the chimney x 1
Roof Cover x 1
Inner Lid x 1
Adaptor x 1
Replacement Wick (Length: 190mm) x 2
A.
B
.
C.
D.
E
.
F
.
G
.
Building x 1
P. 3

P. 4
1. Setting up the product
• Place the unit on flat, level surface.
•Take away the adhesive tape on the chimney (Dia.1).
• Ensure Smoke On/Off button on right side of the unit in off position "O" (Dia. 2).
•Insert the jack of the adaptor (F) into the reception socket at the back of the unit (Dia.
3). Plug the adaptor into a household electrical outlet.
•This power unit is intended to be correctly orientated in a vertical or floor mount
position.
Please note!
vSuggest using the adaptor provided.
OPERATING INSTRUCTIONS :
(3)
(2)
(1)
2. Filling the water tank with water
• Remove the roof cover (D) and the inner lid (E) from the unit (Dia. 4).
•Fill the water tank with approximate 650 mL (21.98 fl.oz.) water to the puffy mark
(Dia. 5).
•Put the inner lid and then the roof cover back onto the unit.
Important!
vWater level should not exceed the puffy mark.
vUse clean room-temperature tap water.
(5)
(4)

P. 5
4. Turning on and turning off smoke
•Ensure Power Cord extending from rear of the unit in on position "
-
" (Dia. 6).
•Shift Smoke On/Off button to on position "
-
" (Dia. 7) to activate the smoke function.
•Wait about 2 minutes for water absorption by the wick (B). "Smoke" will come out
through the chimney.
•Shift Smoke On/Off button to off position "O" (Dia. 8), smoke will stop.
5. Refilling the water tank
•When water inside the water tank runs out to lower
level, there is no smoke and a red light will flash
(Dia. 9).
•Shift Smoke On/Off button to off position "O"
(Dia. 8), the red light will go off .
•Refill the water tank with water by repeating
Point (2).
•Shift Smoke On/Off button to on position "
-
"
(Dia. 7) to activate the smoke function again.
Smoke will start again.
3. Turning on the product
•Locate Power Cord extending from rear of the unit
and shift the button to on position "
-
" (Dia. 6).
•When activated, lights will illuminate the unit.
(6)
(7) (8)
(9)

6. Replacing the wick
•When the wick (B) deteriorates, gets dirt, smoke will go less. Replace it with the
replacement wick (G) provided.
•Remove Smoke Function Mechanism (A).
•Take out the wick from the chimney.
•Insert the replacement wick into the chimney gently and carefully.
•Cover the replacement wick with Smoke Function Mechanism (Dia. 10).
•Wait about 2 minutes for water absorption by the replacement wick.
Important!
vWhen taking out the wick, and if the supporting spring (C) comes out together, put
the spring back into the chimney.
vDock Smoke Function Mechanism on to the chimney so that the jut matches the
small round notche (Dia. 11) correctly.
vEnsure top part of the wick goes upright into Smoke Function Mechanism.
P. 6
(11)(10)
Table of contents
Popular Lighting Equipment manuals by other brands

IOTA
IOTA I-320-HE instruction manual

Oase
Oase HighLine Classic LED daylight Series operating instructions

VS LIGHTING SOLUTIONS
VS LIGHTING SOLUTIONS Blu2Light Connect ME Quick start quide

IKEA
IKEA LEDBERG Important safety instructions

PROEL
PROEL PLLAS050 user manual

Iluminarc
Iluminarc Ilumipanel 90 IP Optic RGB user manual