Lena Lighting Dual Sense WSED414 User manual

Stand-alone Dual Sense Motion Sensor TM
WSED414 (HIM14)
HF and PIR, Daylight harvest Control for lndependentDALI
Mechanical Structure
C - Surface box
B - Facia Cover
PIR
Photocell
LED indicator
56
Infrared receiver
HF Sensor module
ABlind
BBlind
Sensor mode selection
Rotary switchpreset
A - ControlBoard
Note:the blinds areoptional,theymay beinserted
behindthe lens for focussing the detection range.
Installation:
For more details, please refer to user manual.
1Directjunctionboxmounting Surfacemountassembly
2
Note:We recommend the mounting distance between sensor to sensor should be more than 2m to prevent sensors
from false-triggering.
Technical Data
InputCharacteristics
ModelNo. SensorData
HIM14
120~277VAC 50/60Hz
<1W
ModelNo.
Sensorprinciple
Operationfrequency
Transmissionpower
Sensormode
HIM14
Mainsvoltage HighFrequency(microwave),PIR
Stand-bypower 5.8GHz+/-75MHz(HF)
<0.2mW(HF)Switchedpower
Warming-up Max.20pcs devices,40mA
30s 4 modes:PIR,HF, PIR+HF,PIR/HF
Detectionrange
HIM14 Max.(Ox H)12mx6m
Max.(OxH)16mx 12m
SafetyandEMC
EMCstandard(EMC)
Safetystandard(LVD) EN55015, EN61000 HIM54(2lens)
Detectionangle Max.(Lx W x H)16mx 6mx12m
EN60669, AS/NZS60669 360°
EN300440,EN301489-1,
EN62479
RadioEquipment(RED)
Certi cation Environment
Semko, CB, CE, EMC, RED, RCM Operationtemperature
IPrating Ta: -20°C~+55°C
IP20
RED IP20
Subject to change without notice. Edition: 26 Feb. 2020 Ver. A0 Page 1/6

Dual Sense Introduction
commonlyknownMicrowaveandInfraredaremaindetectingtechnologiesinlightingcontrols.Bothhavetheadvantageand
disadvantageforindustrialapplications.
Advantage Advantage
HF PIR
* sensitivetominormotion.
* sensitivetoradialmovement. * nopenetration,con neddetectionarea.
* sensitivetotangentialmovement.
* can bere ectedbyobjectshencecoveringbigdetectionarea
* resilienttoheatsource,smokeandandairconditioner. * resilienttomotionobjectwhichhasnoheatradiation.
Disadvantage Disadvantage
* penetrateswalls, picksupmotionsoutsideoftheof cearea;
* back wave detection, falsetrigger bymotionsatthe back.
* can befalsetriggeredbyventilationfans,waterpipe,elevators
etc.inindustrialapplication.
* can befalsetriggeredbyairconditioner,smokeand
otherheatsources.
TheremedyistocreateDualSensebycombiningbothtechnologiestomakeuseoftheadvantageand bypassthedisadvantage.
4 optional detection modes via DIP switch or remote control:
* HF: Microwave only
* PIR:PIR modeonly
* HF+PIR:both PIRandmicrowavemode,todecreasethedetectioncapabilityanddetection 1 2
area.Onlywhenbothdetectionsare activated,themotionisconsideredvalid.Thisis
topreventthesensorfromfalsetriggerbyheatsource,airconditioner,ventilationfans,
waterpipeandelevatorsetc... I
II
III
IV
HF
PIR
HF+PIR
HF/PIR
* HF/PIR:either PIRormicrowavemode,toincreasethedetectioncapabilityanddetectionarea;
DetectionPattern
09
Intelligent
Photocell Ambientdaylight
threshold
One-Key
Commissioning RotarySwitch
Programing 15
Functions and Features
1 Daylight Harvest
Lightwill notswitchon
whennaturallightis
suf cient,even thereis
motiondetected.
Thelightswitcheson Thelightturnsonatfullordimstomaintainthe lux level. The lightoutput
regulatesaccrodingtothelevelofnaturallightavailable.
automaticallywith
presencewhennatural
lightisinsuf cient.
Subject to change without notice. Edition: 26 Feb. 2020 Ver. A0 Page 2/6

Note:
The Light automatically dims down and
eventually turns offif the natural light lux
level exceeds the daylight threshold.
However, if the stand-by period is preset
xture never switches off
but dim to minimum level, even the
natural light is suf cient.
Thelightswitchesoff when
theambientnaturallightis
suf cient.
Thelightdimstostand-by
periodafterhold-timeand
staysonselectedminimum
dimminglevel.
Thelightswitchesoff
completelyafterthe
stand-byperiod.
Settings (Remote Control HRC-11)
ON/
OFF PermanentON/OFF function
Pressbuttontoselect permanentONorpermanentOFF mode.
* Press button toquitthismode.
ThemodewillchangetoAUTOModeafterpowerfailure.
Reset Settings
Pressbuttonall settingsgobacktorotaryswitchsettings.Sensordetection
modereturnstoDIPswitchsettings.
Shift Button
PressbuttontheLEDonthetopleftcornerwill ashtoindicatemode
selection.All values / settingsinREDarevalidfor 20seconds.
AUTO mode
Pressbuttontoinitiateautomaticmode.The sensorstartsworkingandall
settingsremainasbeforethelightisswitchedON/OFF.
& A
4h h4h
SEMI-AUTO mode
1.Pressbuttonthe redLED ashesforindication.
2.Pressbutton-toinitiatesemi-automode.The xtureis
manuallyturnedonbypressingthepush-switch,andgoesoff automaticallyinthis
mode.(Absencedetectionmode) HRC-11
Poweroutput
Pressthebuttonstoselectlightoutputat80%(atinitial10,000hours)or100%.
functions are disabled.
Brightness+/-
Pressthebuttonstoadjustthelightbrightnesstoresetthetargetluxlevel.
Subject to change without notice. Edition: 26 Feb. 2020 Ver. A0 Page 3/6

Scene program- 1-key commissioning
1.Pressbuttontoprogram.
2.Select the buttons in --by-bydimmingtosetall
parameters.
3.Pressbuttontosave all thesettingsprogrammed intheremotecontrol.
4.Pressbuttontosetthesettingstoeachsensorunit(s).
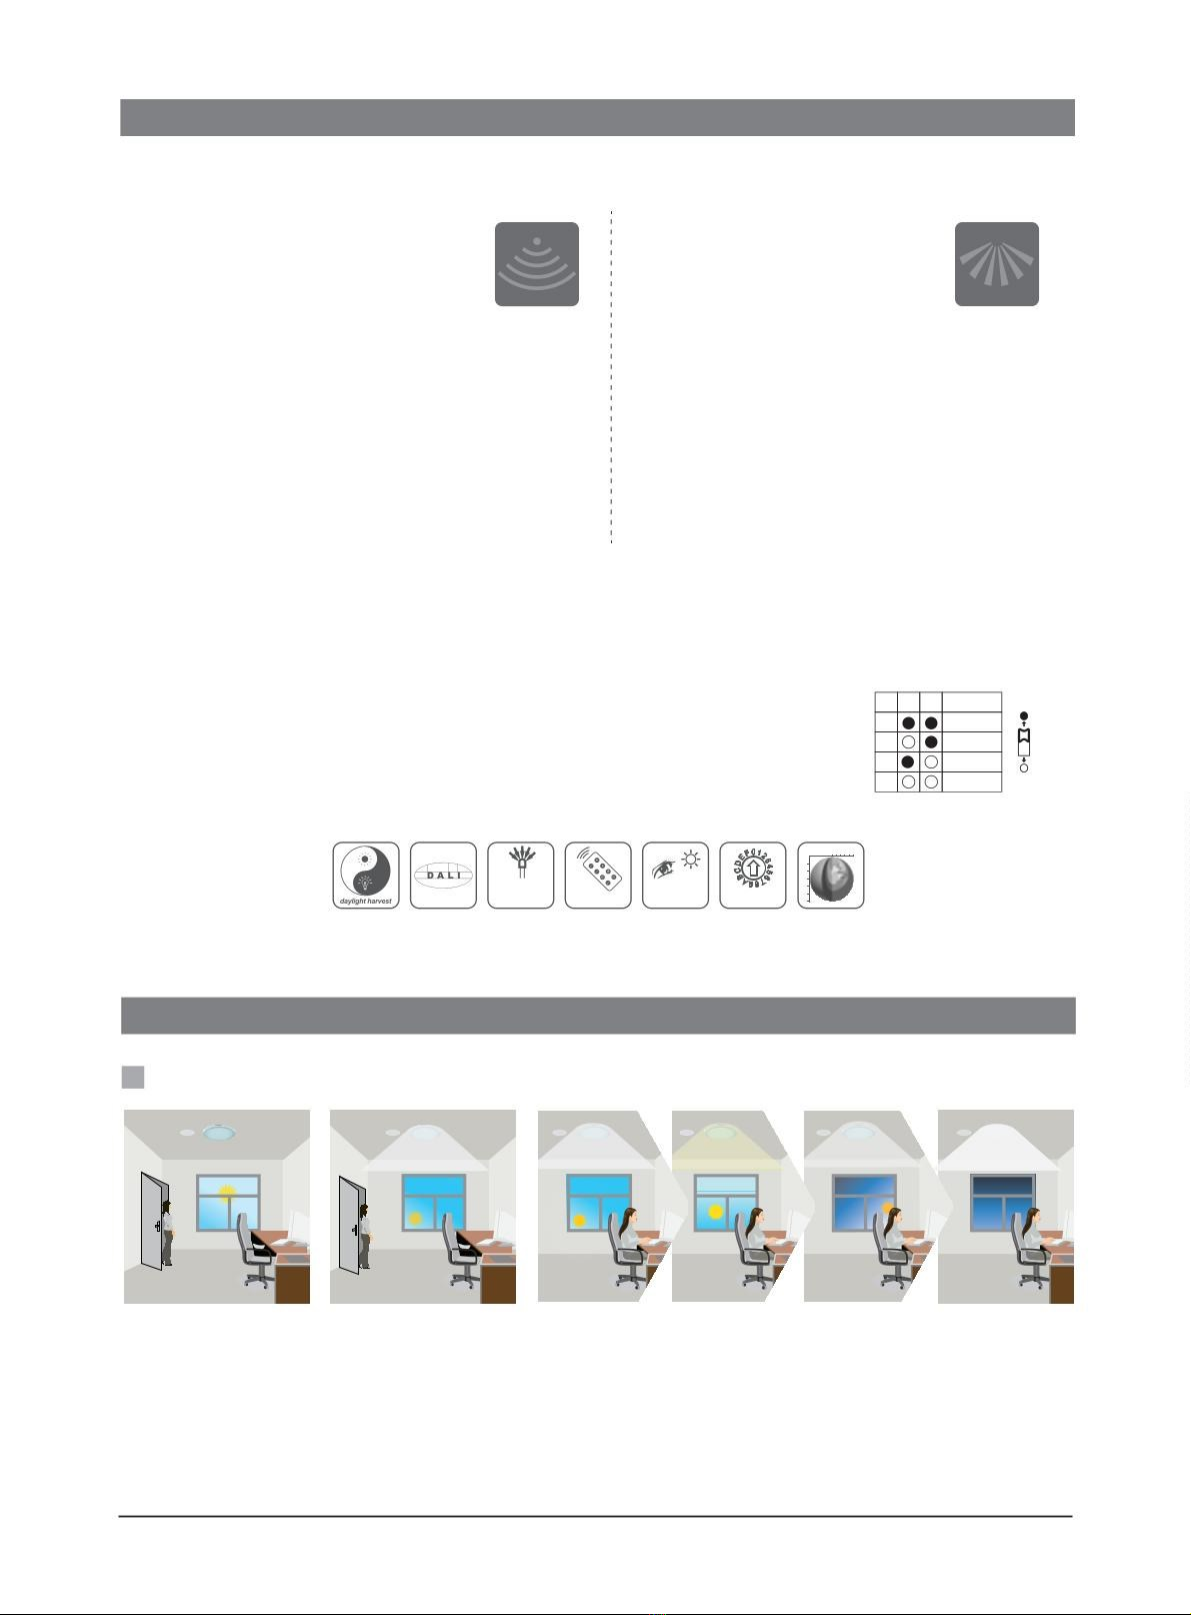
For example, toset detectionrange 100%, daylight threshold Disable, hold-time 5min, stand--by dimming level 30%, the steps should be:
settings are passed on the sensor(s).
Detectionrange
Pressbuttonsinzonetosetdetectionrangeat100%/75%/50%/10%.
Daylight threshold
PressbuttonsinzoneDaylighttosetdaylightsensor/targetlux level at50Lux/ 100Lux/ 300Lux/ 500Lux/ Disable.
Note: 2lux / 10lux are disabled.
To set daylight sensor at 100Lux / 300Lux / rst.
Ambient daylight threshold
1.Pressbuttonthe redLEDstartsto ash.
2.Pressbutton the surroundingluxlevel issampledandsetasthenewdaylightthreshold/ targetlux level.
Hold-time
Pressbuttonsinzone-tosetthehold-timeat2s/30s/ 1min/ 5min/10min/ 15min/ 20min/ 30min.
Note: 1. To set hold-time at 30s / 5min / 15min / rst.
2. 2s is for testing purpose only, stand-by period and daylight sensor settings are disabled in this mode.
*To exitfromTest mode,pressbuttonoranybuttonin-
Stand-by time (corridorfunction)
Pressbuttonsinzone-bytosetthe stand-byperiodat0s/ 10s/ 1min/ 5min/ 10min/ 30min/ 1h/
-level control, the xture is 100%on when there is motion detected, and remains at the stand-by dimming level
when no presence after motion hold-time.
Stand-by dimming level
Pressthebuttoninzone-bydimming tosetthe stand-bydimminglevel at10%/ 20%/30%/ 50%.
Daylight harvest auto-conꢀ gurationfunction
1.Pressbuttonthe redLEDstartsto ash.
2.Select a timeperiodand thesensor will dolightlevel measurementand determine/savethe lowestlight level (commissionline)
with100%lighton, soastosetthetargetluxlevel automatically.
Note:1.Make sure the light level measurement covers the night time.
2.The xture will gointo sensor modeafter the measurement, all sensor settings remain unchanged.
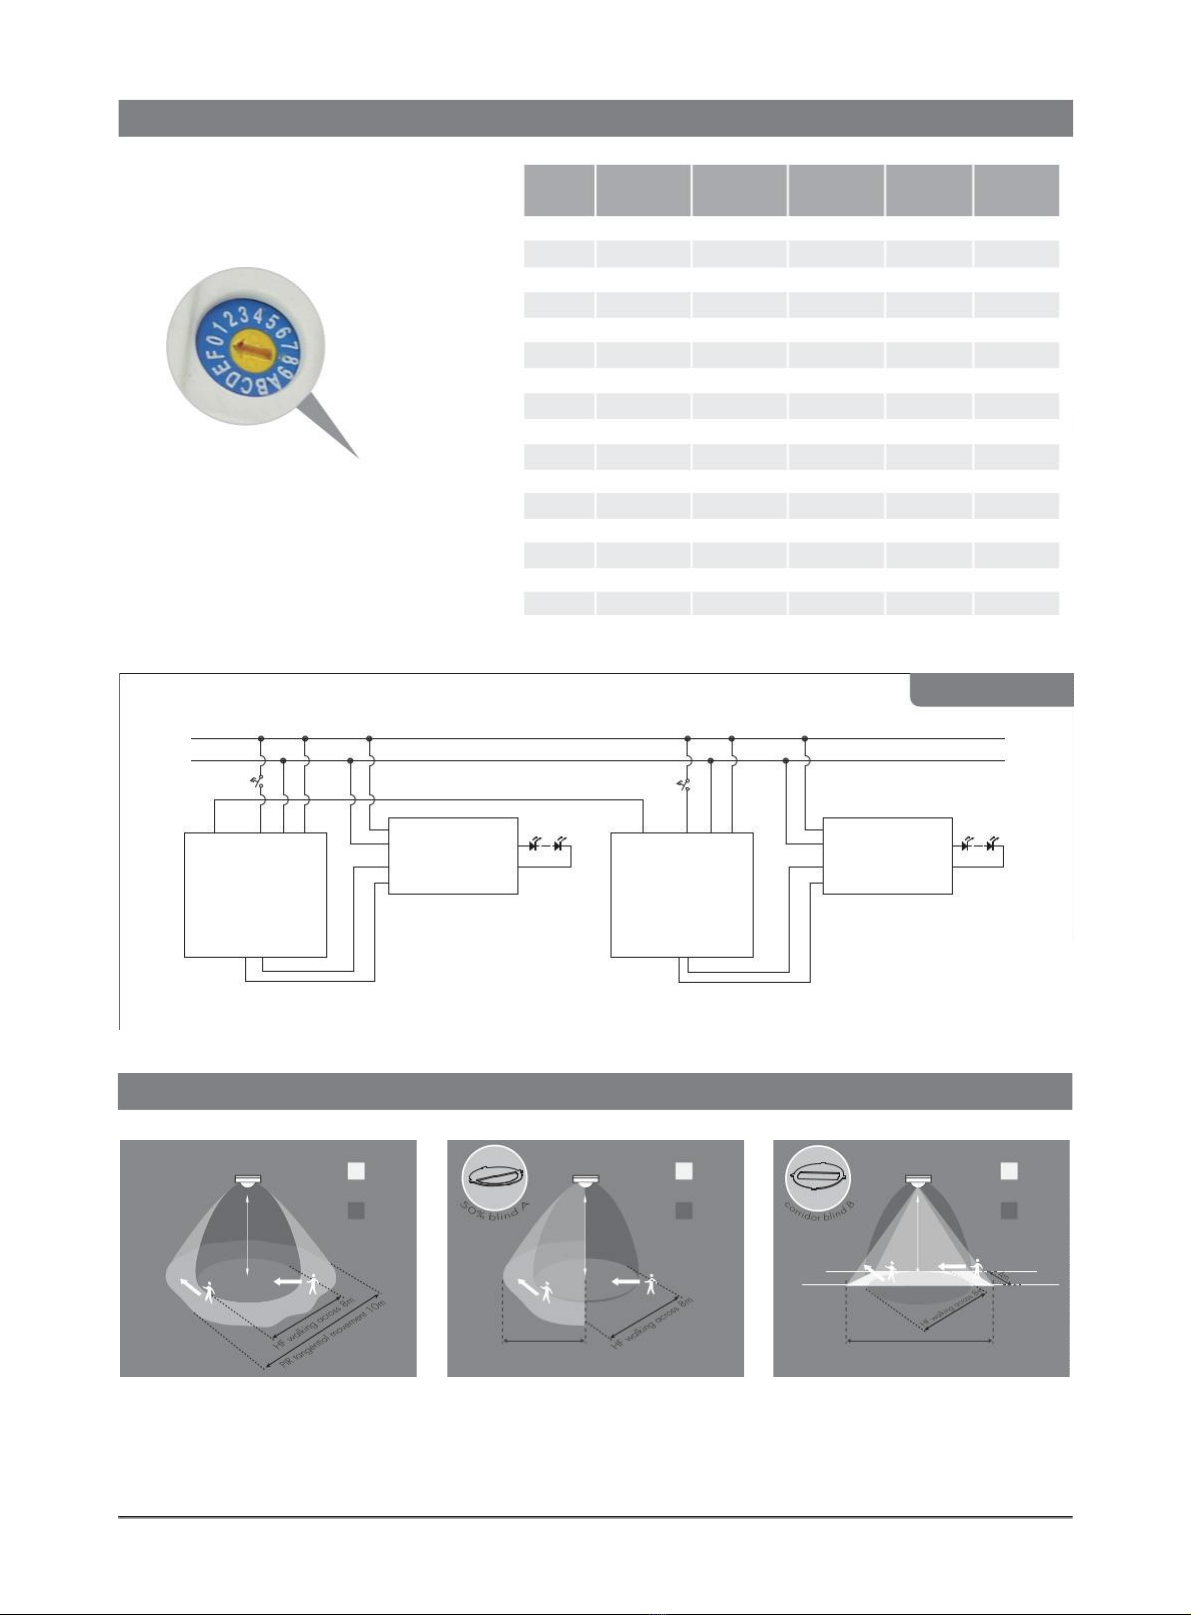
Dual tech & RF mode
1.Pressbuttonsinthiszonetoselectsensortechnology.
HF+PIR:thelightisonwhenbothHFandPIRsensorsareactivated.
HF/PIR:thelightisonwhenHForPIRsensorsareactivated.
2.Learn/ Erase,Transmit,RX100%andRXSTBY%aredisabled.
Subject to change without notice. Edition: 26 Feb. 2020 Ver. A0 Page 4/6

Rotary Switch Preset
Arotaryswitchisbuiltinsidethesensorforscene
selection/ fastprogramming.Total 16channels
areavailable: Detection
range Daylight
sensor Stand-by
time Stand-by
dim level
Channel
0
Hold-time
5s
100% Disable 10s 10%
1
2
3
4
5
6
7
8
9
A
B
100%
100%
100%
100%
100%
100%
100%
100%
100%
100%
100%
100%
100%
100%
100%
1min 50Lux 5min
10min
10%
10%
10%
10%
30%
10%
10%
10%
30%
10%
30%
10%
30%
50%
10%
5min 50Lux
5min 75Lux
5min 100Lux
200Lux
50Lux
5min
10min
10min
10min
10min
20min
20min
30min
30min
30min
5s
30min
75Lux
100Lux
200Lux
100Lux
200Lux
100Lux
200Lux
400Lux
100Lux
1h
Rotaryswitchpreset
C
D
Note: settings can also be changed by remote control
HRC-11. The last action controls.
E
F10s
Wiring Diagram
L
N
L
NL
N
SY SY
NC NC P N L LED+
LED_SY SY P N L LED+
LED_
LED Driver LED Driver
NC NC
DALI+
DALI DALI+
_ _
DALI
HIM14
DALI
HIM14
DALI
- +- +
Detection Pattern
PIR
HF
PIR
HF
PIR
HF
AB
3m 3m 3m
PIRtangentialmovement10m
PIRtangentialmovement5m
Subject to change without notice. Edition: 26 Feb. 2020 Ver. A0 Page 5/6

Additional Information / Documents
1. Regarding precautionsfor microwave sensor installationand operation, please kindly refer to
www.hytronik.com/download ->knowledge ->Microwave Sensors - Precautions for Product Installation and Operation
2. Regardingprecautions for PIR sensor installationand operation,please kindly refer to
www.hytronik.com/download ->knowledge ->PIR Sensors - Precautions for Product InstallationandOperation
3. RegardingHytronik standardguarantee policy, please refer to
www.hytronik.com/download ->knowledge ->Hytronik Standard Guarantee Policy
Subject to change without notice. Edition: 26 Feb. 2020 Ver. A0 Page 6/6
This manual suits for next models
1
Table of contents
Other Lena Lighting Security Sensor manuals
Popular Security Sensor manuals by other brands

Challenger
Challenger SL180N Installation and operating instructions

Global Fire Equipment
Global Fire Equipment ZEOS-AD quick start guide

Sygonix
Sygonix Slave operating instructions

Bosch
Bosch LTC 2210 Series instruction manual

Bosch
Bosch ISC-CDL1-W15G reference guide

Vaxcel
Vaxcel T0173 Assembly and installation instructions

Gill
Gill 4212-PK-151 quick start guide

Ecolink
Ecolink Firefighter FFZB1-ECO Installation manual & users guide

AJAX
AJAX DoorProtect Plus quick start guide

Bosch
Bosch DS835I Series installation instructions

Honeywell
Honeywell GENT S4-720 Data and Installation

Skyhawk
Skyhawk Trapmate Installation & user manual