LENCO DAR-017 User manual

1
Model: DAR-017
USER MANUAL
DAB+/FM radio with Bluetooth
GEBRUIKSHANDLEIDING
DAB+/FM-radio met Bluetooth
BEDIENUNGSANLEITUNG
DAB+/UKW-Radio mit Bluetooth
GUIDE D’UTILISATION
Radio DAB+/FM avec Bluetooth
MANUAL DEL USUARIO
Radio DAB+/FM con Bluetooth
BRUGERVEJLEDNING
DAB+/FM-radio med Bluetooth
BRUKSANVISNING
DAB+/FM-radio med Bluetooth

2
Index
English.........................................................................................................................................3
Nederlands................................................................................................................................ 20
Deutsch ..................................................................................................................................... 38
Français..................................................................................................................................... 57
Español...................................................................................................................................... 75
Dansk/Norsk.............................................................................................................................. 93
Svenska ................................................................................................................................... 111
Version : 1.0

3
English
DAR-017
CAUTION:
Usage of controls or adjustments or performance of procedures other than those specified herein
may result in hazardous radiation exposure.
PRECAUTIONS BEFORE USE
KEEP THESE INSTRUCTIONS IN MIND:
1. Do not cover or block any ventilation openings. When placing the device on a shelf, leave
5 cm (2”) free space around the whole device.
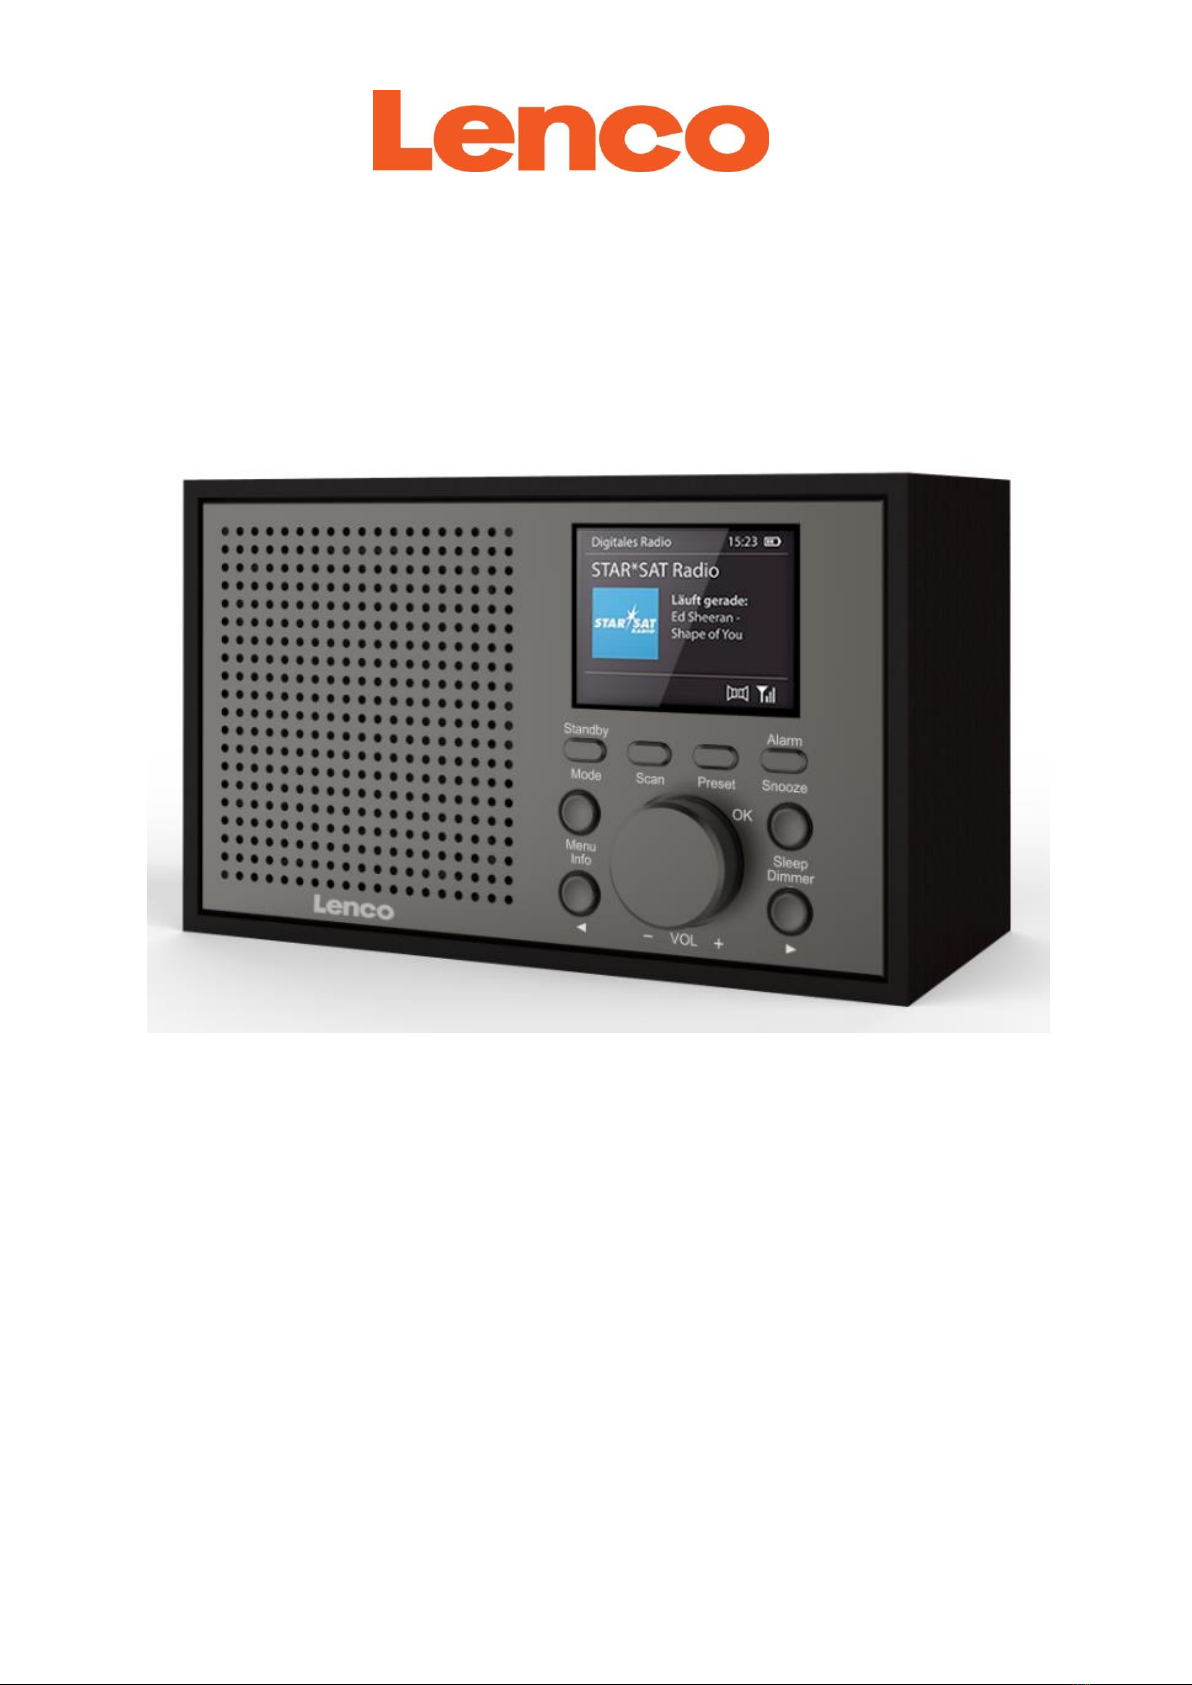
2. Install in accordance with the supplied user manual.
3. Keep the device away from heat sources such as radiators, heaters, stoves, candles and other
heat-generating products or naked flame. The device can only be used in moderate climates.
Extremely cold or warm environments should be avoided. Working temperature between
0°and 35°C.
4. Avoid using the device near strong magnetic fields.
5. Electrostatic discharge can disturb normal usage of this device. If so, simply reset and restart
the device following the instruction manual. During file transmission, please handle with care
and operate in a static-free environment.
6. Warning! Never insert an object into the product through the vents or openings. High voltage
flows through the product and inserting an object can cause electric shock and/or short circuit
internal parts. For the same reason, do not spill water or liquid on the product.
7. Do not use in wet or moist areas such as bathrooms, steamy kitchens or near swimming pools.
8. The device shall not be exposed to dripping or splashing and make sure that no objects filled
with liquids, such as vases, are placed on or near the apparatus.
9. Do not use this device when condensation may occur. When the unit is used in a warm wet
room with damp, water droplets or condensation may occur inside the unit and the unit may
not function properly; let the unit stand in power OFF for 1 or 2 hours before turning on the
power: the unit should be dry before getting any power.
10. Although this device is manufactured with the utmost care and checked several times before
leaving the factory, it is still possible that problems may occur, as with all electrical appliances.
If you notice smoke, an excessive build-up of heat or any other unexpected phenomena, you
should disconnect the plug from the main power socket immediately.
11. This device must operate on a power source as specified on the specification label. If you are
not sure of the type of power supply used in your home, consult your dealer or local power
company.
12. Keep away from animals. Some animals enjoy biting on power cords.
13. To clean the device, use a soft dry cloth. Do not use solvents or petrol based fluids.
To remove severe stains, you may use a damp cloth with dilute detergent.
14. The supplier is not responsible for damage or lost data caused by malfunction, misuse,
modification of the device or battery replacement.
15. Do not interrupt the connection when the device is formatting or transferring files. Otherwise,
data may be corrupted or lost.
16. If the unit has USB playback function, the USB memory stick should be plugged into the unit
directly. Don’t use an USB extension cable because it can cause interference resulting in failing
of data.
17. The rating label has been marked on the bottom or back panel of the device.
18. This device is not intended for use by people (including children) with physical, sensory or
mental disabilities, or a lack of experience and knowledge, unless they’re under supervision or
have received instructions about the correct use of the device by the person who is responsible
for their safety.
19. This product is intended for non professional use only and not for commercial or industrial use.
20. Make sure the unit is adjusted to a stable position. Damage caused by using this product in an
unstable position vibrations or shocks or by failure to follow any other warning or precaution
contained within this user manual will not be covered by warranty.

4
21. Never remove the casing of this device.
22. Never place this device on other electrical equipment.
23. Do not allow children access to plastic bags.
24. Only use attachments/accessories specified by the manufacturer.
25. Refer all servicing to qualified service personnel. Servicing is required when the device has
been damaged in any way, such as the power supply cord or the plug, when liquid has been
spilled or objects have fallen into the device, when the device has been exposed to rain or
moisture, does not operate normally, or has been dropped.
26. Long exposure to loud sounds from personal music players may lead to temporary or
permanent hearing loss.
27. If the product is delivered with power cable or AC power adaptor:
If any trouble occur, disconnect the AC power cord and refer servicing to qualified
personnel.
Don’t step on or pinch the power adaptor. Be very careful, particularly near the plugs and
the cable’s exit point. Do not place heavy items on the power adaptor, which may
damage it. Keep the entire device out of children’s reach! When playing with the power
cable, they can seriously injure themselves.
Unplug this device during lightning storms or when unused for a long period.
The socket outlet must be installed near the equipment and must be easily accessible.
Do not overload ac outlets or extension cords. Overloading can cause fire or electric shock.
Devices with class 1 construction should be connected to a main socket outlet with a
protective earthed connection.
Devices with class 2 construction do not require a earthed connection.
Always hold the plug when pulling it out of the main supply socket. Do not pull the power
cord. This can cause a short circuit.
Do not use a damaged power cord or plug or a loose outlet. Doing so may result in fire or
electric shock.
28. If the product contains or is delivered with a remote control containing coin/cell batteries:
Warning:
“Do not ingest battery, Chemical Burn Hazard” or equivalent working.
[The remote control supplied with] This product contains a coin/button cell battery. If the
battery is swallowed, it can cause severe internal burns in just
2 hours and can lead to death.
Keep new and used batteries away from children.
If the battery compartment does not close securely, stop using the product and keep it
away from children.
If you think batteries might have been swallowed or placed inside any part of the body,
seek immediate medical attention.
29. Caution about the use of Batteries:
Danger of explosion if battery is incorrectly replaced. Replace only with the same or
equivalent type.
Battery cannot be subjected to high or low extreme temperatures, low air pressure at
high altitude during use, storage or transportation.
Replacement of a battery with an incorrect type that can result in an explosion or the
leakage of flammable liquid or gas.
Disposal of a battery into fire or a hot oven, or mechanically crushing or cutting of a
battery, that can result in an explosion.
Leaving a battery in an extremely high temperature surrounding environment that can
result in an explosion or that leakage of flammable liquid or gas.
A battery subjected to extremely low air pressure that may result in an explosion or the
leakage of flammable liquid or gas.
Attention should be drawn to the environmental aspects of battery disposal.

5
INSTALLATION
•Unpack all parts and remove protective material.
•Do not connect the unit to the mains before checking the mains voltage and before all other
connections have been made.

6
Accessories:
1. User manual
2. Power adaptor

7
Product Front Overview
1. Standby button
2. Menu button
3. Left/Stations button
4. Mode button
5. OK/Vol+/Vol-/Nagivate/play/pause/Snooze/Info knob
6. Alarm button
7. Back/Right button
8. Preset button
9. Sleep button
10. Color display

8
Product Rear Overview
11. On/off switch button
12. DC IN socket
13. Headphone out socket
14. Micro USB socket for upgrade
15. Telescopic antenna

9
Initial use
Before operation, please make sure that the VOLTAGE mentioned on the power supply is same as
the voltage of your local area.
Use the supplied mains adaptor to connect the device to a household mains socket.
Switch the device on with the power switch on the rear.
Basic operation-getting started
1. Connect the mains adaptor to the DC IN socket, fully extend the telescopic antenna, plug in and
switch on at the mains.
2. The display backlight will illuminate and the clock (00:00:00) (Time is not set) will flash
3. On the very first use the DAB mode will automatically be selected and the radio will perform a
full scan. The display will show ‘Scanning’ with a bar indicator showing the scan progress and
the total number of stations found.
4. When the scan is finished the radio will play the first alphanumerically found station. If the
radio does not find any stations, ‘No DAB Station’ will be displayed.
5. Adjust the volume to the desired level using the VOL(+/-) knob.
6. Press the stations button and use knob to scroll through the stations list. Press the OK knob on
your favorite station.
7. Press the Mode button to switch between DAB, FM, and Bluetooth mode,
8. Press the Standby button to go into ‘Standby’ mode.
9. Press Sleep to set the Set Sleep Timer: Use Volume knob and rotate to choose between Sleep
off-15 minutes-30 minutes-45 mintues-60 minutes-90 minutes. The radio will go into standby
when the selected minutes have been counted down.
Using the radio- DAB mode
DAB Mode- Full scan
This function will scan for all available DAB stations, Band III channels.

10
In DAB mode, press Menu button and rotate the ok knob to select ‘Full Scan’ then short press the ok
knob to start the DAB full scan. When the scan is finished, the radio will return to the last played
DAB radio station. All stations found will be listed in the station list, which is shown when pressing
the ‘stations’ button.
Please note that the available DAB+ radio stations differ per region/city
DAB Mode- Manual tune
This function allows a specific or new ensemble to be manually added to the stations already
available on the radio.
In DAB mode, press the Menu button and use the ok knob to navigate until “Manual tune” is
highlighted, press the ok knob to confirm.
Use the ok knob to navigate until the desired frequency is selected and then press the ok knob, the
frequency and name of the ensemble and the signal strength will be displayed.
Press the ok knob again to add the ensemble and automatically tune to that station.
DAB Mode- Prune Invalid
This function will remove unavailable stations from the station list. Press the Menu button. Use the
ok knob to navigate to the “Prune Invalid” option and press the ok knob to confirm.
Rotate the ok knob to select (yes) to proceed to prune the invalid/unavailable stations. If (No) is
selected the operation will be cancelled.
DAB Display modes, station Information on DAB Mode
Signal Strength: Displays a signal bar with the strength of the current station. Bit Error Rate (BER):
Provides details of the signal error rate.
Channel and Frequency: Displays the station’s transmission channel number and frequency.
PTY (Program Type): Shows the type and description of the program provided by the DAB station.
Time and Date: Displays the time and date information provided by the broadcaster.

11
Dynamic Label Segment (DLS): Displays scrolling text information supplied by the broadcaster.
Bit Rate: The data rate of which the signal is being transmitted.
DAB Mode- DRC
DRC is dynamic range compression, and it is about increasing the loudness of the quieter parts of
the audio signal, and decreasing the loudness of the louder parts.
In DAB mode, press the Menu button, then use the ok knob to navigate until “DRC” is highlighted.
Press the ok knob to confirm.
Now use the ok knob to cycle through off, high, low level. Press the ok knob to confirm your choice.
DAB mode- System settings
Sleep:
The device features a sleep timer function, which switches off the radio off after a certain time if no
actions have been performed up until then. Also you can enter sleep setting by press SLEEP button.
1. Rotate the knob to select either OFF-15-30-45-60-90 minutes.
2. Press the knob to confirm your selection.
Alarm Setting
Note: Check that the radio has the correct time and date before you set an alarm.
You can also enter Alarm setting by press the ‘ALARM’ button on the front of the radio.
Rotate knob to select ‘Alarm 1’or ‘Alarm 2’for setting.
When you select ‘Alarm 1 ’ and press ok knob, rotate the ok knob to “Alarm” and short press the ok
knob to switch the alarm on- or off.
Rotate the ok knob to scroll to ‘frequency’. You can choose Daily, Once, Weekends or Weekdays.
Short press the ok knob to confirm your selection.

12
Rotate the ok knob to scroll to ‘Wake Up Time’ and short press the ok knob. The Hour digits will start
to flash.
Rotate the ok knob to set the desired hour and then short press the ok knob to confirm.
The minute digits will start to flash.
Rotate the ok knob to set the minutes and short press the ok knob to confirm.
Rotate the ok knob to scroll to the Alarm sound ‘source’. You can choose between Buzzer, Digital
Radio or FM. Short press the ok button to confirm.
Rotate the ok knob to scroll to ‘duration’. You can choose 15, 30, 45, 60, 90 or 120 minutes. Short
press the ok knob to confirm.
Rotate the ok knob and select ‘Volume’ to set the volume for your alarm. Rotate the ok knob to set
the volume. (The minimum volume you can select is 2). Short press the ok knob to confirm. Your
Alarm is now ready to use.
Note: The alarm volume will increase progressively until it reaches the alarm volume you have set.
Repeat the above steps to set Alarm 2 if you need.
Equalizer: Rotate the ok knob to choose between -Normal-Classic-Jazz-Pop-Rock-Speech, My EQ, My
EQ set up(Treble, Bass)
Time/Date: Set Time/Date
Press the ok knob, the Date digit will flash, rotate the ok knob to choose correct date and press the
ok knob to confirm.
The Month digit will start to flash. Rotate the ok knob to choose correct month and press the ok
knob to confirm.
The Year digit will start to flash. Rotate the ok knob to choose correct year and press the ok knob to
confirm.

13
The Hour digit will start to flash. Rotate the ok knob to choose correct hour and press the ok knob to
confirm.
The Minute digit will start to flash. Rotate the ok knob to choose the correct minute and press the ok
knob to confirm.
Now you have finished the time/date configuration.
Auto update: Choose from what source the radio will update the time automatically.
You can choose the following options:
- From Any: updates the time from DAB or FM signal
- From Digital Radio update: updates the time from the DAB signal
- From FM: updates the time from an RDS channel
- No update: If you want to set the time manually
Set 12/24 hour: Rotate the ok knob to choose to set 12 hour- or 24 hour time display
Set date format: Rotate the ok knob to choose DD-MM-YYYY or MM-DD-YYYY.
Backlight: Timeout: off-10 sec-20 sec-30 sec-45 sec-60 sec-90 sec-120 sec-180 sec
On level: High-Medium-Low
Dim level: High-Medium-Low-Off
Language: English, Italian, Deutsch, Francais, Nederlands, Spanish
Factory reset: Press the Ok knob and choose ‘Yes’ to start factory reset.
Software update: Press the ok knob and choose “yes” to update the software if needed. Updating
can only be done with a micro usb cable and connect to computer.
Notes: only select the software update option if you have an update for this unit. (if you accidently
selected this option, use the power off/on the restart the radio)
SW version: Press OK to view system version.

14
Using the radio- FM MODE
Turn the radio on, press the Mode button repeatedly and select the FM mode. The display will show
‘FM’ and the current station name or frequency if RDS is not available.
Manual search
To search manually, first short press the ‘STATIONS’button, you will see ‘start tune’displayed, and
‘Tune’keep showing on right side of the display, then turn the ok knob right to scan upwards or turn
the ok knob left to scan downwards, when you finished manual search, short press ‘STATIONS’
button, ‘Tune’disappeared.
Auto search
To initiate auto search, press and hold the ok knob. The radio starts to scan the frequency band. It
will stop automatically when a station has been found.
If you want the radio to auto search downwards or upwards then you have to do a manual search
downwards or upwards prior to long pressing the ok button.
FM mode- Scan settings
Press the menu button and rotate the ok knob to select ‘Scan setting’. Short press the ok knob and
choose between ‘Strong stations only’ or ‘All stations’ by turning the ok knob. Press the ok knob to
confirm your choice. If choose ‘Strong station only’, the radio will only scan and play stations with a
strong signal. If selecting ‘All stations’, the radio will also scan and play stations with a weak signal.
FM mode- Audio setting
Press the menu button and rotate the ok knob. Choose ‘Forced mono’ ‘Yes’ or ‘No’ and short press
the ok knob to confirm. If your favorite radio stations signal is weak, then choose ‘Forced mono ‘Yes’’
to get better sound quality.
FM mode-System settings (see DAB mode ‘system settings)
FM Display Modes
This function allows information relating to the current station to be shown in the display, short
press the ok knob repeatedly to scroll through the following information screens

15
RDS (scrolling text): The current selected Radio station may include a scrolling message about the
current program.
Program type: This describes the style of the program being broadcast.
Station name: such as BBC RD of the Frequency in Mhz
Audio Mode: The display will show if the station being received is stereo or mono
Time/date: the time and date will be automatically updated by the radio time signal (if RDS is
available).
Using the radio- preset station function
This radio allows you to store up to 10 DAB and 10 FM radio stations as preset. Presets are quickly
selectable radio stations by using the ‘preset’ button on the Radio.
Storing DAB station as preset
Follow the instructions above to select a DAB radio station.
Press and hold the ‘Preset’ button. ‘1: (Empty)’ is displayed. If no previous station has been stored.
Rotate the ok knob to scroll through the preset location that you would like to store the radio
stations to (1-10).
Short press the Select knob to store the station. The message “Preset XX saved” will appear on the
display.
Recalling DAB Preset stations
You can quickly select your presets by pressing the Preset button, then rotate the ok knob to scroll
through the stored presets. Short press the ok knob to choose to the selected station.
If you choose an empty preset, then “Preset empty” will be displayed.

16
Snooze Function
When the alarm sounds, you can press the ok knob to snooze. The default snooze time is 5 minutes.
To stop the alarm, press the standby button.
Bluetooth function
Turn on the radio and short press the Mode button until Bluetooth mode is selected. Turn on the
Bluetooth on your Bluetooth device, search for devices and then select “Lenco DAR-017”. Click it to
pair. When connected successfully you will hear a voice “connected”.
You can press the Stations button to select previous track or the back button to go to the next track.
You can press the ok knob to play or pause the music playback.
The volume can be adjusted by turning the ok knob up- or downwards (note that the volume level is
not synced with the Bluetooth device, meaning you have to turn up the volume of your Bluetooth
device manually first)
To disconnect the existing pairing and pair with new device just press and hold the ok knob.
“This product has a bluetooth reception function, you can’t transmit any bluetooth sound with it:
this means that you can receive wirelessly a bluetooth sound signal from an external source like a
smartphone.”

17
Technical Specifications
Connections
DC IN for power adapter, 3.5mm headphone out
Power adaptor Input
100-240V~50/60 Hz, 0.2A max
Power adaptor Output
5.9V/1.0A 5.9W
Power consumption
Battery
3W RMS
4 x AA(not included)
Power consumption (standby)
<1W
Operating Temperature
0°C-35°C
Operating position
Horizontal
Power supply adaptor: (For EU only)
Manufacturer: Shenzhen Adition Audio Science and Technology Co., Ltd
Model Number: AD0600591000EU
Use only original AC adaptor
Use only the power supply listed in the user instructions.
Dim. unit
170 x 97 x 103 mm (WxDxH)
Weight
600g
NOTE: Only use the power supply listed in this manual.
Information Power Adapter:
Manufacturers name and address : Shenzhen Adition Audio Science & Technology Co., Ltd.
Mingzhuo Industry Park, Guangming New District, Shenzhen, China.
Model Identifier : AD0600591000EU
Input voltage : 100-240VAC
Input AC frequency : 50/60 Hz
Output voltage : 5.9 VDC
Output current : 1.0 A
Output Power : 5.9 W
Average active efficiency : 75.55 %
No load Power consumption : 0.07 W

18
Guarantee
Lenco offers service and warranty in accordance to European law, which means that in case of
repairs (both during and after the warranty period) you should contact your local dealer.
Important note: It is not possible to send products that need repairs to Lenco directly.
Important note: If this unit is opened or accessed by a non-official service center in any way, the
warranty expires.
This device is not suitable for professional use. In case of professional use, all warranty obligations of
the manufacturer will be voided.

19
Disclaimer
Updates to Firmware and/or hardware components are made regularly. Therefore some of the
instruction, specifications and pictures in this documentation may differ slightly from your particular
situation. All items described in this guide for illustration purposes only and may not apply to
particular situation. No legal right or entitlements may be obtained from the description made in
this manual.
Disposal of the Old Device
This symbol indicates that the relevant electrical product or battery should not be
disposed of as general household waste in Europe. To ensure the correct waste
treatment of the product and battery, please dispose them in accordance to any
applicable local laws of requirement for disposal of electrical equipment or
batteries. In so doing, you will help to conserve natural resources and improve
standards of environmental protection in treatment and disposal of electrical
waste (Waste Electrical and Electronic Equipment Directive).
DECLARATION OF CONFORMITY
Hereby, Commaxx declares that the radio equipment type [Lenco DAR-017] is in compliance with
directive 2014/53/EU. The full text of the EU declaration of conformity is available at the following
internet address:
https://commaxx-certificates.com/doc/dar-017_doc.pdf
Type RF
Frequency range (MHz)
Power (dBm)
FM
87.5-108
-
DAB+
174-240
-
Bluetooth
2402-2480
<6
Service
For more information and helpdesk support, please visit www.lenco.com
Commaxx B.V. Wiebachstraat 37, 6466 NG Kerkrade, The Netherlands.

20
Nederlands
DAR-017
VOORZICHTIG:
Het gebruik van bedieningen of afstellingen of het uitvoeren van procedures anders dan hierin
gespecificeerd, kan leiden tot blootstelling aan gevaarlijke straling.
VOORZORGSMAATREGELEN VÓ Ó R GEBRUIK
NEEM MET DE VOLGENDE INSTRUCTIES IN ACHT:
1. Bedek of blokkeer geen van de ventilatieopeningen. Als u het apparaat op een schap plaatst,
dient u voor 5 cm (2") vrije ruimte rondom het gehele apparaat te zorgen.
2. Installeer in overeenstemming met de meegeleverde gebruikshandleiding.
3. Houd het apparaat uit de buurt van warmtebronnen zoals radiatoren, kachels, fornuizen,
kaarsen en andere warmtegenererende producten of open vuur. Het apparaat kan alleen
worden gebruikt in gematigde klimaten. Extreem koude of warme omgevingen dienen te
worden vermeden. Bedrijfstemperatuur tussen 0°en 35°C.
4. Gebruik het apparaat niet in de buurt van krachtige magnetische velden.
5. Elektrostatische ontlading kan de normale werking van dit apparaat verstoren. In dit geval kunt
u het apparaat gewoon resetten en opnieuw starten volgens de gebruiksaanwijzingen. Wees
voorzichtig tijdens bestandsoverdracht en voer dit uit in een omgeving zonder statische
interferentie.
6. Waarschuwing! Steek geen voorwerpen in het product via de ventilatie- of andere openingen.
Er is hoge spanning aanwezig in het product en als u er een voorwerp insteekt, kan dat tot
elektrische schokken en/of kortsluiting van de interne onderdelen leiden. Laat om dezelfde
reden geen water of vloeistof op het product terechtkomen.
7. Gebruik het apparaat niet in natte of vochtige ruimtes zoals badkamers, keukens met veel
stoom of in de buurt van zwembaden.
8. Stel het apparaat niet bloot druppels of spetters en zorg ervoor dat er geen met vloeistof
gevulde voorwerpen, zoals vazen, op of in de buurt van het apparaat worden geplaatst.
9. Gebruik dit apparaat niet als er condensatie kan optreden. Wanneer het apparaat in een
warme en vochtige kamer wordt gebruikt, dan kunnen er waterdruppeltjes of condensatie
binnenin het apparaat worden gevormd waardoor het apparaat mogelijk niet meer goed werkt;
houd en apparaat 1 of 2 uur op UIT staan voordat u de voeding weer inschakelt: het apparaat
dient droog te zijn voordat deze stroom ontvangt.
10. Al is dit apparaat met de grootste zorg vervaardigd en meerdere keren gecontroleerd voordat
deze de fabriek verlaat, is het toch mogelijk dat er problemen optreden, zoals bij alle
elektrische apparaten. Als u rook, overmatige warmteontwikkeling of andere onverwachte
verschijnselen constateert, dient u onmiddellijk de stekker uit het stopcontact te trekken.
11. Dit apparaat moet van stroom worden voorzien door een bron zoals gespecificeerd op het
nominale specificatielabel. Als u niet zeker weet welk type stroomvoorziening in uw huis wordt
gebruikt, neem dan contact op met uw dealer of het plaatselijke energiebedrijf.
12. Houd uit de buurt van dieren. Sommige dieren knauwen graag aan voedingskabels.
13. Gebruik een zachte, droge doek om het apparaat schoon te maken. Gebruik geen
oplosmiddelen of vloeistoffen op benzinebasis.
U kunt een vochtige doek met verdund schoonmaakmiddel gebruiken om hardnekkige vlekken
te verwijderen.
14. De leverancier is niet verantwoordelijk voor schade of verlies van gegevens veroorzaakt door
storing, misbruik, modificatie van het apparaat of vervanging van de batterij.
15. Zorg ervoor de verbinding niet te verbreken terwijl het apparaat bezig is met formatteren of
bestandsoverdracht. Gegevens kunnen anders corrupt of verloren raken.
16. Als het apparaat een USB-afspeelfunctie heeft, moet de USB-geheugenstick rechtstreeks in het
apparaat worden gestoken. Gebruik geen USB-verlengsnoer, omdat deze interferentie kan
veroorzaken waardoor uw gegevens verloren kunnen gaan.
17. Het nominale specificatielabel is te vinden op het onder- of achterpaneel van het apparaat.
This manual suits for next models
2
Table of contents
Languages:
Other LENCO Portable Radio manuals

LENCO
LENCO IPD-5200 User manual

LENCO
LENCO ODR-150 User manual

LENCO
LENCO SCD-580 User manual

LENCO
LENCO SCD-200 User manual

LENCO
LENCO SCD-580SI User manual

LENCO
LENCO SCD-501 User manual

LENCO
LENCO SCD-32 BT User manual

LENCO
LENCO SCD-430RD User manual

LENCO
LENCO PDR-011BK User manual

LENCO
LENCO PDR-045 User manual

LENCO
LENCO SCD-685BK User manual

LENCO
LENCO SCD-70 User manual

LENCO
LENCO MPR-031 User manual

LENCO
LENCO PDR-045BK User manual

LENCO
LENCO SCD-620 User manual

LENCO
LENCO SCD-38 USB User manual

LENCO
LENCO PDR-046 User manual

LENCO
LENCO IPD-5100 User manual

LENCO
LENCO PDR-031 User manual

LENCO
LENCO PDR-03 User manual