Lenovo ZA6G0006US User manual

Lenovo Smart Frame
User Guide
Lenovo CD-3L501F

Basics
Note:
All pictures and illustrations in this document are for reference only.
The Lenovo Smart Frame app supports both AndroidTM andiOS systems. This document uses the
Android systemasanillustrative example.
Because theLenovo Smart Frame app will regularly beupdated, refer to thelatest version for the
actual procedure and screenshots.
Keep thenetwork stable during use ofthe Lenovo Smart Frame.
The Lenovo smart app referred to inthismanual isa phone app.
Before using this information and the product it supports, be sure to read the following:
Safety, Warranty & Quick Start Guide
Regulatory Notice
"Important safety and handling information" in "Appendix".
The Safety, Warranty & Quick Start Guide and the Regulatory Notice are available at:
http://support.lenovo.com
Lenovo Help
Looking for help? The Lenovo Help app can offer you support with direct access to Lenovo's web
assistance and forums*, frequent Q&A*, system upgrades*, hardware function tests, warranty status
checks*, service requests**, and repair status**.
1.Open the app and log in with your account.
2.Enter Home screen, tap > Support to get more help.
Note:
* requires data network access.
** is not available in some countries.
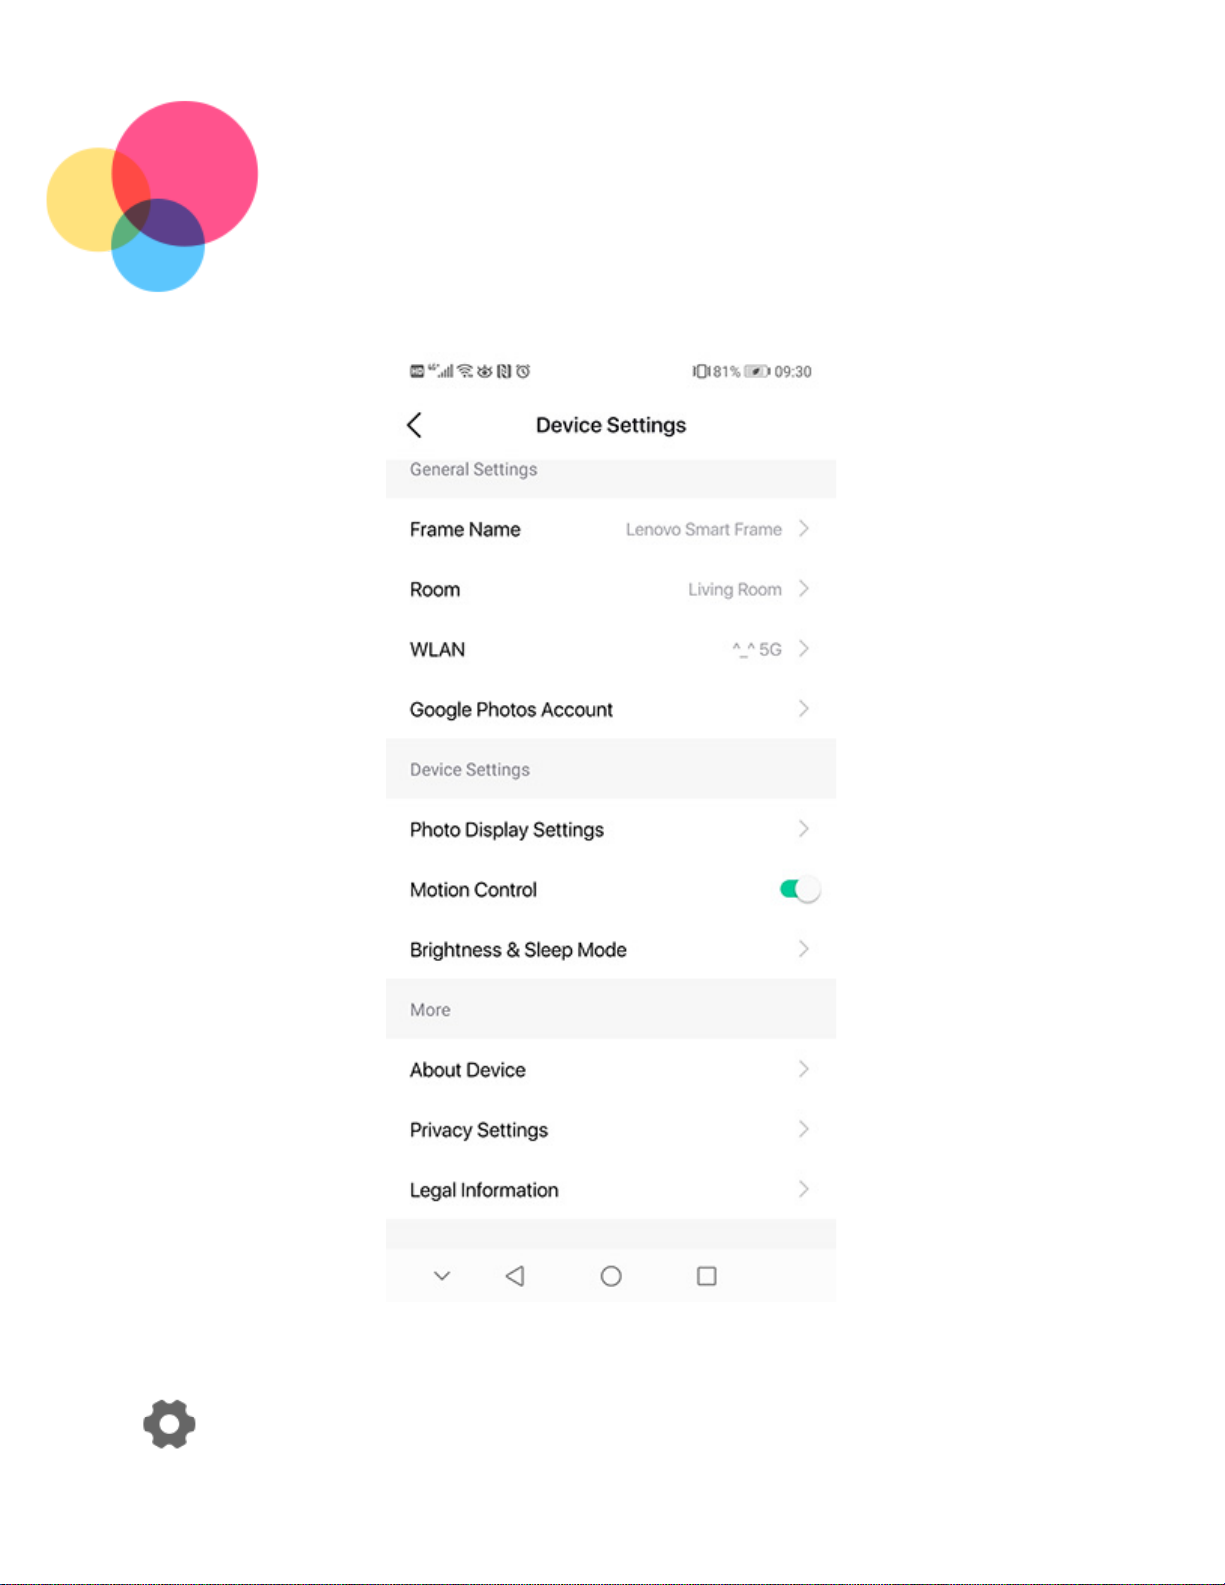
Privacy protection
To protect your privacy, you can delete the device data by removing the Smart Frame device or
performing a factory reset in the app.
1.Open the app and log in with your account.
2.Enter Device home screen, tap .
Tap Remove Device to remove the existing Smart Frame devices.
Enter About Device, tap Factory Reset Device to factory reset.

Technical specifications
Model Lenovo CD-3L501F
Dimension 21.5"
Resolution 1920 x 1080
Wireless
communication Bluetooth 5.0;
WLAN 802.11 ac/a/b/g/n, 2.4GHz/5GHz

Getting started
Getting the app
Search for and download the Lenovo Smart Frame App from the Google Play Store or Apple App Store
to begin the setup process.
Connecting to device
You’ll need to connect your Lenovo Smart Frame to the Internet before using it.
1.Open the Lenovo Smart Frame app.
2.Log in to the app with your Lenovo ID. You can also sign up using email, or use your google or
facebook accounts to login in.
Note: You will need a Lenovo ID to log in to the app if using an IOS system.
3.Turn on Bluetooth. In the app's Home screen, tap Add New Device to find a device. Once a device
is found, you can follow the instructions to confirm that it is the right device by matching the numbers
displayed on both screens, and select Connect to continue.
4.Connect to a WLAN network for your Smart Frame device.
5.Follow the on-screen instructions to set up your Lenovo Smart Frame and connect your Google
account.

Using the Lenovo Smart
Frame app
Home screen
After signing up on your app, enter the Home screen. Pull down from anywhere on the screen to
refresh.
1. Add device and manage rooms 4. The Lenovo Smart Frame device image, tap it
to enter the Device Home screen
2. Include AppSettings, Voice Control, Support,
Contact Us and About 5. Display connectivity status of device
3. Display room name
Device home screen

1. Display default or user-specified device name 5. Go to previous item, such as previous photo
and previous artwork
2. Settings include General Settings, Device
Settings, More and Remove Device 6. Go to next item, such as next photo and next
artwork
3. Click on the "star" icon to save a photo to
favorites 7. Current channel
4. Display what the connected device is showing 8. Include Brightness, Photo Settings and
Channels

Channel list
The Smart Frame device includes several channels to display different content. You can edit the
channel, select a default or optional channel, or create a new channel.
Selected photos: Allows you to select album(s) from your existing Google Photos account.
Art gallery: Displays a pre-composed collection of artwork.
Recommendation: Curates photos from your entire Google Photos library randomly based on an
intelligent algorithm using criteria such as this week in history and recent events.
If there are items that you may not want the frame to show, be sure to archive them directly from
your Google Photos account before displaying this channel.
Clock: Displays a full screen clock face of your choice.

Manage your channel
1.Open the app, enter the Device home screen, tap Channels.
2.Tap Edit Channels.
3.Remove channels from the channel list or add channels to the channel list and then tap Save.
Create channel
1.Open the app, enter the Device home screen, go to Channels > Edit Channels.
2.Tap Create Channel, select album to create your custom channel and then tap Create.

Function display
Display your photos
Select an album from your existing Google Photos account and choose which photos within are listed.
1.Open the app, enter Device home screen.
2.Tap Channels, select the Selected Photos channel and select an album from Google photos.
3.Go to > Photo Display Settings, and set up the photo display style.
The Show Pair switch is set to on by default and needs be turned off to display single photos.
Turn on the Lock Orientation switch and the Smart Frame device will only show photos in the locked
orientation.
Tap Slideshow Speed and select the speed at which your photo slideshow plays. During the
slideshow, you can pause and play the photos.
Turn on Curated Collage Display switch and the Smart Frame device will auto-curate and dispaly
collages.
Show photo created date and show time
1.Open the app, enter the Device home screen.
2.Go to > Photo Display Settings, and set up the date and time.
Tap Show Time and select 12-Hour time or 24-Hour time.
The Display Photo Created Date switch is set to on by default.
View clock
The clock channel displays a full screen clock face of your choice.
1.Open the app and enter Device home screen.
2.Tap Channels, select Clock channel, and select a clock face.

Motion control
Item transition
1.Open the app, enter Device home screen.
2.Go to > Motion Control, the Motion Control switch is set to on by default and needs be turned
off to disable the gesture for your Smart Frame device.

3.Swipe left for the next item (photo, artwork), swipe right for the previous item (photo, artwork).
Channel transition
1.Open the app, enter the Device home screen.
2.Go to > Motion Control, the Motion Control switch is set to on by default and needs be turned
off to disable the gesture for your Smart Frame device.
3.Swipe up for the next channel.
Motion sensor failure
The motion sensor cannot work properly under thebelow conditions:
The light intheroom istoobright, such asdirect sunlight shining ontheframe.
The frame isput ona table and thegesture sensor isclose to thetable surface.
Hand movement isnot horizontally level with themotion sensor position.
Note: We suggest you stand closer to the frame and wait until the keys on the frame light up
before starting a motion command.

Voice control
Control the Smart Frame device with your voice. According to different commands, the Smart Frame
device performs different actions.
1.Open the app, enter the Home screen.
2.Tap > Voice Control. Follow the instructions to enable Alexa and Google Assistant voice
command for your Smart Frame device.

3.You can control the Smart Frame device with existing Alexa or Google Assistant devices.
For example:
You can say "OK Google, turn on Lenovo Smart Frame" or "Alexa, turn on Lenovo Smart Frame".

Auto-Brightness &
Sleep mode
The frame display adjusts brightness based on your environment and turns off after being in a dark
environment for a moment at the preset time when sleep mode is enabled. The frame will exit sleep
mode if the preset exit time arrives or the environment becomes brighter again.
Manage Sleep mode and set a preset time
1.Open the app and enter Device home screen.
2.Go to > Brightness & Sleep Mode, the Sleep Mode switch is set to on by default and needs
be turned off to disable the sleep mode preset.
3.Set a preset time.

Manage Auto-Brightness
1.Open the app and enter Device home screen.
2.Go to > Brightness & Sleep Mode, the Auto-Brightness switch is set to on by default and
needs be turned off to disable the auto-brightness preset.
Note: When manually adjusting brightness settings, the brightness will still automatically revert
back to auto-brightness presets when a preset time arrives.

Appendix
Important safety and handling information
To avoid personal injury, property damage, or accidental damage to the product, read all of the
information in this section before using the product. For additional tips to help you operate your device
safely, go to http://www.lenovo.com/safety.
Handle your device with care
Do not drop, bend, or puncture your device; do not insert foreign objects into or place heavy objects on
your device. Sensitive components inside might become damaged.
Your device screen is made of glass. The glass might break if the device is dropped on a hard surface,
is subjected to a high impact, or is crushed by a heavy object. If the glass chips or cracks, do not touch
the broken glass or attempt to remove it from the device. Stop using the device immediately and contact
Lenovo technical support for repair, replacement, or disposal information.
When using your device, keep it away from hot or high-voltage environments, such as electrical
appliances, electrical heating equipment, or electrical cooking equipment. Use your device only in the
temperature range of 0°C (32°F) to 40°C (104°F) (storage -20°C (-4°F) to 60 °C (140°F)) to avoid
damage.
Don't expose your device to water, rain, extreme humidity, sweat or other liquids.
Do not disassemble or modify your device
Your device is a sealed unit. There are no end-user serviceable parts inside. All internal repairs must
be done by a Lenovo-authorized repair facility or a Lenovo-authorized technician. Attempting to open or
modify your device will void the warranty.
Plastic bag notice
DANGER:
Plastic bags can be dangerous. Keep plastic bags away from babies and children to avoid danger
of suffocation.
Adapter information
Prevent your device and AC adapter from getting wet.
Do not immerse your device in water or leave your device in a location where it can come into
contact with water or other liquids.
Use approved charging methods only.
Note: Please only use standard Lenovo power adapters. The use of third-party power adapters will
affect the charging speed, resulting in abnormal charging and potential damage to the equipment.
Connect a standard power adapter to a suitable power outlet.

Charging devices might become warm during normal use. Ensure that you have adequate ventilation
around the charging device. Unplug the charging device if any of the following occurs:
The charging device has been exposed to rain, liquid, or excessive moisture.
The charging device shows signs of physical damage.
You want to clean the charging device.
Warning:
Lenovo is not responsible for the performance or safety of products not manufactured or
approved by Lenovo. Use only approved Lenovo ac adapters.
Dispose according to local laws and regulations
When your device reaches the end of its useful life, do not crush, incinerate, immerse in water, or
dispose of your device in any manner contrary to local laws and regulations. Some internal parts contain
substances that can explode, leak, or have an adverse environmental effects if disposed of incorrectly.
See “Recycling and environmental information” for additional information.
Keep your device and accessories away from small children
Your device contains small parts that can be a choking hazard to small children. Additionally, the glass
screen can break or crack if dropped on or thrown against a hard surface.
Be aware of heat generated by your device
When your device is turned on, some parts might become hot. The temperature that they reach depends
on the amount of system activity. Extended contact with your body, even through clothing, could cause
discomfort. Avoid keeping your hands, your lap, or any other part of your body in contact with a hot
section of the device for any extended time.
Electronic emission notices
FCC Compliance Statement
This equipment has been tested and found to comply with the limits for a Class B digital device,
pursuant to Part 15 of the FCC Rules. These limits are designed to provide reasonable protection
against harmful interference in a residential installation. This equipment generates, uses, and can
radiate radio frequency energy and, if not installed and used in accordance with the instructions, may
cause harmful interference to radio communications. However, there is no guarantee that interference
will not occur in a particular installation. If this equipment does cause harmful interference to radio or
television reception, which can be determined by turning the equipment off and on, the user is
encouraged to try to correct the interference by one or more of the following measures:
Reorient or relocate the receiving antenna.
Increase the separation between the equipment and receiver.
Connect the equipment into an outlet on a circuit different from that to which the receiver is
connected.
Consult an authorized dealer or service representative for help.
Lenovo is not responsible for any radio or television interference caused by unauthorized changes or
modifications to this equipment. Unauthorized changes or modifications could void the user’s authority to
operate the equipment.
This device complies with Part 15 of the FCC Rules. Operation is subject to the following two conditions:
(1) this device may not cause harmful interference, and (2) this device must accept any interference

received, including interference that may cause undesired operation.
Responsible Party:
Lenovo (United States) Incorporated
1009 Think Place - Building One
Morrisville, NC 27560
Telephone: 1-919-294-5900
ISED Caution
This device complies with Innovation, Science and Economic Development Canada license-exempt RSS
standard(s). Operation is subject to the following two conditions:
(1) This device may not cause interference, and
(2) this device must accept any interference, including interference that may cause undesired operation
of the device.
Le présent appareil est conforme aux CNR d'Industrie Canada applicables aux appareils radio exempts
de licence. L'exploitation est autorisée aux deux conditions suivantes:
(1) l'appareil ne doit pas produire de brouillage, et
(2) l'utilisateur de l'appareil doit accepter tout brouillage radioélectrique subi, même si le brouillage est
susceptible d'en compromettre le fonctionnement.
Environmental, recycling, and disposal information
General recycling statement
Lenovo encourages owners of information technology (IT) equipment to responsibly recycle their
equipment when it is no longer needed. Lenovo offers a variety of programs and services to assist
equipment owners in recycling their IT products. For information on recycling Lenovo products, go to
http://www.lenovo.com/recycling.
Important WEEE information
Electrical and electronic equipment marked with the symbol of a crossed-out wheeled bin may not be
disposed as unsorted municipal waste. Batteries and waste of electrical and electronic equipment
(WEEE) shall be treated separately using the collection framework available to customers for the return,
recycling, and treatment of batteries and WEEE. When possible, remove and isolate batteries from
WEEE prior to placing WEEE in the waste collection stream.
Country-specific information is available at http://www.lenovo.com/recycling.
Recycling information for Japan
Recycling and disposal information for Japan is available at http://www.lenovo.com/recycling/japan.
Recycling information for India
Recycling and disposal information for India is available at
http://www.lenovo.com/social_responsibility/us/en/sustainability/ptb_india.html.
Export classification notice

This product is subject to the United States Export Administration Regulations (EAR) and has an Export
Classification Control Number (ECCN) of 5A992.c. It can be re-exported except to any of the embargoed
countries in the EAR E1 country list.
Troubleshooting
Unable to pair to smart phone
1. Make sure that the frame is not connected to any other smart phone. The Frame can only connect to
one smart phone at a time.
2. Make sure the Bluetooth function on your smart phone is working properly. You may test your smart
phone Bluetooth function by pairing it to other smart phones.
3. On the frame, long press both the star and volume down key at the same time for 5 seconds to go
back to the pair interface, and try to pair again.
4. If you still cannot pair the smart phone, please call customer service.
Fail to log into Google Photo
1. Make sure your smart phone is connected to the Internet.
2. Make sure Google Photo is available at the time and region you are using it.
3. Make sure your Lenovo Smart Frame app is the latest version. Reinstall if needed.
4. Make sure the network remains stable when you log in with your Google ID.
5. If you still cannot log in, please call customer service.
Why Google ID may require re-login
This is part of the Google security mechanism where you are required to log in to your Google ID after
a period of time.
Cannot connect to WLAN
1. If your frame cannot connect to WLAN, please try to reconfigure your frame and pair to your device
again. During the pairing you will be asked to select the WLAN network the frame will be connected
to.
2. If the above does not solve the issue, please call customer service.
The Frame is unresponsive
1. Please unplug and plug back in the power cable.
2. Long press the star and volume down key at the same time for 5 seconds to go back to the pair
interface, and then retry.
3. If it still cannot be resolved, please call customer service.
Other manuals for ZA6G0006US
1
Table of contents
Other Lenovo Digital Photo Frame manuals