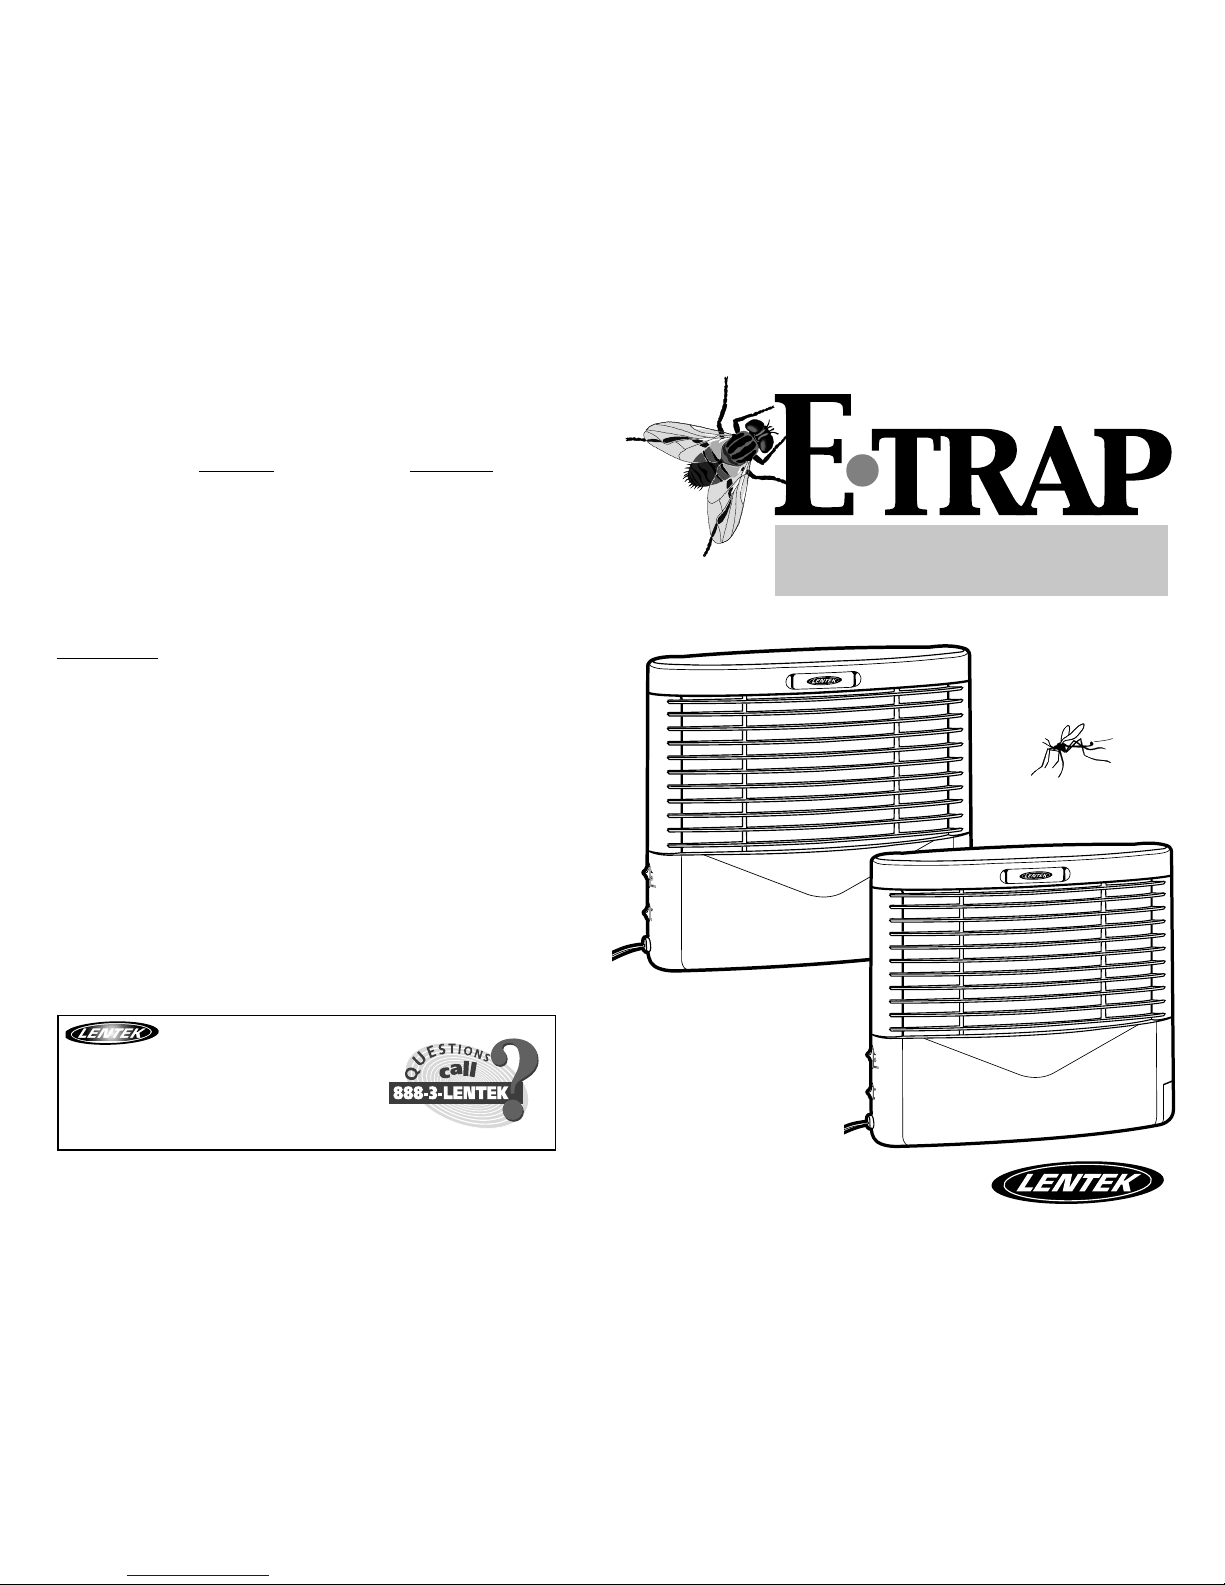
Lentek e-trap Manual

THE ELECTRONIC
FLYING INSECT TRAP
DIRECTIONS FOR USE
™
© 2002 Lentek International. All rights reserved. REVINSTFT1525 0603
All specifications are subject to change without notice.
ONE YEAR LIMITED WARRANTY
Purchase Date: ITEM# (above UPC code)
This Limited Warranty is effective upon purchase date.
Please fill out the separate registration card and mail.
1. Lentek International warrants this product to be free of manufacturing
defects. Should any such defect develop or become evident within ONE
year from the date of purchase, Lentek International will replace the entire
product or, at its option, repair or replace the defective part(s)
without charge.
To Return Unit:
2. Securely pack the entire unit. Be sure the carton clearly identifies the
sender by name and address. Attach a letter or card describing the nature
of the defect. The original receipt of the purchase must be included in the
returned package to be eligible for warranty coverage.
3. This warranty is void if the damage or malfunction is due to abuse or
failure to operate the product in accordance with the instructions and/or
on the recommended electrical current.
Mail prepaid via insured parcel post to:
LENTEK INTERNATIONAL,INC.
3600 COMMERCE BLVD.• DOCK #7 • KISSIMMEE,FL 34741
LENTEK INTERNATIONAL INC.
3700 Commerce Blvd.• Kissimmee,FL.34741
Phone: 407•857•8786
Fax: 407•857•4045
Toll Free: 888•3LENTEK (353-6835)
Email: [email protected]
www.lentek.com

5
Fig.13
Fig.14
Fig.15
MAINTENANCE:
Cleaning the E-Trap
The E Trap should be cleaned whenever it is dusty or dirty.
1. Turn power OFF and disconnect.
2. Wipe with damp cloth.
Caution: Do not submerse in water.
Repla ing the lamps
1. Turn power OFF and disconnect
2. Loosen screws at the back of unit (See Fig.13)
3. Remove front cover. (See Fig.14)
4. Unscrew the lamps in the directions as shown in Fig.15,
and remove
5. Replace with new lamps
6. Replace and tighten front cover
This unit can be used with an approved extension cord
(SJW A, SJEW A, or SJTW A) only, rated as great as unit.
Use only extension cords which have plugs and receptacles
which accept the units end.
Keep out of reach of children.
Never carry unit by cord or yank it to disconnect from receptacle.
Keep cord away from heat, cold, oil, and sharp edges.
Disconnect the unit from receptacle when not in use, before servicing, when
changing bulbs, or cleaning out dead bugs.
Do not insert foreign objects into this unit.
This unit is for indoor use only. To avoid risk of fire or electrical shock, do not use
where it may be exposed to water or moisture, including on roofed but open porches.
Te hni al Spe ifi ations
Input voltage: AC 110 120V
Base: 0.61 in x 11.30 in
UVA Light Bulb: F8T5BL
SAFETY:
CAUTION:
Dear Customer,
Thank you and congratulations on your pur-
chase of this ingenious device. This product
is the latest in new technology from
Lentek™. Your satisfaction is very important
to us.
Visit our website at: www.lentek.com and
view the rest of our products, such as our
Pet Appliance, Home Comfort, Wine
Collection, Housewares and PestContro®.
While you’re there, register your new pur-
chase, sign up to receive our newsletter, and
learn more about our company.
Questions can also be asked on our website,
or you can call: 1-888-3-LENTEK, or 407-
857-8786 or contact your local Lentek deal-
er.
We look forward to serving you, now and in
the future.
Enjoy!
Lou Lentine
Lou Lentine
President

THE TECHNOLOGY BEHIND THE E-TRAP:
Thank you for your on the purchase of the E trap by Lentek.
How the E-trap differs from a “Bug Zapper”:
Similar to a “Bug Zapper”, the high density ultraviolet lights attract flying insects to the
trap.
But...here’s how the E-trap differs from a “Bug Zapper.”
As the insect nears the
reflective grid located at the rear of the cabinet, using patent pending technology, it
experiences a continuous low voltage shock that temporarily disables the insect. It then
drops downward to the exclusive sound suppression chamber. Inside the chamber,
another, slightly different, low voltage grid slowly disables and dehydrates the insect.
You then simply remove the sound suppression chamber drawer and discard the “dried”
insects into the trash.
Complies with FDA criteria for use in food establishments when installed in an
acceptable manner according to the 1999 food code, reference no. 6- 03.13
There’s no exploding inse t parts,
no burning ele tri al smells,
no popping noises…
and no flying inse ts to bother you.
YOUR NEW E-TRAP INCLUDES THE FOLLOWING:
14
INSTALLATION (CONTINUED) :
8) Insert the “Hanging Bar” to the first notch, and
slide it to the right to lock it into place.
9) Take the E trap and slide the “Hanging Bar” straight
down onto the “Top Mounting Bracket” on the
wall. This should allow the E trap to come to rest
on the shelf.
NOTE:
For the sake of safety, the lamps are not installed onto the unit in the package. For the
lamp installation procedures, please refer to the part of “Replacing the Lamps” at the
later part of the manual.
1) Locate the Suppression Chamber Drawer on the
bottom right hand side of the E trap. Using the lip
on the bottom, slide the chamber drawer all the
way out.
2) Before opening the chamber, look inside the
clear viewing window for any surprises (ie. bees
or other still living insects).
3) Now you are ready to empty the chamber. Hold
the drawer firmly in one hand. With your other
hand, gently lift up on the funnel edge, lifting the
lid off, being careful not to dump the dried bugs
all over.
4) Empty the dried bugs into the trash.
5) Replace the lid, and slide the chamber drawer
back into place.
EMPTYING YOUR E•TRAP:

E trap Main Unit
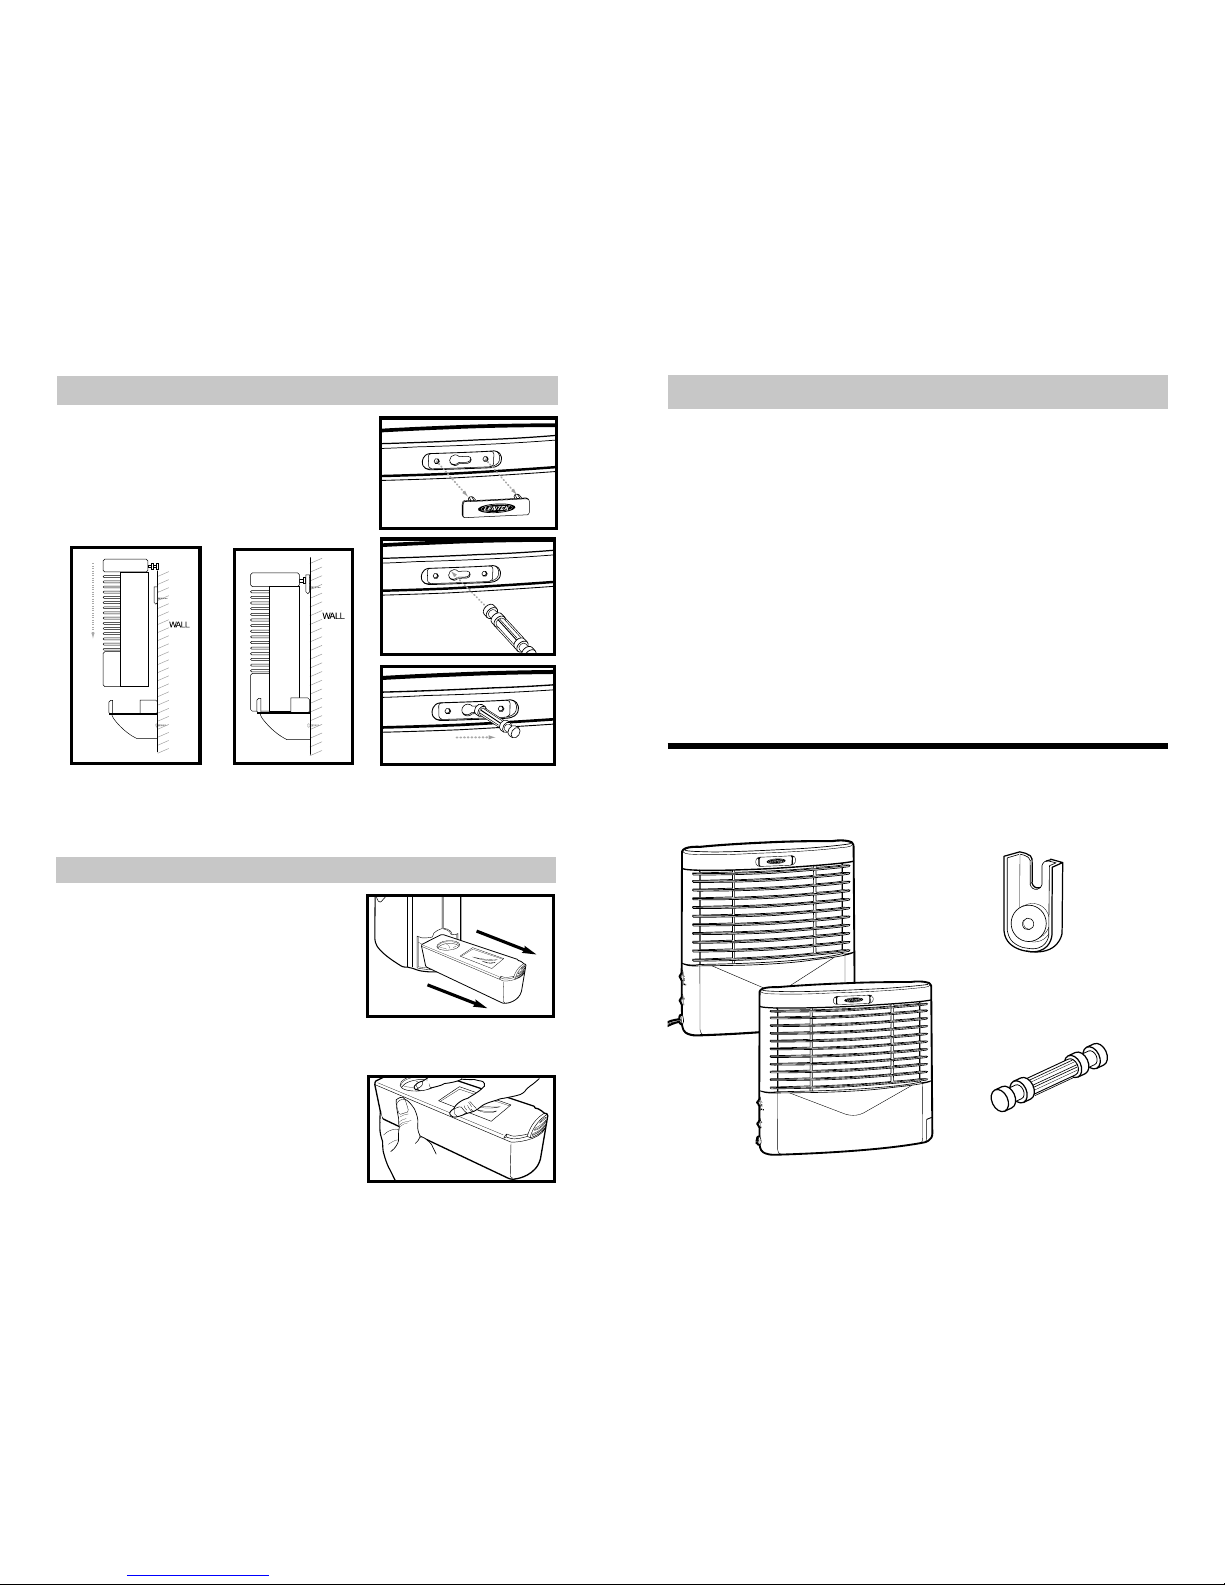
Top Wall Mount Bracket
Hanging Bar
Bottom Wall Mount Bracket
Base Stand
1 Flat Head Screw
2 Round Head Screws
2 3
SETTINGS/TRAP LOCATION:
Sound suppression
chamber drawer
Funnel
Clear viewing window
INSTALLATION - BASE STAND OR WALL MOUNT :
The first thing you will need to do is locate a spot to place the E trap that is closest to the
problem area, but far enough away from people and activities. The E trap attracts the
insects with ultraviolet lights. Ideal placement is at 3 4 feet height in a darkened location
away from windows.
BASE STAND:
1) Slide the tabs on the bottom of the
E trap into the slots on the base until
they have snapped into place.
WALL MOUNT:
1) Decide on the height you would like to place the
E trap. Locate a stud in the wall at the height you have
chosen. Place a mark where the “Top Mounting
Bracket” () will be placed.
2) FOR THE FT10 & FT15
Measure from that point, straight down 11.53”
(292.70mm). Mark the spot.
FOR THE FT20 & FT25
Measure from that point, straight down 17.44”
(443.00mm). Mark the spot.
3) Using that spot as your center point, measure 13/16”
to each side, making sure you are level, mark those
points.
4) Using the “Flat Head Screw” (), take the “Top
Mounting Bracket,” () with the flat side facing
towards you, and screw it into the first spot marked.
5) Screw the other two remaining screws into the other
two spots. (NOTE: Do not screw these in all the way.
Leave about 1/8” between the screw head and
the wall.)
6) Take the “Bottom Wall Mount Bracket”
and line up the holes on the back
with the screws and lower the shelf to
lock it into place.
7) Locate on the back of the E trap,
towards the top, a rectangular cover.
Insert your fingers on each side of it
and pull it out.
Nighttime Setting – This sets the voltage charge that
stuns the insect specifically aimed at evening flying
insects.
Daytime Setting – This sets the voltage charge that
stuns the insect specifically aimed at flies and other
daytime flying insects.
Automatic Setting – Sensor automatically switches
from day to evening setting.
This turns the E trap ON
This turns the E trap OFF
Not only does the E trap have manual settings for day and night, but it also has a
built in sensor that automatically switches from trapping small insects to larger insects,
depending on the day or evening.
(AUTO setting is not available on FT10 and FT20 Models)
Other Lentek Lawn And Garden Equipment manuals
Popular Lawn And Garden Equipment manuals by other brands

Outdoor Life Products
Outdoor Life Products Outdoor Living 5030F Assembly instructions

Pioneer
Pioneer Brite Striper 2000 Instruction manual & parts list

Gronomics
Gronomics VEGB 24-48 Assembly instruction

Jata hogar
Jata hogar mosquitoTRAP MIE4 manual

The Handy
The Handy THGTL-A manual

Cub Cadet
Cub Cadet 59A30034150 Operator's manual