LEOMO TYPE-S Use and care manual

TYPE-S
Operations and Safety Manual
LEM-TS1 VERSION 1.0

Overview
Introduction ............................................................................................................................................ 4
Features ................................................................................................................................................. 4
Parts and Optional Accessories ............................................................................................................. 5
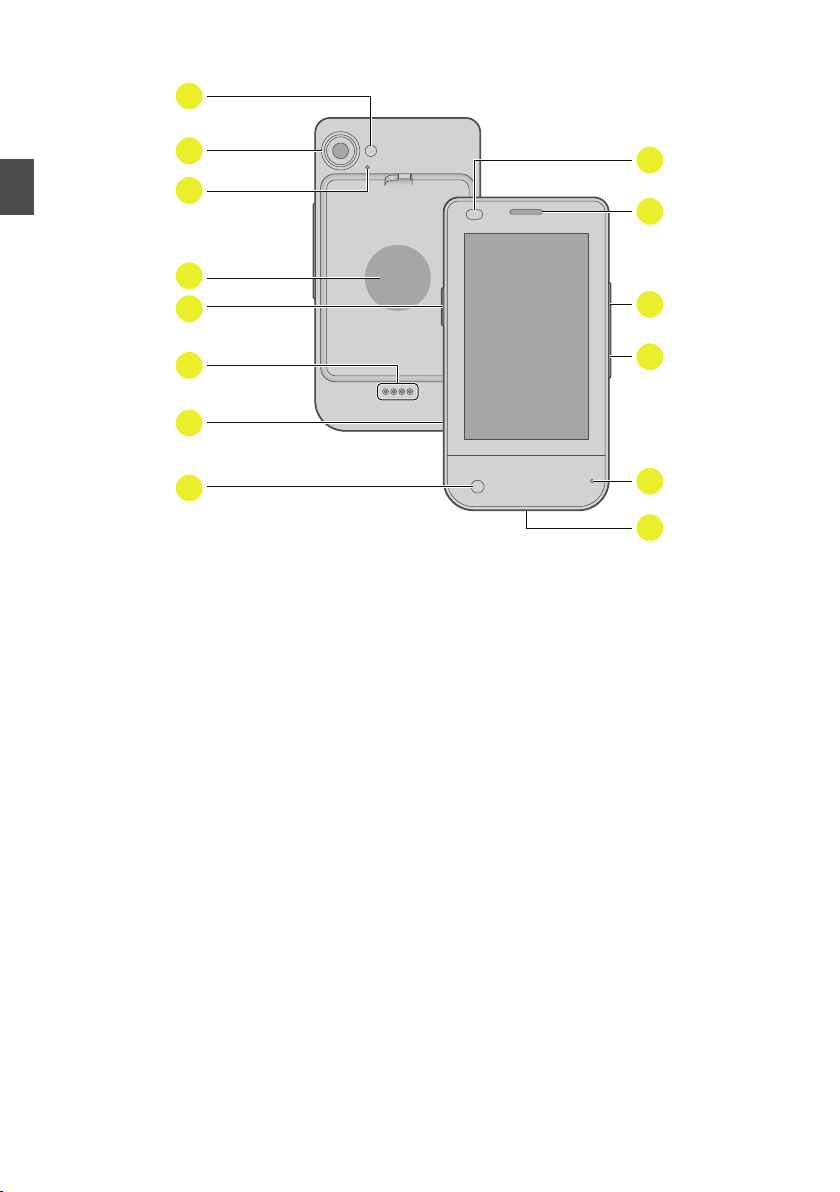
Parts and Controls of the TYPE-S .......................................................................................................... 8
Getting Started
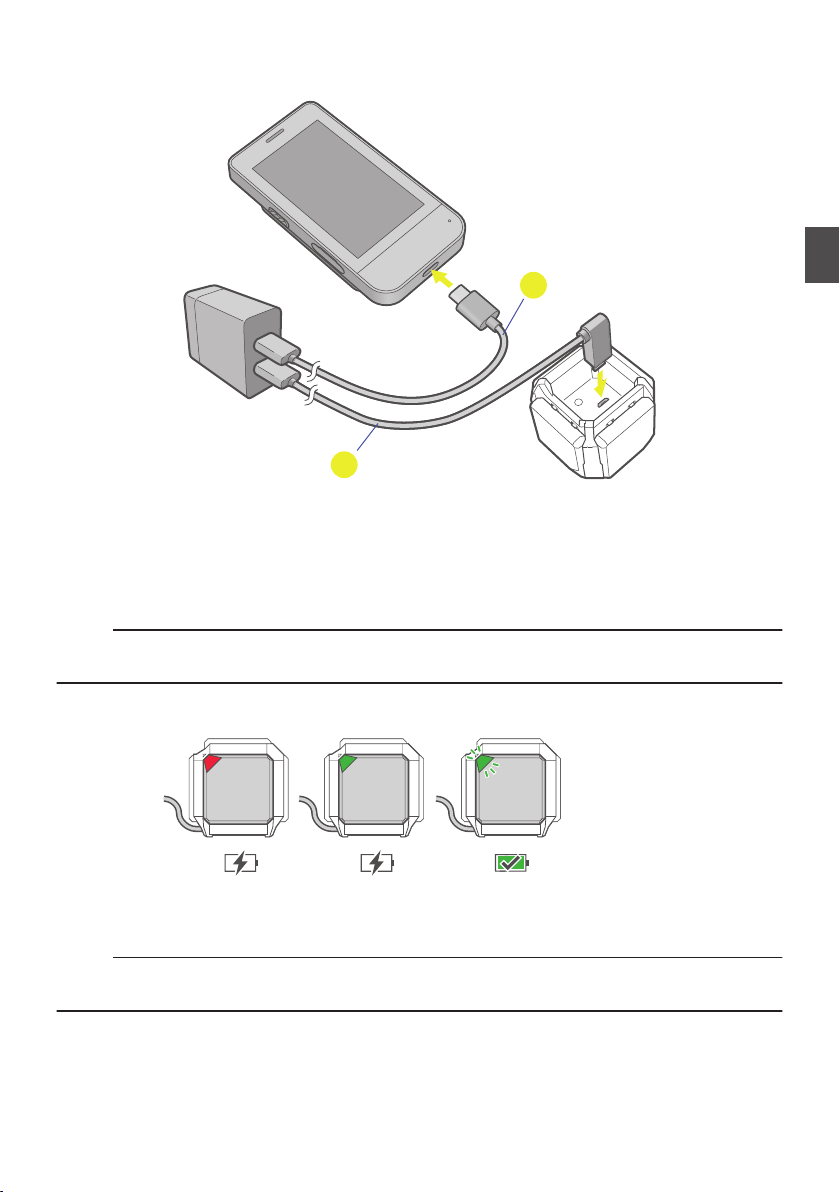
Charging Devices ................................................................................................................................... 9
Turning the TYPE-S On ........................................................................................................................ 12
Making the Initial Settings ..................................................................................................................... 13
TYPE-S Home Screen ......................................................................................................................... 14
Starting the LEOMO App ...................................................................................................................... 16
Installing the TYPE-S on a Bike ............................................................................................................ 17
Using Optional Accessories ................................................................................................................. 20
Basic Operations
Turning the LEOMO Motion Sensors On .............................................................................................. 24
Pairing the LEOMO Motion Sensors .................................................................................................... 25
Enabling/Disabling the LEOMO Motion Sensors .................................................................................. 27
Assigning the LEOMO Motion Sensor Locations ................................................................................. 28
Pairing ANT+ Sensors .......................................................................................................................... 29
Wearing Your LEOMO Motion Sensors ................................................................................................ 30
Hardware Controls for the LEOMO App ............................................................................................... 32
Recording an Activity ........................................................................................................................... 33
Customizing the LEOMO App .............................................................................................................. 35
LEOMO App Screens
LEOMO App Home Screen .................................................................................................................. 36
Activity Screens .................................................................................................................................... 38
LEOMO Web App
Header ................................................................................................................................................. 40
DASHBOARD ...................................................................................................................................... 41
ACTIVITIES .......................................................................................................................................... 42
COMPARE ........................................................................................................................................... 44
CALENDAR ......................................................................................................................................... 46
Motion and Training
Why Motion? ........................................................................................................................................ 47
Motion Performance Indicators ............................................................................................................ 48
Dead Spot Score (DSS) ....................................................................................................................... 49
Leg Angular Range (LEG AR) .............................................................................................................. 51
Foot Angular Range (FOOT AR) .......................................................................................................... 53
Foot Angular Range (Q1) Foot AR (Q1) ............................................................................................... 55
Pelvic Angle ......................................................................................................................................... 57
Pelvic Rock .......................................................................................................................................... 59
Pelvic Rotation ..................................................................................................................................... 61
Torso Angle .......................................................................................................................................... 63
Torso Rock ........................................................................................................................................... 65
Torso Rotation ...................................................................................................................................... 67
2

Technical Information
Specifications of the TYPE-S ............................................................................................................... 69
Specifications of the Optional LEOMO Motion Sensors ....................................................................... 72
Specifications of the Optional Power Mount ......................................................................................... 73
Limitation of Liability ............................................................................................................................. 74
Certification Information ....................................................................................................................... 75
3

Introduction
Highly accurate, real-time quantified motion for cycling
Whether you are a coach who wants to add accuracy and effective tracking to your observations, or a
cyclist wanting objective feedback of your motions in real-time, the lab-level accurate motion tracking
capabilities of the TYPE-S will deliver. Combining the latest in technology, biomechanics, and cycling form
analysis, the TYPE-S brings training, coaching, and injury prevention to a whole new level, inside and
outside the lab.
Features
0Quantify your body’s 3D movements in real life training and racing environments.
0Includes a transflective display, which is clearly visible in direct sunlight, and accepts optional five
wireless LEOMO Motion Sensors.
0Powerful real-time graphing is available for trend evaluations of your motion, power, cadence, speed,
heart rate, and GPS data.
0Available as a smartphone, too, enabling voice calls, photo/video shooting, and use of various
AndroidTM applications.
0Analyze your activity data anywhere using LEOMO’s browser-based analysis tool.
4Introduction
Overview

Parts and Optional Accessories
TYPE-S
12
TYPE-S Sensor Kit
1 2
TYPE-S
×2
×25
×5 (Pro)/ ×2
3
7
6
4
8
5
LEOMO Motion Sensor Kit Pro /
LEOMO Motion Sensor Kit
Parts and Optional Accessories 5
Overview

Optional Accessories
×2
×25
×5 (Pro)/ ×2
3
7
6
4
8
5
9
12 13 14
10 11
LEOMO Motion Sensor Kit Pro /
LEOMO Motion Sensor Kit
ATYPE-S main unit
BMulti-sport Adapter with Bike Plate for fitting on bike mount
LEOMO Motion Sensor Kit Pro / LEOMO Motion Sensor Kit (Optional)
CSensor Charger for charging LEOMO Motion Sensors
DLEOMO Motion Sensors (Set of 5 in the case of LEOMO Motion Sensor Kit Pro) / (Set of 2 in the case
of LEOMO Motion Sensor Kit) for motion data collection
ESensor Carrier for keeping LEOMO Motion Sensors powered off while in transit
FUSB Cable for charging LEOMO Motion Sensors inserted in Sensor Charger
GSensor Clips for using LEOMO Motion Sensors on shoes
HSensor Adhesives 2 (Set of 50, 25 Sheets) for wearing LEOMO Motion Sensors. They have stronger
adhesion than the previous Sensor Adhesives.
IPower Mount with Bike Plate (Optional) for fitting on bike mount while charging TYPE-S
JCamera Mount (Optional) for mounting TYPE-S on a general camera mount for shooting photo/video
KBike Plate (Optional) for fitting on a general bike mount
6Parts and Optional Accessories
Overview

LArm Band (Optional) for wearing TYPE-S on arm
MWaist Belt (Optional) for wearing TYPE-S around waist
NUSB Type-C Cable (Optional) for charging TYPE-S or for communication with devices such as personal
computers
OAC Adapter (Optional, Not shown)
PMulti-sport Adapter (Optional, same to but without the Bike Plate)
QSoft Bumper (Optional, Not shown)
See “Using Optional Accessories” (P 20) for details.
RMetal Bumper (Optional, Not shown)
See “Using Optional Accessories” (P 20) for details.
Parts and Optional Accessories 7
Overview

Parts and Controls of the TYPE-S
1
9
10
11
12
13
14
6
7
8
2
3
4
5
AFlash light
BRear camera
CSecond microphone
DNFC
Compatible with NFC type A/B
EPower key
Turns on/off the TYPE-S. To turn the TYPE-S off, press and hold the key for two seconds.
FPin for Power Mount
Connects the TYPE-S and the Power Mount.
Gnano SIM card / Memory card slot
Accommodates a nano SIM and a micro SD cards.
HFront camera
IProximity / Light sensor
JReceiver / Speaker
KVolume Key (Up)
Increases the volume from the TYPE-S.
When the LEOMO App is being used, it starts/pauses an activity.
LVolume Key (Down)
Decreases the volume from the TYPE-S.
When the LEOMO App is being used, it marks laps.
MMain microphone
NUSB Type-C port
Connect a USB Type-C cable (optional) this port to charge the TYPE-S.
8Parts and Controls of the TYPE-S
Overview

Charging Devices
Charge your TYPE-S, and LEOMO Motion Sensors (optional) if you will use ones.
1
2
TYPE-S
AC Adapter (optional)
LEOMO Motion Sensors (Up to 5) in Sensor Charger
(optional)
AUSB type-C cable (optional)
BUSB cable (optional)
NOTE :
An AC adapter that outputs 5 VDC, 1.5 A or higher must be used for charging the TYPE-S and LEOMO
Motion Sensors.
Charging Indications of the LEOMO Motion Sensors
0Charging (0-20%): Red LED
0Charging (20% - 100%): Green LED
0Finished Charging: Blinking green LED
NOTE :
When the LEOMO Motion Sensors are connected to the TYPE-S, their assigned location color will take
precedent over their charging color.
Charging Devices 9
Getting Started

Using an Optional Power Mount
Charge the Power Mount using a USB type-C cable (optional).
To charge the TYPE-S and Power Mount simultaneously, attach the TYPE-S to the Power Mount, and
connect the USB type-C cable to the connector on the Power Mount.
10 Charging Devices
Getting Started

Using the Button on the Power Mount
Pressing the button on the right of the USB Type-C port shows the battery level of the Power Mount.
Pressing and holding this button while charging the TYPE-S stops charging. Press the button again to
resume charging.
Empty Full
Charging Devices 11
Getting Started

Turning the TYPE-S On
1Turn on the TYPE-S by holding down the power key on the left side of the TYPE-S until it
powers on.
Power key
2When you use the TYPE-S first time after purchase, follow the instructions displayed on the
screen to make the initial settings.
For details, see “Making the Initial Settings” below.
When the initial settings have already been done, swipe up from the bottom of the screen for PIN
entering, enter the PIN that you have registered during initial setting, then tap the check mark.
The home screen appears.
12 Turning the TYPE-S On
Getting Started

Making the Initial Settings
When the TYPE-S is first powered on after purchase, it shows a message asking if you will use a SIM.
1Insert a SIM.
To use communication functions of the TYPE-S outside Wi-Fi coverage areas, obtain a nano SIM and
insert it in the TYPE-S nano SIM/memory card slot.
Skip this step if you will not use a SIM.
2Make Android configurations.
Follow the instructions displayed on the screen to make the required Android configurations related to
Wi-Fi connection, Android, and the GoogleTM account to be used.
The home screen appears.
Making the Initial Settings 13
Getting Started

TYPE-S Home Screen
LEOMO App icon
Home button
The TYPE-S is a device having the preinstalled LEOMO App. It can also be used as an Android
smartphone.
There is usually one pill-shaped home button at the bottom of the screen, and the back button is also
shown when necessary.
The back button takes you back one step or one screen, and the home button always shows the TYPE-S
home screen. Swipe right on the home button and hold to view all the currently running apps. Scroll
between apps by swiping slowly right or left, and release to open the center app.
The LEOMO App icon is used to start the LEOMO App. Tap the icon to start the LEOMO App.
Using the Android 9’s Three Navigation Buttons
The TYPE-S uses Android 9, you can select the three-button navigation system instead of the gesture
navigation system, as follows.
1Swipe up from the bottom at the home screen.
2Scroll down to find and tap the Settings icon.
3Proceed to System > Gestures > Swipe up on Home button.
4Turn it off.
The three navigation buttons appear at the bottom of the screen.
14 TYPE-S Home Screen
Getting Started

Using the Magnification Feature
The Android 9 provides screen magnification feature. You can enable it as follows.
1Swipe up from the bottom at the home screen.
2Scroll down to find and tap the Settings icon.
3Proceed to Accessibility > Magnification > Magnify with triple-tap.
4Turn it on.
Now, triple-tapping the screen zooms in the displayed content. Use two-finger dragging to pan across the
screen. Triple-tap the screen again to zoom out.
TYPE-S Home Screen 15
Getting Started

Starting the LEOMO App
Tap the LEOMO App icon.
LEOMO App icon
The LEOMO App starts.
Closing the LEOMO App
1Swipe left from the right edge of the screen.
The pill-shaped home button appears on the right of the screen.
2Point the home button and swipe it left.
The all currently running apps are shown.
3Point the LEOMO App, and swipe it up.
The LEOMO App stops running background and disappears from the screen.
16 Starting the LEOMO App
Getting Started

Installing the TYPE-S on a Bike
0Attach a standard quarter turn bike mount to your bike’s stem or handlebar. Attach the TYPE-S to the
Multi-sport Adapter, and attach the Bike Plate at the back of the Multi-sport Adapter as necessary.
Then, set them on the bike mount and twist 90 degrees to secure them to the bike.
Attaching the TYPE-S to the Multi-sport Adapter or Optional Power Mount
Set the bottom of the TYPE-S on the Multi-sport Adapter or Power Mount ( ), then press its top until it
clicks into place. ( ) Make sure that the knob at the back has located the correct position and the TYPE-
S is locked. ( )
Multi-sport Adapter Click!
Power Mount Click!
Installing the TYPE-S on a Bike 17
Getting Started

NOTE :
0We recommend you to use a safety cord that ties Multi-sport Adapter to the bike’s stem or
handlebar in case the Bike Plate or the bike mount breaks.
0Use a standard quarter turn bike mount for a cycle computer having 3-inch or larger screen. The
following figures show the required clearance.
60mm
R54mm
R60mm
WARNING
In order to maintain the product’s waterproof capabilities, please follow all instructions in this manual
and the LEOMO terms of use listed below. Any damage resulting from user negligence will void the
product warranty.
0Make sure the nano SIM card/memory card tray of the TYPE-S is fully inserted.
0Upon charging, make sure the USB Type-C ports and USB type-C cable are completely dry.
For more information, please go to https://leomo.io/warranty and https://leomo.io/terms
18 Installing the TYPE-S on a Bike
Getting Started

Detaching the TYPE-S from the Multi-sport Adapter or Power Mount
Unlock the knob at the back of the Multi-sport Adapter or Power Mount ( ), then detach the TYPE-S
from it ( , ).
Multi-sport Adapter
Power Mount
Installing the TYPE-S on a Bike 19
Getting Started

Using Optional Accessories
Using an Optional Soft Bumper
Attaching the TYPE-S to a Soft Bumper
Slide the upper edge of the TYPE-S under the hook of the Soft Bumper ( ), then press its bottom until
it fits in the Soft Bumper. ( )
Detaching the TYPE-S from the Soft Bumper
Push the bottom of the TYPE-S out from the Soft Bumper as shown in the figure.
20 Using Optional Accessories
Getting Started
Table of contents