Letscom F-533 User manual

F-533
User Manual
Thank you for purchasing our product.
This manual addresses the safety
guidelines, warranty, and operating
instructions. Please review this manual
thoroughly before operating your device.
Ring Fill Light

Package Contents................................................................
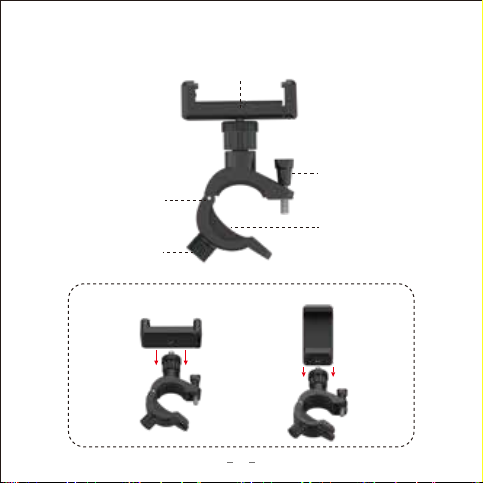
At a Glance..........................................................................
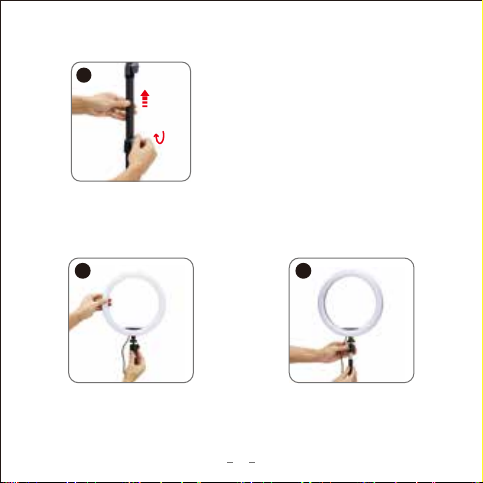
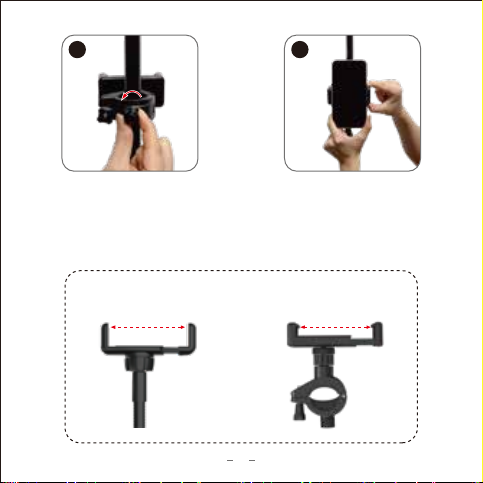
Installation Guide.................................................................
Disassembly Guide..............................................................
Using Your Ring Fill Light....................................................
Specifications......................................................................
SAFETY AND WARRANTY.................................................
Contents
1
2
5
10
10
14
16

⑤
Package Contents
① Ring Fill Light × 1
② Tripod Stand × 1
③Ball Head × 1
④ Flexible Phone Holder × 1
⑤Fixed Phone Holder × 1
⑥Selfie Remote Control × 1
⑦User Manual × 1
1
②
③④
①
⑥ ⑦
F-533
User Manual
Thank you for purchasing our product.
This manual addresses the safety
guidelines, warranty, and operating
instructions. Please review this manual
thoroughly before operating your device.
Ring Fill Light

At a Glance
2
USB Connector
LED Panel
Light Controller
Screw Hole
1. Ring Fill Light
2. Tripod Stand Screw
Stand Fastener
Telescoping Stand
(4 adjustable sections)
Tripod Fastener
Foldable Tripod Stand

3
Phone Holder
Flexible Tube
Screw
3. Ball Head
4. Flexible Phone Holder
360° Ball Head
Ball Head Fastener
Screw Hole
Screw

4
5. Fixed Phone Holder
Phone Holder
Gasket
Locking Knob
Adjustment Knob
Clip
Two Installation Methods

Installation Guide
5
1. Tripod Stand
Hold the node of the tripod
base and push down firmly
to open the tripod.
Loosen the tripod fastener. Pull out the three legs of
the tripod base.
Adjust the tripod to your
desired height and tighten
the tripod fastener.
1 2
4
3

6
Loosen the stand fasteners. Extend
each stand to your desired height
and tighten the fasteners.
5
2. Ring Fill Light
While holding the ring fill light in
one hand, screw the ball head
into the bottom of the light.
Screw the bottom of the
ball head into the top of
the tripod stand.
12

7
3. Phone Holder
Clip the fixed phone
holder to the middle pole
of the tripod stand.
Tighten the locking knob.
Screw the flexible phone
holder into the screw hole
on the ring fill light.
Loosen the ball head
fastener, adjust the ring fill
light to your desired angle,
and then tighten the fastener.
You can also install your phone on the stand using the fixed
phone holder.
12
1 2

8
Turn the adjustment
knob counterclockwise to
secure it to the pole.
Place your phone on the
holder and adjust the
shooting angle as needed.
3 4
Extendable Phone Holders
Up to 3.7 inches Up to 3.6 inches

9
End Result

10
Disassembly Guide
Using Your Ring Fill Light
Power on
Adjust Brightness & Change Lighting Mode
1) Remove your phone from the phone
holder. Unscrew the phone holder from
the ring fill light.
2) Unscrew the ring fill light from the ball
head and unscrew the ball head from the
stand.
3) Loosen the stand fasteners, retract the
stand, and then tighten the fasteners.
4) Loosen the tripod fastener, fold up the
tripod base, and then tighten the fastener.
After mounting the ring fill light on the tripod stand, connect the USB
connector of the ring fill light to a USB wall charger or computer USB
port that is powered on.
Press the power button to turn the light on, press the up / down button to
increase / decrease the brightness (10 levels). Press the mode button to
change lighting mode (white / natural / warm).

11
Use Selfie Remote Control
Increase Brightness
Change Lighting Mode
Decrease Brightness
Power Button
Note:
Our ring fill light has mode memory. When turned on, it will be set to
the last used mode (When you disconnect the power, it will be reset
to factory settings).
Button A
(Shutter for iPhones)
Button B
(Shutter for Android Phones)
Power Switch
LED Indicator
Battery Cover
On/off
M
Model
Up
Down

12
1) Turn on the Bluetooth of your phone.
2) Slide the power switch to ON. The remote control will enter into
pairing mode (the LED indicator will flash blue).
3) Choose "AB Shutter3" from the list of found Bluetooth devices on
your phone to pair.
● Select App
You can use the built-in camera app to take photos with our selfie
remote control or download "Camera 360" from Google Play store. If the
built-in camera is not supported, please check the compatible device
and app list in Compatible Devices table.
● Take a Photo / Start Recording
When our selfie remote control is successfully paired with your phone,
open the camera app, press Button A or Button B on the remote control
depending on your phone type to take a photo / start recording.
Note:
When the selfie remote control is connected to your phone, you may
encounter text input problem, please go to your smartphone "Settings"
→ "System" → "Keyboard & Input Method" and select system default
input method.
● Pair

13
Compatible Devices
Compatible Devices
iPhone8/8P, iPhone7/7P,
iPhone6/6S/6P/6SP,
iPhoneSE, iPhone 5S/5C/5,
iPhone 4S/4,
iPad 3/2, iPad mini, iPad with
Retina Display, iPod touch 4th
Samsung Galaxy S2/S3/S4+,
Note 1, Note 2, Note 3+, Tab 2,
Note 8, 10.1+
Moto X / Nexus 4, 5, 7+
Xiaomi 1S, 2S, 3+
Sony Xperia S
HTC New one and X+
Other Android phones
Built-in
Camera App Camera 360 App
C
A
M
E
R
A
3
6
0
iOS
C
A
M
E
R
A
3
6
0
iOS
C
A
M
E
R
A
3
6
0
iOS
C
A
M
E
R
A
3
6
0
iOS
android
Not Applicable

Specifications
14
F-533
ABS+PC
10.2 inches / 0.26 meters (outer diameter)
8.1 inches / 0.21 meters (inner diameter)
White / Natural / Warm
3000K to 6000K
10 levels
1100 to 2200 lm
120
USB
5V / 2A
10W
10 feet / 3 meters
Model
Material
Ring Diameter
Lighting Mode
Color Temperature
Adjustable Brightness
Lumens
Number of LED Bulbs
Power Supply Mode
Input Power
Output Power
Power Cord Length
Specifications (Ring Fill Light)

15
AB Shutter3
V4.0
33 feet / 10 meters
CR2032
Approximately 6 months
(average use of 10 times a day)
Model
Bluetooth Version
Bluetooth Connection
Distance
Battery Type
Battery Life
Specifications (Selfie Remote Control)

16
SAFETY AND WARRANTY
● This product must be used with an input power of 5V / 2A, and low
power input will reduce the brightness of the ring fill light.
● Do NOT try to dismantle or modify the product.
● Keep this product away from water and any flammable gases or
liquids.
● Do NOT repair the product in dangerous places such as gas, steam,
etc. It is easy to conduct electricity in a humid environment.
● Do not let any liquid flow into the product, as this may seriously
damage the product.
● Do NOT use the product in the environment where the room
temperature is lower than 0°C (32°F) or higher than 45°C (113°F).
● Clean the product only with a dry, soft cotton cloth or equivalent. Do
not scrub it with gasoline, volatile oil, etc.
● If an abnormal situation occurs, stop using the product and cut off the
power immediately.
● Keep the product clean. When the product is not in use, store it
properly.
● Keep the product out of the reach of children.
Safety Instructions

17
Warranty
We strive to build our products with the highest attention to detail and
craftsmanship. However, sometimes there are occurrences of defect.
We are happy to offer a one-year hassle-free warranty to all our
products as we continue to make amazing products. Please contact us
if you have any questions about our devices.
Table of contents