LEVIOR 26775 User manual

WINCH SHEET LIFTER
INSTRUCTIONS MANUAL

INTRODUCTION
IMPORTANT PRECAUTIONS
▲Never use the tool to lift people or animals.
▲Keep children away. Children must never be allowed in the work area. Do not let them handle
machines, tools or extension cords.
▲Keep animals away. Animals can cause damage to or failure of the lift and may result in
personal injury.
▲Keep the work area free of obstructions. Cluttered areas invite injuries.
▲Do not overload the lifter capacity (max 54KG).
Page 1
▲The lift is designed as a wallboard lift and shall be used for no other purpose. The lift is not a
personnel lift or platform and shall not be used as such. Using the lift for purposes other than a
wallboard lift can subject the unit to stresses and loads that it was not designed to carry.
The winch sheet lift allows one person to lift a drywall panel easily without assistance. The panel can be
raised to a maximum height of 3440 mm for attachment to level ceilings-or (with the lift's cradle tilted) to
sloped ceilings or side walls. The lift's cradle lowers to 1530 mm off the floor for easy panel loading, and can
support up to 54Kgs..
BEFORE operating this equipment, thoroughly read this set of instructions, make sure you
understand them, and only then follow the step-by-step directions. FAILURE TO READ AND
FOLLOW THESE INSTRUCTIONS could result in failure of the equipment. Failure of the equipment
while the lift is raised can include a sudden and rapid lowering of the lift and load possibly resulting
in serious property damage, serious bodily injury and/or death.
▲ALWAYS study these instructions before operating, and pay close attention to all warnings.
▲ALWAYS inspect the unit carefully before each day's use ( pay special attention to the condition
of the cable). Replace at the first sign of wear.
▲ALWAYS allow the lift to reach working room temperature(between -20ºC~50ºC) before use
(moving a cold unit into a warm room can cause condensation, which could affect the operation of
the winch). ALSO make sure the lifter will not be used in the conditions of bad weather such as
strong wind,high air pressure and etc.
▲NEVER use the lift if either crossarm support is not secured by its locking spring tab.
▲ALWAYS wear a hard hat when operating this lift. ALWAYS watch for overhead obstructions
when lifting the drywall panel.
▲NEVER lift more than one sheet of drywall at a time.

ASSEMBLY
COMPONENTS
The lift is shipped as several components that must be assembled before use:
. Tripod base assembly
. Frame assembly, which includes a winch assembly and telescoping lift sections
. Cradle assembly, without its detachable crossarms
. Two cradle crossarm assemblies with extension crossarms
Frame Assembly
Page 2
Outrigger Crossarm Crossarm
Cradle
Telescoping
Sections
Tripod base assembly
Housing
Winch
Brake

Page 3
Fig 1. Begin by setting up the tripod base: press down on
the slide yoke ring and swing the outer legs out until they
lock in the working position (note the holes on the bottom
of the slide tube).
Fig 2. To hold the tripod base in position
during this procedure set the backstop as
shown.
Fig 3. Place the frame assembly on
the tripod base.
Fig 4. Make sure the angle of frame assembly is in
the angle of tripod base correctly.
Fig 5. When the frame is correctly
positioned on the tripod base
release the backstop.
Fig 6. Rotate the handle of the winch backforward (towards
you) slightly until the safety plate is in the groove of the slide
bar .

Page 4
Fig 9. Place the tapered plates of the crossarms into the
tapered sockets on the cradle. The spring tab on the back
of the crossarm will lock it into place.
Fig 10. To extend the outriggers for use, pull out
on the outrigger lock pin with your right hand and
slide the outrigger out with your left hand as
shown. The lock pin will engage at different points
on the outrigger. MAKE SURE that the lock pins
are engaged in one of these positions before
loading the unit. Retract the outriggers when
storing or transporting the unit.
Fig 8. Mount the cradle on top of the
telescoping section. Flip out the tilt latch
to allow the cradle to tilt for loading and
for hanging drywall on sidewalls and
sloped ceilings.
Fig 7. Make sure that the safety plate in the
socket of the slide bar.

OPERATING PROCEDURE
SAFETY CHECK BEFORE OPERATION
Before you begin operating the lift each day:
. Inspect the unit carefully for wear or damage. Pay special attention
to the cable.
. Be sure the lift is at working room temperature before operating.
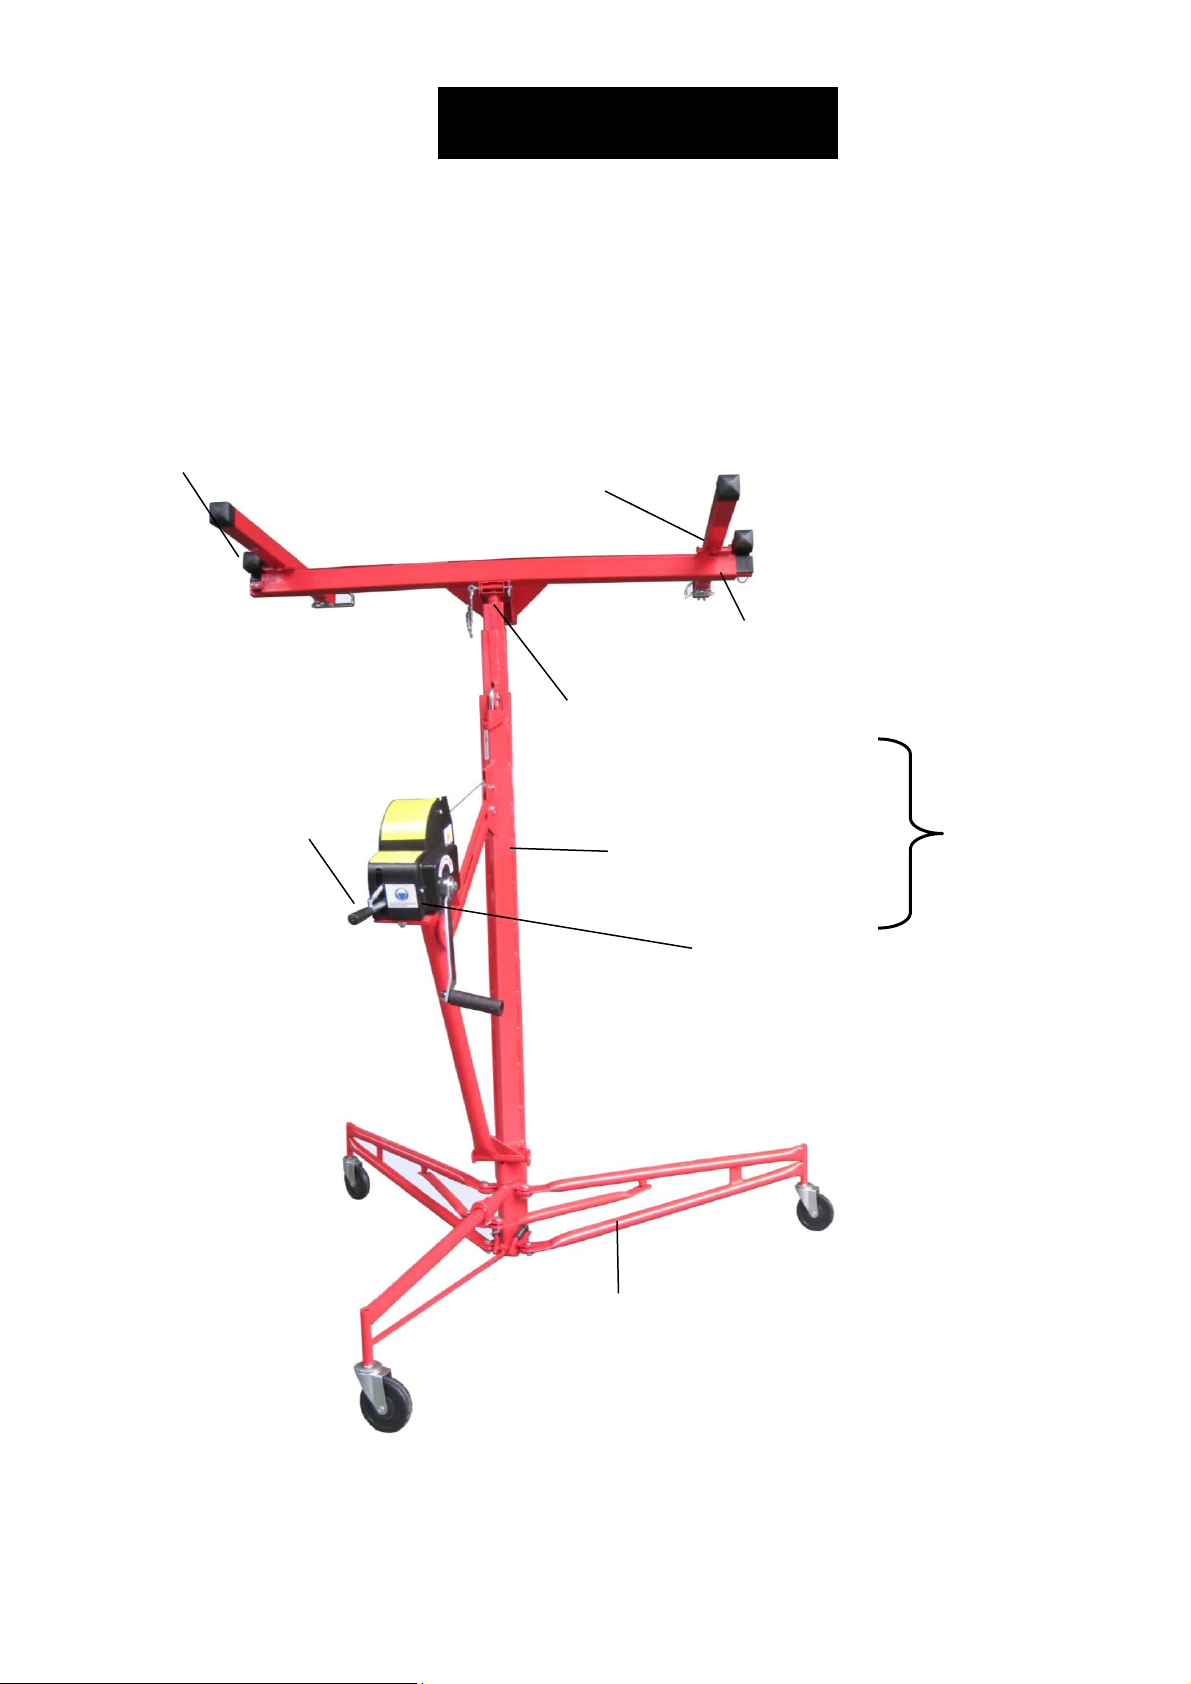
TO LOAD A DRYWALL PANEL
1. Set (lower) the backstop, so the lift won't roll backward.
2. Swing open the panel support hooks on the two crossarms. WARNING
Be sure the cradle is turned so the support hooks are on the To avoid injury:
opposite side from the winch handle. . Use ONLY for lifting a
3. Extend the crossarm outriggers on the cradle as needed to drywall panel.
fully support the length of the drywall panel. . Lift ONLY one panel at a
4. Release the tilt latch to tilt the cradle. time.
5. Hold the drywall panel with its face paper toward the tilted Do not overload the lifter
cradle, and load the panel onto the lift as shown. Set the capacity (max 54KG)
panel onto the support hooks, and carefully lean it against
the crossarms.
6. If installing the panel on a flat ceiling, tilt the cradle back up
to its level position and lock the tilt latch. If installing the panel
on a side wall or a sloped ceiling, leave the cradle tilted.
7. Raise the backstop on the base, and carefully roll the lift
close to the position where the panel will be installed. Brake
TO RAISE THE PANEL (see right picture and the warning on winch)
IMPORTANT: Always lower the backstop before raising the
panel to a sloped ceiling or a side wall.
Crank the winch handle forward until the panel is at the desired
height. The brake will hold the cradle at the desired height when you
stop cranking. But need to release the brake to it's natural place first.
TO LOWER THE PANEL
Slowly rotate the winch with your right hand backward to lower the panel, if you want to lower the panel
to the desired height, press down the brake, then rotate the winch forward (clockwise) a bit to prevent the
panel from lowering suddenly (As the brake piece is out of the gear section when you rotate the winch
backward).
MAINTENANCE
. Inspect the cable before each work day. Replace it at the first sign of wear.
. Occasionally oil the cable pulleys. Crank up the telescoping sections for access to the internal cable pulley.
. Occasionally oil the caster bearings.
. If the telescoping section of the frame don't operate smoothly, apply household paraffin to the sliding
surfaces. Page 5
WARNING
To avoid serious injury,
follow all "Important
Precautions," page 1
WARNING
ALWAYS wear a hard hat
when operating.
IMPORTANT: Read the "Important Precautions" on page 1 before
you operate the lift.
WARNING
To avoid serious injury,
watch for overhead
obstructions when raising
panel.

PARTS DRAWING
Page 6

PARTS LIST
PART# QTY PART# QTY
1 1 26 1
2 1 27 1
3 6 28 Cable 1
4 8 29 Slide Bar 1
512 30 Safety Plate 1
6 2 31 Nylock Nut M12 1
7 2 32 Winch Support Post 1
8 2 33 Screw M5x8 4
9 3 34 Screw M5x12 1
10 135 3
11 136 2
12 137 2
13 138 1
14 139 1
15 140 1
16 141 1
17 442 2
18 243 2
19 244 2
20 245 2
21 246 2
22 147 8
23 348 1
24 349 1
25 350 1
Page 7
Lock Nut M5
Safety Cover
Side cover plate
DESC
Spring
Flat Washer Ø5
Outrigger Crossarm
Flat Washer Ø10
Hex Nut M10
Long Pin
End cap
Winch Assy
Body, cradle
Body, crossarm
Pin
Back Ring Ø10
Hex Bolt M10×25
Ring
Press Plate
Hex Bolt M8×16
Across Pin
Telescoping section, Outer
Telescoping section, Inter
Body, mounting head
Latch ,cradle tilt
Mini Chain
Wing Bolt M8x25
Pulley Pin
Hook Pole, panel support
Safety Hook Weldment
Pulley
Bearing Ø100
Rivet
DESC
Tripod base assembly
Pull Spring
R Pin
Nylock Nut M10
Flat Washer Ø12
Split Pin Ø2.5×25
Plastic Foot Cap
Housing, frame
Arm
Leg, outer
Caster w/brake
Table of contents
Popular Lifting System manuals by other brands

Maxon
Maxon DMD-22 instruction manual

Castex
Castex PB-1600 Operator and parts manual

The Handy
The Handy 20707G INSTRUCTIONS, PARTS DRAWING, PART LIST

ATH-Heinl
ATH-Heinl ATH Comfort Lift 2.40 manual

Genie
Genie SUPERLIFT Contractor SLC-6 Parts & service manual

CTE
CTE B-LIFT PRO Series Instructions for use and maintenance

HALDER
HALDER EH 22352 Translation of the original operating instructions

Sinoboom
Sinoboom AB22EJ Plus Maintenance manual

spanesi
spanesi 100 - H 100/6m Series Operation, service and parts manual

Fenton
Fenton Shift N Step Operator's manual

Nussbaum
Nussbaum SPL 3200 Operating Instruction and Documentation

ergolet
ergolet LunaIPx4 user manual