Levoit LVAC-200 User manual

LVAC-200 Cordless
Stick Vacuum
USER MANUAL
GUIDE DE L’UTILISATEUR
Aspirateur-balai sans fil
LVAC-200
EN FR
Questions or Concerns?
Please contact us MonFri, 9:00 am5:00 pm PST/PDT
Questions ou préoccupations?
Veuillez nous contacter du lundi au vendredi, de 9 h à 17 h HNP/HAP

2
Table of Contents Table des matières
Package Contents
Specifications
Safety Instructions
Getting to Know Your Vacuum
Controls
Using Your Vacuum
Care & Maintenance
Cleaning
Storage
Troubleshooting
Warranty Information
Customer Support
Contenu de l’emballage
Caractéristiques
Consignes de sécurité
Tout savoir sur votre aspirateur
Commandes
Utilisation de votre aspirateur
Soins et entretien
Nettoyage
Rangement
Dépannage
Information sur la garantie
Service à la clientèle
3
3
4
6
7
7
9
12
15
16
18
20
21
21
22
24
25
25
27
30
33
34
36
38
EN • English FR • Français

3
EN
Package Contents
1 x Vacuum Body
1 x Long Stick
1 x Short Stick
1 x Vacuum Head
1 x 2-in-1 Crevice Tool
1 x 2-in-1 Pet Tool
1 x Wall Mount
2 x Screw
2 x Wall Anchor
1 x Charger
1 x User Manual
Specifications
EN • English
User Manual
LVAC-200 Cordless Stick Vacuum
*Note: May vary +/- 10%
Model LSV-V201-WUS,
LSV-V201-WCA
Battery Input 22.2V 2200mAh
Li-ion battery
Rated Power 180W*
Charging Input 100–240V~
50/60Hz 0.5A
Dimensions 9.8 x 7.7 x 43.3 in /
25.0 x 19.5 x 110.0 cm
Battery Operating
Conditions
Charging Temperature:
39.2°–104°F / 4°–40°C
Storage Temperature:
32°–77°F / 0°–25°C
Storage Humidity:
65%±20%

4
EN
• CAUTION: Risk of injury. Roller brush may start
unexpectedly. Remove battery pack before
cleaning or servicing.
• Do not leave the vacuum unattended while it
is on. Unplug from outlet when not charging
and before servicing.
• Do not use outdoors or on wet surfaces.
• Children should be supervised to ensure that
they do not play with the vacuum.
• Do not allow to be used as a toy. Close attention
is necessary when used by or near children.
• This vacuum is not to be used by persons
(including children) with reduced physical,
sensory, or mental capacities, or lack of
experience and knowledge, unless they
have been given supervision or instruction
concerning the use of the appliance by a
person responsible for their safety.
• Children should not clean or perform
maintenance on the vacuum without
supervision.
• Only use the vacuum as described in this
manual.
• Use only manufacturer’s recommended
attachments.
• Do not use your vacuum if it is damaged or
not working correctly, or if the charger or plug
is damaged. Do not try to repair it yourself.
Contact Customer Support (see page 20).
• Do not handle the charger or vacuum with
wet hands.
• Do not put any object into any opening. Do
not use the vacuum with any opening blocked.
Keep free of dust, lint, hair, or anything that
may reduce airflow.
WARNING – To reduce the risk of fire, electric shock, or injury:
When using this vacuum, basic precautions should always be followed, including the following:
IMPORTANT SAFETY
INSTRUCTIONS
• Keep hair, loose clothing, fingers, and all body
parts away from openings and moving parts.
• Use extra care when cleaning on stairs.
• Do not vacuum the following (or use where
they may be present):
• Sharp objects such as glass shards,
metallic nails, metal paper clips, or pins;
• Ultrafine particles such as lime, cement,
sawdust, gypsum powder, or ashes;
• Hazardous materials or chemicals such
as solvents, drain cleaner, strong acids,
or strong alkalis.
• Always turn the vacuum o before connecting
or disconnecting the stick, nozzles, brushes, or
vacuum head.
• Do not vacuum water or any liquids.
• Do not vacuum anything that is burning or
smoking, such as cigarettes, matches, or hot
ashes.
• Do not use without dust bin and filters in
place.
• Do not point the vacuum at any person or
animal while it is on.
• Store the vacuum on a small stand or hang it
from the wall.
• Do not use the vacuum in temperatures above
104°F (40°C) or below 39.2°F (4°C).
READ ALL INSTRUCTIONS BEFORE USING THIS APPLIANCE

5
EN
SAFETY INSTRUCTIONS CONT.
• Do not pull or carry the vacuum by the charging
cable, use the cable as a handle, close a door
on the cable, or pull the cable around sharp
edges or corners. Do not run any appliance
over the cable.
• Prevent unintentional starting. Ensure the
switch is in the o-position before connecting
to battery pack, picking up or carrying the
appliance. Carrying the appliance with your
finger on the switch or energizing appliance
that have the switch on invites accidents.
• Disconnect the battery pack from the appliance
before making any adjustments, changing
accessories, or storing appliance. Such
preventive safety measures reduce the risk of
starting the appliance accidentally.
• Do not unplug by pulling on cord. To unplug,
grasp the plug, not the cord. Turn o all controls
before unplugging.
• Never place the charger or its cable near any
heat source.
• Keep the charging cable out of areas where
people walk often. Place the cable where it will
not be tripped over.
• Do not use the charger to charge other
appliances besides this vacuum.
• Only recharge the vacuum with the charger
specified by Arovast Corporation. A charger
that is suitable for one type of appliance
may create a risk of fire when used with a
dierent battery pack. For use only with the
SAW15A-260-0500UD adapter manufactured
by Shenzhen Shi Ying Yuan Electronics Co.,
Ltd. For more information, please contact
Customer Support (see page 20).
Battery & Charger
• Only use the battery pack specifically designed
for this vacuum. Use of any other battery
packs may create a risk of injury and fire.
For use only with the LSV-V201B-WUS battery
pack manufactured by Suzhou Lishen Energy
Science & Technology Co., Ltd. For more
information, please contact Customer Support
(see page 20).
• When the battery pack is not in use, keep it
away from other metal objects, like paper
clips, coins, keys, nails, screws, or other small
metal objects that can make a connection from
one terminal to another. Shorting the battery
terminals together may cause burns or a fire.
• Under abusive conditions, liquid may be
ejected from the battery. Avoid contact. If
contact occurs, flush with water. If liquid
contacts eyes, immediately flush with water
and seek medical help. Liquid ejected from the
battery may cause irritation or burns.
• Do not use the battery pack or vacuum if they
are damaged or modified. Damaged or modified
batteries may exhibit unpredictable behavior
resulting in fire, explosions, or risk of injury.
• Have servicing performed only by a qualified
repair person using identical replacement parts.
This will ensure that the safety of the vacuum is
maintained.
• Do not modify or attempt to repair the vacuum
or the battery pack except as indicated in the
manual.
• Do not expose the battery pack or vacuum
to fire or excessive temperatures. The battery
used in this device may present a risk of fire
or chemical burn if mistreated. Do not
disassemble, short contacts, heat above
140°F (60°C), or incinerate. Exposure to fire or
temperatures above 266°F (130°C) may cause
an explosion.
• Follow all charging instructions and do not
charge the battery pack or vacuum outside of the
temperature range specified in the instructions.
Charging improperly or at temperatures outside
of the specified range may damage the battery
and increase the risk of fire.
• WARNING: Do not use with non-rechargeable
batteries.
SAVE THESE INSTRUCTIONS
WARNING: Read all safety warnings and
instructions. Failure to follow the warnings
and instructions may result in electric shock,
fire, and/or serious injury.
NOT FOR COMMERCIAL USE
HOUSEHOLD USE ONLY
6
EN
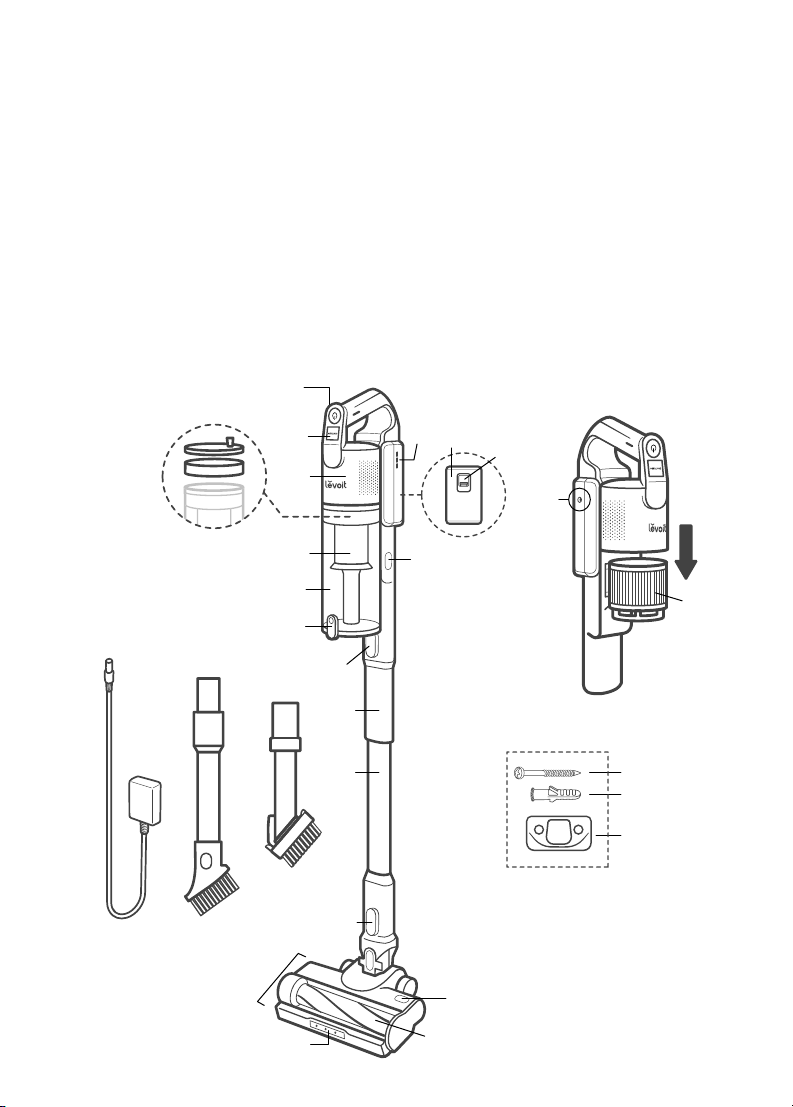
GETTING TO KNOW YOUR VACUUM
A. On/O Button
B. Eco/Turbo Mode Button
C. Vacuum Body
D. Pre-Motor Filters
E. Battery Indicator Lights
F. Battery
G. Battery Release Button
H. Metal Filter
I. Dust Bin
J. Lid Release Button
K. Dust Bin Release Button
L. Vacuum Body Release Button
M. Charger
N. 2-in-1 Crevice Tool
O. 2-in-1 Pet Tool
P. Short Stick
Q. Long Stick
R. Vacuum Head Release Button
S. Vacuum Head
T. LED Lights
U. Roller Brush
V. Roller Brush Release Button
W. Vacuum Handle
X. Charging Port (on the battery)
Y. Post-Motor Filter
Z. Screws
AA. Wall Anchors
BB. Wall Mount
A
W
E
B
D
Z
AA
BB
Y
Q
P
J
N O
S
R
V
U
T
M
I
HK
L
C
FG
X

7
EN
CONTROLS USING YOUR VACUUM
1. Build the vacuum stick by aligning the dots
on the long stick and short stick, then push
together until they lock in place. [Figure 1.1]
2. Attach the vacuum head or a nozzle
attachment to the bottom of the stick, then
attach the vacuum body to the top of the
stick. [Figure 1.2]
Note: There is a clicking sound when the
parts are properly joined together.
Note: Fully charge the battery before
first use.
Battery Indicator Light Chart
(During Use)
Figure 1.1
Figure 1.2
Battery Level Battery Indicators
70–100%
35–70%
10–35%
0–10%
On/O Button
• Turns on/o the vacuum.
Eco/Turbo Mode Button
• Cycles through Eco Mode and Turbo Mode.
• The vacuum will default to Eco Mode. Press
once for Turbo Mode. Press again to switch
back to Eco Mode.
• Eco Mode is suitable for daily cleaning.
• Turbo Mode is suitable for deep cleaning.
Battery Indicator Lights
• Indicate the battery level when
you are using the vacuum.
3. Charge the vacuum (see page 9).
4. Press the On/O Button to turn the vacuum
on. The vacuum will default to Eco Mode.
5. Press the Eco/Turbo Mode Button to adjust
the suction power between Eco Mode and
Turbo Mode.
6. Press the On/O Button to turn the vacuum
o.
8
EN
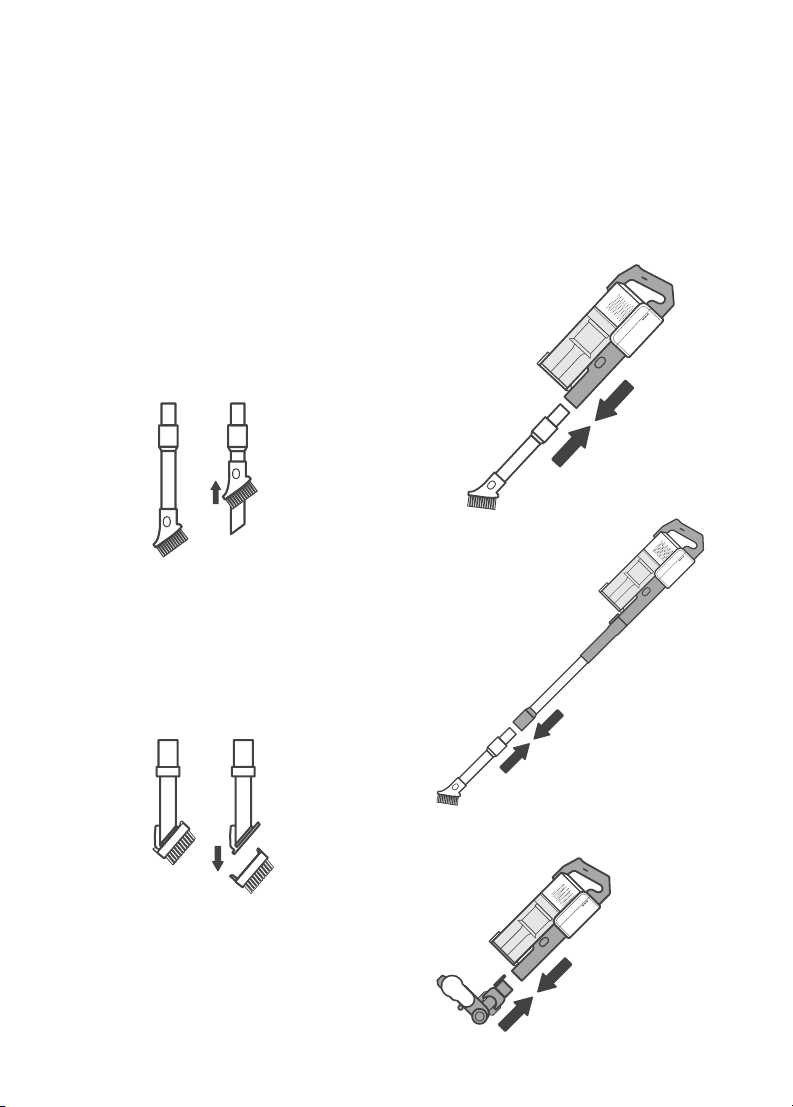
Nozzle Attachments
Your vacuum comes with nozzle attachments to
help you tackle daily or weekly cleanup job.
2-in-1 Crevice Tool
• Press button to slide bristles up/down
and switch between crevice tool and
dusting brush. [Figure 1.3]
• Use the crevice tool to clean hard-to-
reach places like crevices in furniture
and corners of a room or car.
• Use the dusting brush to clean dust
and hard surfaces like mantels or
baseboards.
2-in-1 Pet Tool
• Use the brush head to clean fur o soft
upholstery or pets.
• Remove the brush head to use the fur
removal tool which loosens hair on
fabric and carpet. [Figure 1.4]
Figure 1.3
Figure 1.4
Note: You can also attach the vacuum
body directly to the vacuum head.
[Figure 1.7]
To use a nozzle attachment:
1. Press and hold the Vacuum Body
Release Button and gently pull the
vacuum body from the stick.
2. Slide the nozzle attachment onto the
vacuum body. [Figure 1.5]
Figure 1.5
Figure 1.6
Figure 1.7
3. Optionally, leave the stick attached
to the vacuum body and press the
Vacuum Head Release Button to
remove the vacuum head. Then, attach
the nozzle attachment to the end of the
stick. [Figure 1.6]
9
EN
CARE & MAINTENANCE
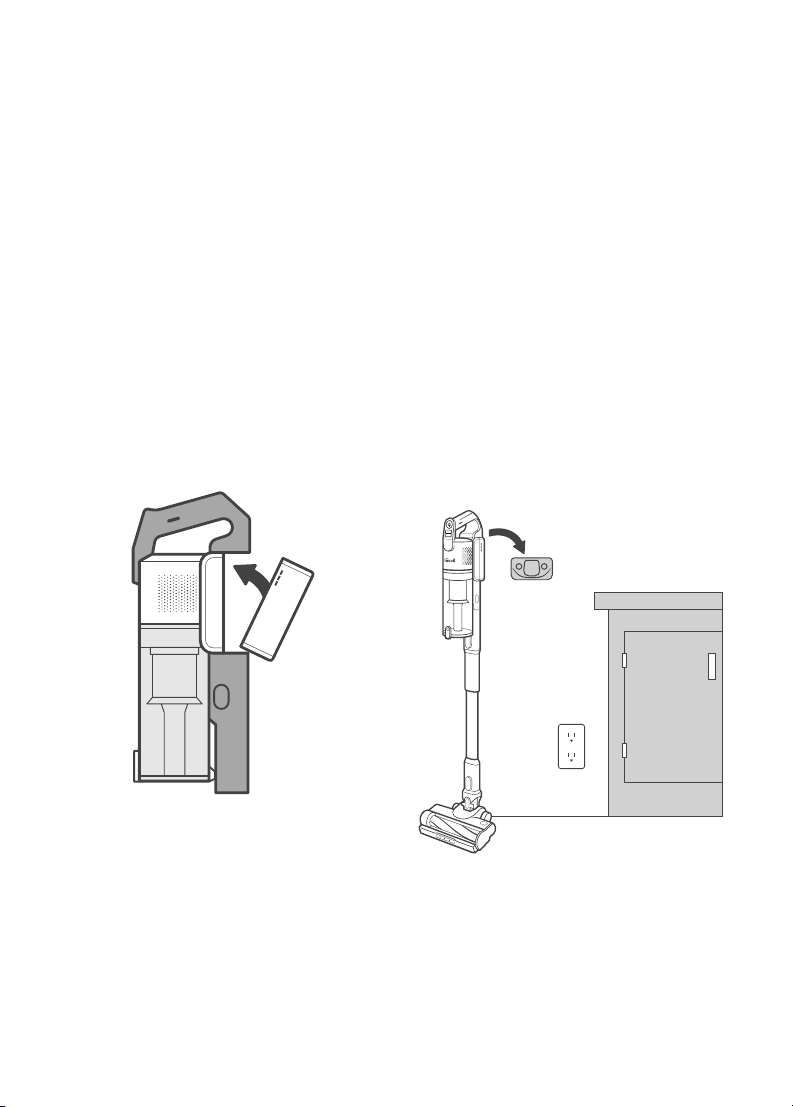
Battery Installation
Your vacuum uses a 2200mAh Li-ion battery.
Use the included charger to charge the
vacuum.
Charging the Vacuum
Note:
• To maintain the life of the battery, store the
vacuum in a cool, dry place.
• Store the battery in a semi-charged state
(at least 2 battery indicator lights) and
maintain this by charging the battery every
3 months.
Note:
• The wall mount must be high enough on
the wall to allow the vacuum to stand up.
• Make sure that the wall is free of gas
pipes, water pipes, electrical cables, and
wires.
1. Turn the vacuum o. Press the Battery
Release Button and remove the battery.
2. To reinstall, slide the battery into the slot in
the vacuum body. [Figure 2.1] There will
be a clicking sound when the battery is
properly installed.
Figure 2.1
Figure 2.2
Note: Make sure the vacuum is turned o
before charging.
1. Install the wall mount by screwing it into
the wall near a power outlet. [Figure 2.2]
10
EN
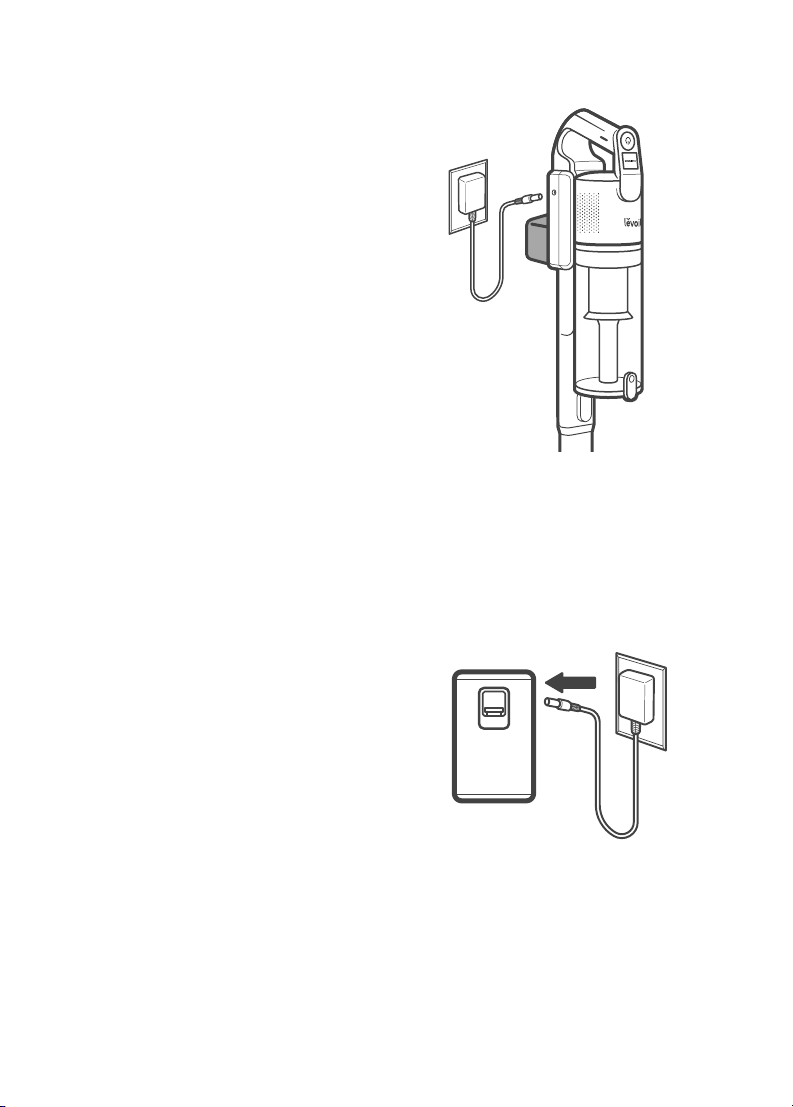
Figure 2.4
Figure 2.3
2. Hang the vacuum on the wall mount.
[Figure 2.3]
3. Insert the charger into the charging port on
the battery. [Figure 2.3]
4. Plug the charger into the outlet. The
battery lights will blink while charging.
[Figure 2.3]
5. When the vacuum is fully charged, the 3
battery indicator lights will turn solid for 5
minutes, then turn o.
Alternatively, the battery can be charged
separate from the vacuum body.
1. Press the Battery Release Button to
remove the battery.
2. Insert the charger into the charging port on
the battery. [Figure 2.4]
3. Plug the charger into an outlet. The battery
indicator lights will blink while charging.
4. When the vacuum is fully charged, the 3
battery indicator lights will turn solid for 5
minutes, then turn o.
CARE & MAINTENANCE CONT.
Other manuals for LVAC-200
2
This manual suits for next models
2
Table of contents
Languages:
Other Levoit Vacuum Cleaner manuals


