Lexicon JAM MAN User manual

User Guide

Lexicon Part #070-09276 Printed in the U.S.A.
Unpacking and Inspection
After unpacking the unit, save all packing materials in case you ever need to re-ship. Thoroughly inspect the unit and packing materials for signs of damage.
Report any shipment damage to the carrier at once; report equipment malfunction to your dealer.
This equipment generates and uses radio frequency energy and if not installed and used properly, that is, in strict accordance with the manufacturer's instructions, may cause
interference to radio and television reception. It has been type tested and found to comply with the limits for a Class B computing device in accordance with the specifications in
Subpart J of Part 15 of FCC Rules, which are designated to provide reasonable protection against such interference in a residential installation. However, there is no guarantee
thatinterferencewillnotoccurinaparticularinstallation.Ifthisequipmentdoescauseinterferencetoradioortelevisionreception,whichcanbedeterminedbyturningtheequipment
OFF and ON, the user is encouraged to try to correct the interference by one or more of the following measures: reorient the receiving antenna; relocate the computer with respect
to the receiver; move the computer away from the receiver; plug the computer into a different outlet so that the computer and receiver are on different branch circuits. If necessary,
the user should consult the dealer or an experienced radio/television technician for additional suggestions. The user may find the following booklet prepared by the Federal
Communications Commission helpful: "How to identify and Resolve Radio/TV Interference Problems." This booklet is available from the U.S. Government Printing Office,
Washington, DC 20402, Stock No. 004-000-00345-4.
Notice
Lexicon Inc.
3 Oak Park
Bedford, MA 01730 USA
Telephone 781-280-0300
Fax 781-280-0490
Copyright 1993, Lexicon Inc.
All Rights Reserved.
CAUTION
RISK OF ELECTRIC SHOCK
DO NOT OPEN
This triangle, which appears on your com-
ponent, alerts you to the presence of unin-
sulated, dangerous voltage inside the en-
closure... voltage that may be sufficient to
constitute a risk of shock.
Thistriangle,whichappearsonyour com-
ponent, alerts you to important operating
and maintenance instructions in this ac-
companying literature.
Le présent appareil numérique n'émet pas de bruits radioélectriques dépassant les limites applicables aux appareils numériques de la class B prescrites dans le Règlement sur
le brouillage radioélectrique édicté par le ministère des Communications du Canada.

User GuideUser Guide

Loop Mode...........................................................................
15
Basic Looping...............................................................16
Punch In Loop ..............................................................16
Make a loop .............................................................17
Add layers of sound to your loop .............................17
Replace a portion of your loop .................................17
Mute .........................................................................17
Cue the next function ...............................................17
Playing with multiple loops.......................................18
Things to keep in mind.............................................19
Phrased Loops .............................................................19
Using MIDI Clock..........................................................20
Control the tempo of another device........................20
Let another device determine JamMan's loop size..21
Adding Memory ......................................................................
22
MIDI Implementation ..............................................................
24
MIDI Implementation Notes .................................................
26
MIDI Fade.....................................................................27
MIDI Asynchronous Stop/Start .....................................27
Specifications.........................................................................
28
Getting Started .........................................................................
1
Introduction............................................................................
1
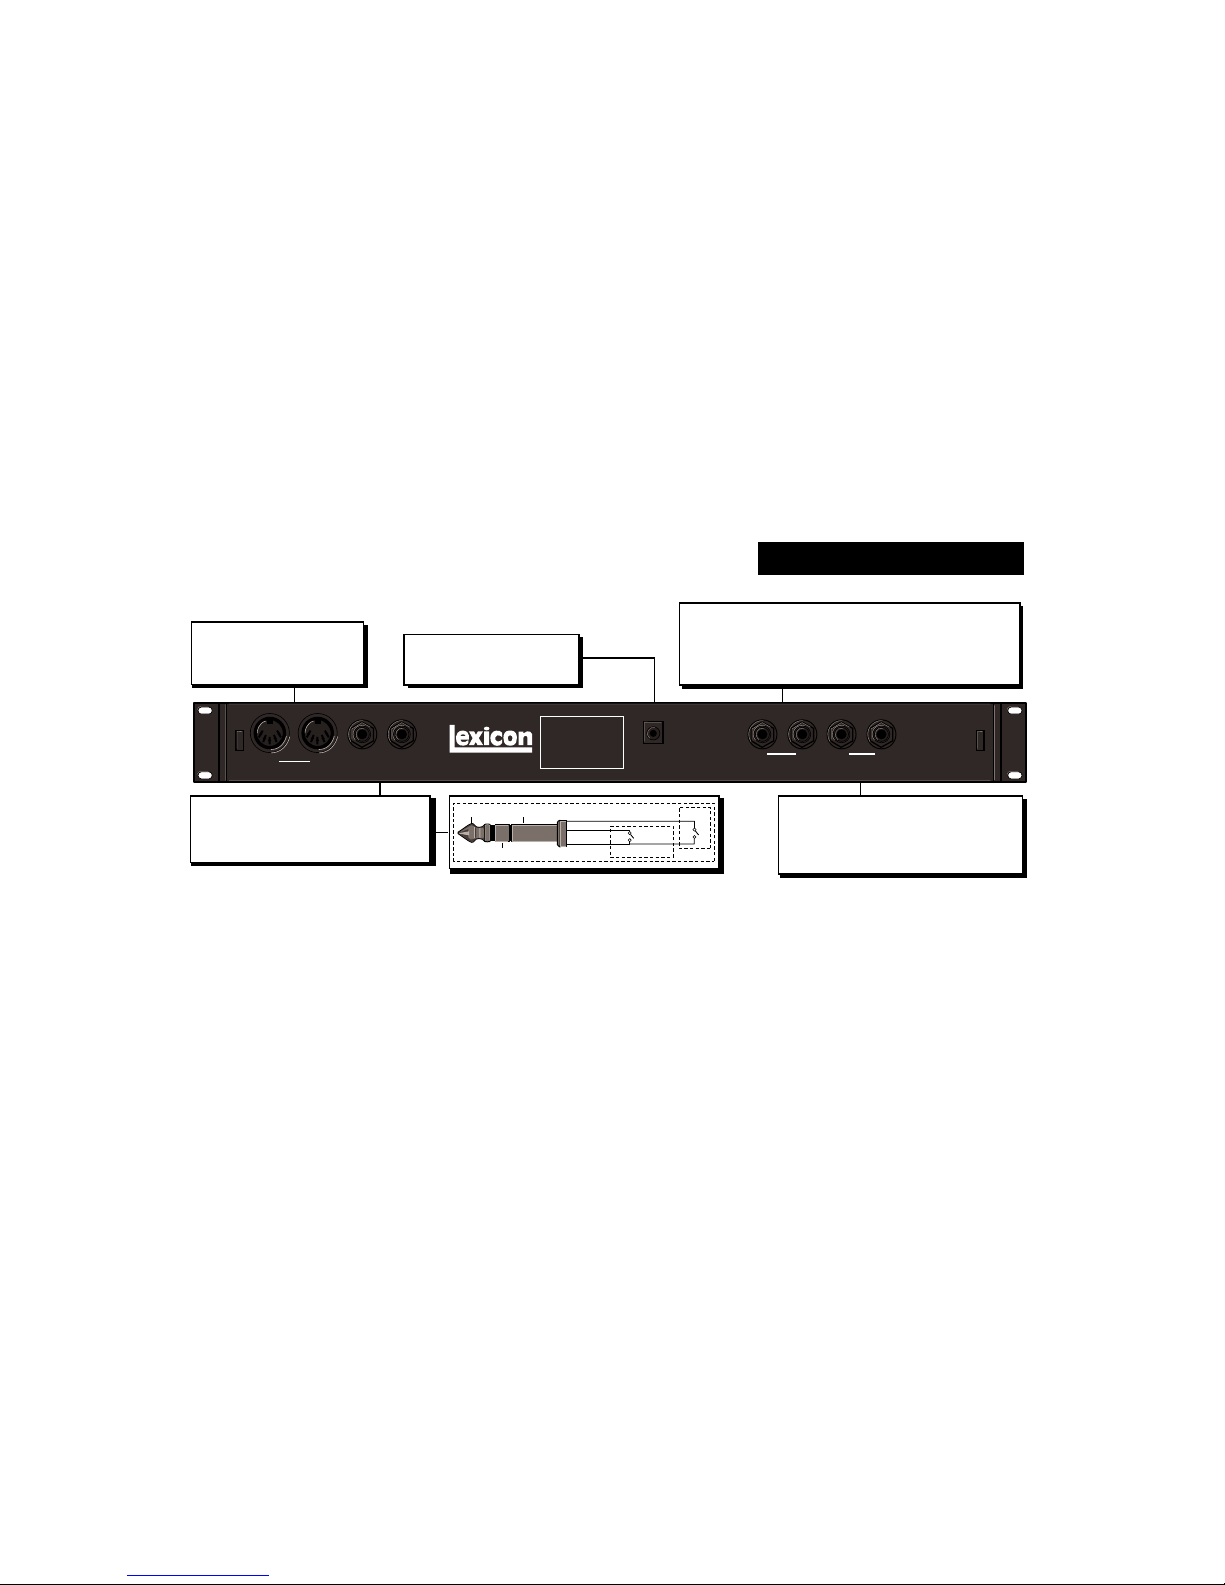
Front Panel Overview ............................................................
2
Setting Audio Levels.......................................................3
Rear Panel Connections........................................................
4
Audio Connections .........................................................5
Headphones ...................................................................5
Footswitches ..................................................................5
Modes of Operation .................................................................
6
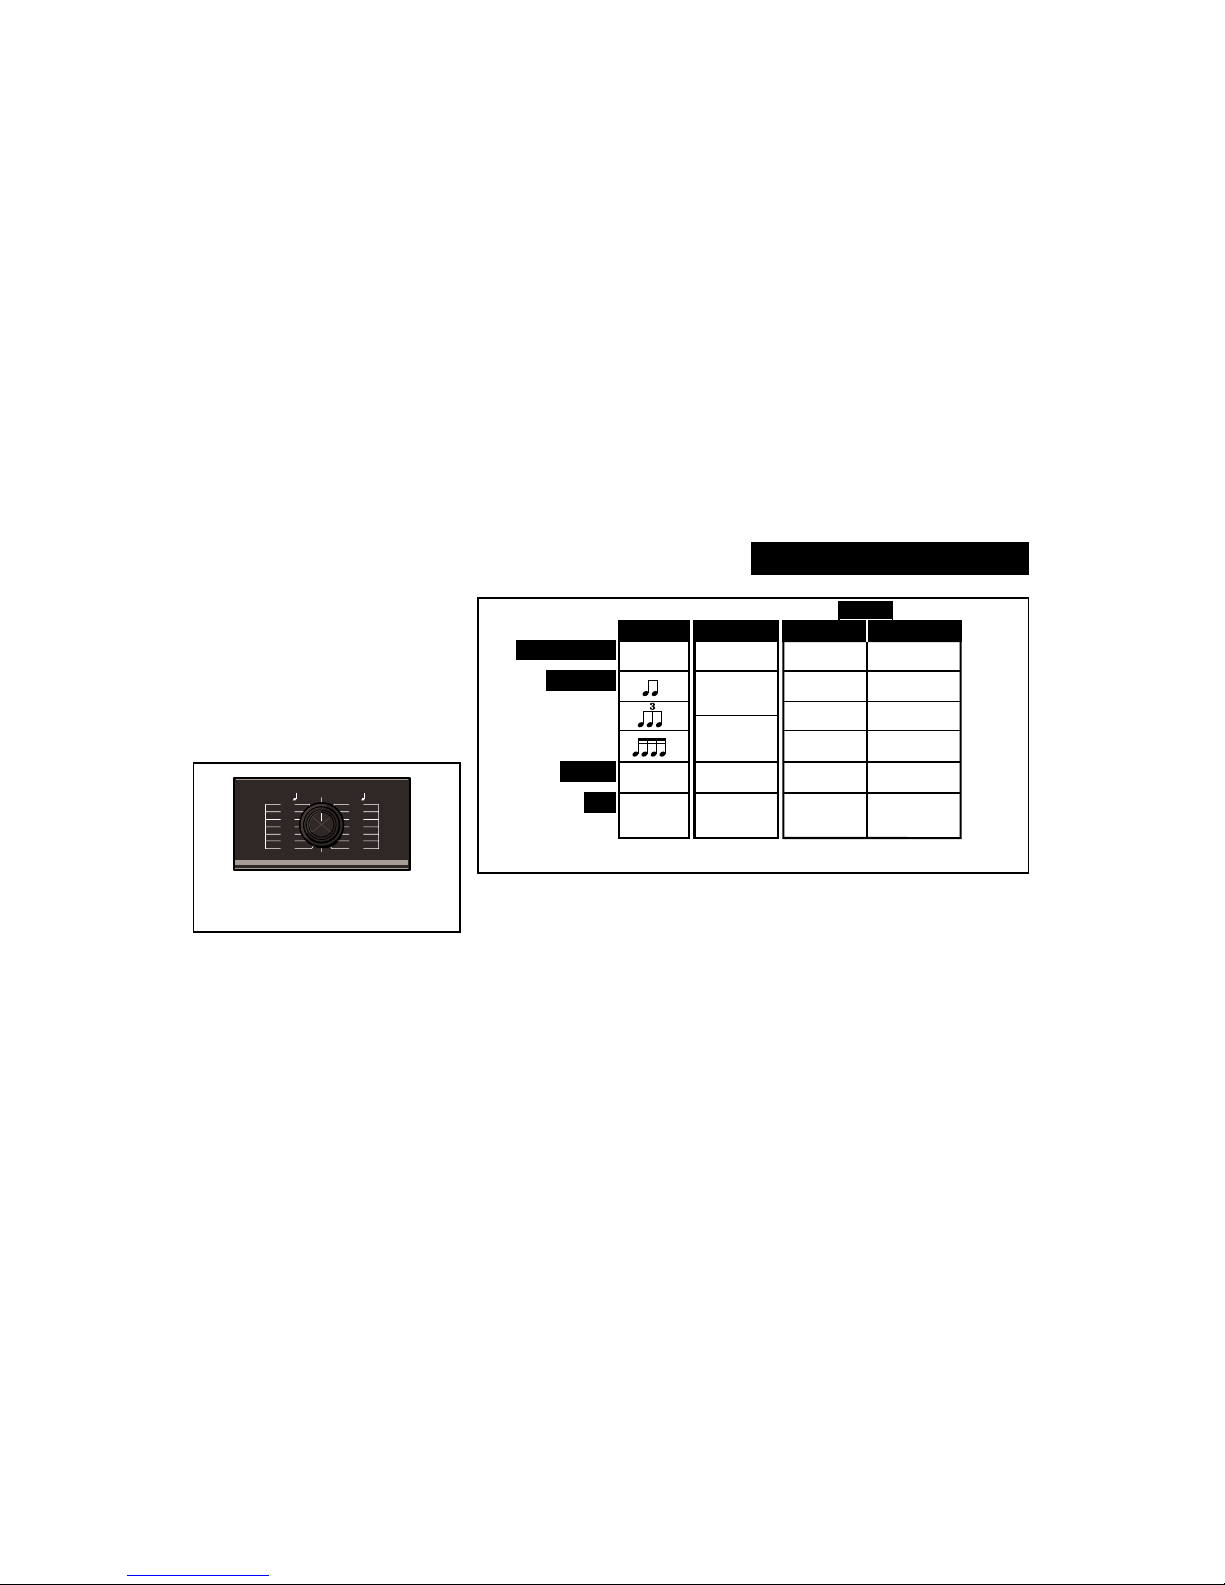
Echo Mode ............................................................................
7
Basic Echo .....................................................................8
Change the echo rate.....................................................9
Varying the rhythm .........................................................9
More about
ECHO
mode.............................................10
Sample Mode ......................................................................
11
Basic Sampling.............................................................12
Manually-triggered samples .........................................13
Backward sample play .................................................13
Audio-triggered playback..............................................13
Audio-triggerred record ................................................14
More about
SAMPLE
mode..........................................14
Table of Contents

Getting Started
1
Introduction
Congratulations on your purchase of
JamMan. You now possess a unique new
delay device which we believe will become
not only an indispensable tool in your setup
—but also a new musical instrument. We're
certainthat,onceyoubegintorealizethefull
capabilities of JamMan —whether you're
composing,performing, teaching,or mixing,
your music will never be the same.
Cleverly concealed behind JamMan's
deceptively simple front panel, are really
three unique effects boxes: a tap-tempo
echo, a sampler, and a looping device.
Each of these offers features which are
unavailableanywhereelse—andallofthem
are designed to free you from programming.
JamMan lets
your
tempo set the pace for
echo rates, loop lengths, or samples. It can
even control other equipment, such as se-
quencers and drum machines, via MIDI.
With 8 seconds of memory, a footswitch
provided for hands-off control of tempo and
resetfunctions,andcompleteremotecontrol
viaMIDI,JamManreallyletsyoutapintoyour
creativity.
Want more?
A second, optional footswitch allows
completefootswitchcontrolofallofthefunc-
tions available within any JamMan mode.
If you want more memory, you can up-
gradeJamManatanytimefrom8secondsto
32 seconds. Complete instructions for add-
ing memory are given in the manual.
To make sure you get the most out of
JamMan, be sure to read the manual.

INPUT
Setsthelevel of the incoming
signal. Status LED indicates
acceptable signal level
(green), or overload (red).
OUTPUT
Controls the output level.
MODE
Allows selection of three basic modes:
ECHO
,
SAMPLE
or
LOOP
(
PUNCH-IN
or
PHRASED
).
When the unit is being used with an external
MIDI Clock, this knob allows selection of loop
size —expressed in MIDI quarter-notes (3
beats/loop, 4 beats/loop, etc.)
Front Panel Overview
FUNCTION
Selects the function assigned to TAP and lights the
corresponding LED (MUTE, LAYER or REPLACE).
A blinking LED indicates function is selected and
cued to be activated by next TAP. LEDs can also
indicate selected echo rhythm.
MIX
Controls the proportion of processed
(wet) to unprocessed (dry) signals.
TEMPO
Depending on the mode of operation,
LED blinks at the current tempo, or lights
during sample record and play.
TAP
Enters timing information. Two
pushes define a tempo. Also toggles
the selected function on/off.
SELECT
Depending on the mode of operation,
selects feedback level, audio trigger
threshold, or selects a loop.
DISPLAY
Significanceof symbolsvaries withmode of
operation. Plus (+) and minus (-) symbols,
numeric display of digits 0-16, and decimal
pointprovidevisualfeedbackineachmode.
2
RESET/BYPASS
Depending on the mode of
operation, RESET resets the
unit; BYPASS toggles muting.
OUTPUTMIXINPUT
TEMPO
MUTE/
LAYER/
REPLACE/
FUNCTIONRESET/BYPASS
PUNCH IN
LOOP PHRASED
LOOP
3
4
6
8
12
16
24
MIDI
DRY WET
SELECT TAP
ECHO
SAMPLE
3
4
6
8
12
16
24
MIDI

Setting Audio Levels
1. Turn the Mode knob to
ECHO
.
2. Turn INPUT and OUTPUT all the way
down (fully counter-clockwise).
3. Set the instrument output or effects send
beinginputtoJamMantoanominallevel.
With an instrument, this should be your
loudest playing level; with a console, ad-
justthe output oreffects send toproduce
the highest level possible with the least
amount of noise.
4. While sending audio to JamMan, gradu-
ally turn up the INPUT control until the
status LED* lights green. Continue to
advance INPUT until the LED shows red
on only the loudest peaks. If the LED
shows red continuously, turn the INPUT
control down.
5. IfJamManisusingaconsole’ssendsand
returns, set the MIX control fully clock-
wise (100% wet). If you are using an
instrument amplifier, start with MIX set
halfway up.
6. Gradually increase the setting of the
OUTPUT control until the audio level
from the amplifier or mixer is approxi-
mately the same as when JamMan is
bypassed.
3
*The statusLED isoff whenthe incomingsignalis
too low (less than-30dB). Green indicates accept-
able levels (-30 to -6dB). The LED lights red to
indicate overload (-6 to 0dB).

Rear Panel Connections
4
MIDI
Two 5-pin DIN MIDI connec-
tors are provided for MIDI IN
and MIDI OUT.
POWER
Use Lexicon MSA power pack,
or 9VAC 1 amp equivalent.
OUPUT
Single-ended (unbalanced) stereo outputs provide +4dBu
nominal output level. Use the right output connector for mono
output. If no connection is made at the right output, the left
output can be used to drive headphones at modest volume.
FOOTSWITCHES
Two connectors, for momentary contact
footswitches, allow footswitch control of
frontpanel functions.
INPUT
Single-ended (unbalanced) inputs accept
levels as low as -30dBu. Input impedance is
50kΩinstereo,25kΩinmono.Eithercanbe
used for mono input.
FOOTSWITCHES POWER OUTPUTS INPUTS
9V~, 1A,
50-60Hz
LEXICON, INC.
WALTHAM MA 02154
MADE IN U.S.A.
P/N 021-09504
SERIAL #
THIS DEVICE COMPLIES WITH PART
15 OF THE FCC RULES.
OPERATION IS SUBJECT TO THE
FOLLOWING TWO CONDITIONS:
(1) THIS DEVICE MAY NOT CAUSE
HARMFUL INTERFERENCE, AND
(2) THIS DEVICE MUST ACCEPT ANY
INTERFERENCE RECEIVED<
INCLUDING INTERFERENCE THAT
MAY CAUSE UNDESIRED OPERATION.
:TIP
:RING
:SLEEVE
TAP
RESET/BYP
COMMON
SELECT
FUNCTION
COMMON
L
(PHONES) L
R
(MONO) R
(MONO)
OUT IN
MIDI
USE LEXICON
MSA AC ADAPTER
J
AM
M
AN
TIP
RING
SLEEVE
Tip Sleeve
Ring
TAP
RESET/BYPASS

Headphones
A stereo signal which is adequate to drive
headphones is available at the left output
(provided no connections are made through
the right output). This feature is provided as
a convenience for practice purposes, and is
intended to provide only modest volume.
Audio Connections
Audio connections to JamMan are unbal-
anced and should be made with high quality
shielded cables with 1/4" tip-sleeve phone
jacks at the JamMan end.
JamMan produces effects from either
monoorstereosources.Withmonosources,
the dry signal appears, along with audio ef-
fects, at both outputs. For instruments and
sourceswithstereo outputs, usebothinputs.
We recommend using the outputs in stereo
wheneverstereoinputsareused,butifmono
output is required, use the right output jack.
The left and right signals are summed inter-
nally when only the right output is used.
Footswitches
Footswitches connected via the rear-
panel footswitch jacks allow control of TAP
and RESET/BYPASS (or SELECT and
FUNCTION).Two momentary foot-switches
can be wired to a tip-ring-sleeve connector.
A stereo Y-connector allows two identical
single switches to be used.
Onefootswitchisprovidedwithyourunit,alongwitha setof labelsto identify
footswitch functionality. If you are only going to be using one
footswitch,connect it to perform TAP and RESET/BYPASS functions, and
label it accordingly.
5
TAPRESET/BYPASS
SELECTFUNCTION
Use a second (optional) footswitch to
control SELECT and FUNCTION.

PUNCH IN
LOOP PHRASED
LOOP
3
4
6
8
12
16
24
MIDI
ECHO
SAMPLE
3
4
6
8
12
16
24
MIDI
Modes of Operation
6
RESET/BYPASS, FUNCTION, SELECT, and
TAPwill performdifferentfunctions, depending
on the mode that is selected here.
With
ECHO
,
SAMPLE
, and
LOOP
modes, JamMan is actually three complete
boxes behind a single, easy-to-use front
panel. Each operating mode is selected
simply by turning the front panel Mode knob
(shown below).
Each mode offers a unique and exciting
set of functions which are accessible from
the front panel, by footswitch control, or via
MIDI.
Bypass
ECHO SAMPLE
FUNCTION
SELECT
TAP
Feedback
Echo Rate
Reset
Forward
Sample
Play
Audio Trigger
Threshold
Manual
Record/Play
Reset Reset at next
loop boundary
Mute Mute at next
loop boundary
Layer Layer
Replace Replace at next
loop boundary
Loop number
Defines 1st
loop; toggles
FUNCTION
Loop number
Defines 1st
loop; toggles
FUNCTION
PUNCH-IN PHRASED
LOOP
RESET/BYPASS
Reverse
Sample
Play
The function(s) of each front panel switch in each mode.
Thenextsectionsofthe manual describe
each mode in detail, with step-by-step in-
structions to get you started in each mode.

Echo Mode
With JamMan on, and an audio source
connected,
1. Turn the Mode knob to
ECHO.
2. Set the front panel MIX
control halfway
between
DRY
and
WET
.
7
Set Mode knob to
ECHO
.
With JamMan, you no longer have to
struggle with calculations of appropriate de-
lay times to create rhythmic echoes when
you play. Now, you can tap a tempo, and
JamMan will sync to you.
ECHO
mode allows you to tap in a delay
time in whatever tempo you want. Simply
press TAP twice in rhythm to establish the
tempo you want —the
TEMPO
LED on the
front panel will start blinking at the echo rate
you’ve set. Sixteen levels of feedback con-
trol (echo regeneration) are provided
throughthefront-panelSELECTknob,orvia
footswitch.
Once you’ve tapped in the basic rhythm
(for example, quarter-notes), pressing
FUNCTION allows you to split the echo rate
into eighth-note, triplet, or sixteenth-note
echo rates, or to keep it in the basic quarter-
note rhythm —the echo rate will always fit
musicallywiththetempoyou’veestablished.
Changing tempos is as easy as tapping in a
different rhythm.
Pressing RESET/BYPASS mutes the
echo effect.
PUNCH IN
LOOP PHRASED
LOOP
3
4
6
8
12
16
24
MIDI ECHO
SAMPLE
3
4
6
8
12
16
24
MIDI

DISPLAY
+ = Inactive in this mode
- = Inactive in this mode
1-16 = Feedback level (default = 1)
•= Inactive in this mode
RESET/BYPASS
Activates and deactivates wet audio
bypass. Causes a “P”to appear in the
display when active.
SELECT
Selects feedback level. (Display levels
1-16correspondto 0-100%feedback.)
8
LED blinks at the current echo rate. When a new rate is
tappedin, theLEDlightssolidon thefirsttap,thenblinks
atthenewechorateonthesecondtap.(Ifnosecondtap
is received, echo rate will automatically be set to the
maximum available memory.)
MUTE/
LAYER/
REPLACE/
FUNCTIONRESET/BYPASS SELECT TEMPO TAP
TAP
Press twice in rhythm to set
echo rate.
FUNCTION
Selects between tapped rhythm
andthreerhythmicvariations(your
tempo divided by 2, 3 or 4.)
LEDs show the currently selected
echo rhythm
(selected by FUNCTION).
Basic Echo

When you run any sound through Jam-
Man,youwillhearaveryquickecho. (This is
JamMan’s default echo rate of 80ms.)
The display indicates feedback level.
WhenyouselectEchomode,thiscontrolwill
default to 1 (no feedback). Turning the front
panel SELECT
knob clockwise will increase
thenumberofechorepetitionsyouhear.The
highest setting (16) provides infinite feed-
back. Be careful! This can cause signal
overloadas echoescontinuallyaccumulate.
Change the echo rate
Tochange theecho rate, simplyTAP two
beats—JamMan will adjusttheechorate to
whatever rhythm you tap —so the results
will always be musical.
Forexample,TAPtwobeatsinanytempo
you want. Now, anything played through
JamManwillhaveaone-beatechorepeatat
whatever tempo you tapped. The
TEMPO
LED will flash in time.
3. Press FUNCTION again to hear your
original echo rate change to eighth-note
triplets. The middle display LED should
light.
4. Press FUNCTION again to hear your
originalechorateinsixteenth-notes.The
bottom display LED should light.
5. PressFUNCTION again toreturnto your
original echo rate. None of the display
LEDs should be lit.
Note that you can set any of these rhyth-
mic variations
before
you tap in a tempo —
allowing you, for example, to tap in quarter-
notes and get a sixteenth-note echo rate.
9
Toselectanew echorateatanytime,just
TAP twice. RESET/BYPASS allows you to
mute the current rhythm while tapping in a
new one.
Vary the rhythm
FUNCTION allows you to select among
four echo rates on the fly: the rhythm you
TAP in, and three variations on your original
rhythm.
To hear how this works:
1. Play audio through JamMan, and TAP in
twoquarter-notes intime withyour audio
source.
2. Press FUNCTION. The first push will
divide the echo rate in half. You should
now be hearing eighth-note repetitions.
—Note that the uppermost display LED
is lit to indicate division of the original
echo rate by 2.

More about
ECHO
mode
Remember that it takes only two TAPs to
set an echo rate ...
If TAP is only pressed once, JamMan will
set the longest echo rate possible (8 sec-
onds, or 32 seconds, depending on the
memory capacity of your unit.)
The
TEMPO
LED, will light solid on the
first TAP, then start blinking at the selected
echo rate after the second TAP. This LED
continues to blink at the tapped in echo rate,
no matter what rhythmic variation is chosen.
10
PressingFUNCTION gives you four rhythmic
variations of any rhythm you TAP ...
MUTE /
LAYER /
REPLACE /
Tapped-in Rhythm
Rhythmic Variations FUNCTION Setting
(No LEDs Lit)

Sample Mode
Set Mode knob to
SAMPLE
.
With JamMan on, and an audio source
connected,
1. Turn the Mode knob to
SAMPLE.
2. Set the front panel MIX
control halfway
between
DRY
and
WET.
SAMPLE
mode allows you to capture a
single sample of as long as 8 seconds (32
seconds with memory upgrade).
Onceasampleisrecorded,youcansetit
to play forward or backward. —You can
evenchangedirectionasmanytimesasyou
like during playback. You can trigger play
manually (or via footswitch), or set it to play
in response to one of fifteen levels of audio
threshold.
11
PUNCH IN
LOOP PHRASED
LOOP
3
4
6
8
12
16
24
MIDI ECHO
SAMPLE
3
4
6
8
12
16
24
MIDI

RESET/BYPASS
Resets the unit to sample record
ready. Does not affect audio
threshold or +/- settings.
LEDs are Inactive in this mode. TAP
If no audio trigger is specified via
SELECT, first push starts record-
ing;second pushstopsrecording.If
an audio trigger has started record-
ing, first push will stop recording.
Once a sample is recorded, subse-
quent pushes restart sample play.
If an audio trigger is set to 2-16,
pressing TAP overrides the audio
trigger to start recording.
DISPLAY
+ = Sample selected to play forward; flashing = ready to record
- = Sample selected to play backwards
1-16 = Audio trigger threshold
•= Indicates audio sample is stored
Single segment chase pattern indicates sample record; dual segment
chase patterns indicate forward and backward sample play.
FUNCTION
Toggles “+”and “-”, selecting whether
the recorded sample is to play forward
or backward.
12
LEDlightsduring sample record,flashes
on start of sample play.
SELECT
Selects audio threshold which triggers start of
sample record or play. ( 1 = manual trigger via
TAP, 2-16 correspond to increased sensitivity
—lower audio levels required for trigger.)
Basic Sampling
MUTE/
LAYER/
REPLACE/
FUNCTION
RESET/BYPASS SELECT
TEMPO
TAP

Manually-triggered samples
1. SetSELECT
to“1”toallowTAPtotrigger
sample record start and stop. A flashing
plus symbol (+) indicates JamMan is
ready to record.
2. Send an audio source into JamMan.
13
3. Press TAP. The display will
show a single-segment chase
pattern to indicate JamMan is
recording.
4. Press TAP again to stop recording. If a
second TAP is not received, recording
will be stopped automatically when the
memory capacity of the unit is reached.
5. These two TAPs define your sample.
Once a sample has been captured, a
decimalpointwillbedisplayedtoindicate
a sample has been recorded.
Audio triggered playback
1. If you have already captured a sample,
run an audio source into JamMan, and
turn the front panel MIX control all the
way to WET
.
This will let you hear your
sample whenever it is triggered without
hearing the material that is triggering
sample play.
2. WhilesendingaudiointoJamMan,slowly
increasethesettingofSELECTuntilyour
sample starts to play. (The TEMPO LED
will flash when the audio threshold has
been reached.)
All of the display indicators are the same
asfor manually-triggeredsample play —
and FUNCTION toggles reverse play on
your audio trigger.
3. Lower MIX to 50% to hear both the
sample and the audio trigger.
Youcanre-triggersampleplaywhenever
you like, even during playback.
Backward sample play
Onceasamplehasbeenrecorded,press
FUNCTION to change the plus (+) in the
display to a minus (-).
Now, pressing TAP will cause
thesample(andthedisplaychase
lights) to play backwards.
You can press FUNCTION at any time
during sample play to toggle forward and
reverse playback.
Now, pressing TAP will trigger
sample play. Dual-segment
chase lights will be displayed
during sample play.

14
Audio triggered record
1. If you have already captured a sample,
press RESET/BYPASS.
2. Now, your audio trigger will start the re-
cording of a sample. Press TAP to stop
recording, or let the memory capacity of
your unit fill with your sample.
More about
SAMPLE
mode
Ifyou areusing an audiotrigger andfind
that the beginning of your sample is being
cut off on playback, raise the audio thresh-
old.If, on audio triggered sample playback,
the sample is retriggering too easily, lower
the threshold.

Loop Mode
15
Punch In
Loop Phrased
Loop
3
4
6
8
12
16
24
MIDI
Echo
Sample
3
4
6
8
12
16
24
MIDI
These numbers allow you to choose the
numberofMIDIquarter-notesinaloopwhen
you are working with a drum machine, or a
sequencer.
RESET, MUTE and REPLACE can be auto-
mated to start at the loop boundary by selecting
PHRASED LOOP. In PUNCH IN LOOP, these
functions will occur on your manual trigger.
JamMan sends out MIDI clock signals in
thetempoestablishedbyyourloop, allowing
sequencers, drum machines, or other Jam-
Man units to sync to
your
tempo. Alterna-
tively, you can send MIDI Clock to JamMan,
allowing you to capture loops which are
perfectly timed to the MIDI tempo.
Togetstartedin
LOOP
mode,connectan
audio source to JamMan and,
1. TurntheModeknobto
PUNCHINLOOP
and set it to 4.
2. Set the front panel MIX
control halfway
between
DRY
and
WET
.
JamMan provides two versions of its
LOOP
mode,
PUNCH IN
and
PHRASED.
Thesearedifferentiatedprimarilybywhether
you want the overdub functions you’ve se-
lectedto occurimmediately,or atthe start of
the next musical phrase.
Either mode allows you to play a loop of
anylength (up tothememorycapacity of the
unit), which will replay indefinitely with no
degradation of audio quality. Once a loop is
recorded, you can add as many layers as
you like. Depending on your choice of initial
looplength,multipleloops(asmanyaseight)
can be created and selected for play, or
layering. Mute, replace, and cue functions
are also available.

MUTE/
LAYER/
REPLACE/
FUNCTION
RESET/BYPASS SELECT
TEMPO
TAP
RESET/BYPASS
In Punch-In Loop mode, immediately
resets the unit to begin a completely
new sequence of loop recording. In
PhrasedLoopmode,resetwilloccurat
the end of the current loop.
TAP
First push starts recording. Second
push stops recording and immediately
playstheloop.Subsequentpushesturn
on and off the selected dub function.
LEDs(activatedviaFUNCTION)show
selected and cued dub functions.
16
Off: Function not selected
Blinking: Function cued
On: Function active
DISPLAY
+ = Loop displayed is cued to begin at
start of next phrase
- = When recording first loop,
indicates less than 1 second of
memory remains
1-8 = ID number of current, or cued loop
•= Indicates displayed loop is the
final loop of the current sequence
0 = ready to define the first loop of a
new sequence
Chase pattern indicates loop recording.
Basic Looping
FUNCTION
Selects MUTE, LAYER, or
REPLACEas thedubfunction
assigned to TAP. LED lights while first loop is being
recorded,thenblinksatthetempo
set by that loop.
SELECT
Selectsamongamaximumof8loops.(LoopID
number is displayed.) The actual number of
loops which can be made is determined by the
length of your first loop.
Table of contents
Other Lexicon Music Equipment manuals