LG P935 User manual

ENGLISH
Quick start guide
LG-P935
To download the latest full version of the user guide, go to
www.lg.com/ca_en on your PC or laptop.

LG-P935 overview
LG-P935 overview .................................. 1
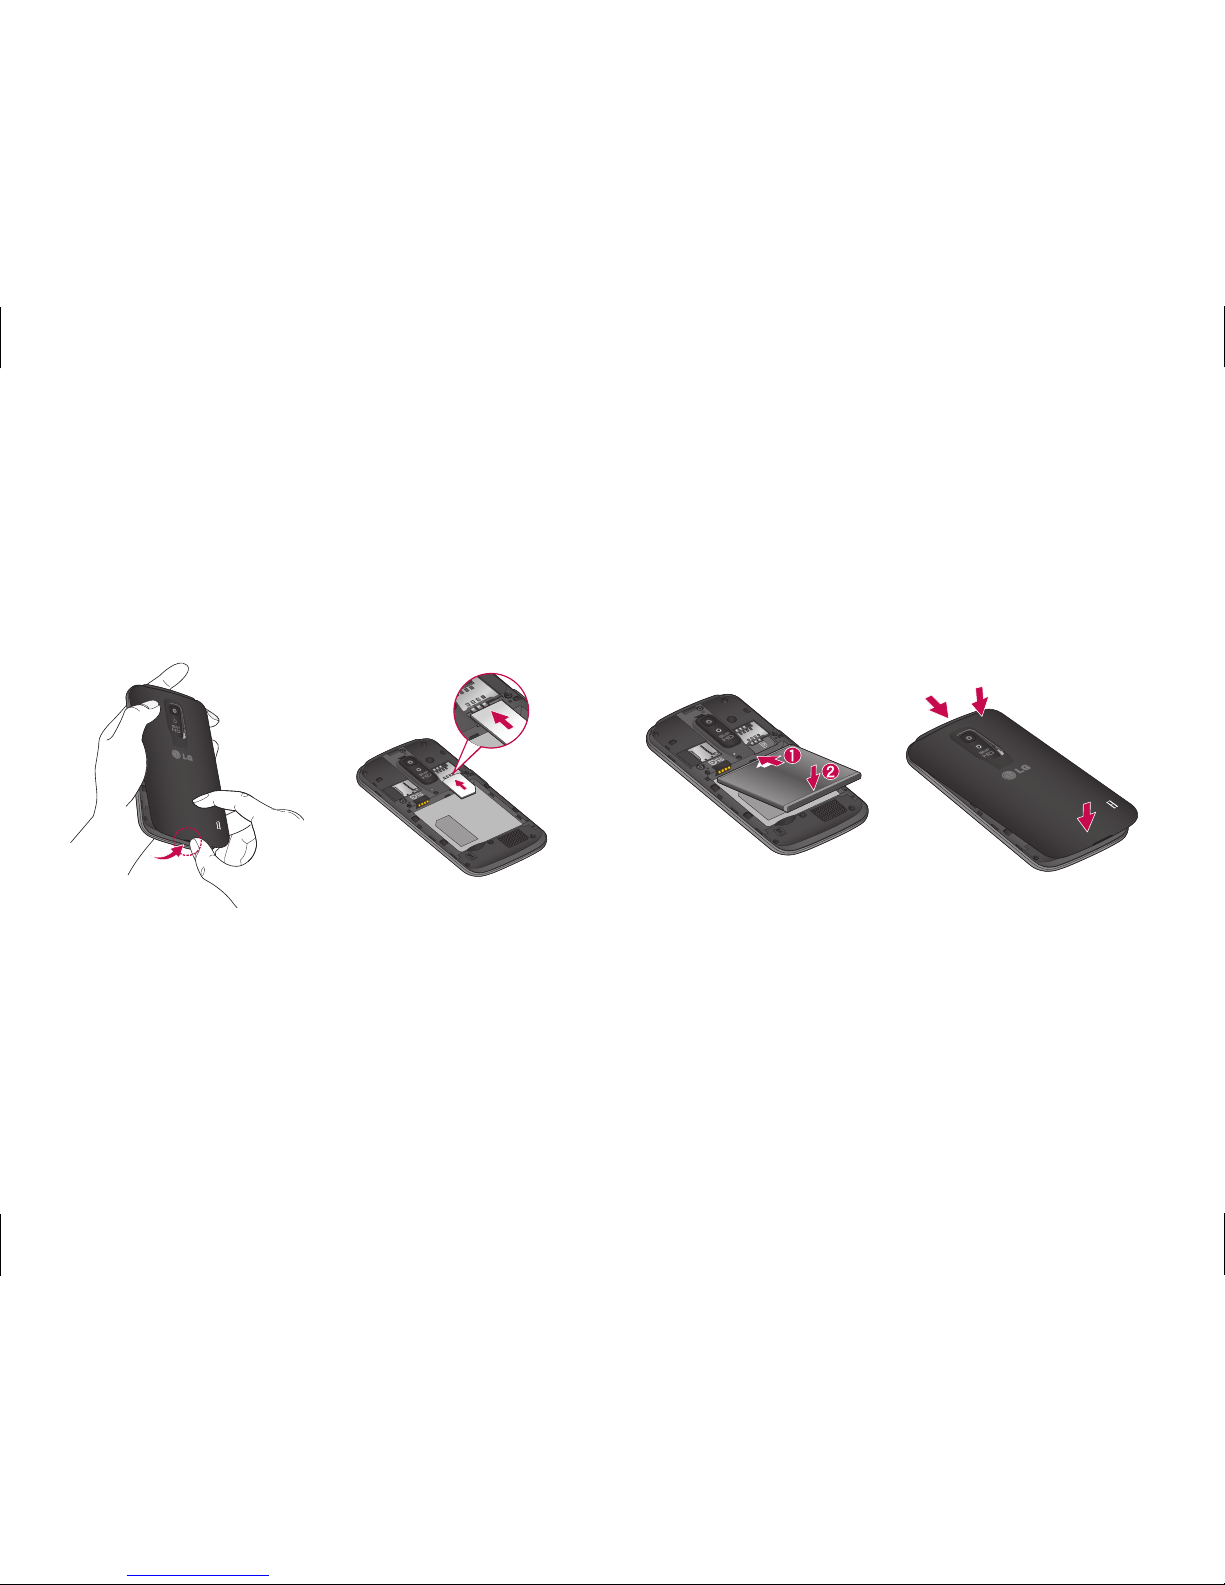
Setup ....................................................... 2
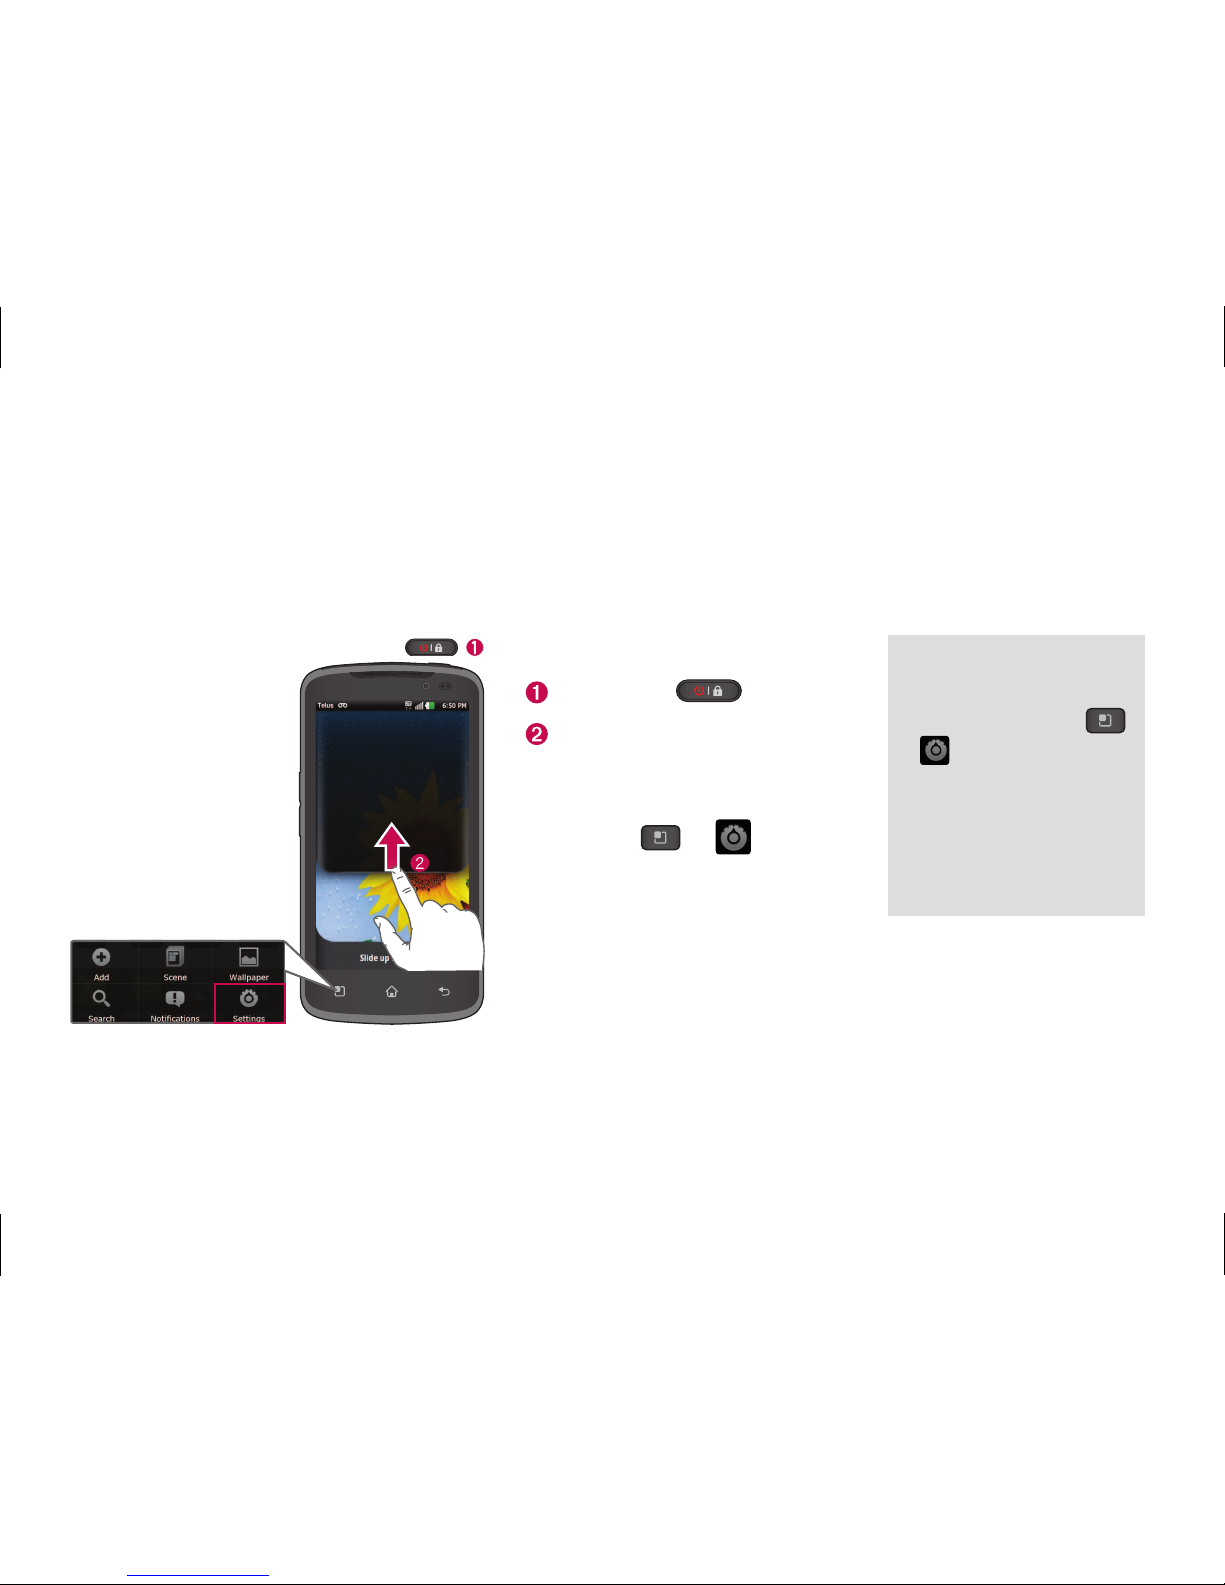
Home screen........................................... 5
Unlock screen ......................................... 6
Notification screen ................................. 7
Make a call/send a message .................8
Contacts .................................................. 9
Internet/Maps ....................................... 10
Camera ....................................................11
Video camera..........................................11
1.
2.
3.
4.
5.
6.
7.
8.
9.
10.
11.
12.
13.
14.
15.
16.
Google account......................................12
Downloading applications.....................13
Email.......................................................14
Transferring music, photos and videos....15
Safety......................................................16
Technical data.......................................44
Index
Earpiece
Volume keys
Menu
Check what options
are available.

1
LG-P935 overview
Google account......................................
12
Downloading applications.....................
13
Email.......................................................
14
Transferring music, photos and videos....
15
Safety......................................................
16
Technical data.......................................44
Index
Earpiece
Proximity & Ambient
Light sensor
Camera lens
Back
Return to the previous screen.
Home
Return to home from any screen.
Volume keys
Menu
Check what options
are available.
Stereo headphone
connector
Power/Lock key
Charger, micro USB
cable connector

2
Setup (continued)
To store multimedia files, such as pictures taken using a built-in camera, you must insert a
memory card into your phone.
Installing the memory card
1. Turn the phone
off before
inserting or
removing the
memory card.
Remove the back
cover.
2. Insert the memory
card into the slot.
Make sure the gold
contact area is facing
downwards.
WARNING! Do not insert or remove the memory card when the phone is turned on. Otherwise the memory
card, as well as your phone, may become damaged and the data stored on the memory card may be
corrupted. To remove the memory card safely , on the Home screen touch the Applications tab then select
Settings > SD card & phone storage > Unmount SD card.
Before you start using the phone, you need to insert the SIM card and battery.
Installing the SIM card and battery
1. Remove the back
cover.
2. Make sure the gold
contact area on
the card is facing
downwards.
3. Insert the
battery.
4. Insert the back
cover.
Setup

3
Setup (continued)
To store multimedia files, such as pictures taken using a built-in camera, you must insert a
memory card into your phone.
Installing the memory card
1. Turn the phone
off before
inserting or
removing the
memory card.
Remove the back
cover.
2. Insert the memory
card into the slot.
Make sure the gold
contact area is facing
downwards.
WARNING! Do not insert or remove the memory card when the phone is turned on. Otherwise the memory
card, as well as your phone, may become damaged and the data stored on the memory card may be
corrupted. To remove the memory card safely , on the Home screen touch the Applications tab then select
Settings > SD card & phone storage > Unmount SD card.
Before you start using the phone, you need to insert the SIM card and battery.
Installing the SIM card and battery
1. Remove the back
cover.
2. Make sure the gold
contact area on
the card is facing
downwards.
3. Insert the
battery.
4. Insert the back
cover.
Setup

4
You can customize each screen by adding widgets or shortcuts to your favourite applications.
Adding icons to the Home screen
Swipe your finger right or left to move through the screens.
Stop when you get to a screen that you want to add items to.
Touch and hold an empty area in the Home screen. Touch
either Widgets, Shortcuts, Folders or Wallpapers option
then select the item you want to add.
Widgets: add applications that are updated dynamically
Shortcuts: add direct links to applications
Folders: create folders to organize your contacts/shortcuts
Wallpaper: change the wallpaper on the current Home screen
TIP! Touch and hold the application you want to add to the Home screen, by selecting it from . To delete an
application, touch and hold it, then drag it to the icon.
Home screen
When you first turn on the phone, you will be guided through a series of essential steps to
configure the phone settings.
Turning on the phone Charging the phone
Press and hold the Power/
Lock key for a couple of
seconds.
• The charging port is on the top of
the phone.
• Insert one end of the charging
cable into the phone and plug the
other end into an electrical socket.
• To maximize the battery lifetime,
ensure that the battery is fully
charged before you use it for the
first time.
TIP! If the phone is locked and does not work, press and hold the Power/Lock key for 10 seconds to turn it off.
Setup (continued)

5
You can customize each screen by adding widgets or shortcuts to your favourite applications.
Adding icons to the Home screen
Swipe your finger right or left to move through the screens.
Stop when you get to a screen that you want to add items to.
Touch and hold an empty area in the Home screen. Touch
either Widgets, Shortcuts, Folders or Wallpapers option
then select the item you want to add.
Widgets: add applications that are updated dynamically
Shortcuts: add direct links to applications
Folders: create folders to organize your contacts/shortcuts
Wallpaper: change the wallpaper on the current Home screen
TIP! Touch and hold the application you want to add to the Home screen, by selecting it from . To delete an
application, touch and hold it, then drag it to the icon.
Home screen
When you first turn on the phone, you will be guided through a series of essential steps to
configure the phone settings.
Turning on the phone Charging the phone
• The charging port is on the top of
the phone.
• Insert one end of the charging
cable into the phone and plug the
other end into an electrical socket.
• To maximize the battery lifetime,
ensure that the battery is fully
charged before you use it for the
first time.
TIP! If the phone is locked and does not work, press and hold the Power/Lock key for 10 seconds to turn it off.
Setup (continued)

6
On this screen, you can view and manage ring, Wi-Fi, Bluetooth, GPS, the music player etc.
The 'notification drawer' runs across the top of the screen.
Notification screen
After a period of inactivity, to conserve the battery, the screen you are currently viewing will
be replaced by the lock screen.
Unlocking the screen
Press the key.
Slide the screen upwards.
Setting up the display
1. Touch
> .
2. Select Display > Screen
timeout.
3. Select the period of time
you want.
NOTE: to lock your
screen using the pattern
lock feature, touch
> > Location &
security > Set up screen
lock > Pattern. A short
tutorial will guide you
through the process of
setting a pattern lock.
Unlock screen
Turning features on/off
1.
Touch and slide the notification
drawer downwards.
2.
Touch the icons to turn the
corresponding features on/off.
TIP! To preserve battery life, turn off Wi-Fi, Bluetooth and GPS when you are not using them.

7
On this screen, you can view and manage ring, Wi-Fi, Bluetooth, GPS, the music player etc.
The 'notification drawer' runs across the top of the screen.
Notification screen
After a period of inactivity, to conserve the battery, the screen you are currently viewing will
be replaced by the lock screen.
Unlocking the screen
Press the key.
Slide the screen upwards.
Setting up the display
1. Touch
> .
2. Select Display > Screen
timeout.
3. Select the period of time
you want.
NOTE: to lock your
screen using the pattern
lock feature, touch
> > Location &
security > Set up screen
lock > Pattern. A short
tutorial will guide you
through the process of
setting a pattern lock.
Unlock screen
Turning features on/off
1. Touch and slide the notification
drawer downwards.
2. Touch the icons to turn the
corresponding features on/off.
<notification drawer>
To view further settings
options
Touch
> > Wireless &
networks.
Ring -
Vibration Data
Connectivity
Wi-Fi Bluetooth GPS
TIP! To preserve battery life, turn off Wi-Fi, Bluetooth and GPS when you are not using them.

8
You can automatically synchronize the contacts on the phone with any of your online
address books, or even import contacts from another SIM/SD card.
Importing/exporting contacts
Touch
> More > Import/Export.
NOTE: to add a number from a recent call to your contacts, locate the number
in your call log, touch and hold the number, then select Add to contacts. Touch
Create new contact to create a new contact entry, or touch Add to the existing
to add a new number to existing contacts.
Contacts
It only takes a few taps to make a call or send a message.
Making a call
1. Touch .
2. Dial the number you want to call or start typing the name of the contact by touching .
Sending a message
1. Touch .
2. Touch New message.
3. Enter the name or number you want to send the message to, or touch to select a
number from your contacts list.
4. Compose your message and press Send.
NOTE: To answer an incoming call in locked screen, drag the icon towards right. When the screen is
unlocked, you just need to touch the icon to answer.
Make a call/send a message

9
You can automatically synchronize the contacts on the phone with any of your online
address books, or even import contacts from another SIM/SD card.
Importing/exporting contacts
Touch
> More > Import/Export.
NOTE: to add a number from a recent call to your contacts, locate the number
in your call log, touch and hold the number, then select Add to contacts. Touch
Create new contact to create a new contact entry, or touch Add to the existing
to add a new number to existing contacts.
Contacts
It only takes a few taps to make a call or send a message.
Making a call
1. Touch .
2. Dial the number you want to call or start typing the name of the contact by touching
.
Sending a message
1. Touch .
2. Touch New message.
3. Enter the name or number you want to send the message to, or touch to select a
number from your contacts list.
4. Compose your message and press Send.
NOTE: To answer an incoming call in locked screen, drag the icon towards right. When the screen is
unlocked, you just need to touch the icon to answer.
Make a call/send a message

10
Switch lenses
Zoom
Brightness
Flash
Settings
Video camera
NOTE: You need to insert a
memory card before taking
a picture or video. If you
don't insert a memory card,
you will not be able to take a
picture or record a video.
Switch lenses
Zoom
Brightness
Flash
Settings
Camera
Use the Web browser to surf the Net with ease. Use Maps during a journey to pinpoint your
location and check for traffic updates on route.
Browsing the Web
1. Touch .
2. Touch .
Enter text.
3. Scroll up/down or pinch to view the webpage.
Setting up Maps
1. Touch > .
2. Set up the connection to Wi-Fi or Mobile data connection/GPS.
Pinch-to-Zoom: use your index finger and thumb in a pinching or spreading
motion to zoom in or out when using the Web browser, a map or pictures.
Internet/Maps
NOTE: Additional costs may be incurred
when connecting and using online
services. Check data charges with your
network provider.

11
Switch lenses
Zoom
Brightness
Flash
Settings
Video mode
Taking a photo
Gallery
Video camera
NOTE: You need to insert a
memory card before taking
a picture or video. If you
don't insert a memory card,
you will not be able to take a
picture or record a video.
Switch lenses
Zoom
Brightness
Flash
Settings
Camera mode
Start recording
Gallery
Camera
Use the Web browser to surf the Net with ease. Use Maps during a journey to pinpoint your
location and check for traffic updates on route.
Browsing the Web
1. Touch .
2. Touch .
Enter text.
3. Scroll up/down or pinch to view the webpage.
Setting up Maps
1. Touch > .
2. Set up the connection to Wi-Fi or Mobile data connection/GPS.
Pinch-to-Zoom: use your index finger and thumb in a pinching or spreading
motion to zoom in or out when using the Web browser, a map or pictures.
Internet/Maps
NOTE: Additional costs may be incurred
when connecting and using online
services. Check data charges with your
network provider.

12
Download fun games and useful apps from Android Market.
From Android Market
1. Touch > .
2. Sign in to your Google account.
3. Select an app from the list of featured apps or use the search
feature.
Managing applications
Touch > > Applications > Manage applications.
You cannot delete the pre-installed applications.
TIP! Launch the downloaded application from the icon.
Downloading applications
The first time you open the Google application, you need to sign in. If you do not have a
Google account, you will be prompted to create one.
Creating a Google account
1. Touch > .
2. Touch Next then Create to start the Google
mail setup wizard.
3. Touch to open the
keyboard and enter your name or username.
4. Touch Next.
You then need to follow
the setup instructions
and enter the necessary
information to activate the
account. Please wait while
the server creates your
account.
TIP! Once you have created your Google mail account, you can access Google mail and Google Apps, and use
Google's many services on the phone.
Google account

13
Download fun games and useful apps from Android Market.
From Android Market
1. Touch > .
2. Sign in to your Google account.
3. Select an app from the list of featured apps or use the search
feature.
Managing applications
Touch > > Applications > Manage applications.
You cannot delete the pre-installed applications.
TIP! Launch the downloaded application from the icon.
Downloading applications
The first time you open the Google application, you need to sign in. If you do not have a
Google account, you will be prompted to create one.
Creating a Google account
1. Touch > .
2. Touch Next then Create to start the Google
mail setup wizard.
3. Touch to open the
keyboard and enter your name or username.
4. Touch Next.
You then need to follow
the setup instructions
and enter the necessary
information to activate the
account. Please wait while
the server creates your
account.
TIP! Once you have created your Google mail account, you can access Google mail and Google Apps, and use
Google's many services on the phone.
Google account

14
2. You can see USB
connection mode
popup. Tap Mass
storage and OK to
confirm.
(From the Home
screen, tap the Menu
Key and tap Settings
> Connectivity
settings > USB
connection mode >
Mess storage.)
1.
Connect the phone
to your PC using the
USB cable.
3. Open the removable
memory folder on
your PC. Copy the
files from your PC to
the drive folder.
4. Open the Notifications
panel and tap Turn off
USB storage.
Then tap Turn off USB
storage on the USB
Mass Storage screen
and safely disconnect
the phone from your
computer.
Transferring music, photos and videos
You can stay connected with MS Exchange and other popular email providers.
Setting up an account
1. Touch > .
2. Select a mailbox type.
3. Enter your email address and password,
then touch Next.
4. Follow the remaining instructions.
Sending an email
1. Touch > .
2. Touch .
3. Enter your text, touch Attach to attach a
file (if needed) and then touch Send.
TIP! You can set sound and vibration alerts to notify you when you receive a new email.
Email

15
2. You can see USB
connection mode
popup. Tap Mass
storage and OK to
confirm.
(From the Home
screen, tap the Menu
Key and tap Settings
> Connectivity
settings > USB
connection mode >
Mess storage.)
1. Connect the phone
to your PC using the
USB cable.
3. Open the removable
memory folder on
your PC. Copy the
files from your PC to
the drive folder.
4. Open the Notifications
panel and tap Turn off
USB storage.
Then tap Turn off USB
storage on the USB
Mass Storage screen
and safely disconnect
the phone from your
computer.
Transferring music, photos and videos
You can stay connected with MS Exchange and other popular email providers.
Setting up an account
1. Touch > .
2. Select a mailbox type.
3. Enter your email address and password,
then touch Next.
4. Follow the remaining instructions.
Sending an email
1. Touch > .
2. Touch .
3. Enter your text, touch Attach to attach a
file (if needed) and then touch Send.
TIP! You can set sound and vibration alerts to notify you when you receive a new email.
Email

16
Antenna Care
Use only the supplied or an approved
replacement antenna.
Unauthorised antennas, modifications, or
attachments could damage the phone and
may violate FCC regulations.
Phone Operation
NORMAL POSITION: Hold the phone as you
would any other telephone with the antenna
pointed up and over your shoulder.
Tips on Efficient Operation
For your phone to operate most efficiently:
Do not touch the antenna unnecessarily
when the phone is in use.
TIA (Telecommunications Industry Association)
Safety Information
The following is the complete TIA Safety
Information for wireless handheld phones.
Exposure to Radio Frequency Signal
Your wireless handheld portable phone is
a low power radio transmitter and receiver.
When it is ON, it receives and also sends
out Radio Frequency (RF) signals. In
August, 1996, the Federal Communications
Commissions (FCC) adopted RF exposure
guidelines with safety levels for handheld
wireless phones. Those guidelines are
consistent with the safety standards
previously set by both U.S. and international
standards bodies:
•ANSIC95.1(1992)*
•NCRPReport86(1986)
•ICNIRP(1996)
•HealthCanada,SafetyCode6,1999.
Those standards were based on
comprehensive and periodic evaluations
of the relevant scientific literature. For
example, over 120 scientists, engineers, and
physicians from universities, government
health agencies, and industry reviewed the
available body of research to develop the
ANSI Standard (C95.1). The design of your
phone complies with the FCC guidelines, IC
Regulations (and those standards).
Safety

17
Antenna Care
Use only the supplied or an approved
replacement antenna.
Unauthorised antennas, modifications, or
attachments could damage the phone and
may violate FCC regulations.
Phone Operation
NORMAL POSITION: Hold the phone as you
would any other telephone with the antenna
pointed up and over your shoulder.
Tips on Efficient Operation
For your phone to operate most efficiently:
Do not touch the antenna unnecessarily
when the phone is in use.
Contact with the antenna affects call quality
and may cause the phone to operate at a
higher power level than otherwise needed.
Driving
Check the laws and regulations on the use
of wireless phones in the areas where you
drive and always obey them. Also, if using
your phone while driving, please observe the
following:
•Givefullattentiontodriving-drivingsafely
is your first responsibility;
•Usehands-freeoperation.
standards bodies:
•ANSIC95.1(1992)*
•NCRPReport86(1986)
•ICNIRP(1996)
•HealthCanada,SafetyCode6,1999.
Those standards were based on
comprehensive and periodic evaluations
of the relevant scientific literature. For
example, over 120 scientists, engineers, and
physicians from universities, government
health agencies, and industry reviewed the
available body of research to develop the
ANSI Standard (C95.1). The design of your
phone complies with the FCC guidelines, IC
Regulations (and those standards).
Safety

18
Safety
Hearing Aids
Some digital wireless phones may interfere
with some hearing aids. In the event of such
interference, you may want to consult your
service provider (or call the customer service
line to discuss alternatives.) Optional for
each phone manufacturer.
Other Medical Devices
If you use any other personal medical
device, consult the manufacturer of your
device to determine if it is adequately
shielded from external RF energy. Your
physician may be able to assist you in
obtaining this information.
Electronic Devices
Most modern electronic equipment is
shielded from RF signals.
However, certain electronic equipment may
not be shielded against the RF signals from
your wireless phone.
Pacemakers
The Health Industry Manufacturers
Association recommends that a
minimum separation of six (6”) inches
be maintained between a handheld
wireless phone and a pacemaker to avoid
potential interference with the pacemaker.
These recommendations are consistent
with the independent research by and
recommendations of Wireless Technology
Research.
Persons with Pacemakers:
•ShouldALWAYSkeepthephonemore
than six inches from their pacemaker when
the phone is turned ON;
•Shouldnotcarrythephoneinabreast
pocket;
•Shouldusetheearoppositethe
pacemaker to minimize the potential for
interference;
•ShouldturnthephoneOFFimmediately
if there is any reason to suspect that
interference is taking place.
Other manuals for P935
1
This manual suits for next models
1
Table of contents
Other LG Cell Phone manuals