LG GSA-4040B User manual

GSA-4040B
Super Multi DVD Drive
English Deutsch Français Italiano Español Português

i
CAUTION : The laser used in the Super Multi DVD Drive can damage your eyes.
Do not attempt to open the cover.
To reduce the risk of electric shock, do not remove the cover (or back).
There are no user-serviceable parts inside.
Refer servicing to qualified service personnel.
Use of controls or performance of procedures other than those specified
herein may result in hazardous radiation exposure.
WARNING : To reduce the risk of fire or electric shock, do not expose this appliance to
rain or moisture
Industry Canada Requirement
This Class B digital apparatus meets all requirements of the Canadian Interference-Causing
Equipment Regulations.
Cet appareil numérique de la classe B respecte toutes les exigences du Règlement sur le
matériel brouilleur du Canada.
FCC COMPLIANCE STATEMENT
Note : This equipment has been tested and found to comply with the limits for a Class B
digital device, pursuant to Part 15 of the FCC Rules.
These limits are designed to provide reasonable protection against harmful
interference in a residential installation. This equipment generates, uses, and can
radiate radio frequency energy and, if not installed and used in accordance with the
instructions, may cause harmful interference to radio communications.
However, there is no guarantee that interference will not occur in a particular installation.
If this equipment does cause harmful interference to radio or television reception,
which can be determined by turning the equipment off and on, the user is encouraged
to try to correct the interference by one or more of the following measures:
- Reorient or relocate the receiving antenna.
- Increase the separation between the equipment and receiver.
- Connect the equipment into an outlet on a circuit different from that to which the
receiver is connected.
- Consult the dealer or an Authorized Service Center for help.
• FCC WARNING
Changes or modifications not expressly approved by the party responsible for compliance
could void the user’s authority to operate the equipment.
• This Super Multi DVD Drive is for use only with UL listed personal computers that have
installation instructions detailing user-installation of card cage accessories.
English

ii
This product is manufactured to comply with the radio interference requirements of
EEC DIRECTIVE 89/336/EEC, 93/68/EEC and 73/23/EEC.
CAUTION - INVISIBLE LASER RADIATION WHEN OPEN AVOID, EXPOSURE TO BEAM.
VARNING-OSYNLIG LASERSTRÄLNING NÄR DENNA DEL ÄR ÖPPNAD STRÄLEN ÄR FARLIG.
CLASS 1 LASER PRODUCT
KLASSE 1 LASER PRODUKT
LUOKAN 1 LASER LAITE
KLASS 1 LASER APPARAT
CLASE 1 PRODUCTO LÁSER
CLASSE 1 PRODOTTO LASER
This unit uses CD-ROM discs with the following mark
When you use this unit as a CD player, use compact
discs with the following mark
This unit uses CD-R discs with the following mark.
This unit uses CD-RW discs with the following mark.
This unit uses High Speed CD-RW discs with the
following mark
This unit uses Ultra Speed CD-RW discs with the
following mark.
WARNING: Only drives bearing the logo Compact Disc ReWritable Ultra Speed can write or
erase Ultra Speed CD-RW media.
Ultra Speed CD-RW Media may be recognized by the same Compact Disc ReWritable Ultra
Speed logo on the disc label or packaging material.
Attempting to write to Ultra Speed CD-RW media using CD-RW drives NOT bearing the logo
Compact Disc ReWritable Ultra Speed may result in data loss.
Recordable
ReWritable
ReWritable
High Speed
ReWritable
Ultra Speed

DirectCDTM v2.5b(s)
1
Introduction
Installation
Operation
Appendix
Contents
Features . . . . . . . . . . . . . . . . . . . . . . . . . . . . . . . . . . . . . . . . 2
Important Precautions. . . . . . . . . . . . . . . . . . . . . . . . . . . . . 3
System Environment . . . . . . . . . . . . . . . . . . . . . . . . . . . . . . 4
Location and Function of Controls. . . . . . . . . . . . . . . . . . . 5
Installing the Drive . . . . . . . . . . . . . . . . . . . . . . . . . . . . . . . 6
Device Drivers . . . . . . . . . . . . . . . . . . . . . . . . . . . . . . . . . . 11
How to Use the Discs . . . . . . . . . . . . . . . . . . . . . . . . . . . . 12
Troubleshooting. . . . . . . . . . . . . . . . . . . . . . . . . . . . . . . . . 13
Specifications . . . . . . . . . . . . . . . . . . . . . . . . . . . . . . . . . . 14
■Microsoft®and Windows®are trademarks registered in the United
States and other countries by the Microsoft Corporation.
■The company names and product names written in this manual are
trademarks or registered trademarks of the respective companies.

DirectCDTM v2.5b(s) Introduction
2
Thank you for
purchasing this
uper Multi
DVD Drive
Package Items
Features
•Enhanced-IDE (ATAPI) interface.
•Power tray loading and ejection of disc.
(The disc can also be ejected manually.)
•Combination CD-R/RW, DVD-R/RW, DVD+R/RW, DVD-RAM Drive
functions into one drive.
•Supports UDF for easy writing to CD-RW, DVD-RW, DVD+RW and
DVD-RAM discs.
•Supports Region playback control Phase II.
•Supports Windows 98, 2000 Professional, ME, XP Home Edition,
XP Professional.
•Automatic buffer underrun error prevention technology.
•24X max Writing (CD-R), 16X max Writing (CD-RW), 4X max Writing
(DVD-R, DVD+R), 3X max Writing (DVD-RAM), 2X max Writing (DVD-
RW), 2.4X Writing (DVD+RW), 32X max Reading (CD-ROM, CD-R),
24X max Reading (CD-RW), 12X max Reading (DVD-ROM single),
8X max Reading (DVD-ROM dual), 8X max Reading (DVD-R/RW,
DVD+R/RW, DVD-VIDEO), 3X Reading (DVD-RAM)*.
* Writing speed depends highly on capabilities of discs.
As a result, for highspeed rewrite, it supports max 8x or max 12x
speed [not 10x speed].
CD-RW Writing : Low speed:4X
High speed:8X.12X
Ulatra speed:16X
Item Quantity
- Internal Super Multi DVD Drive 1
- BHA Recording & Authoring Software
(B’s Recorder Gold 5, B’s CLiP,
neoDVD, RAM driver)
1
- MPEG-2 Software (POWER DVD) 1
- E-IDE (ATAPI) cable 1
- Audio Cable 1
- Mounting Screws 4
- Manual for Super Multi DVD Drive 1
- Blank DVD-RAM Disc 1

DirectCDTM v2.5b(s) Introduction
3
Precautions
Installation
Operation
Important Precautions
Follow these precautions when handling the drive or discs.
•Please take notice that the manufacturer of this equipment does not
offer any warranty against data loss due to inappropriate installation
or handling, or direct or indirect damages.
•Please take notice that the manufacturer will bear no responsibility
for direct or indirect damages caused by the use of this product or its
malfunction.
•Please take notice that the manufacturer will bear no responsibility for
damage to data caused by this product.
•Please backup (copy) all important data as a protection against data
loss.
•Avoid placing the drive in a location subject to:
- high humidity
- high temperature
- excessive dust
- mechanical vibration
- direct sunlight
We recommend using the drive in a horizontal or vertical position.
Do not use it in tilted position.
•Don’t move the drive suddenly from a cold place to a warm one or
raise the room temperature suddenly. Condensation may occur,
causing abnormal operation.
•Make sure to remove the disc before moving the drive. The disc may
become damaged, causing data loss.
•Be careful to prevent foreign objects, such as liquids or metal, from
entering the drive. In case a foreign object enters the drive, please
consult the dealer where the drive was purchased.
•Don’t interrupt the electric power while the drive is operating.
•When connecting two IDE devices to the Primary or Secondary
connectors, make sure that the two devices are not configured as
both Master, or both Slave. If they are both set the same, Windows
may fail to run or recognize the drives.
•The total length of the IDE cable should be no more than 18 inches
(about 45 cm).

DirectCDTM v2.5b(s) Introduction
4
Computer
oftware
❏ Occasionally CD-R and CD-RW discs written by a CD-R/RW drive cannot be read by other
CD drives*. These unreadable discs may need to be read using the CD-R/RW drive they
were created with
* The disc written using the CD-R/RW drive might not be readable by CD-ROMs other
than Multi-read compatible (UDF compatible) CD-ROMs.
Multiread compatible (UDF compatible) CD-ROMs are:
1. CD-ROMs that can read low reflectance.
2. CD-ROMs that support Packet Write.
❏ Please note: Certain software (i.e. particularly those including Video playback) may
require a considerably increased specification PC to give acceptable results. While
this Super Multi DVD Drive can read DVD-video discs, decoding them to display on
your pc’s monitor requires separate MPEG decoding that is done by separate hard-
ware (either an MPEG decoder card or MPEG decoding done by your video card), or
separate software that you install to do MPEG decoding. For further details, refer to
the documentation that comes with MPEG software.
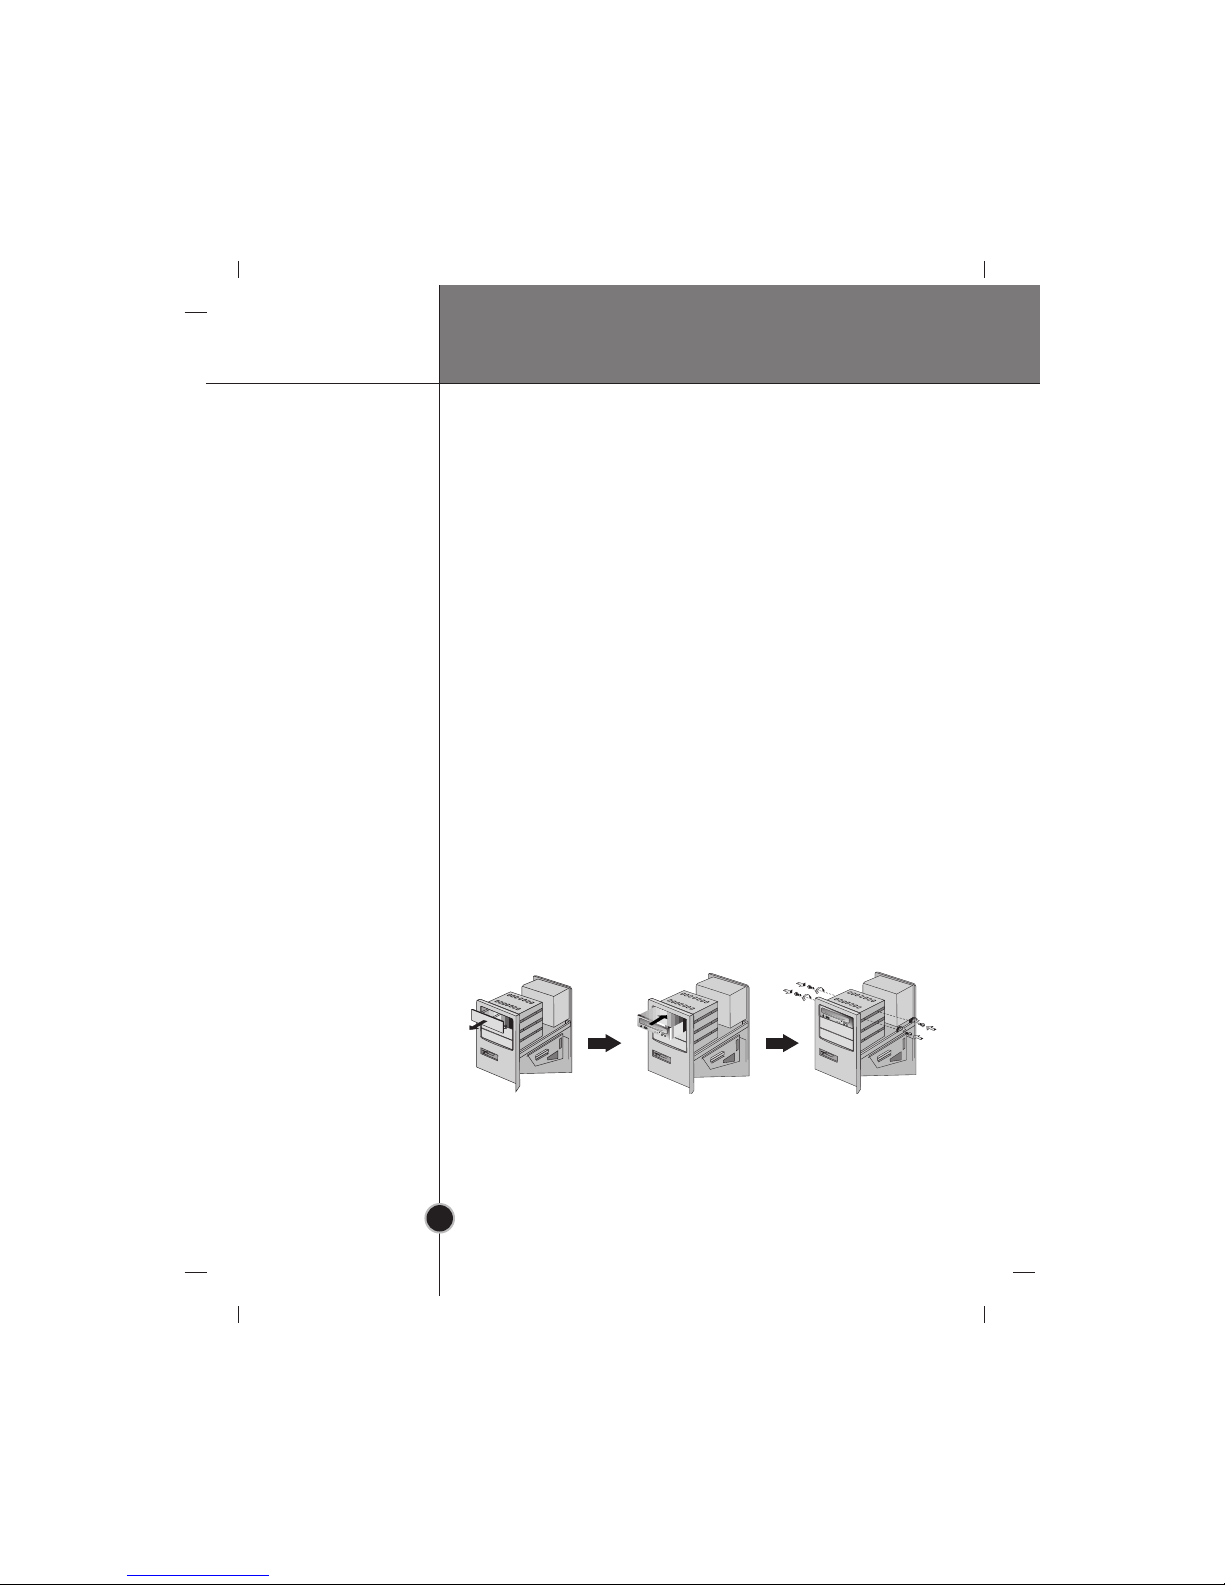
Install the supplied CD/DVD Recording, Authoring & DVD-RAM Driver
Software before using this unit.
* Please uninstall any previous CD burning software you may have loaded on your PC in
order to prevent possible compatibility issues. Once you have installed the supplied software,
you may (if you wish) begin to reinstall previous software, taking note for errors.
System Environment
This unit can be operated in the system environment explained here.
Pentium III 700MHz or Higher with IBM PC or
Compatible.
5GB or more free space.
(The free space needed for writing depends on the
quantity of data.)
Enhanced-IDE interface (as Primary Slave,
Secondary Master or Slave)
5.25-inch half-height bay required
+5V/+12V power socket required
Windows 98/2000 Professional/ME/XP(Home Edition/
Professional), Direct X 8.1 or Higher is required
CD-R : LG, Mitsubishi Chemical, Verbatim, Taiyo Yuden, TDK
or SKC discs are recommended.
CD-RW : LG, Ricoh, Mitsubishi Chemical, Verbatim discs are
recommended.
DVD-R : Pioneer, FujiFilm, Maxell, TDK are recommended.
DVD-RW :
JVC, Mitsubishi Chemical, Pioneer are recommended.
DVD+R : Taiyo Yuden, Ricoh are recommended.
DVD+RW : Ricoh , Mitsubishi Chemical are recommended.
DVD-RAM : Maxell, Panasonic are recommended.
System
requirements
Hard disk
Interface
Drive bay
Power
Software Required OS
CD-R, CD-RW, DVD-R,
DVD-RW, DVD+R, DVD+RW,
DVD-RAM discs
CPU
Memory 128MB or greater.

DirectCDTM v2.5b(s) Introduction
5
Front Panel
Rear Panel
Location and Function of Controls
4
132
1. Disc Tray
2. Emergency Eject Hole
3. Stop/Eject Button
AUDIO OUTSELECT
IDEINTERFACECONNECTOR
INPUT
DC
39
401
25VGND12V
R GND L C.SEL
SLAVE
MASTER
1 2 3 4 5
1. Digital Audio Output Connector
This connector is not supported.
2. Analog Audio Output Connector
3. Jumper Connector
This jumper determines whether the drive is configured as a master or slave.
Changing the master-slave configuration takes effect after power-on reset.
4. IDE Interface Connector
Connect to the IDE (Integrated Device Electronics) Interface using a 40-pin
flat IDE cable.
NOTE : Do not connect or disconnect the cable when the power is on, as this
could cause a short circuit and damage the system. Always turn the power
OFF when connecting or disconnecting this cable.
5. Power Connector
4. Drive activity indicators
The LED used to indicate the
operation of Super Multi DVD Drive.
Read:
The green color is displayed during disc reading
session.
Write:
The green color is flashed during disc writing
sessions.(CD-R/RW, DVD-R/RW)
The green color is displayed during disc
writing session. (DVD-RAM, DVD+R/RW)

DirectCDTM v2.5b(s) Installation
6
Before
Installation
Removing the
Computer
Cover
Mounting the
Drive
Installing the Drive
Before installing the drive, please note the following points.
■You will need the following:
•A screw driver of a suitable size to fit the securing screws
for the drive unit.
•The manual for the computer, so you can find the mounting
positions for the IDE controller cable.
■Turn off all peripheral appliances of the computer and the computer
itself, and disconnect their power cords from the wall sockets.
■
Discharge any static electricity on your person by touching the
computer covers, etc.
Make sure all peripheral devices of the computer and the computer itself
are turned off, and then remove the cover. Refer to the manual for the
computer for details about removing the cover.
NOTE : There may be sharp edges inside the computer so take care to
avoid injury.
1. Remove the 51/4″ drive bay panel from the computer. Refer to the
manual for the computer for details.
2. Insert the drive unit into the bay. Do not apply excessive pressure to
the cables inside the computer.
3. Secure the drive with the screws provided. If there is not enough
space behind the drive, connect the IDE and other cables before
securing the drive.
NOTE : This is a general installation guide. If your PC hardware appears
different, please consult your hardware manual for installing peripheral
devices.
READ
READ
WRITE
READ
READ
WRITE

DirectCDTM v2.5b(s) Installation
7
Jumper etup
Before installation, set the jumper connector on the rear panel.
The drive can be connected as the Master or Slave on an EIDE (ATAPI)
interface. When several (up to four) EIDE devices are connected, each
must be set in a unique way. Specific knowledge of hardware and
software is necessary to install the drive.
NOTE : If two peripheral devices with the same settings are both
connected to the Primary or to the Secondary EIDE bus, the host
computer may fail to run or may malfunction. Careful attention is
necessary.
AUDIOOUTSELECT
IDEINTERFACECONNECTOR
INPUT
DC
39
401
25VGND12V
R GND L C.SEL
SLAVE
MASTER
R GND L C.SEL
SLAVE
MASTER
39
40
UDIO OUT SELECT
CS: Cable Select (CSEL)
SL: Slave
MA: Master
NOTE : Only one jumper should be installed on the jumper connector.
If more than one jumper is installed, the drive may malfunction or be
damaged.
Master/Slave setting is determined by jumper installation on the Jumper
Connector. The following table shows the possible jumper settings.
If you use CSEL setting, the MASTER/SLAVE setting will be made
automatically, depending on the hardware configuration.
For more details refer to the manual of your computer.
Name Function
Drive set as Master
Drive set as Slave
Drive mode set by CSEL on the
host IDE interface
MA
(Master)
SL
(Slave)
CS
(Cable Select)
C
S
S
L
M
A

DirectCDTM v2.5b(s) Installation
8
PC Connection
To Install as a
Master Drive
The Super Multi DVD Drive connects to the motherboard of the host
computer using an IDE interface cable. You may connect the Super Multi
DVD Drive as a Slave or Master device, depending on your computer.
NOTE : A hard disk is normally installed as the Primary Master on the
EIDE (ATAPI) interface. Other EIDE peripheral devices such as hard
drives and Super Multi DVD Drives are then set differently.
To install the drive as a Master, the jumper can be left as supplied from
the factory.
DIGITALANALOG
INTERFACEPOWER
DRCSM
SLA
GL
G39
1
+5+12
GND
40
2
AUDIOAUDIO
Master drive
(Booting hard disk)
Primary
connector
Secondary
connector
Master drive
(Super Multi DVD
Drive)
(Jumper left as
Master)
Motherboard
- OR -
DIGITALANALOG
INTERFACEPOWER
DRCSM
SLA
GL
G39
1
+5+12
GND
40
2
AUDIOAUDIO
DIGITALANALOG
INTERFACEPOWER
DRCSM
SLA
GL
G39
1
+5+12
GND
40
2
AUDIOAUDIO
Master drive
(Booting hard disk)
Primary
connector
Master drive
(Super Multi DVD
Drive)
(Jumper left as
Master)
Slave drive
(Other IDE drive)
Secondary
connector

DirectCDTM v2.5b(s) Installation
9
To Install as a
lave Drive
Connecting
the Power
Connector
To install the drive as a Slave, change the jumper setting on the rear
panel to SL.
DIGITALANALOG
INTERFACE POWER
DRCSM
SLA
GLG 39
1
+5+12
GND
40
2
AUDIOAUDIO
Master drive
(Booting hard disk)
Slave drive
(Super Multi DVD
Drive)
(Jumper set to
Slave)
DIGITALANALOG
INTERFACE POWER
DRCSM
SLA
GL
G39
1
+5+12
GND
40
2
AUDIOAUDIO
DIGITALANALOG
INTERFACE POWER
DRCSM
SLA
GL
G39
1
+5+12
GND
40
2
AUDIOAUDIO
Master drive
(Booting hard disk)
Primary connector
Slave drive
(Super Multi DVD
Drive)
(Jumper set to
Slave)
Secondary
connector
Master drive
(Other IDE drive)
- OR -
Connect the power cable from the computer’s power supply to the socket
on the drive unit, fitting the connector firmly into the power in connector.
If there is no spare power cable available in the computer, you will have
to purchase a splitter cable of a suitable type.
AUDIOOUTSELECT
IDE INTERFACE CONNECTOR
INPUT
DC
39
401
25VGND12V
RGNDLC.SEL
SLAVE
MASTER
5V GND 12V
CD INPUT
Beveled edge up
NOTE : Improper connection may damage the drive and void the
warranty. Generally, the power connector can only fit one way.

DirectCDTM v2.5b(s) Installation
10
Connecting
the Interface
Connector
Connecting
the ound
Card
Replacing the
Computer
Cover
Connect the 40-pin IDE cable to the back of the Super Multi DVD Drive,
making sure the coloured (red) stripe on the IDE cable is connected to pin
1 on the Super Multi DVD drive (Pin 1 is closest to the Power Connector).
NOTE : Generally, the IDE connector is keyed and will only fit one way.
AUDIOOUTSELECT
IDEINTERFACECONNECTOR
INPUT
DC
39
401
25VGND12V
RGNDLC.SEL
SLAVE
MASTER
Pin1
Red-edge
If the computer is using a sound card, the drive is connected to the sound
card with an audio cable. The supplied analog audio cable fits most sound
cards or one can be purchased at a local computer store.
Refer to the manual for the sound card for detailed
information regarding this connection.
R GND L C.SEL
SLAVE
MASTER
39
40 5V GND 12V
AUDIO OUT SELECT
IDE INTERFACE CONNECTOR CD INPUT
1
2
LR
AUDIO OUT SELECT
IDEINTERFA
39
40
RGNDLC.SEL
SLAVE
MASTER
marking L-R
Sound card
When the installation of the drive unit is complete, replace the computer
cover

DirectCDTM v2.5b(s) Installation
11
For Windows
98/2000/ME/XP
Users
Device Drivers
When using Windows 98/2000 Professional/Me/XP Home Edition/
XP Professional, no special device driver is required.
Your system, upon Power On and bootup after installing and connecting
the new Super Multi DVD Drive, will recognize and load native software
drivers automatically.
Please consult the following internet sites:
http://www.lgservice.com (then choose your country from the list)
http://www.lgeservice.com/drivers.html
■In order to ensure normal drive operation, please check the following:
•The drive is displayed in
Windows 98/ME : [Control Panel]-[System]-[Device Manager]-
[CD-ROM]
Windows 2000/XP : [Control Panel]-[System]-[Hardware]-
[Device Manager]-[DVD/CD-ROM-drives]
•32-bit is displayed in
[Control Panel]-[System]-[Performance]
■If the drive is not recognized by your computer, please check the
following items.
•If a indicator is displayed on the IDE controller in [Control
Panel]-[System]-[Device Manager]-[Hard Disk Controller], you
will need to contact your PC’s manufacturer or the motherboard’s
manufacturer and get the appropriate IDE controller driver.
■Run Add New Hardware in Control Panel to let PC search again for
new device.

DirectCDTM v2.5b(s) Operation
12
Emergency
Eject
How to Use the Discs
When using CD-ROM discs, CD-R discs, DVD discs or CD-RW discs,
don’t attach any stickers or labels to the discs. It could cause read and
write errors, but data on the disc may be lost due to damage to the disc
itself.
The Discs in this unit operate at a very high speed!
DO NOT use damaged, cracked or warped discs. The drive’s optical unit
may be damaged if they break.
DO NOT use non-standard discs. NON-standard discs may not play or
store data properly.
This drive has a feature that allows the CD to be ejected manually if this
becomes necessary such as failure of the drive or a power outage.
NOTE: Don’t use this feature except in an emergency.
1) Turn the power to OFF.
2) Poke a fine-tipped object (such as a straightened heavy duty paper
clip) into the small hole above the eject button. The front door will
pop open and the disk tray will come partway out.
3) Pull the front door to open it all the way, then grip the disc tray
between thumb and forefinger and gently pull it straight out.
NOTE: This feature is a last measure to be used only in an emergency.
Using it excessively will cause malfunction.
* If you cannot get a good grip on the disc tray with your fingers, use a
steel binder clip or spring clamp to pull it out.

DirectCDTM v2.5b(s) Appendix
13
Before
Requesting
ervice
Troubleshooting
Before calling for service, check this list.
•The drive doesn’t have power.
•Is the power supply cable from the host computer plugged in?
•Is the Power Connector to the drive securely attached?
•The system doesn’t start.
•Are the Primary and Secondary connections and the Master and
Slave settings correct?
•Is the total length of the IDE cable 18 inches or less?
•Is each connector completely attached?
Other connections may have been knocked while installing the drive.
•Cannot Read or Write Discs.
•Is the condition of everything else in the system (CPU, hard disc,
and others) as it should be? (See system environment page 4.)
•Does the CD-R, DVD or CD-RW disc have dirt or scratches?
•Did a screen saver or other application operate while writing to the
disc?
•Is there enough free space on the CD-R/RW, DVD-R/RW,
DVD+R/RW and DVD-RAM disc?
•Does writing fail even using the simulation test?
•Is the disc loaded in the drive with the read/write surface facing the
right direction? (label up)
•Is the drive installed in the correct orientation?
•Was the drive or disc moved from a low temperature environment
to a high temperature environment? (There is a possibility of
condensation on the lens in the drive or on the surface of the disc.)
When you call for service, be prepared to give as much information as
possible of your system, environment, and the specific problem. (What
happened? When? How long? What was going on? Were there any error
messages displayed? etc.)
Please Note: Since this product supports Region Playback Control
Phase II, a certain MPEG decoder card or Software without regional code
setting may cause this drive not to read DVD-ROM discs. This Drive
enables you to change the regional code up to 5 times.

14
Specifications
The drive’s appearance and specifications may change without prior notice.
CD/DVD/CD-RW
DVD(Single/Dual), DVD-RW, DVD-R, DVD+RW, DVD+R, DVD- RAM,
CD-Digital Audio & CD-Extra, CD-Plus, CD-ROM, CD-ROM
XA-Ready, CD-I FMV, CD-TEXT, CD-Bridge, CD-R, CD-RW,
Photo-CD (Single & Multi-Session), Video CD, DVD-VIDEO
12cm/ 8cm, standard size CD's
E-IDE/ATAPI
Write :
(CD-R) : 4X, 8X, 16X, 24X
(CD-RW) : 4X, 8X,12X, 16X
(DVD-R) : 1X, 2X,4X
(DVD-RW) : 1X, 2X
(DVD+R) : 2.4X, 4X
(DVD+RW) : 2.4X
(DVD-RAM):2X
(Ver.2.0), 3X(Ver.2.1)
Horizontal/Vertical
CD: CD-RW : 1500 to 3600 Kbytes/s (10X - 24X CAV)
CD-R/ROM : 2070 to 4800 Kbytes/s (14X - 32X CAV)
DVD: Dual : 4570 to 11000 Kbytes/s (4.2X - 8X CAV)
Single : 6880 to 16200 Kbytes/s (5.1X - 12X CAV)
16.6 Mbytes/s (PIO Mode 4), (MULTI-DMA Mode 2)
33.3 Mbytes/s (Ultra-DMA Mode 2)
CD-ROM: 125msec (Typical)
DVD-ROM : 145msec (Typical)
DVD-RAM : 165msec (Typical)
2 Mbytes
100000 Power On Hours (Duty Cycle 10%)
0.7 Vrms at 47 kohm(Typical)
Temperature:5°C to 45 °C Humidity: 15% to 85% R.H.
Temperature: -30 °C to 60 °CHumidity: 10% to 90% R.H.
5.75"x1.63"x7.27" (146 x 41.3 x 184.7 mm)-without front bezel
Less than 2.1lbs.(0.94Kg)
DC 5V, DC 12V
Items
General Supported Discs
Disc Diameter
Host Interface
Read/Write Speed
Mounting direction
Performance Data transfer rate
*Sustained
*Burst(ATAPI)
Average Access
Time (Random)
Buffer capacity
MTBF
Audio Output Line Output
Environmental
When operating
When not operating
Dimensions Dimensions
& Mass (WxHxD)
Weight
Electrical Power
Level
Read :
(CD-ROM/R) : 32X max
(CD-RW) : 24X max
(DVD-ROM)(Single/Dual) :12X/8X max
(DVD-R/RW) : 8X max
(DVD+R/RW) : 8X max
(DVD-VIDEO) : 8X max
(DVD-RAM) :2X(Ver.1.0/2.0),
3X(Ver.2.1)

P/NO. 3828HM1048B
Worldwide support ; http://www.LGservice.com
Worldwide corporate site : http://www.LGE.com
USA support (backup site) : http://www.LGEservice.com
USA corporate site : http://www.LGEus.com
Caution!
The disc rotates at high speed in the drive unit.
Use of worn, damaged, or non-standard CD-ROM discs
can adversely affect the drive and cause the disc to
shatter or crush while in use.
Disc crush can only occur when you use a damaged
CD-ROM disc in the drive. It is an extremely rare
occurrence, but there are steps which can be taken to
prevent it.
Always check your discs before inserting them into
the drive.
1. Take care not to use worn, cracked, damaged,
warped or poor quality CD-ROMs, as this may
cause damage to your drive.
2. Check the clear plastic on the center of the disc,
cracks here are the main cause of disc crush.
3. Do not play CD-ROMs which are a non-standard
(I.e. non-circular)shape, such as heart shaped
discs, or discs in the shape of a business card.
How can you keep your discs from becoming
damaged?
1. When not in use, remove discs from the drive.
2. Keep discs in the packaging supplied with them
and out of direct sunlight and away from heat
sources.
Excessive vibration or a sudden jolt to the drive during
operation may cause a malfunction.
Avoid exposing the drive to sudden changes in
temperature as it may cause condensation to collect
inside the drive.
Copyright ©2003
LG Electronics U.S.A. Inc.
1000 Sylvan Ave.
Englewood Cliffs NJ 07632
U. S. A.
or http://www.lgeus.com
LG Electronics Canada Inc.
550 MATHESON Blvd. East Mississauga.
Ontario L4Z4G3 Canada
LG Electronics Deutschland GMBH
Jakob-Kaiser-Straße 12,
D-47877 Willich, Germany
LG Electronics U. K. Ltd.
LG House, 264 Bath Road,
Slough Berkshire SL1 4DT
United Kingdom
Goldstar France E.U.R.L
Paris Nord II 22, Avenue des
Nations-B.P.50372 VILLEPINTE
95945 ROISSY CDG CEDEX France
LG Electronics Italia S.P.A.
Centro Direzione “IL Quadrate”Via
Modigliani, 20090 Segrate (MI) Italy
LG Electronics España
Complejo Europa Empressaries (Edif.Bruselas)
Ctra. N-VI 28230 Las Rozas Madrid Spain
LG Electronics Australia Pty Ltd.
23, pike st Rydalmere NSW 2116
or http://www.lge.com.au
©2003 Made by
Other manuals for GSA-4040B
1
Table of contents
Other LG DVD Drive manuals