LG DV8621P User manual

DVD PLAYER
OWNER’S MANUAL
MODEL : DV8621P
Before connecting, operating or adjusting this product,
please read this instruction booklet carefully and completely.

2
Safety Precautions
This lightning flash with arrowhead symbol within an
equilateral triangle is intended to alert the user to
the presence of uninsulated dangerous voltage
within the product’s enclosure that may be of
sufficient magnitude to constitute a risk of electric
shock to persons.
The exclamation point within an equilateral triangle
is intended to alert the user to the presence of
important operating and maintenance (servicing)
instructions in the literature accompanying the
product.
WARNING: Do not install this equipment in a confined space
such as a book case or similar unit.
CAUTION:
This Digital Video Disc Player employs a Laser System.
To ensure proper use of this product, please read this owner’s
manual carefully and retain for future reference should the unit
require maintenance, contact an authorized service location
(see service procedure).
Use of controls, adjustments, or the performance of proce-
dures other than those specified herein may result in haz-
ardous radiation exposure.
To prevent direct exposure to laser beam, do not try to open
the enclosure. Visible laser radiation when open. DO NOT
STARE INTO BEAM.
CAUTION: The apparatus should not be exposed to water
(dripping or splashing) and no objects filled with liquids, such
as vases, should be placed on the apparatus.
NOTES ON COPYRIGHTS:
It is forbidden by law to copy, broadcast, show, broadcast
via cable, play in public, or rent copyrighted material without
permission.
This product features the copy protection function developed
by Macrovision. Copy protection signals are recorded on some
discs. When recording and playing the pictures of these discs
on a VCR, picture noise will appear.
This product incorporates copyright protection technology that
is protected by method claims of certain U.S. patents and other
intellectual property rights owned by Macrovision Corporation
and other rights owners. Use of this copyright protection tech-
nology must be authorized by Macrovision Corporation, and is
intended for home and other limited viewing uses only unless
otherwise authorized by Macrovision Corporation. Reverse
engineering or disassembly is prohibited.
CONSUMERS SHOULD NOTE THAT NOT ALL HIGH DEFINI-
TION TELEVISION SETS ARE FULLY COMPATIBLE WITH
THIS PRODUCT AND MAY CAUSE ARTIFACTS TO BE
DISPLAYED IN THE PICTURE. IN CASE OF 525 OR 625
PROGRESSIVE SCAN PICTURE PROBLEMS, IT IS RECOM-
MENDED THAT THE USER SWITCH THE CONNECTION TO
THE ‘STANDARD DEFINITION’ OUTPUT. IF THERE ARE
QUESTIONS REGARDING OUR TV SET COMPATIBILITY
WITH THIS MODEL 525p AND 625p DVD PLAYER, PLEASE
CONTACT OUR CUSTOMER SERVICE CENTER.
SERIAL NUMBER: The serial number is found on the back of
this unit. This number is unique to this unit and not available to
others. You should record requested information here and
retain this guide as a permanent record of your purchase.
Model No. ___________________________________
Serial No. ___________________________________
WARNING: TO REDUCE THE RISK OF FIRE OR ELEC-
TRIC SHOCK, DO NOT EXPOSE THIS PRODUCT TO
RAIN OR MOISTURE.
CAUTION
RISK OF ELECTRIC SHOCK
DO NOT OPEN
CAUTION: TO REDUCE THE RISK
OF ELECTRIC SHOCK
DO NOT REMOVE COVER (OR BACK)
NO USER-SERVICEABLE PARTS INSIDE
REFER SERVICING TO QUALIFIED SERVICE
PERSONNEL.

3
INTRODUCTION
Table of Contents
Introduction
Safety Precautions . . . . . . . . . . . . . . . . . . . . . . . . . 2
Table of Contents . . . . . . . . . . . . . . . . . . . . . . . . . . 3
Before Use . . . . . . . . . . . . . . . . . . . . . . . . . . . . . . 4-5
Playable Discs . . . . . . . . . . . . . . . . . . . . . . . . . . . 4
Precautions . . . . . . . . . . . . . . . . . . . . . . . . . . . . . 5
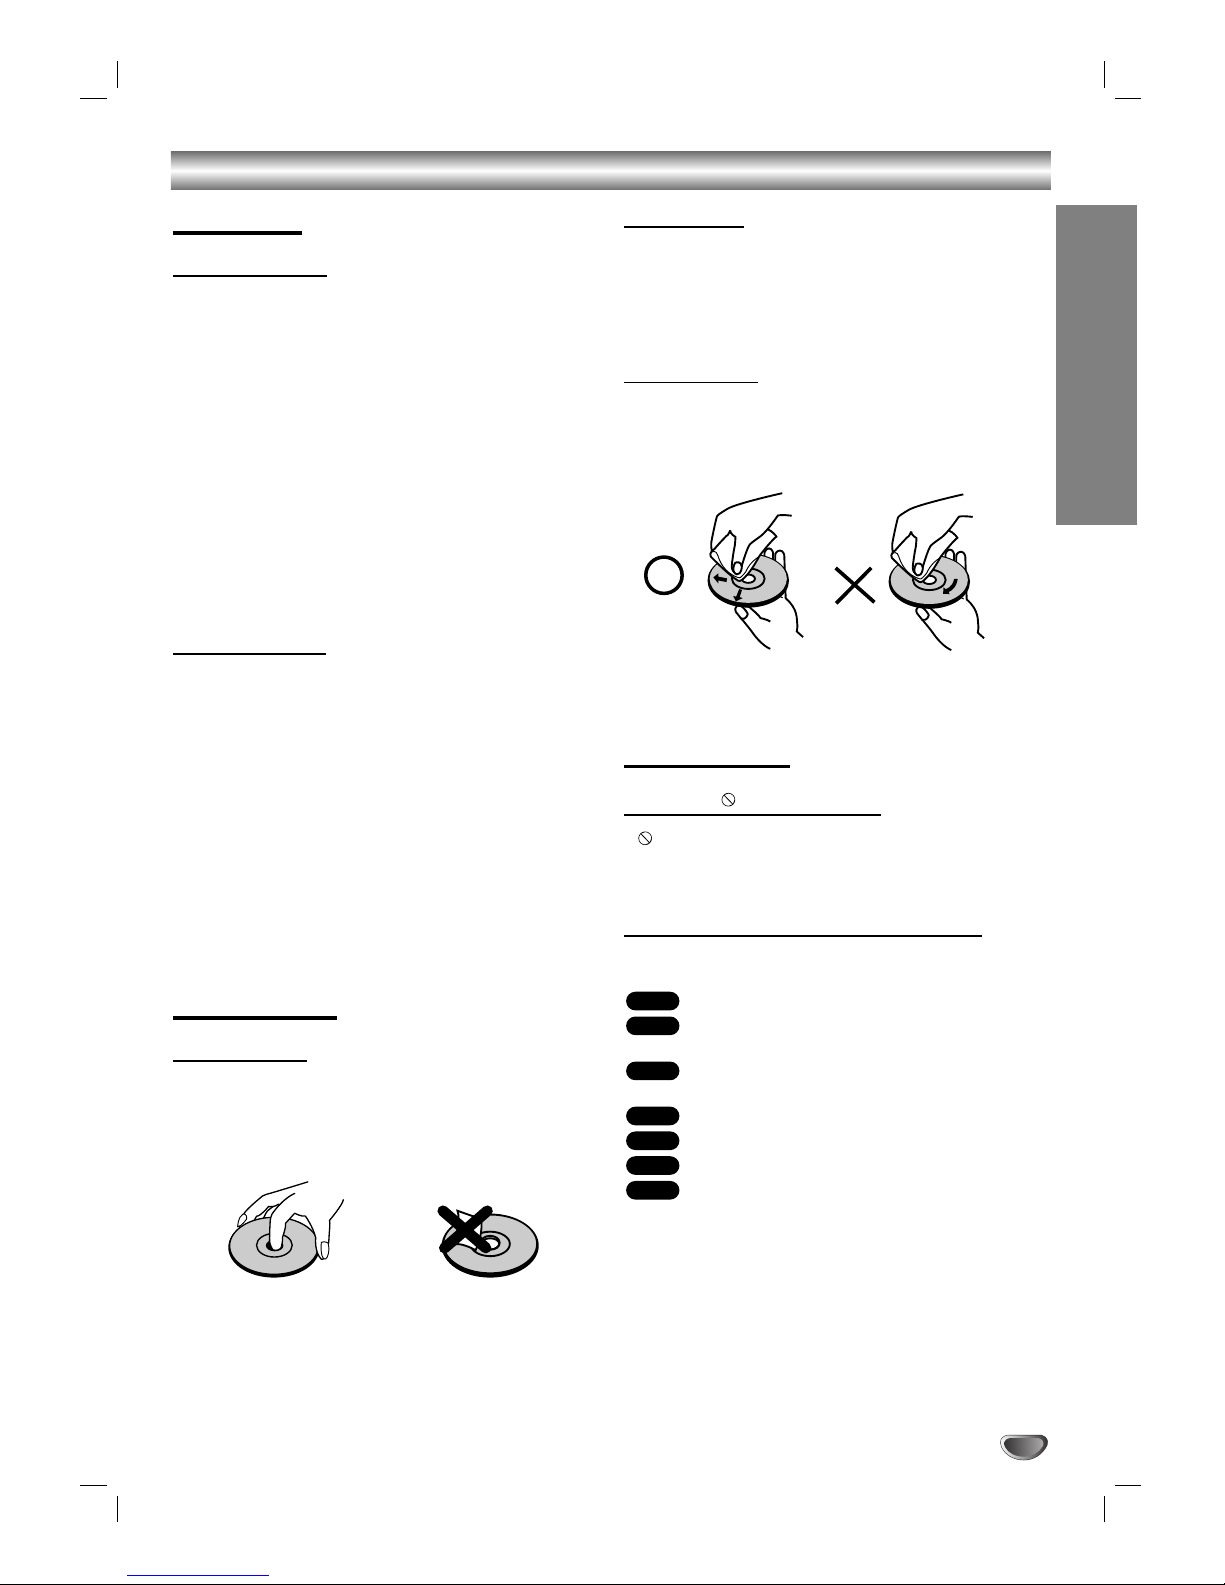
Notes on Discs . . . . . . . . . . . . . . . . . . . . . . . . . . 5
About Symbols . . . . . . . . . . . . . . . . . . . . . . . . . . 5
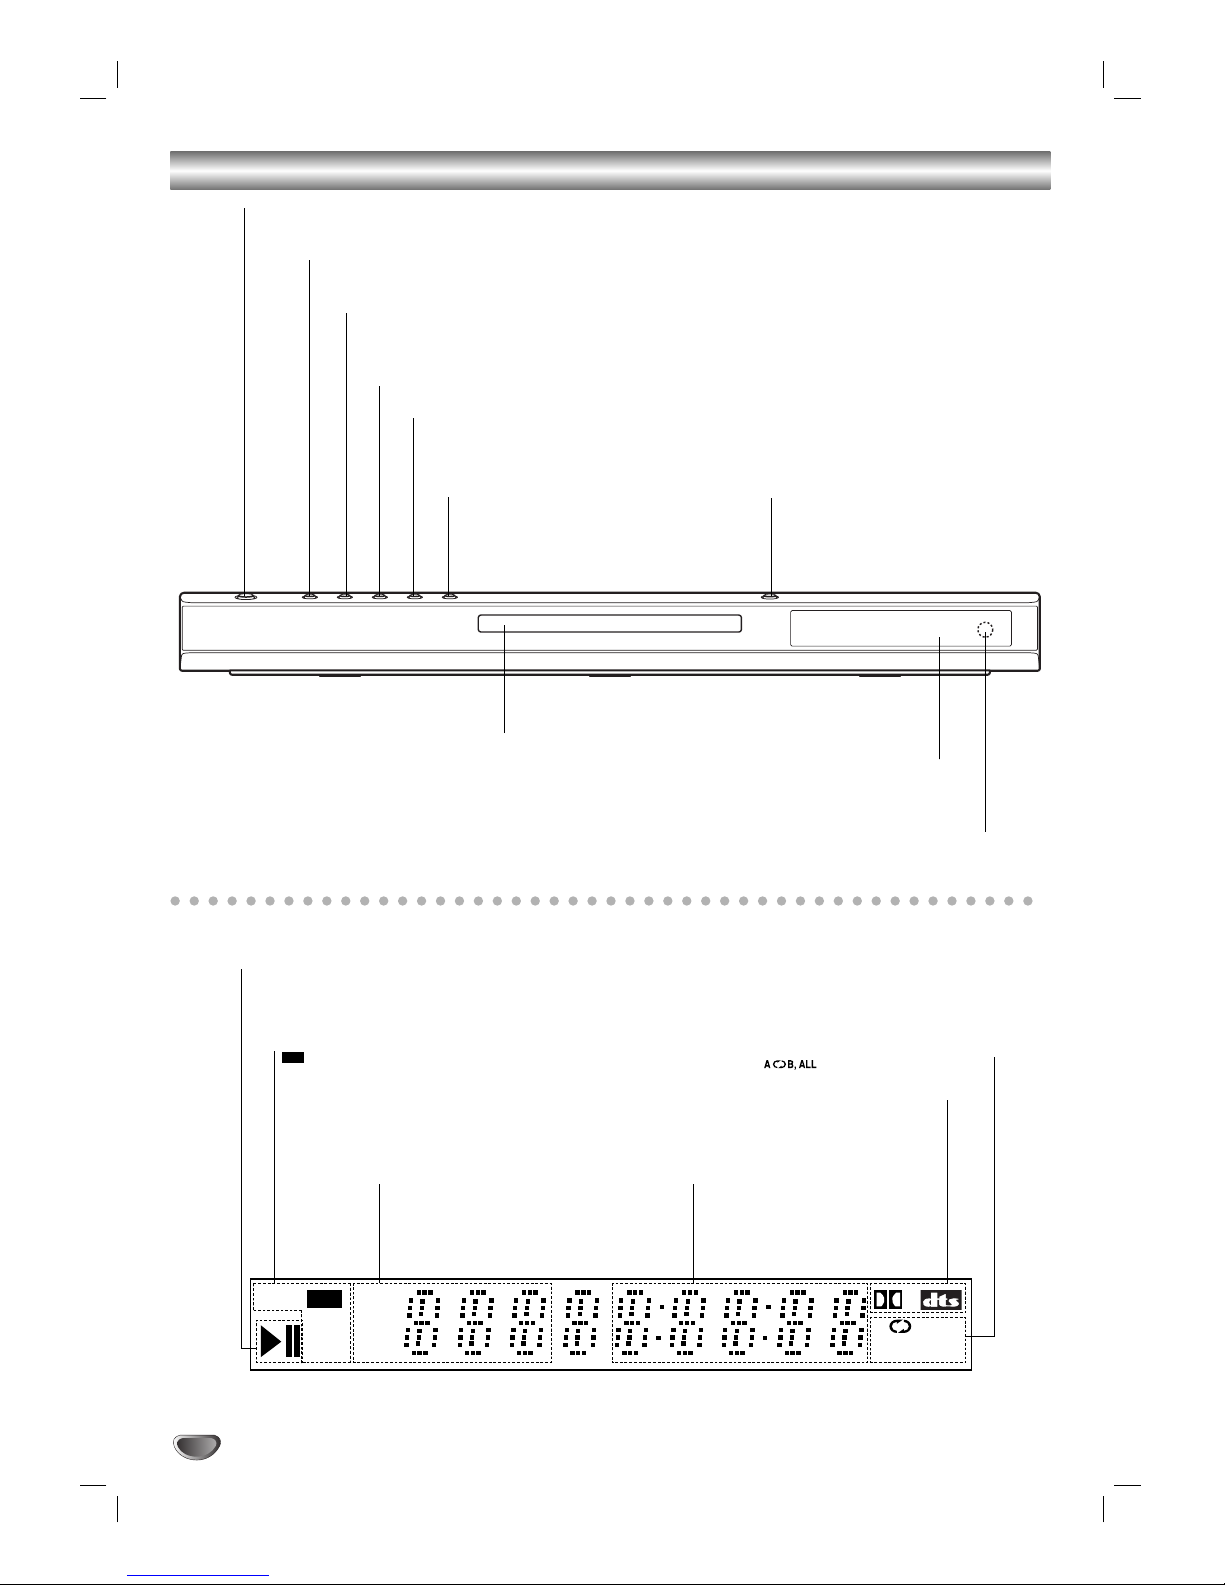
Front Panel and Display Window . . . . . . . . . . . . . . 6
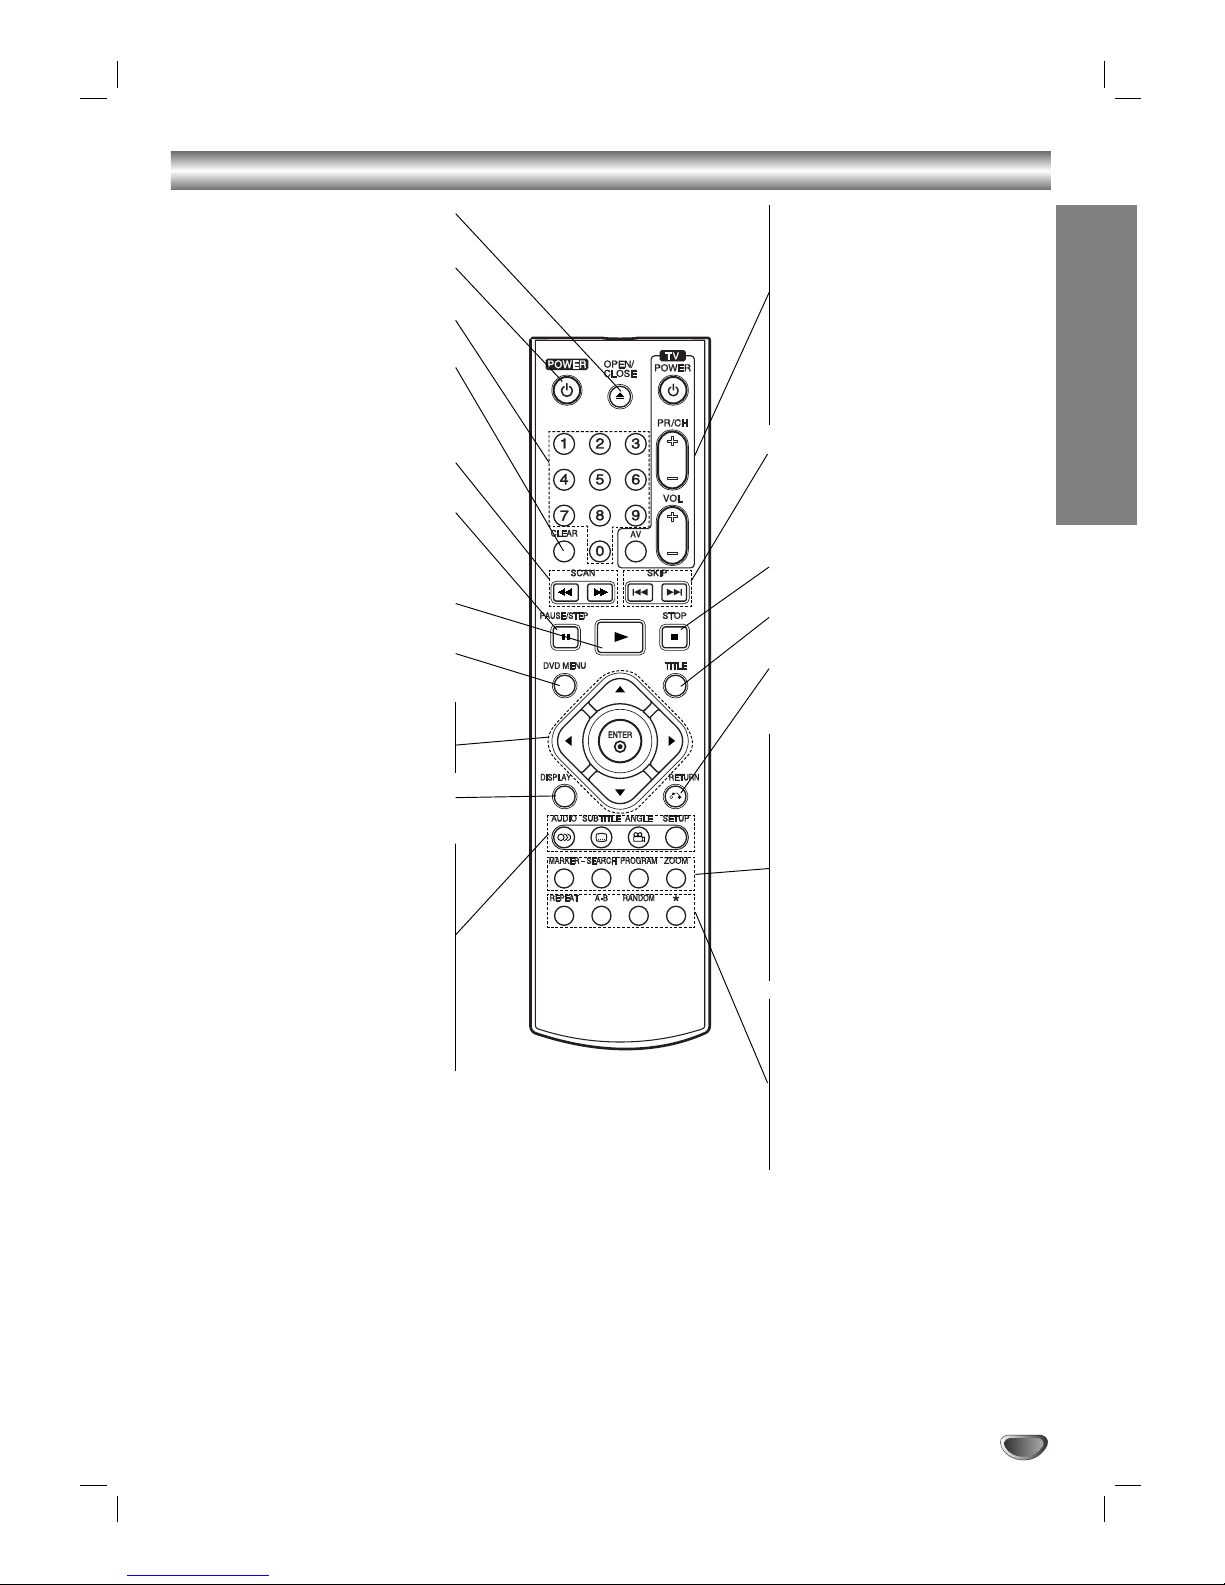
Remote Control . . . . . . . . . . . . . . . . . . . . . . . . . . . . 7
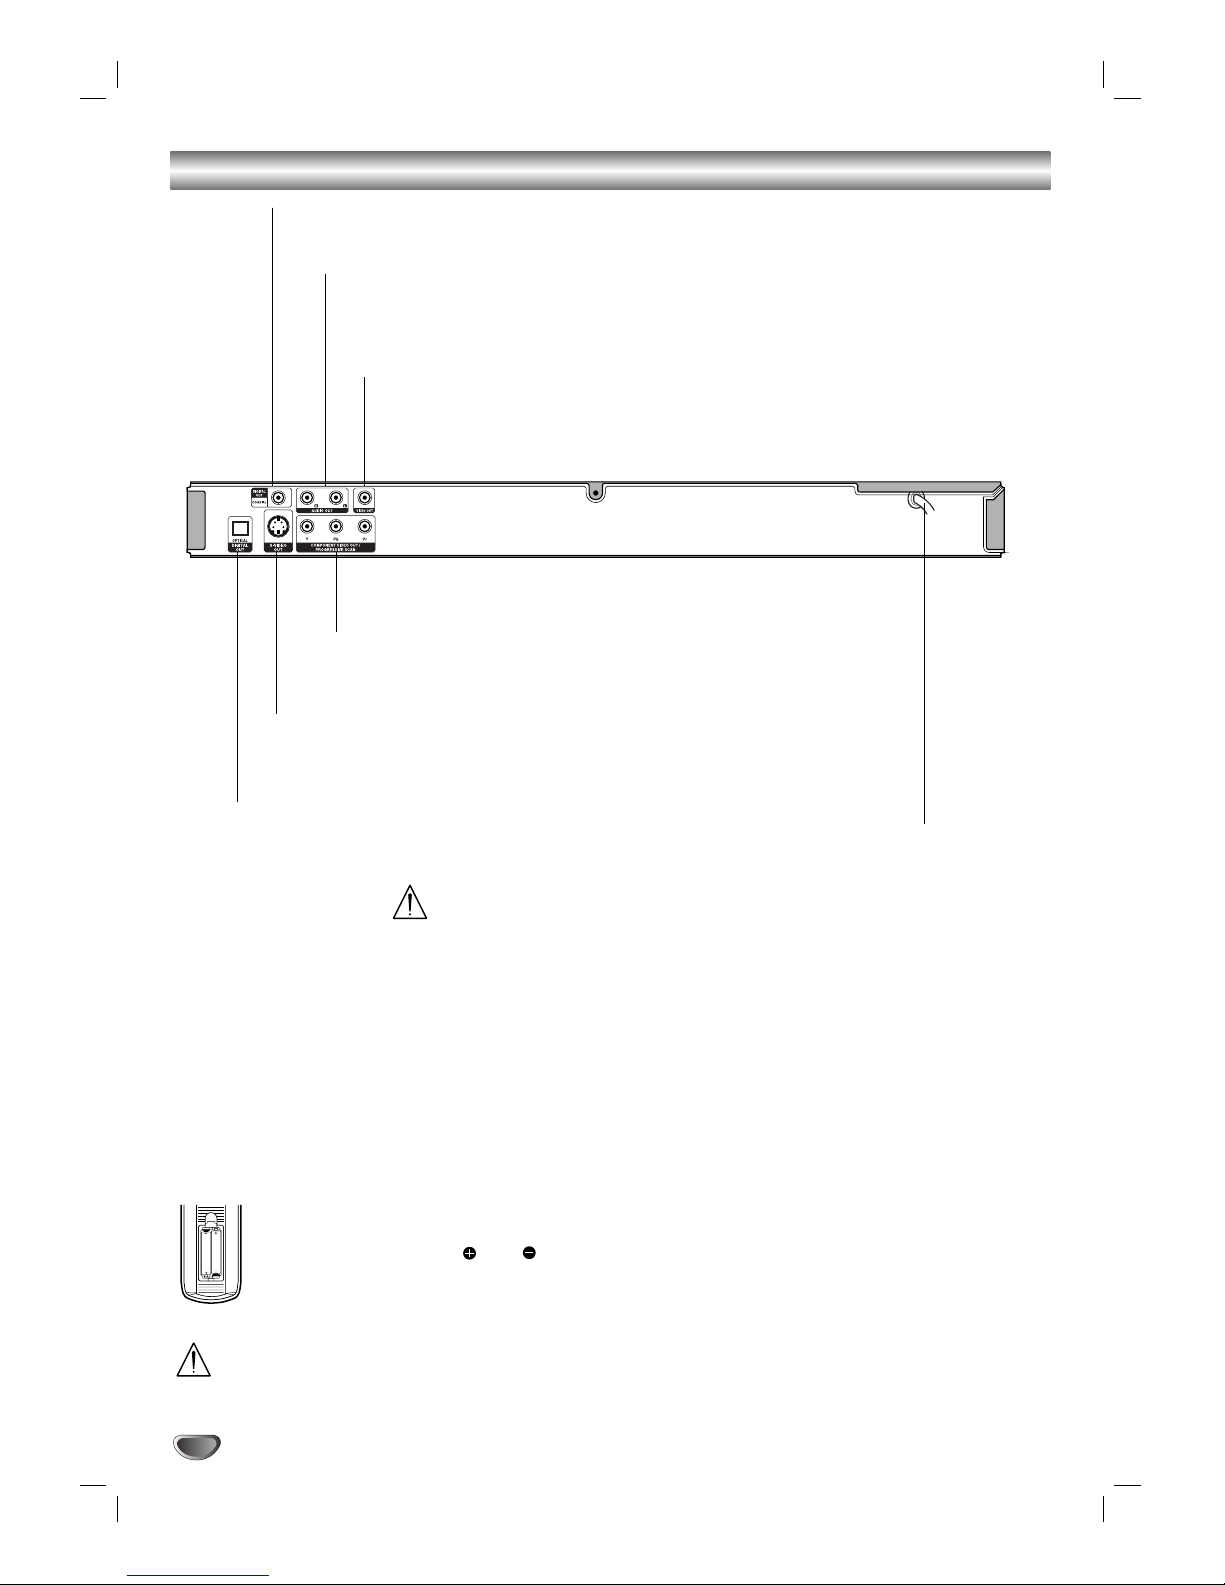
Rear Panel . . . . . . . . . . . . . . . . . . . . . . . . . . . . . . . . 8
Preparation
Connections . . . . . . . . . . . . . . . . . . . . . . . . . . . . 9-10
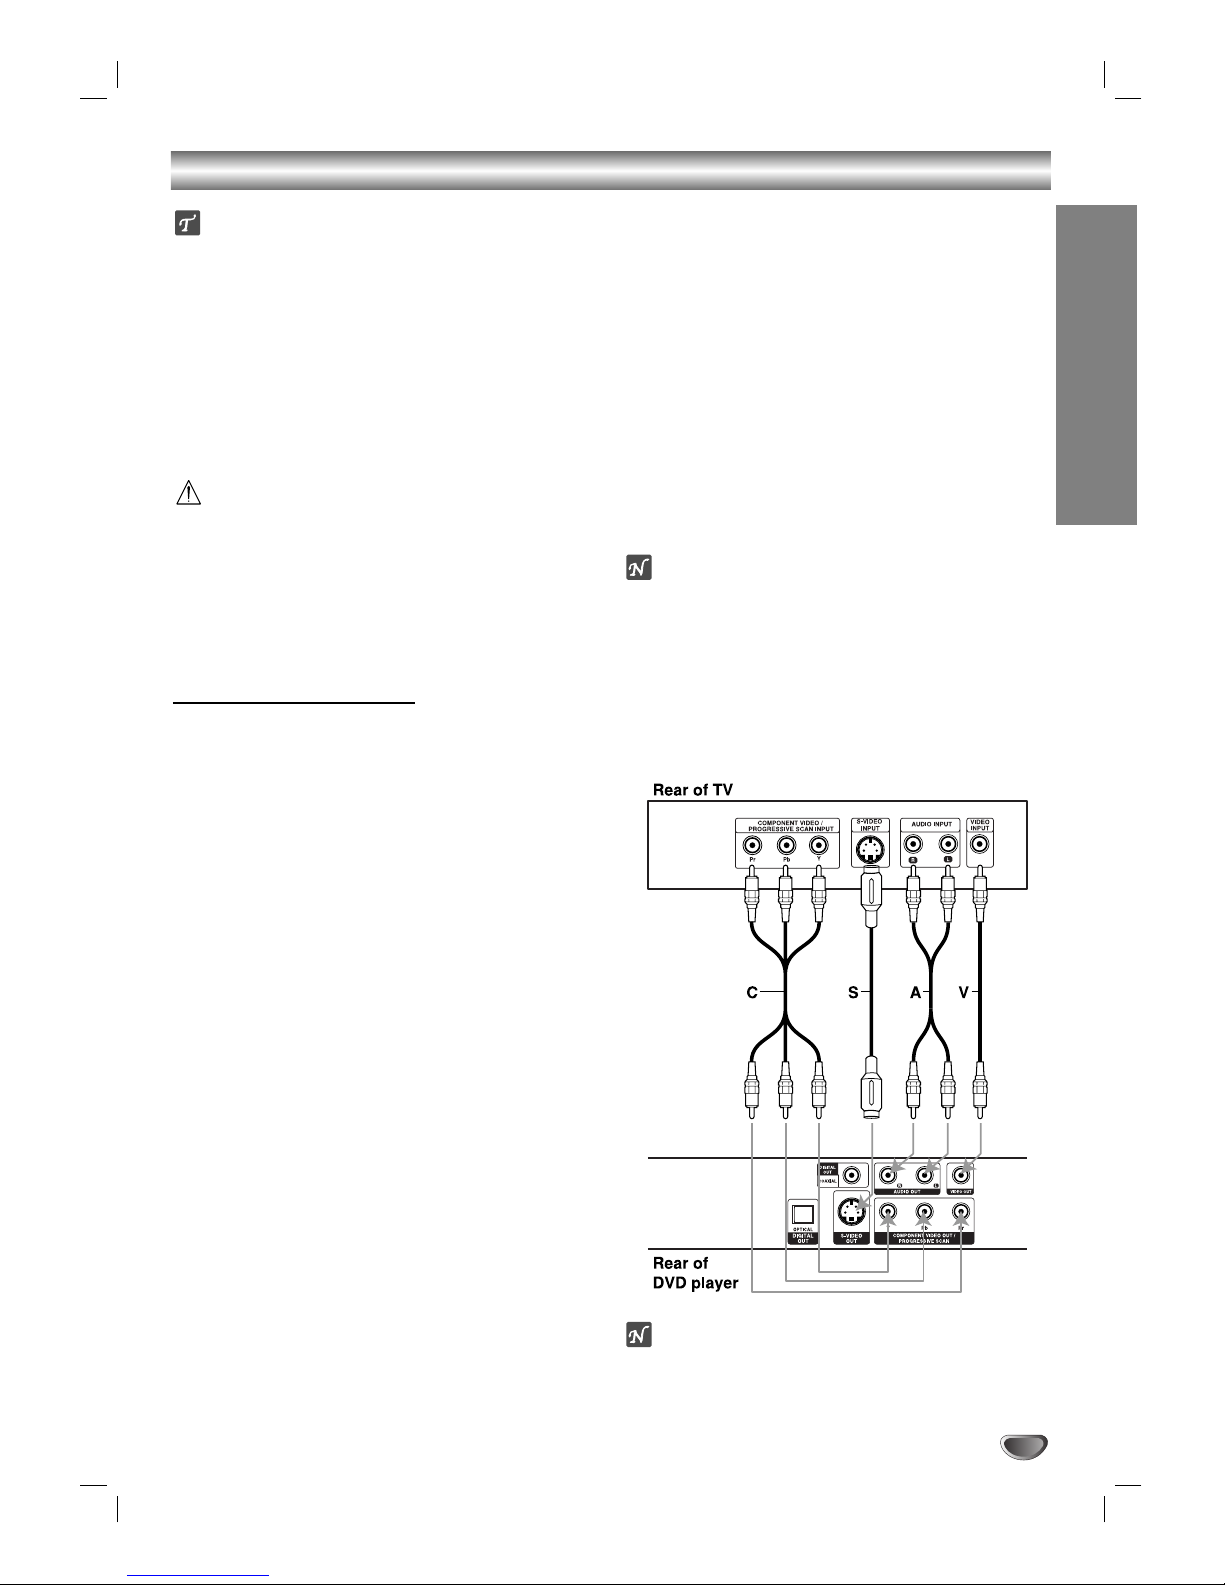
Connecting to a TV . . . . . . . . . . . . . . . . . . . . . . . 9
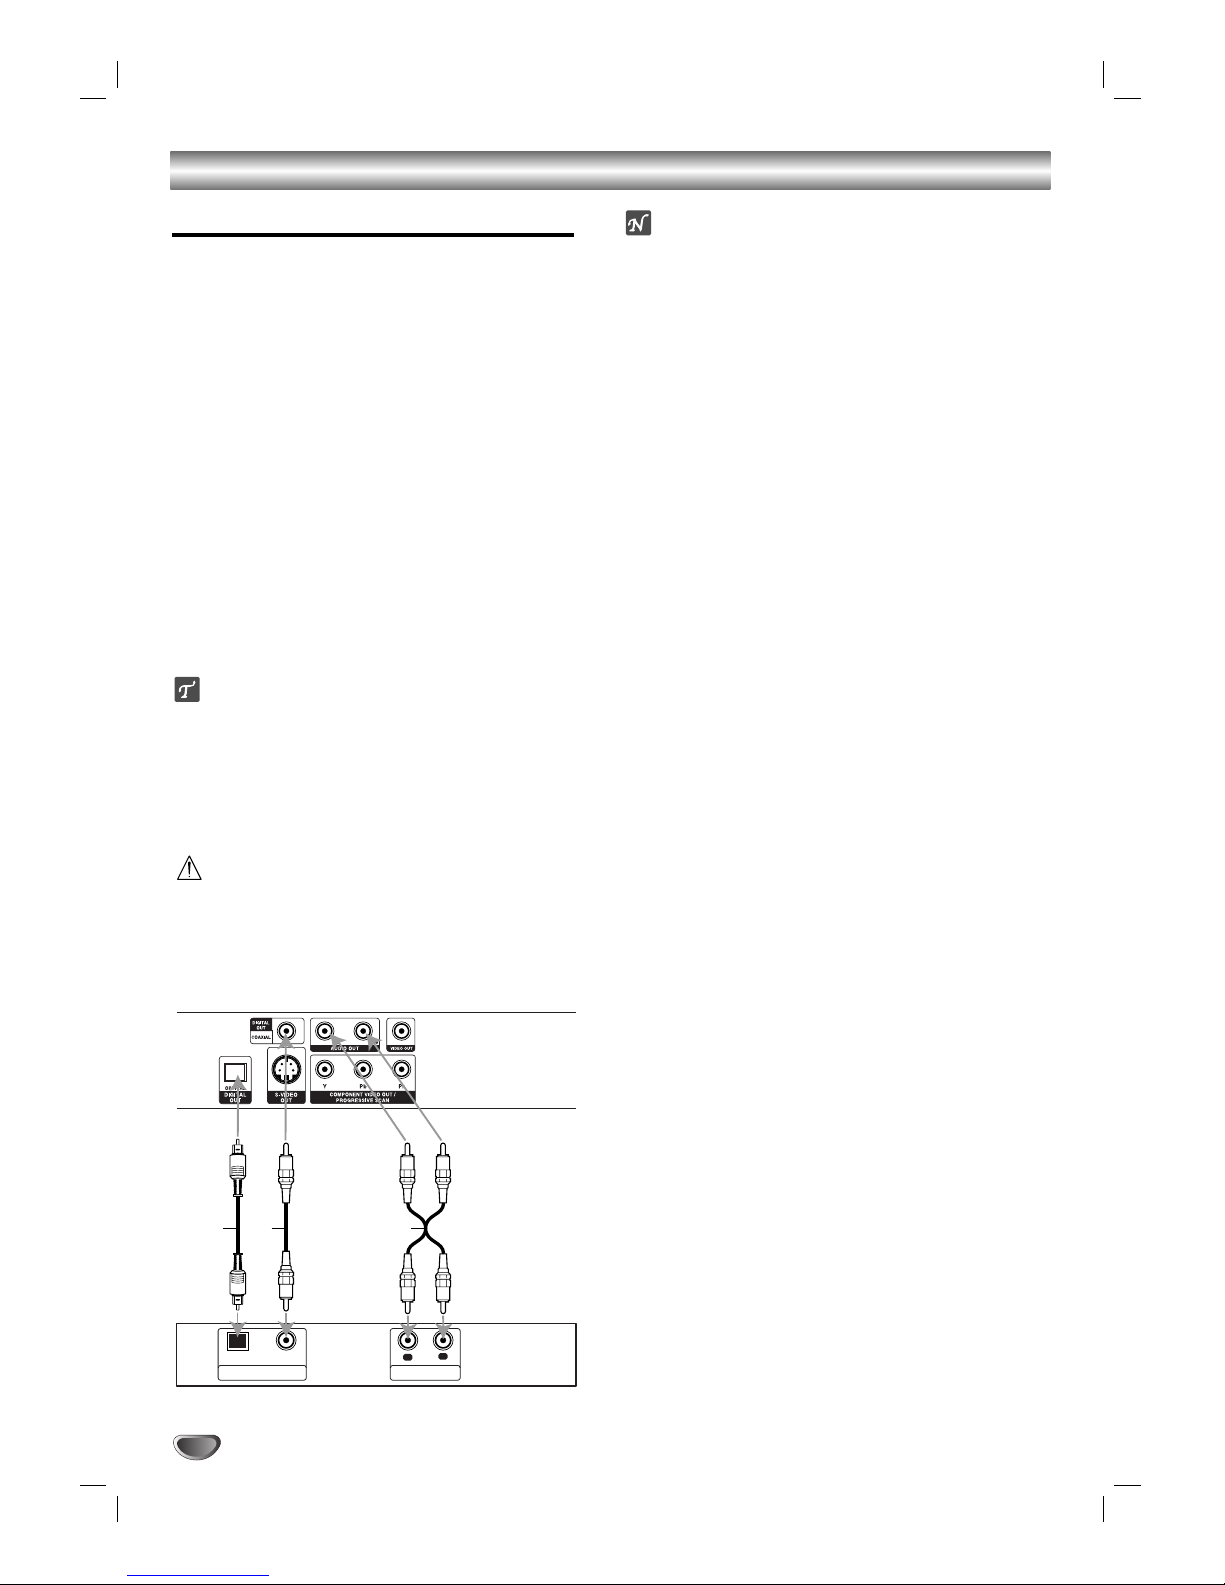
Connecting to Optional Equipment . . . . . . . . . . . 10
Before Operation . . . . . . . . . . . . . . . . . . . . . . . 11-14
General Explanation. . . . . . . . . . . . . . . . . . . . . . 11
On-Screen Display . . . . . . . . . . . . . . . . . . . . . . . 11
Initial Settings . . . . . . . . . . . . . . . . . . . . . . . . 12-14
Initial Settings General Operation. . . . . . . . . 12
Language . . . . . . . . . . . . . . . . . . . . . . . . . . 12
Picture. . . . . . . . . . . . . . . . . . . . . . . . . . . . . 12
Sound . . . . . . . . . . . . . . . . . . . . . . . . . . . . . 13
Others . . . . . . . . . . . . . . . . . . . . . . . . . . . . . 13
Parental Control. . . . . . . . . . . . . . . . . . . . . . 14
Operation
Operation with DVD and Video CD . . . . . . . . . 15-17
Playing a DVD and Video CD. . . . . . . . . . . . . . . 15
General Features . . . . . . . . . . . . . . . . . . . . . . . . 15
Moving to another TITLE . . . . . . . . . . . . . . . 15
Moving to another CHAPTER/TRACK . . . . . 15
Search. . . . . . . . . . . . . . . . . . . . . . . . . . . . . 15
Still Picture and Frame-by-Frame Playback . 16
Slow Motion. . . . . . . . . . . . . . . . . . . . . . . . . 16
Random . . . . . . . . . . . . . . . . . . . . . . . . . . . 16
Repeat . . . . . . . . . . . . . . . . . . . . . . . . . . . . 16
Repeat A-B . . . . . . . . . . . . . . . . . . . . . . . . . 16
Time Search . . . . . . . . . . . . . . . . . . . . . . . . 16
3D Surround . . . . . . . . . . . . . . . . . . . . . . . . 16
Zoom. . . . . . . . . . . . . . . . . . . . . . . . . . . . . . 17
Marker Search. . . . . . . . . . . . . . . . . . . . . . . 17
Special DVD Features . . . . . . . . . . . . . . . . . . . . 17
Title Menu . . . . . . . . . . . . . . . . . . . . . . . . . . 17
Disc Menu . . . . . . . . . . . . . . . . . . . . . . . . . . 17
Camera Angle . . . . . . . . . . . . . . . . . . . . . . . 17
Changing the Audio Language . . . . . . . . . . . 17
Changing the Audio Channel . . . . . . . . . . . . 17
Subtitles . . . . . . . . . . . . . . . . . . . . . . . . . . . 17
Operation with Audio CD and MP3/WMA Disc
. . 18-19
Playing an Audio CD and MP3/WMA Disc . . . . . 18
Notes on MP3/WMA Recordings . . . . . . . . . . . . 18
Pause . . . . . . . . . . . . . . . . . . . . . . . . . . . . . 19
Moving to another Track . . . . . . . . . . . . . . . 19
Repeat Track/ All/ Off. . . . . . . . . . . . . . . . . . 19
Search. . . . . . . . . . . . . . . . . . . . . . . . . . . . . 19
Random . . . . . . . . . . . . . . . . . . . . . . . . . . . 19
Repeat A-B . . . . . . . . . . . . . . . . . . . . . . . . . 19
3D Surround . . . . . . . . . . . . . . . . . . . . . . . . 19
Changing the Audio Channel . . . . . . . . . . . . 19
Operation with JPEG Disc. . . . . . . . . . . . . . . . . . . 20
Viewing a JPEG disc . . . . . . . . . . . . . . . . . . . . . 20
Moving to another File . . . . . . . . . . . . . . . . . 20
Still Picture . . . . . . . . . . . . . . . . . . . . . . . . . 20
To flip the picture . . . . . . . . . . . . . . . . . . . . . 20
To rotate picture. . . . . . . . . . . . . . . . . . . . . . 20
Notes on JPEG Recordings . . . . . . . . . . . . . 20
Programmed Playback . . . . . . . . . . . . . . . . . . . . . 21
Programmed Playback with Audio CD and
MP3/WMA Disc . . . . . . . . . . . . . . . . . . . . . . . . . 21
Programmed Playback with Video CD . . . . . . . . 21
Repeat Programmed Tracks . . . . . . . . . . . . 21
Erasing a Track from Program List . . . . . . . . 21
Erasing the Complete Program List . . . . . . . 21
Additional Information . . . . . . . . . . . . . . . . . . . . . 22
Last Condition Memory . . . . . . . . . . . . . . . . . . . 22
Screen Saver. . . . . . . . . . . . . . . . . . . . . . . . . . . 22
Video Mode Setting . . . . . . . . . . . . . . . . . . . . . . 22
Controlling other TVs with the remote control . . . 22
System Select . . . . . . . . . . . . . . . . . . . . . . . . . . 22
Reference
Troubleshooting . . . . . . . . . . . . . . . . . . . . . . . . . . 23
Language Code List . . . . . . . . . . . . . . . . . . . . . . . 24
Country Code List . . . . . . . . . . . . . . . . . . . . . . . . . 25
Specifications . . . . . . . . . . . . . . . . . . . . . . . . . . . . 26
About the symbols for instructions
Indicates hazards likely to cause harm to the unit
itself or other material damage.
Indicates special operating features of this unit.
Indicates tips and hints for making the task easier.

4
Before Use
Playable Discs
DVD
(8 cm / 12 cm disc)
Video CD (VCD)
(8 cm / 12 cm disc)
Audio CD
(8 cm / 12 cm disc)
In addition, this unit can play a DVD±R, DVD±RW, Kodak
PICTURE CD, SVCD, and CD-R or CD-RW that contains
audio titles, MP3, WMA or JPEG files.
Notes
–Depending on the conditions of the recording equip-
ment or the CD-R/RW (or DVD
±
R/±RW) disc itself,
some CD-R/RW (or DVD
±
R/±RW) discs cannot be
played on the unit.
–Do not attach any seal or label to either side (the
labeled side or the recorded side) of a disc.
–
Do not use irregularly shaped CDs (e.g., heart-shaped
or octagonal). It may result in malfunctions.
Notes on DVDs and Video CDs
Some playback operations of DVDs and Video CDs
may be intentionally fixed by software manufacturers.
As this unit plays DVDs and Video CDs according to
disc content designed by the software manufacturer,
some playback features of the unit may not be available
or other functions may be added.
Refer also to the instructions supplied with the DVDs
and Video CDs. Some DVDs made for business pur-
poses may not be played on the unit.
Regional code of the DVD player and DVDs
This DVD player is designed and manufactured
for playback of region “4” encoded DVD soft-
ware. The region code on the labels of some
DVD discs indicates which type of player can play those
discs. This unit can play only DVD discs labeled “4” or
“ALL”. If you try to play any other discs, the message
“Check Regional Code” will appear on the TV screen.
Some DVD discs may not have a region code label even
though their playback is prohibited by area limits.
Disc-related terms
Title (DVD only)
The main film content or accompanying feature content
or additional feature content, or music album.
Each title is assigned a title reference number enabling
you to locate it easily.
Chapter (DVD only)
Sections of a picture or a musical piece that are smaller
than titles. A title is composed of one or several chap-
ters. Each chapter is assigned a chapter number,
enabling you to locate the chapter you want. Depending
on the disc, chapters may not be recorded.
Track (Video CD and audio CD only)
Sections of a picture or a musical piece on a video CD
or an audio CD. Each track is assigned a track number,
enabling you to locate the track you want.
Scene
On a video CD with PBC (Playback control) functions,
moving pictures and still pictures are divided into sec-
tions called “Scenes”. Each scene is displayed in the
menu screen and assigned a scene number, enabling
you to locate the scene you want.
Ascene is composed of one or several tracks.
Types of video CDs
There are two types of video CDs:
Video CDs equipped with PBC (Version 2.0)
PBC (Playback control) functions allow you to interact
with the system via menus, search functions, or other
typical computer-like operations. Moreover, still pictures
of high resolution can be played if they are included in
the disc.
Video CDs not equipped with PBC (Version 1.1)
Operated in the same way as audio CDs, these discs
allow playback of video pictures as well as sound, but
they are not equipped with PBC.
4

5
INTRODUCTION
Before Use (Continued)
Precautions
Handling the unit
When shipping the unit
The original shipping carton and packing materials
come in handy. For maximum protection, re-pack the
unit as it was originally packed at the factory.
When setting up the unit
The picture and sound of a nearby TV, VCR, or radio
may be distorted during playback. In this case, position
the unit away from the TV, VCR, or radio, or turn off the
unit after removing the disc.
To keep the exterior surfaces clean
Do not use volatile liquids, such as insecticide spray,
near the unit. Do not leave rubber or plastic products in
contact with the unit for a long period of time. They will
leave marks on the surface.
Cleaning the unit
To clean the cabinet
Use a soft, dry cloth. If the surfaces are extremely dirty,
use a soft cloth lightly moistened with a mild detergent
solution. Do not use strong solvents such as alcohol,
benzine, or thinner, as these might damage the surface
of the unit.
To obtain a clear picture
The DVD player is a high-tech, precision device. If the
optical pick-up lens and disc drive parts are dirty or
worn, the picture quality will be poor.
Regular inspection and maintenance are recommended
after every 1,000 hours of use. (This depends on the
operating environment.)
For details, please contact your nearest dealer.
Notes on Discs
Handling discs
Do not touch the playback side of the disc.
Hold the disc by the edges so that fingerprints will not
get on the surface.
Do not stick paper or tape on the disc.
Storing discs
After playing, store the disc in its case.
Do not expose the disc to direct sunlight or sources of
heat, or leave it in a parked car exposed to direct sun-
light, as there may be a considerable temperature
increase inside the car.
Cleaning discs
Fingerprints and dust on the disc can cause poor pic-
ture quality and sound distortion. Before playing, clean
the disc with a clean cloth. Wipe the disc from the cen-
ter out.
Do not use strong solvents such as alcohol, benzine,
thinner, commercially available cleaners, or anti-static
spray intended for older vinyl records.
About Symbols
About the symbol display
“ ” may appear on the TV screen during operation.
This icon means the function explained in this owner’s
manual is not available on that specific DVD video disc.
About the disc symbols for instructions
Asection whose title has one of the following symbol is
applicable only to the disc represented by the symbol.
DVD
Video CDs with the PBC (playback control)
function.
Video CDs without the PBC (playback control)
function.
Audio CDs.
MP3 disc.
WMA disc.
JPEG disc.
JPEG
WMA
MP3
CD
VCD1.1
VCD2.0
DVD

6
Front Panel and Display Window
A
D
ALL
B
DVDS VCD CHP
MP3
CD TRK
Indicates current player
function (Play, Pause)
DVD inserted
CD Audio CD inserted
VCD Video CD inserted
SVCD Super Video CD inserted
MP3 MP3 or WMA disc inserted
DVD
CHP/TRK Indicates
current chapter or
track number
Indicates total playing
time/elapsed time
Indicates encoding
DTS and Dolby digital
of the current disc.
Display Window
Indicates repeat mode
Forward Skip/Scan ( >/ M)
Go to the next chapter / track.
Press and hold for two seconds for fast
forward search.
Reverse Scan/Skip ( m/ .)
Go to previous chapter / track or to the beginning.
Press and hold for two seconds for fast reverse search.
STOP ( x) Stops playback.
PAUSE ( X)
Pauses playback. Press repeatedly for
frame-by-frame playback.
PLAY ( N)
Starts playback.
OPEN / CLOSE ( Z)
Opens or closes the disc tray.
Disc Tray
Insert a disc here.
POWER
Switches the player ON and OFF.
Remote Sensor
Point the DVD Player remote control
here.
Display window
Shows the current status of the
player.

7
INTRODUCTION
Remote Control
TV Control Buttons
TV POWER:
Turns the TV on or off.
TV PR/CH +/–:
Selects TV’s channel.
TV VOL +/–:
Adjusts TV’s volume.
AV:
Selects the TV’s source.
SKIP (./ >)
Go to next chapter or track.
Returns to beginning of current
chapter or track or go to previ-
ous chapter or track.
STOP ( x)
Stops playback.
TITLE
Displays title menu, if available.
RETURN
Removes the setup menu, dis-
plays the video CD with PBC.
• MARKER
Marks any point during play-
back.
• SEARCH
Displays MARKER SEARCH
menu.
• PROGRAM
Places a track on the program
list.
• ZOOM
Enlarges video image.
• REPEAT
Repeat chapter, track, title, all.
• A-B
Repeat sequence.
• RANDOM
Plays tracks in random order.
• * This button is not available.
OPEN / CLOSE
Opens and closes the disc tray.
POWER
Switches DVD Player ON and OFF.
0-9 number buttons
Selects numbered items in a menu.
CLEAR
Removes a track number on the
program list or a mark on the
MARKER SEARCH menu.
SCAN ( m/ M)
Search backward or forward.
PAUSE / STEP ( X)
Pauses playback temporarily/ press
repeatedly for frame-by-frame
playback.
PLAY ( N)
Starts playback.
DVD MENU
Accesses menu on a DVD disc.
bBvV(left/right/up/down) •
Selects an item in the menu.
ENTER •
Confirms menu selection.
DISPLAY
Accesses On-Screen display.
AUDIO •
Selects an audio language (DVD) or
an audio channel (CD).
SUBTITLE •
Selects a subtitle language.
ANGLE •
Selects a DVD camera angle if
available
SETUP •
Accesses or removes setup menu.

8
Rear Panel
Do not touch the inner pins of the jacks on the
rear panel. Electrostatic discharge may cause
permanent damage to the unit.
Remote Control Operation
Point the remote control at the remote sensor and
press the buttons.
Remote Ccontrol Battery installation
Detach the battery cover on the rear of
the remote control, and insert two
batteries (size AAA) with and
aligned correctly.
Do not mix old and new batteries and never
mix different types of batteries such as
standard, alkaline, etc.
AAA
AAA
COAXIAL (Digital audio out jack)
Connect to digital (coaxial) audio equipment.
AUDIO OUT (Left / Right)
Connect to an amplifier, receiver, or
stereo system.
VIDEO OUT
Connect to a TV with video inputs.
AC Power Cord
Plug into the power source.
OPTICAL DIGITAL OUT (Digital audio out jack)
Connect to digital (optical) audio equipment.
S-VIDEO OUT
Connect to a TV with S-Video inputs.
COMPONENT VIDEO OUT/PROGRESSIVE SCAN (Y Pb Pr)
Connect to a TV with Y Pb Pr inputs.

Connections
Tips
Depending on your TV and other equipment you wish
to connect, there are various ways you could connect
the player. Use only one of the connections
described below.
Please refer to the manuals of your TV, VCR, Stereo
System or other devices as necessary to make the
best connections.
For better sound reproduction, connect the player’s
AUDIO OUT jacks to the audio in jacks of your
amplifier, receiver, stereo or audio/video equipment.
See “Connecting to Optional Equipment”on page 10.
Caution
–
Make sure the DVD Player is connected directly to the
TV. Tune the TV to the correct video input channel.
–Do not connect the DVD Player’s AUDIO OUT jack to
the phono in jack (record deck) of your audio system.
–Do not connect your DVD Player via your VCR. The
DVD image could be distorted by the copy protection
system.
Connecting to a TV
Make one of the following connections, depending on
the capabilities of your existing equipment.
Video connection
11
Connect the VIDEO OUT jack on the DVD Player to
the video in jack on the TV using the video cable (V).
22
Connect the Left and Right AUDIO OUT jacks of
the DVD Player to the audio left/right in jacks on the
TV (A) using the audio cables.
S-Video connection
11
Connect the S-VIDEO OUT jack on the DVD Player
to the S-Video in jack on the TV using the S-Video
cable (S).
22
Connect the Left and Right AUDIO OUT jacks of
the DVD Player to the audio left/right in jacks on the
TV (A) using the audio cables.
Component Video (Color Stream®) connection
11
Connect the COMPONENT VIDEO OUT/
PROGRESSIVE SCAN jacks on the DVD Player to
the corresponding in jacks on the TV using an Y Pb
Pr cable (C).
22
Connect the Left and Right AUDIO OUT jacks of
the DVD Player to the audio left/right in jacks on the
TV (A) using the audio cables.
Progressive Scan (ColorStream®Pro) connection
If your television is a high-definition or “digital ready”
television, you may take advantage of the DVD
Player’s progressive scan output for the highest
video resolution possible.
If your TV does not accept the Progressive Scan for-
mat, the picture will appear scrambled if you try
Progressive Scan on the DVD Player.
11
Connect the COMPONENT VIDEO OUT/
PROGRESSIVE SCAN jacks on the DVD Player to
the corresponding in jacks on the TV using the
YPb Pr cable (C).
22
Connect the Left and Right AUDIO OUT jacks of
the DVD Player to the audio left/right in jacks on the
TV (A) using the audio cables.
Notes
–Set the Progressive to “On” on the setup menu for
progressive signal, see page 12.
–Set the Progressive to “Off” by removing any disc
from the unit and close the disc tray. See that “no
disc” is displayed on the display window. Then press
STOP and hold it for five seconds before relesasing it.
–Progressive scan does not work with the analog video
connections (yellow VIDEO OUT jack) or S-VIDEO
connection.
Note
If the TV has an S-video input, connect the DVD player
with the S-video cable. When using an S-video cable,
do not connect the yellow video cable.
PREPARATION
9

Connections (Continued)
Connecting to Optional Equipment
Connecting to an amplifier equipped with two
channel analog stereo or Dolby Pro Logic ll/
Pro Logic
Connect the Left and Right AUDIO OUT jacks on the
DVD Player to the audio left and right in jacks on your
amplifier, receiver, or stereo system, using the audio
cables (A).
Connecting to an amplifier equipped with two
channel digital stereo (PCM) or to an Audio/
Video receiver equipped with a multi-channel
decoder (Dolby Digital™, MPEG 2, or DTS)
11
Connect one of the DVD Player’s DIGITAL AUDIO
OUT jacks (OPTICAL Oor COAXIAL X) to the cor-
responding in jack on your amplifier. Use an option-
al digital (optical Oor coaxial X) audio cable.
22
You will need to activate the player’s digital output.
(See “Digital Audio Output” on page 13).
Digital Multi-channel sound
Adigital multi-channel connection provides the best
sound quality. For this you need a multi-channel
Audio/Video receiver that supports one or more of the
audio formats supported by your DVD Player (MPEG 2,
Dolby Digital and DTS). Check the receiver manual and
the logos on the front of the receiver.
Caution:
Due to the DTS Licensing agreement, the digital output
will be in DTS digital out when DTS audio stream is
selected.
Notes
–
If the audio format of the digital output does not match
the capabilities of your receiver, the receiver will
produce a strong, distorted sound or no sound at all.
–Six Channel Digital Surround Sound via digital con-
nection can only be obtained if your receiver is
equipped with a Digital Multi-channel decoder.
–To see the audio format of the current DVD in the on-
screen display, press AUDIO.
10
Amplifier (Receiver)
Rear of DVD player
AXO
R
L
AUDIO INPUTDIGITAL INPUT
OPTICAL COAXIAL

Before Operation
General Explanation
This manual gives basic instructions for operating the
DVD Player. Some DVDs require specific operation or
allow only limited operation during playback. When this
occurs, the symbol appears on the TV screen, indi-
cating that the operation is not permitted by the DVD
Player or is not available on the disc.
On-Screen Display
General playback status can be displayed on the TV
screen. Some items can be changed on the menu.
On-screen display operation
11
Press DISPLAY during playback.
22
Press 33/44to select an item.
The selected item will be highlighted.
33
Press 11/22to change the setting of an item.
The number buttons can be also be used for setting
numbers (e.g., title number). For some functions,
press ENTER to execute the setting.
Temporary Feedback Field Icons
Repeat Title
Repeat Chapter
Repeat Track (non-PBC Video CDs only)
Repeat All Tracks (non-PBC Video CDs only)
Repeat A-B
Repeat Off
Resume play from this point
Action prohibited or not available
Notes
Some discs may not provide all of the features on the
on-screen display example shown below.
If no button is pressed for 10 seconds, the on-screen
display disappears.
OFF
A B
ALL
TRACK
CHAPT
TITLE
PREPARATION
Items
Title Number
Chapter Number
Time search
Audio language
and Digital Audio
Output mode
Subtitle language
Angle
Sound
Function (Press 33/44to select desired item)
Shows the current title number and total number of
titles, and skips to the desired title number.
Shows the current chapter number and total number of
chapters, and skips to the desired chapter number.
Shows the elapsed playing time, and
searches the point by the elapsed time directly.
Shows the current audio soundtrack language,
encoding method, and channel number, and
changes the setting.
Shows the current subtitles language, and
changes the setting.
Shows the current angle number and total number of
angles, and changes the angle number.
Shows the current sound mode, and
changes the setting.
Selection Method
11
/
22
,or
Numbers ENTER
11
/
22
,or
Numbers ENTER
Numbers ENTER
11
/
22
,or
AUDIO
11
/
22
,or
SUBTILE
11
/
22
,or
ANGLE
11
/
22
1 /3
1 /12
0:20:09
1 ENG
D
5.1 CH
OFF
1 /1
NORM.
ABC
Items
Track Number
Time
Audio Channel
Sound
Function (Press 33/44to select desired item)
Shows the current track number, total number of tracks
and PBC On mode, and skip to the desired track number.
Shows the elapsed playing time (Display only)
Shows the audio channel, and
changes the audio channel.
Shows the current sound mode, and
changes the setting.
Selection Method
11
/
22
,or
Numbers ENTER
–
11
/
22
,or
AUDIO
11
/
22
1 /4
0:20:09
STER.
NORM.
VCD2.0 VCD1.1
DVD
11

Before Operation (Continued)
Initial Settings
You can set your own Personal Preferences on the
player.
Initial Settings General Operation
11
Press SETUP.
The setup menu appears.
22
Press 33/44to select the desired item.
The screen will show the current setting for the
selected item, as well as alternate setting(s).
33
While the desired item is selected, press 22, then
33/44to select the desired setting.
44
Press ENTER to confirm your selection.
Some items require additional steps.
55
Press SETUP, RETURN, or PLAY to exit the
setup menu.
Language
Disc Language
Select a language for the disc’s Menu, Audio, and
Subtitle.
Original : The original language set for the disc is selected.
Other : To select another language, press number buttons to
enter the corresponding 4-digit number according to the lan-
guage code list on page 24. If you enter the wrong language
code, press CLEAR.
Menu Language
Select a language for the setup menu. This is the menu
you see when you press SETUP.
Picture
TV Aspect
4:3 Letterbox: Select when a standard 4:3 TV is con-
nected. Displays theatrical images with masking bars
above and below the picture.
4:3 Panscan: Select when a conventional TV set is
connected. The video material formatted in the Pan &
Scan style is played back in that style (Both sides of the
picture are cut off).
16:9 Wide: Select when a 16:9 wide TV is connected.
Progressive Scan
Progressive Scan Video provides the highest quality
pictures with less flickering.
If you are using the COMPONENT VIDEO OUT/
PROGRESSIVE SCAN jacks, but are connecting the
DVD Player to a standard (analog) television, set
Progressive Scan to Off.
If you are using the Component Video jacks for
connection to a TV or monitor that is compatible with a
progressive scan signal, set Progressive Scan to On.
Caution
Once the setting for progressive scan output is entered,
an image will only be visible on a progressive scan
compatible TV or monitor. If you set Progressive Scan
to On in error, you must reset the unit.
1) Remove any disc from the unit and close the disc
tray. See that “no disc” is displayed on the display
window.
2) Press STOP and hold it for five seconds before
releasing it. The video output will be restored to the
standard setting and a picture will once again be
visible on a conventional analog TV or monitor.
DVD
DVD
DVD
12
Disc Subtitle
Disc Menu
Rating
Country Code
TV Aspect
Menu Language
Progressive Scan
Di it l A di O t t
Disc Audio English
Hungarian
Russian
Polish
German
Disc Subtitle
Disc Menu
Rating
Country Code
TV Aspect
Menu Language
Progressive Scan
Digital Audio Output
5.1 Speaker Setup
Others
Disc Audio 4:3
4:3
16:9
Letterbox
Panscan
Wide
Disc Subtitle
Disc Menu
Rating
Country Code
TV Aspect
Menu Language
Progressive Scan
Digital Audio Output
5.1 Speaker Setup
Others
Disc Audio Original
French
Chinese
Italian
English
Other – – – –
Hungarian
Russian
Polish
German
Disc Subtitle
Disc Menu
Rating
Country Code
TV Aspect
Menu Language
Progressive Scan
Digital Audio Output
5.1 Speaker Setup
Others
Disc Audio Off
On
Disc Subtitle
Disc Menu
Rating
Country Code
TV Aspect
Menu Language
Progressive Scan
Digital Audio Output
5.1 Speaker Setup
Others
Disc Audio Original
French
Chinese
Italian
English
Other – – – –
Hungarian
Russian
Polish
German

Before Operation (Continued)
Sound
Digital Audio Output
Each DVD disc has a variety of audio output options.
Set the player’s Digital Audio Output according to the
type of audio system you use.
DOLBY DIGITAL/PCM: Select “DOLBY DIGITAL/PCM”
if you connected the DVD Player’s DIGITAL OUT jack to
a Dolby Digital decoder (or an amplifier or other equip-
ment with a Dolby Digital decoder).
Stream/PCM: Select “Stream/PCM” if you connected
the DVD Player’s DIGITAL OUT jack to an amplifier or
other equipment with a DTS decoder, Dolby Digital
decoder or MPEG decoder.
PCM: Select when connected to a 2-channel digital
stereo amplifier. The DVD player outputs sounds in the
PCM 2ch format when you play a DVD video disc
recorded on the Dolby Digital, MPEG1, or MPEG2
recording system.
Sample Frequency
To change the Sample Frequency setting, first select
the desired Digital Audio Output as indicated as above.
If your receiver or amplifier is NOT capable of handling
96KHz signals, select 48KHz. When this choice is
made, this unit will automatically convert any 96KHz
signals to 48KHz so your system can decode them.
If your receiver or amplifier is capable of handling
96KHz signals, select 96KHz. When this choice is
made, this unit will pass each type of signal through
without any further processing.
Others
The DRC, Vocal, PBC and Auto Play settings can
be changed.
Press 33/44to select the desired item and press
ENTER. The setting of the selected item is changed
between On and Off.
Dynamic Range Control (DRC)
With the DVD format, you can hear a program’s sound-
track in the most accurate and realistic presentation
possible, thanks to digital audio technology. However,
you may wish to compress the dynamic range of the
audio output (the difference between the loudest sounds
and the quietest ones). Then, you may listen to a movie
at a lower volume without losing clarity of sound. Set
DRC to On for this effect.
Vocal
Set Vocal to On only when a multi-channel karaoke
DVD is playing. The karaoke channels on the disc will
mix into normal stereo sound.
PBC
Set Playback Control (PBC) to On or Off.
On: Video CDs with PBC are played according to the PBC.
Off: Video CDs with PBC are played the same way as Audio
CDs.
Auto Play
You can set up the DVD Player so a DVD disc automat-
ically starts playing whenever the DVD is inserted.
If Auto Play mode is set to On, this DVD player will
search a title that playback time is long most and then
play back the title automatically.
On: Auto Play function is activated.
Off: Auto Play function is not activated.
Note
The Auto Play function may not work for some DVDs.
DVD
PREPARATION
13
Disc Subtitle
Disc Menu
Rating
Country Code
TV Aspect
Menu Language
Progressive Scan
Digital Audio Output
5.1 Speaker Setup
Others
Disc Audio
Vocal
DRC
PBC
Auto Play
On
On
Off
On
Disc Subtitle
Disc Menu
Rating
Country Code
TV Aspect
Menu Language
Progressive Scan
Digital Audio Output
5.1 Speaker Setup
Others
Disc Audio DOLBY
DIGITAL /PCM
Stream/PCM
PCM
Sample Freq.
48 KHz
96KHz

Before Operation (Continued)
Parental Control
Rating
Movies on DVDs may contain scenes not suitable for
children. Therefore, discs may contain Parental Control
information that applies to the complete disc or to
certain scenes on the disc. These scenes are rated
from 1 to 8, and alternatively, more suitable scenes are
available for selection on some discs. Ratings are
country-dependent. The Parental Control feature allows
you to prevent discs from being played by your children
or to have certain discs played with alternative scenes.
11
Select “Rating” on the Setup menu using the
33/44buttons.
22
While “Rating” is selected, press 22.
33
When you have not entered a password yet.
Enter a 4-digit password using the numbered but-
tons to create a personal 4-digit security password.
then press ENTER. Enter the 4-digit password
again and press ENTER to verify.
When you have already entered a password;
Enter a 4-digit password using the numbered but-
tons to confirm the personal 4-digit security pass-
word, then press ENTER.
If you make a mistake before pressing ENTER, press
CLEAR and enter 4-digit security password again.
44
Select a rating from 1 to 8 using the 33/44but-
tons. One (1) has the least playback restrictions.
Eight (8) has the most playback restrictions.
Unlock: If you select Unlock, Parental Control is
not active. The disc will play in full.
Ratings 1 to 8: Some discs contain scenes not
suitable for children. If you set a rating for the play-
er, all disc scenes with the same rating or lower will
be played. Higher rated scenes will not be played
unless an alternative scene is available on the disc.
The alternative must have the same rating or a
lower one. If no suitable alternative is found, play-
back will stop. You must enter the 4-digit password
or change the rating level in order to play the disc.
55
Press ENTER to confirm your rating selection,
then press SETUP to exit the menu.
Country Code
Enter the code of a country/area whose standards were
used to rate the DVD video disc, referring to the list
(See “Country Code List”, page 25.).
11
Select Country Code using the 33/44buttons on
the setup menu.
22
While Country Code is selected, press 2.
33
Follow step 3 of “Rating” on left.
44
Select the first character using the 33/44buttons.
55
Shift the cursor using 2button and select the
second character using 33/44buttons.
66
Press ENTER to confirm your country code
selection, then press SETUP to exit the menu.
Note
Confirmation of the 4-digit password is necessary when
the code is changed (see “Changing the 4-digit code”
below.).
Changing the 4-digit code
1Follow Steps 1-2 as shown above to the left (Rating).
2Enter the old code, then press ENTER.
3Select Change using 33/44buttons then press
ENTER.
4Enter the new 4-digit code, then press ENTER.
5Enter exactly the same code a second time and veri-
fy by pressing ENTER.
6Press SETUP to exit the menu.
If you forget your 4-digit code
If you forget your password, to clear the current pass-
word, follow the procedure below.
1Press SETUP to display the setup menu.
2Use the Number buttons to enter the 6-digit number
“210499”.
The 4-digit password is cleared. “P CLr” appears on the
display for a moment.
3
Enter a new code as shown above to the left (Rating).
DVD
DVD
14
Disc Subtitle
Disc Menu
Rating
Country Code
TV Aspect
Menu Language
Progressive Scan
Digital Audio Output
5.1 Speaker Setup
Others
Disc Audio Code Set
U S
Disc Subtitle
Disc Menu
Rating
Country Code
TV Aspect
Menu Language
Progressive Scan
Digital Audio Output
5.1 Speaker Setup
Others
Disc Audio 8
7
6
5
4
3
2
1
Unlock
Change

Operation with DVD and Video CD
Playing a DVD and Video CD
Playback Setup
Turn on the TV and select the video input source con-
nected to the DVD player.
Audio system: Turn on the audio system and select
the input source connected to the DVD player.
11
Press OPEN/CLOSE to open the disc tray.
22
Load your chosen disc in the tray, with the
playback side down.
33
Press OPEN/CLOSE to close the tray.
READING appears on the TV screen, and playback
starts automatically. If playback does not start,
press PLAY.
In some cases, the disc menu might appear
instead.
If a menu screen is displayed
The menu screen may be displayed first after loading a
DVD or Video CD which offer a menu.
Use the 11223344buttons to select the title/chapter you
want to view, then press ENTER to start playback.
Press TITLE or DVD MENU to return to the menu
screen.
Use the number buttons to select the track you want
to view.
Press RETURN to return to the menu screen.
Menu setting and the exact operating procedures for
using the menu may differ depending on the disc.
Follow the instructions on the each menu screen.
You also may set PBC to Off under setup. See page
13.
Notes
–If Parental Control is set and the disc is not within the
Rating settings (not authorized), the 4-digit code must
be entered and/or the disc must be authorized (see
“Parental Control”, on page 14).
–DVDs may have a region code.
Your player will not play discs that have a region code
different from your player. The region code for this
player is 4 (four).
General Features
Note
Unless stated otherwise, all operations described use
the remote control. Some features may also be
available on the Setup menu.
Moving to another TITLE
When a disc has more than one title, you can move to
another title as follows:
Press DISPLAY, then press the appropriate num-
bered button (0-9) to select a title number.
Moving to another CHAPTER/TRACK
When a title on a disc has more than one chapter or a
disc has more than one track, you can move to another
chapter/track as follows:
Press SKIP .or >briefly during
playback to select the next chapter/track or to return
to the beginning of the current chapter/track.
Press .twice briefly to step back to the previous
chapter/track.
To go directly to any chapter during DVD playback,
press DISPLAY. Then, press 33/44to select the
chapter/track icon. Then, enter the chapter/track
number using the numbered buttons (0-9).
Note
For two-digit numbers, press the numbered buttons
(0-9)in rapid succession.
Search
1Press SCAN mor Mduring playback.
The player will now go into SEARCH mode.
2Press SCAN mor Mrepeatedly to select the
required speed: mX2, mX4, mX16, mX100
(backward) or MX2, MX4, MX16, MX100
(forward).
With a Video CD, the Search speed changes: mX2,
mX4, mX8, (backward) or MX2, MX4, MX8,
(forward).
3To exit SEARCH mode, press PLAY.
VCD1.1VCD2.0
DVD
1 /3
1 /12
VCD1.1
DVD
1 /3
DVD
VCD2.0
DVD
VCD1.1VCD2.0
DVD
OPERATION
15

Operation with DVD and Video CD
General Features (continued)
Still Picture and Frame-by-Frame playback
1Press PAUSE/STEP during playback.
The player will now go into PAUSE mode.
2
You can advance the picture frame-by-frame by press-
ing PAUSE/STEP repeatedly on the remote control.
Slow Motion
1Press PAUSE/STEP (X) during playback.
The recorder will now go into PAUSE mode.
2Press SCAN (mor M) during PAUSE mode.
The DVD player will enter SLOW mode.
3Use the SCAN (mor M) to select the required
speed: t 1/16, t 1/8, t 1/4, or t 1/2 (back-
ward), or T1/16, T1/8, T1/4, or T1/2 (forward).
With a Video CD, the Slow speed changes: T1/8,
T1/4 or T1/2 (forward).
4.To exit Slow Motion mode, press PLAY (N).
Note
Slow motion playback in reverse is not possible with
Video CDs.
Random
1Press RANDOM during playback or in stop mode.
The “RANDOM” appears on the TV screen.
2To return to normal playback, press RANDOM again.
The “NORMAL” appears on the TV screen.
Tips
By pressing SKIP >during Random playback, the
unit selects another title (track) and resumes Random
playback.
Note
This function only works with DVD Karaoke discs and
video CD without PBC.
On a Video CD with PBC, you must set PBC to Off on
the setup menu to use the Random function. See
page 13.
Repeat
DVD Video Discs - Repeat Chapter/Title/Off
1To repeat the currently playing chapter, press
REPEAT.
The Repeat Chapter icon appears on the TV screen.
2To repeat the title currently playing, press REPEAT a
second time.
The Repeat Title icon appears on the TV screen.
3To exit Repeat mode, press REPEAT a third time.
The Repeat Off icon appears on the TV screen.
Video CDs - Repeat Track/All/Off
1To repeat the track currently playing, press REPEAT.
The Repeat Track icon appears on the TV screen.
2To repeat the disc currently playing, press REPEAT a
second time.
The Repeat All icon appears on the TV screen.
3To exit Repeat mode, press REPEAT a third time.
The Repeat Off icon appears on the TV screen.
Note
On a Video CD with PBC, you must set PBC to Off on the
setup menu to use the Repeat function. See page 13.
Repeat A-B
To repeat a sequence in a title:
1Press A-B at your chosen starting point.
“ A * ” appears briefly on the TV screen.
2Press A-B again at your chosen end point.
“A B” appears briefly on the TV screen, and the repeat
sequence begins (“A
s
B” appears the display window).
3To cancel the sequence, press A-B.
Time Search
The Time Search function allows you to start playing at
any chosen time on the disc.
1Press DISPLAY during playback. The on-screen dis-
play appears on the screen.
The Time Search box shows the elapsed playing time of the
current disc.
2Within 10 seconds, press 33/44to select the Time
Search icon in the on-screen display.
The “-:--:--” appears in the Time Search box.
3Within 10 seconds, use the number buttons to enter
the required start time. Enter hours, minutes, and sec-
onds from left to right in the box.
If you enter the wrong numbers, press CLEAR to remove the
numbers you entered. Then enter the correct numbers.
4Within 10 seconds, press ENTER to confirm the start
time.
Playback starts from the selected time on the disc. If you enter
an invalid time, playback will continue from the current point.
3D Surround
This unit can produce a 3D Surround effect, which
simulates multi-channel audio playback from two
conventional stereo speakers, instead of the five or
more speakers normally required to listen to multi-
channel audio from a home theater system.
1Press DISPLAY during playback.
2Use 3or 4to select the sound option.
The sound option will be highlighted.
3Use 1or 2to to select “3D SUR”.
To turn off the 3D Surround effect, select “NORM”.
3D SUR
NORM.
VCD1.1VCD2.0
DVD
-:--:--
0:20:09
DVD
OFF
A B
A *
VCD1.1VCD2.0
DVD
OFF
ALL
TRACK
TITLE
CHAPT
VCD1.1VCD2.0
DVD
VCD1.1VCD2.0
Karaoke DVD
VCD1.1VCD2.0
DVD
VCD1.1VCD2.0
DVD
16

Operation with DVD and Video CD
General Features (continued)
Zoom
The Zoom function allows you to enlarge the video
image and to move through the enlarged image.
1Press ZOOM during playback or still playback to
activate the Zoom function.
If you press ZOOM repeatedly, the magnification level
increases up to six steps.
2Use the 11223344buttons to move through the zoomed
picture.
3Press CLEAR to resume normal playback or return to
the paused image.
Note
The zoom function may not work for some DVDs.
Marker Search
You can start playback from a memorized point. Up to
nine points can be memorized.
To enter a mark, follow these steps.
1During disc playback, press MARKER when
playback reaches the spot that you want to
memorize.
The Marker icon will appear on the TV screen briefly.
2Repeat step 1 to enter up to nine Marker points on a
disc.
To Recall a Marked Scene
1During disc playback, press SEARCH.
The MARKER SEARCH menu will appear on the screen.
2Within 10 seconds, press 1/2to select a Marker
number that you want to recall.
3Press ENTER.
Playback will start from the Marked scene.
4To remove the MARKER SEARCH menu, press
SEARCH.
To clear a Marked Scene
1During disc playback, press SEARCH.
The MARKER SEARCH menu will appear on the screen.
2Press 1/2to select the Marker number that you want
to erase.
3Press CLEAR.
The Marker number will be erased from the list.
4Repeat steps 2 and 3 to erase additional Marker
numbers.
5To remove the MARKER SEARCH menu, press
SEARCH.
Special DVD Features
Checking the contents of DVD Video
discs: Menus
DVDs may offer menus that allow you to access special
features. To use the disc menu, press DVD MENU.
Then, press the appropriate number button to select an
option. Or, use the 11223344buttons to highlight your
selection, then press ENTER.
Title Menu
1Press TITLE.
If the current title has a menu, the menu will appear on the
screen. Otherwise, the disc menu may appear.
2The menu can list camera angles, spoken language
and subtitle options, and chapters for the title.
3To remove the title menu, press TITLE again.
Disc Menu
1Press DVD MENU.
The disc menu is displayed.
2To remove the disc menu, press DVD MENU again.
Camera Angle
If the disc contains scenes recorded at different camera
angles, you can change to a different camera angle
during playback.
Press ANGLE repeatedly during playback to select a
desired angle.
The number of the current angle appears on the display.
Changing the Audio Language
Press AUDIO repeatedly during playback to hear a
different audio language or audio track.
Changing the Audio Channel
Press AUDIO repeatedly during playback to hear a dif-
ferent audio channel (STER., LEFT or RIGHT).
Subtitles
Press SUBTITLE repeatedly during playback to see the
different subtitle languages.
Note
If appears, the feature is not available on the disc.
1 ENG
ABC
DVD
VCD1.1VCD2.0
1 ENG
D
5.1 CH
DVD
1 /1
DVD
DVD
DVD
DVD
MARKER SEARCH
1/9
VCD1.1VCD2.0
DVD
VCD1.1VCD2.0
DVD
OPERATION
17

Operation with Audio CD and MP3/WMA Disc
Playing an Audio CD and
MP3/WMA
Disc
The DVD Player can play MP3/WMA formatted record-
ings on CD-ROM, CD-R or CD-RW discs.
Before playing MP3/WMA recordings, read the notes on
MP3/WMA Recordings on right.
11
Insert a disc and close the tray.
Audio CD; Audio CD menu appears on the TV
screen go to step 4.
MP3/WMA disc; The MP3/WMA-JPEG choice
menu appears on the TV screen. Go to step 2
22
Press 33/44to select the MP3/WMA then press
ENTER.
The MP3/WMA menu appears on the TV screen.
Press RETURN to move to the MP3/WMA-JPEG
choice menu.
33
Press 33/44to select a folder, and ENTER.
Alist of files in the folder appears.
44
Press 33/44to select a track then press PLAY or
ENTER.
Playback starts.
During playback, the current track’s elapsed playing
time will appear on the display window and menu.
Playback will stop at the end of the disc.
Press TITLE to move to the next page.
Press DVD MENU to move to the previous page.
Audio CD menu MP3/WMA menu
Tip
If you are in a file list and want to return to the Folder
list, use the 33/44to highlight and press ENTER to
return to the previous menu screen.
55
To stop playback at any other time, press STOP.
Notes on MP3/WMA Recordings
About MP3
An MP3 file is audio data compressed by using the
MPEG1 audio layer-3 file-coding scheme. We call
files that have the “.mp3” file extension “MP3 files”.
The player can not read an MP3 file that has a file
extension other than “.mp3”.
About WMA(Window Media Audio)
An WMA file is a Microsoft audio compression
technology.
WMA(Windows Media Audio) offers double the audio
compression of the MP3 format.
MP3/WMA Disc compatibility with this player is
limited as follows:
1. Sampling Frequency / only at 44.1kHz (MP3),
22.05 - 44.1kHz (WMA)
2. Bit rate / within 32 - 320kbps (MP3),
32 - 128kbps (WMA)
3. CD-R physical format should be “ISO 9660”
4. If you record MP3/WMA files using the software
which cannot create a FILE SYSTEM, for example
“Direct-CD” etc., it is impossible to playback
MP3/WMA files. We recommend that you use “Easy-
CD Creator”, which creates an ISO9660 file system.
5. A single session disc requires MP3/WMA files in the
first track. If there is no MP3/WMA file in the 1st
track, it cannot playback MP3/WMA files. If you wish
to playback MP3/WMA files, format all the data in
the disc or use a new one.
6. File names should be named using 8 letters or less
and must incorporate “.mp3” or “.wma” extension
e.g. “********.MP3” or “********.WMA”.
7. Do not use special letters such as “/ : * ? “ < > ” etc.
8. Total number of files on the disc should be less than
650.
This DVD player requires discs/recordings to meet
certain technical standards in order to achieve optimal
playback quality. Pre-recorded DVDs are automatically
set to these standards. There are many different types
of recordable disc formats (including CD-R containing
MP3 or WMA files). That require certain pre-existing
conditions (see above) to insure compatible playback.
Customers should also note that permission is
required in order to download MP3/WMA files and
music from the Internet. Our company has no right
to grant such permission. Permission should
always be sought from the copyright owner.
WMA
MP3CD
18
Program
CD
STER. NORM.
0: 56: 18
TRACK01
TRACK02
TRACK03
TRACK04
TRACK05
TRACK06
TRACK07
TRACK08 Clear All
TRACK 1.mp3
TRACK 2.mp3
TRACK 3.mp3
TRACK 4.mp3
TRACK 5.mp3
TRACK 6.mp3
TRACK 7.mp3
TRACK 8.mp3
MP3 WMA
OFF00:00
1
Clear All
Program
JPEG
MP3 WMA
Folder1
Folder2
Folder3
Folder4
Folder5
Folder6
Folder7
Folder8
MP3 WMA
OFF00:00
Clear All
Program

19
OPERATION
Operation with Audio and MP3/WMA Disc (Continued)
Pause
1Press PAUSE/STEP during playback.
2To return to playback, press PLAY or press
PAUSE/STEP again.
Moving to another Track
Press SKIP .or >briefly during
playback to go to the next track or to return to the
beginning of the current track.
Press SKIP .twice briefly to step back to the pre-
vious track.
In case of audio CD, to go directly to any track, enter
the track number using the numbered buttons (0-9)
during playback.
Repeat Track/All/Off
1To repeat the track currently playing, press REPEAT.
The Repeat icon and “TRACK” appears on the menu
screen.
2To repeat all tracks on a disc, press REPEAT a sec-
ond time.
The Repeat icon and “ALL” appears on the menu screen.
3To cancel Repeat mode, press REPEAT a third time.
The Repeat icon and “OFF” appears on the menu screen.
Search
1Press SCAN mor Mduring playback.
The player will now go into SEARCH mode.
2Press SCAN mor Mrepeatedly to select the
required speed: mX2, mX4, mX8 (backward) or
MX2, MX4, MX8 (forward).
Search speed and direction are indicated on the menu
screen.
3To exit SEARCH mode, press PLAY.
Random
1Press RANDOM during playback or when playback is
stopped.
The unit automatically begins Random Playback and
“RAND.” appears on the menu screen.
2To return to normal playback, press RANDOM repeat-
edly until “RAND.” disappears on the menu screen.
Repeat A-B
To repeat a sequence.
1During disc playback, press A-B at your chosen start-
ing point.
The Repeat icon and “A* ” appears on the menu screen.
2Press A-B again at your chosen end point.
The Repeat icon and “A B” appears on the menu screen,
and the sequence begins to play repeatedly.
3To exit the sequence and return to normal play, press
A-B again.
The Repeat icon and “OFF” appears on the menu screen.
3D Surround
This unit can produce a 3D Surround effect, which
simulates multi-channel audio playback from two
conventional stereo speakers, instead of the five or
more speakers normally required to listen to multi-
channel audio from a home theater system.
1Press DISPLAY during playback.
2Use 1or 2to select the sound option.
The sound option will be highlighted.
3Use 3or 4to to select “3D SUR”.
To turn off the 3D Surround effect, select “NORM”.
Changing the Audio Channel
Press AUDIO repeatedly during playback to hear a
different audio channel (STER., LEFT, or RIGHT).
CD
CD
CD
WMA
MP3CD
WMA
MP3CD
WMA
MP3CD
WMA
MP3CD
WMA
MP3CD

Viewing a JPEG disc
This DVD Player can play discs with JPEG files and
Kodak picture CD. Before playing JPEG recordings,
read the notes on JPEG Recordings on right.
11
Insert a disc and close the tray.
The MP3/WMA-JPEG choice menu appears on the
TV screen.
22
Press 33/44to select the JPEG then press
ENTER.
The JPEG menu appears on the TV screen.
33
Press 33/44to select a folder, and ENTER.
Alist of files in the folder appears.
Press RETURN to move to the MP3/WMA-JPEG
choice menu.
Tip
If you are in a file list and want to return to the Folder
list, use the 3/4buttons on the remote to highlight
“” and press ENTER to return to the
previous menu screen.
44
If you want to view a particular file, press 33/44to
highlight a file and press ENTER or PLAY.
Viewing the file proceeding starts.
During viewing a file, press RETURN to move to
the previous menu (JPEG menu).
Press TITLE to move to the next page.
Press DVD MENU to move to the previous page.
Tip
There are three viewing Slide Speed options: Fast,
Normal, Slow, and Off. Press 1/2to highlight the Slide
Speed then press 3/4to select the option you want to
use, and press ENTER.
55
To stop viewing at any other time, press STOP.
The JPEG menu appears.
Moving to another File
Press SKIP .or >once during viewing a picture
to advance to the next file or to the previous file.
Still Picture
1Press PAUSE/STEP during slide show.
The player will now go into PAUSE mode.
2To return to the slide show, press PLAY or press
PAUSE/STEP again.
To flip the picture
Press 33/44during showing a picture to flip the
picture horizontally or a vertically.
To rotate picture
Press 1/2during showing a picture to rotate the
picture clockwise or counter clockwise.
Notes on JPEG Recordings
Depending upon the size and number of the JPEG
files, it could take a long time for the DVD player to
read the disc’s contents. If you don’t see an on-
screen display after several minutes, some of the files
are too big — reduce the resolution of the JPEG files
to less than 2 mega pixels and burn another disc.
Total number of files and folders on the disc should
be less than 650.
Some disc may be incompatible due to different
recording format or condition of disc.
When you are using software such as “Easy CD
Creator” to burn the jpeg files into the CD-R, ensure
that all the selected files have the “.jpg” extensions
when copying into the CD layout.
If the files have “.jpe” or “.jpeg” extensions, please
rename them as “.jpg” files.
File names without “.jpg” extension will not be able to
be read by this DVD player. Even though the files are
shown as JPEG image files in windows explorer.
JPEG
20
Operation with JPEG Disc
Slide Speed
5/32 1024X768
Picture1.jpg
Picture2.jpg
Picture3.jpg
Picture4.jpg
Picture5.jpg
Picture6.jpg
Picture7.jpg
JPEG
Off
Folder1
MP3 WMA
JPEG
5/32 Picture5.jpg1024X768
Slide Speed Off
Folder1
Folder2
Folder3
Folder4
Folder5
Folder6
Folder7
Folder8
JPEG
Table of contents
Other LG DVD Player manuals