LG 38WR50MS User manual

www.lg.com
OWNER’S MANUAL
MONITOR SIGNAGE
38WR50MS
Please read this manual carefully before operating your set and retain it
for future reference.
MONITOR SIGNAGE MODELS
ENG
ENGLISH

2
ENG
ENGLISH
TABLE OF CONTENTS
CONTENTS
4 LICENSES
5 ASSEMBLING AND
PREPARING
5 Accessories
6 Parts
7 StorageMethodforPanelProtection
7 - CorrectMethod
7 - IncorrectMethod
8 Installingonawall
9 EXTERNALEQUIPMENTSETUP
9 - IRRECEIVER
10 REMOTE CONTROL
12 Displayingthedevicenameconnectedto
aninputport
13 USING THE MONITOR SET
13 ConnectingtoaPC
13 - RGBconnection
14 - DVIconnection
14 - HDMIconnection
15 - DisplayPortconnection
15 - IRReceiverconnection
16 Adjustingthescreen
16 - Selectinganimagemode
16 - Customizingimageoptions
17 - CustomizingPCdisplayoptions
17 Adjustingthesound
17 - Selectingansoundmode
18 - Customizingsoundoptions
18 Usingadditionaloptions
18 - Adjustingaspectratio
20 - Usingtheinputlist
21 ENTERTAINMENT
21 - Connectingtoawirednetwork
22 - NetworkStatus
23 - ConnectingUSBstoragedevices
24 - Browsingfiles
26 - Viewingmovies
29 - Viewingphotos
32 - Listeningtomusic
34 - ViewingtheContentsList
35 - DivX®VODGuide
36 - UsingPIP/PBP
37 CUSTOMIZING SETTINGS
37 Accessingthemainmenus
38 - PICTUREsettings
41 - AUDIOsettings
42 - TIMEsettings
43 - OPTIONsettings
46 PictureID
47 - NETWORKsettings
48 MAKING CONNECTIONS
49 ConnectingtoaHDreceiver,DVD,
Camcorder,CameraorGamingDevice
49 - DVIconnection
49 - HDMIconnection
50 ConnectingtotheLAN
50 - LANconnection
50 ConnectingtoaUSB
51 DaisyChainMonitors
51 - RGBCable
51 - DVICable
52 TROUBLESHOOTING
55 SPECIFICATIONS
57 IR CODES

3
ENG
ENGLISH
TABLE OF CONTENTS
58 CONTROLLING THE MULTIPLE
PRODUCT
58 Connectingthecable
58 RS-232CConfigurations
58 CommunicationParameter
59 Commandreferencelist
61 Transmission/Receivingprotocol

ENGLISH
4LICENSES
LICENSES
Supportedlicensesmaydifferbymodel.Formoreinformationofthelicenses,visitwww.lg.com.
HDMI,theHDMIlogoandHigh-DefinitionMultimediaInterfacearetrademarks
orregisteredtrademarksofHDMILicensingLLC.
ABOUTDIVXVIDEO:DivX isadigitalvideoformatcreatedbyDivX,LLC,a
subsidiaryofRoviCorporation.ThisisanofficialDivXCertified devicethat
playsDivXvideo.Visitdivx.comformoreinformationandsoftwaretoolsto
convertyourfilesintoDivXvideos.
ABOUTDIVXVIDEO-ON-DEMAND:ThisDivX
Certified devicemustberegisteredinordertoplaypurchasedDivXVideo-
on-Demand(VOD)movies.Toobtainyourregistrationcode,locatethe
DivXVODsectioninyourdevicesetupmenu.Gotovod.divx.comformore
informationonhowtocompleteyourregistration.
DivXCertified toplayDivX videouptoHD1080p,includingpremium
content.
DivX ,DivXCertified andassociatedlogosaretrademarksofRovi
Corporationoritssubsidiariesandareusedunderlicense.
CoveredbyoneormoreofthefollowingU.S.patents:7,295,673;7,460,668;
7,515,710;7,519,274
ManufacturedunderlicensefromDolbyLaboratories.Dolbyandthedouble-D
symbolaretrademarksofDolbyLaboratories.

5
ENG
ENGLISH
ASSEMBLING AND PREPARING
Theaccessoriessuppliedwithyourproductmayvarydependingonthemodel.
Productspecificationsorcontentsinthismanualmaybechangedwithoutpriornoticeduetoupgrade
ofproductfunctions.
ASSEMBLING AND PREPARING
Accessories
Checkyourproductboxforthefollowingitems.Ifthereareanymissingaccessories,contactthelocal
dealerwhereyoupurchasedyourproduct.Theillustrationsinthismanualmaydifferfromtheactualproduct
andaccessories.
Donotuseanypirateditemstoensurethesafetyandproductlifespan.
Anydamagesorinjuriesbyusingpirateditemsarenotcoveredbythewarranty.
CAUTION
NOTE
P
A
G
E
INPUT
ENERGY
SAVING
MARK
ARC
ON
OFF
. , !
ABC
DEF
GHI
JKL
MNO
PQRS
TUV
1/a/A
- * #
WXYZ
CLEAR
MONITOR
PSM
AUTO
MUTE
BRIGHT
NESS
MENU
POWER
OK
S.MENU
ID
BACK TILE
ON OFF
EXIT
Remote Control
and Batteries
Power Cord
IR Receiver CD (Owner's Manual,
SuperSign Elite-w Program/
SuperSign Manual) / Card
RGB Cable

6
ENG
ENGLISH
ASSEMBLING AND PREPARING
Screen Marks
Screen Buttons
Parts
Connection panel
Power Indicator
LEDOn:Powerison
LEDOff:Powerisoff
Screen Marks Description
INPUT Changestheinputsource.
MENU Accessesthemainmenus,orsavesyourinputandexitsthemenus.
Adjusttheupanddown.
Adjuststhevolumelevel.
AUTO/SET Displaysthecurrentsignalandmode.
Pressthisbuttontoadjustthescreenautomatically(availableonlyinRGBmode)
Turnsthepoweronoroff.
PowerIndicator ThisIndicatorlightsupredwhenthedisplayoperatesnormally(onmode).Ifthedisplay
Insleepmode(InPowerSavingmode),thisindicatorcolorchangestoamber.
YoucansetthePowerindicatortoonoroffbyselectingOPTIONinthemainmenu.
NOTE

7
ENG
ENGLISH
ASSEMBLING AND PREPARING
Correct Method Incorrect Method
Storage Method for Panel Protection
Iftheproductneedstobesetupright,holdboth
sidesoftheproduct,andtiltbackwardcarefully
for.Donotletthepanelnottotouchthefloor.
Whenlayingdowntheproduct,layacushionona
flatfloor.Puttheproductonitwiththepanelof
theproductfacingdown.
Ifthereisnotacushionavailable,ensuretheflooris
cleanandthenlaytheproductdowncarefullywiththe
panelfacingeitherupwardordownward.
Atthistime,
becarefulforobjectsnottofallonthepanel.
Iftheproductistiltedontothebezel,thebottomof
thepanelmaybedamaged.
Iftheproductistiltedontotheedgeofthe panel,
thepanelmaybedamaged.
Panel
Panel
Panel
Panel
Cushion
Panel

8
ENG
ENGLISH
ASSEMBLING AND PREPARING
Disconnectthepowercordfirst,andthen
moveorinstalltheMonitorset.Otherwise
electricshockmayoccur.
IfyouinstalltheMonitorsetonaceilingor
slantedwall,itmayfallandresultinsevere
injury.
Donotovertightenthescrewsasthismay
causedamagetotheMonitorsetandvoid
yourwarranty.
Usethescrewsandwallmountsthat
meettheVESAstandard.Anydamages
orinjuriesbymisuseorusinganimproper
accessoryarenotcoveredbythewarranty.
CAUTION
NOTE
Donotinstalltheproductinaplacewith
noventilation(e.g.,onabookshelforina
closet)oronacarpetorcushion.Ifthereis
nootheroptionbuttomounttheproducton
thewall,makesurethatsufcientventilation
isprovidedbeforeinstallation.
-Failuretodosomayresultinaredueto
theincreaseintheinternaltemperature.
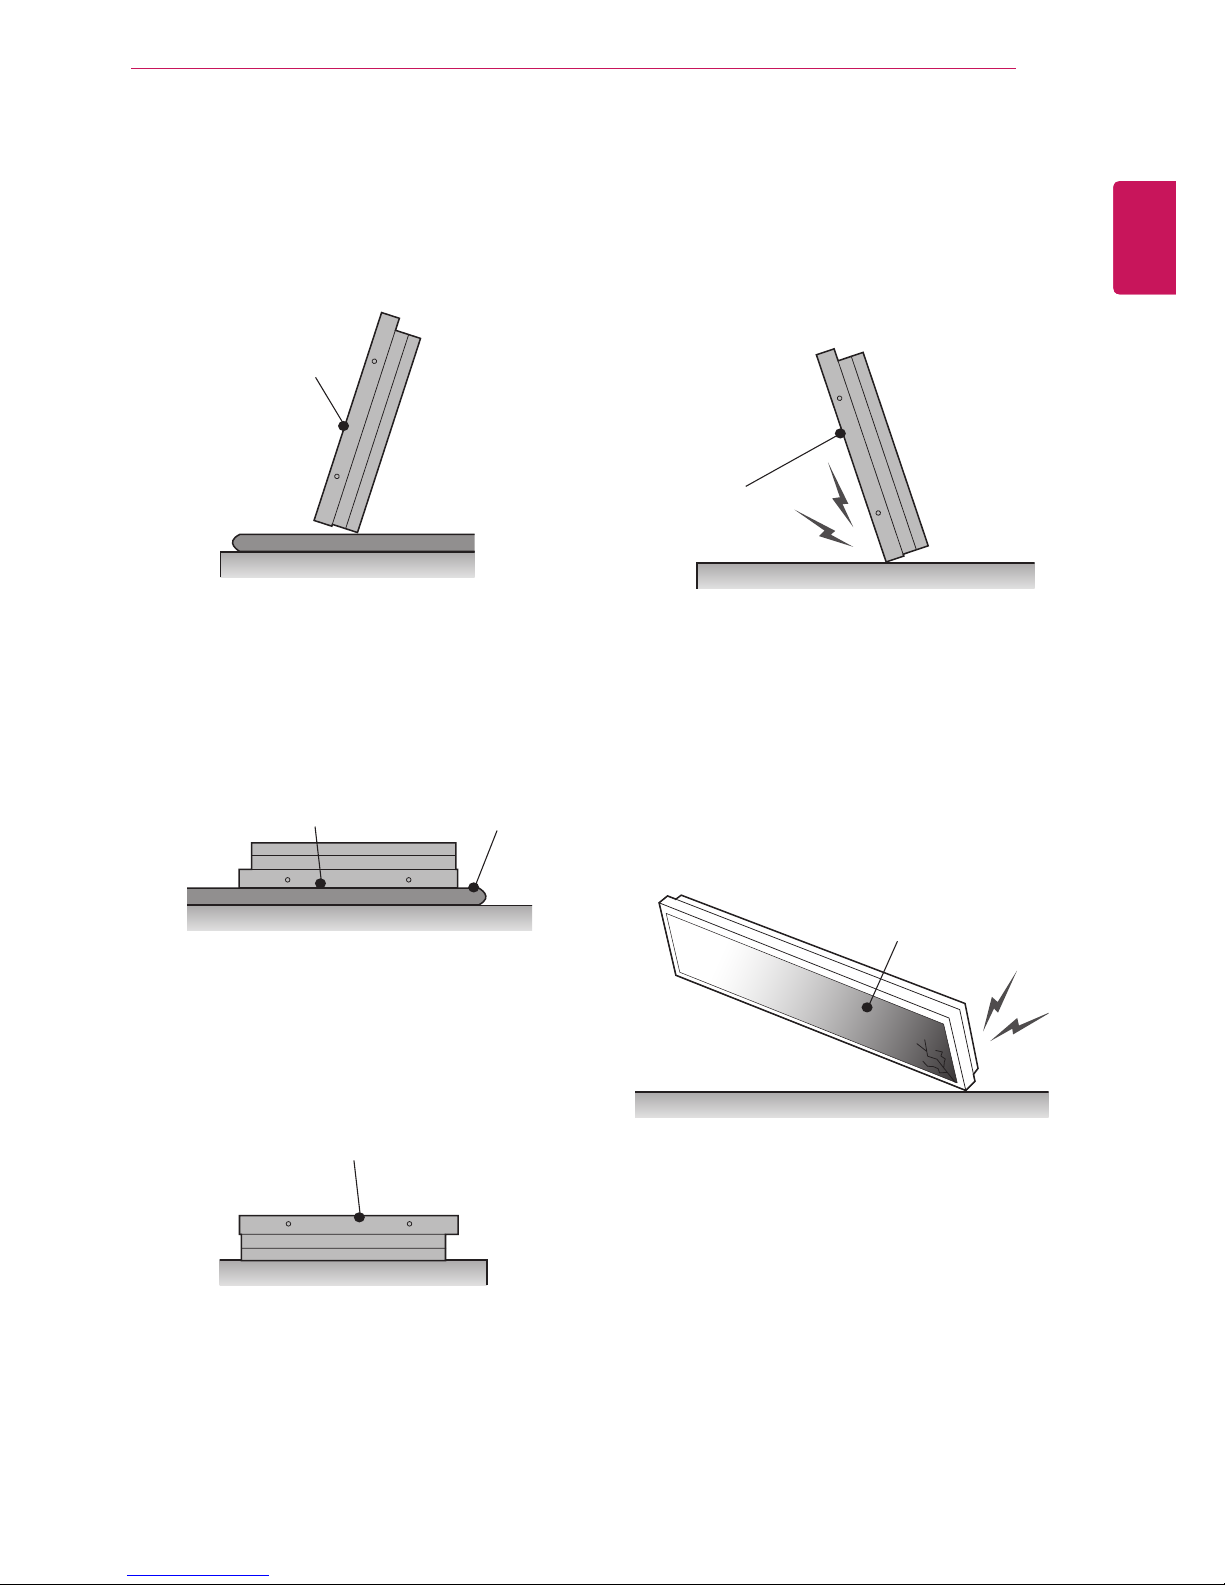
Installthemonitoratleast10cmawayfromthe
wallandleaveabout10cmofspaceateachside
ofthemonitortoensuresufficientventilation.
Usethewallmountplateandscrewsthatcomply
withtheVESAstandard.
Installing on a wall
ToinstalltheMonitoronawall(Optional),usethe
VESAscrews(notincluded)tofastenit.
10cm
10cm
10cm 10cm
20cm

9
ENG
ENGLISH
ASSEMBLING AND PREPARING
EXTERNAL EQUIPMENT SETUP
IR RECEIVER
Thisallowsaremotecontrolsensortobeplacedinacustomlocation.Thenthatdisplaycancontrolother
displaysviaanRS-232Ccable.
GB OUT
GB IN
AUDIO IN
REMOTE
S
S
LAN

10
ENG
ENGLISH
REMOTE CONTROL
REMOTE CONTROL
P
A
G
E
INPUT
ENERGY
SAVING
MARK
ARC
ON
OFF
1
. , !
2
ABC
3
DEF
4
GHI
5
JKL
6
MNO
7
PQRS
8
TUV
9
1/a/A
0
- * #
WXYZ
CLEAR
OK
S.MENU
MONITOR
PSM
AUTO
MUTE
BRIGHT
NESS
MENU
ID
BACK TILE
ON OFF
EXIT
POWER
P
A
G
E
INPUT
ENER
GY
SAVING
MARK
ARC
1
.
,
!
2
ABC
3
D
E
F
4
G
HI
5
J
K
L
6
M
N
O
7
PQ
R
S
7
7
8
T
U
V
9
1/a/A
0
- * #
WXYZ
C
LEA
R
ON
OF
F
MONITOR
MONITOR
PSM
MU
T
E
BRI
G
H
T
NESS
PO
WE
R
Thedescriptionsinthismanualarebasedonthebuttonsoftheremotecontrol.Pleasereadthismanual
carefullyandusetheMonitorsetcorrectly.
Toreplacebatteries,openthebatterycover,replacebatteries(1.5VAAA)matching and endstothe
labelinsidethecompartment,andclosethebatterycover.
Toremovethebatteries,performtheinstallationactionsinreverse.
Donotmixoldandnewbatteries,asthis
maydamagetheremotecontrol.
Makesuretopointtheremotecontroltothe
remotecontrolsensorontheMonitorset.
CAUTION
P
A
G
E
INPUT
ENERGY
SAVING
MARK
ARC
ON
OFF
. , !
ABC
DEF
GHI
JKL
MNO
PQRS
TUV
1/a/A
- * #
WXYZ
CLEAR
OK
S.MENU
MONITOR
PSM
AUTO
MUTE
BRIGHT
NESS
MENU
ID
BACK TILE
ON OFF
EXIT
POWER
(POWER)
TurnstheMonitorsetonoroff.
Monitor On / Off
Turnoffthemonitorandthen
turnitbackon.
1/a/A Button
Togglesbetweennumerical
andalphabetical.
ENERGY SAVING( )
Adjuststhebrightnessof
thescreentoreduceenergy
consumption.
INPUT
Selectstheinputmode.
Number and Alphabet buttons
Entersnumericaloralphabetical
charactersdependingonthe
setting.
CLEAR
Deletestheenterednumerical
oralphabeticalcharacter.
PSM
SelectsthePictureStatus
Mode.
MUTE
Mutesallsounds.
Volume Up / Down
Adjuststhevolumelevel. Brightness Key
Adjustthebrightnessby
pressingtheUpandDown
buttonsontheremotecontrol.
InUSBmode,theOSDmenu
hasthePagefunctionto
movetothenextfilelist.
ARC
SelectstheAspectRatio
Mode.
MARK
Selectsaspecificfileinthe
USBmode.

11
ENG
ENGLISH
REMOTE CONTROL
P
A
G
E
INPUT
ENERGY
SAVING
MARK
ARC
ON
OFF
. , !
ABC
DEF
GHI
JKL
MNO
PQRS
TUV
1/a/A
- * #
WXYZ
CLEAR
OK
S.MENU
MONITOR
PSM
AUTO
MUTE
BRIGHT
NESS
MENU
ID
BACK TILE
ON OFF
EXIT
POWER
S.MENU
(SuperSignMenuKey)
Thisbuttonselectionisnot
applicable.
EXIT
Clearsallon-screendisplays
andreturnstoMonitorset
viewingfromanymenu.
TILE
Thecurrentmodeldoesnot
supportthisfunction.
MENU (Seep.37)
Accessesthemainmenus
orsavesyourinputandexit
menus.
Navigation buttons
Scrollsthroughmenusor
options.
OK
Selectsmenusoroptionsand
confirmsyourinput.
BACK
Allowstheusertomoveback
onestepinuserinteraction
function.
USB Menu control buttons
Controlsmediaplayback.
ID ON/OFF
WhenthenumberofPicture
IDisequaltoSetIDyoucan
controlthemonitorwhich
youwantinthemultidisplay
condition.
AUTO
Automaticallyadjustspicture
positionandminimizesimage
instability.(RGBinputonly)
P
A
G
E
INPUT
ENERGY
SAVING
MARK
ARC
ON
OFF
1
. , !
2
ABC
3
DEF
4
GHI
5
JKL
6
MNO
7
PQRS
8
TUV
9
1/a/A
0
- * #
WXYZ
CLEAR
OK
S.MENU
MONITOR
PSM
AUTO
MUTE
BRIGHT
NESS
MENU
ID
BACK TILE
ON OFF
EXIT
POWER
OK
S
.MEN
U
A
U
T
O
MEN
U
ID
BA
C
K
T
IL
E
ON
O
FF
E
XIT

12
ENG
ENGLISH
REMOTE CONTROL
Displaying the device name connected to an input port
Displaywhichdevicesareconnectedtowhich
externalinputports.
P
A
G
E
INPUT
ENERGY
SAVING
MARK
ARC
ON
OFF
. , !
ABC
DEF
GHI
JKL
MNO
PQRS
TUV
1/a/A
- * #
WXYZ
CLEAR
OK
S.MENU
MONITOR
PSM
AUTO
MUTE
BRIGHT
NESS
MENU
ID
BACK TILE
ON OFF
EXIT
POWER
P
A
G
E
INPUT
ENERGY
SAVING
MARK
ARC
ON
OFF
. , !
ABC
DEF
GHI
JKL
MNO
PQRS
TUV
1/a/A
- * #
WXYZ
CLEAR
OK
S.MENU
MONITOR
PSM
AUTO
MUTE
BRIGHT
NESS
MENU
ID
BACK TILE
ON OFF
EXIT
POWER
1 AccesstheInputlistscreenandpresstheblue
(inputlabel)buttonontheremotecontrol.
2 Youcanassignaninputlabelforeveryinput
exceptUSB.
Externalinputssupported:HDMI,DVI-D,
DisplayPort
Labelsavailable:DTV,PC
TheinputlabelsaredisplayedontheInput
Labelscreenoratthetopleftofthescreen
whenyouchangetheexternalinputsetting.
ForDTV/PC-compatiblesignals,suchas
1080p60Hz,thescreensettingsmay
changeaccordingtotheinputlabel.TheJust
ScanoptionisavailableifaPCisconnected
asanexternaldevice.
NOTE
InputLabel
Close
HDMI
DVI-D
DisplayPort

13
ENG
ENGLISH
USING THE MONITOR SET
Connecting to a PC
Your Monitor set supports the Plug & Play* feature.
* Plug & Play: A PC will have a built-in driver for
the monitor, no extra software is needed.
Connect the signal
input cable and tighten
it by turning the screws
clockwise.
RGB connection
Transmits the analog video signal from your PC to
the Monitor set. Connect the PC and the Monitor
set with the 15 pin signal cable as shown the
following illustrations.
Select RGB input.
NOTE
It is recommended to use the Monitor set
with the HDMI connection for the best image
quality.
To comply with the specifications of the
product, use a shielded interface cable with
ferrite core, such as D-sub 15 pin cable and
DVI/HDMI cable provided with the product.
If you turn the Monitor set on when the set
becomes cold, the screen may flicker. This is
normal.
Some red, green, or blue spots may appear
on the screen. This is normal.
Do not press the screen with your finger for
a long time as this may result in temporary
distortion on the screen.
Avoid displaying a fixed image on the
screen for a long period of time to prevent
image burn. Use a screensaver if possible.
CAUTION
Use the standard Macintosh
adapter since an incompatible
adapter is available in the
market. (Different signaling
system)
Apple computers may require an adapter to
connect to this monitor. Call or visit their web
site for more information.
NOTE
PC
Macintosh Adapter
(not included)
PC/MAC
(not included)
Back of the product.

14
ENG
ENGLISH
USING THE MONITOR SET
DVI connection
TransmitsdigitalvideosignalfromyourPCto
theMonitorset.ConnectthePCandtheMonitor
setwiththeDVIcableasshownthefollowing
illustrations.
SelectDVIinput.
HDMI connection
Transmitsdigitalvideoandaudiosignalsfromyour
PCtotheMonitorset.ConnectthePCandthe
MonitorsetwiththeHDMIcableasshowninthe
followingillustrations.
SelectHDMIinput
UseaHighSpeedHDMI™Cable.
PleasecheckthePCenvironmentifyou
cannothearthesoundinHDMImode.
SomePCsrequireyoutomanuallychange
thedefaultaudiooutputtoHDMI.
IfyouwanttouseHDMI-PCmode,you
mustsettheinputlabeltoPCmode.
WhenHDMIPCisused,acompatiblity
problemcouldoccur.
NOTE
(notincluded) (notincluded)
PC PC
(notincluded)
PC
Backoftheproduct. Backoftheproduct.

15
ENG
ENGLISH
USING THE MONITOR SET
IR Receiver connection
AllowstheuseofawiredremoteorIRreceiver
extension.
Display Port connection
Transmitsdigitalvideoandaudiosignalsfrom
yourPCtotheMonitor.ConnectthePCandthe
MonitorwiththeDisplayPortcableasshownin
thefollowingillustrations.
SelectDisplayPortinputsource.
Soundmaynotbeavailabledependingon
theDPversionofyourPC.
NOTE
(notincluded)
PC
Backoftheproduct.
Backoftheproduct.

16
ENG
ENGLISH
USING THE MONITOR SET
Adjusting the screen
Selecting an image mode
Displayimagesinitsoptimizedsettingsby
selectingoneofthepresetimagemodes.
1 PressMENUtoaccessthemainmenus.
2 PresstheNavigationbuttonstoscrollto
PICTUREandpressOK.
3 PresstheNavigationbuttonstoscrollto
Picture ModeandpressOK.
4 PresstheNavigationbuttonstoscrolltoan
imagemodeyouwantandpressOK.
Customizing image options
Customizebasicandadvancedoptionsofeach
imagemodeforthebestscreenperformance.
1 PressMENUtoaccessthemainmenus.
2 PresstheNavigationbuttonstoscrollto
PICTUREandpressOK.
3 PresstheNavigationbuttonstoscrollto
Picture ModeandpressOK.
4 PresstheNavigationbuttonstoscrolltoan
imagemodeyouwantandpressOK.
5 Selectandadjustfollowingoptions,andthen
pressOK.
Mode Description
Vivid Adjuststhevideoimagefortheretail
environmentbyenhancingthecontrast,
brightness,color,andsharpness.
Standard Adjuststheimageforthenormal
environment.
Cinema Optimizesthevideoimageforacinematic
looktoenjoymoviesasifyouareina
movietheater.
Sport Optimizesthevideoimageforhighand
dynamicactionsbyemphasizingprimary
colorssuchaswhite,grass,orskyblue.
Game Optimizesthevideoimageforafast
gamingscreensuchasPCsorgames.
5 Whenyouarefinished,pressEXIT.
Whenyoureturntothepreviousmenu,press
BACK.
Option Description
Backlight Adjuststhebrightnessofthescreen
bycontrollingtheLCDbacklight.If
youdecreasethebrightnesslevel,
thescreenbecomesdarkerandthe
powerconsumptionwillbereduced
withoutanyvideosignalloss.
Contrast Increasesordecreasesthegradient
ofthevideosignal.Youmayuse
Contrastwhenthebrightpartofthe
pictureissaturated.
Brightness Adjuststhebaselevelofthesignalin
thepicture.YoumayuseBrightness
whenthedarkpartofthepictureis
saturated.
Sharpness Adjuststhelevelofcrispnessinthe
edgesbetweenthelightanddark
areasofthepicture.Thelowerthe
level,thesoftertheimage.
Color Adjustsintensityofallcolors.
Tint Adjuststhebalancebetweenredand
greenlevels.
Color Temp. SettowarmtoenhancehotterColors
suchasred,orsettocooltomake
picturebluish.
Advanced
Control
Customizestheadvancedoptions.
RefertotheAdvancedimageoptions.
Picture Reset Restorestheoptionstothedefault
setting.
6 Whenyouarefinished,pressEXIT.
Whenyoureturntothepreviousmenu,press
BACK.

17
ENG
ENGLISH
USING THE MONITOR SET
Customizing PC display options
Customizeoptionsofeachimagemodeforthe
bestimagequality.
Thisfunctionworksinthefollowingmode:
RGB[PC]mode.
1 PressMENUtoaccessthemainmenus.
2 PresstheNavigationbuttonstoscrollto
PICTUREandpressOK.
3 PresstheNavigationbuttonstoscrollto
ScreenandpressOK.
4 Selectandadjustfollowingoptions,andthen
pressOK.
Option Description
Resolution Selectsaproperresolution.See
“CustomizingPCdisplayoptions”.
Auto
Config.
Setstoadjustthescreenposition,clock,
andphaseautomatically.
Thedisplayedimagemaybeunstablefor
afewsecondswhiletheconfigurationis
inprogress.
Position/
Size/Phase
Adjuststheoptionswhenthepictureis
notclear,especiallywhencharactersare
shaky,aftertheautoconfiguration.
Reset Restorestheoptionstothedefault
setting.
5 Whenyouarefinished,pressEXIT.
Whenyoureturntothepreviousmenu,press
BACK.
Adjusting the sound
Selecting an sound mode
Playthesoundinitsoptimizedsettingsby
selectingoneofthepresetsoundmodes.
1 PressMENUtoaccessthemainmenus.
2 PresstheNavigationbuttonstoscrollto
AUDIOandpressOK.
3 PresstheNavigationbuttonstoscrolltoSound
ModeandpressOK.
4 PresstheNavigationbuttonstoscrolltoa
soundmodeyouwantandpressOK.
Mode Description
Standard Selectwhenyouwantstandard-quality
sound.
Music Selectwhenyoulistentomusic.
Cinema Selectwhenyouwatchmovies.
Sports Selectwhenyouwatchsportsevents.
Game Selectwhenyouplaygames.
5 Whenyouarefinished,pressEXIT.
Whenyoureturntothepreviousmenu,press
BACK.

18
ENG
ENGLISH
USING THE MONITOR SET
Customizing sound options
Customizeoptionsofeachsoundmodeforthe
bestsoundquality.
1 PressMENUtoaccessthemainmenus.
2 PresstheNavigationbuttonstoscrollto
AUDIOandpressOK.
3 PresstheNavigationbuttonstoscrolltoSound
ModeandpressOK.
4 PresstheNavigationbuttonstoscrolltoa
soundmodeyouwantandpressOK.
5 Selectandadjustfollowingoptions,andthen
pressOK.
Option Description
Infinite
Sound
LG'sInfinitySoundoptionprovides5.1
channelstereosoundqualityfromtwo
speakers.
Treble Increasestheintensityofthehigh
frequencypartofaudio.
Bass Increasestheintensityofthelow
frequencypartofaudio.
Reset Resetsthesoundmodetothedefault
setting.
6 Whenyouarefinished,pressEXIT.
Whenyoureturntothepreviousmenu,press
BACK.
Using additional options
Adjusting aspect ratio
Resizetheimagetoviewtheimageatitsoptimal
sizebypressingARC whileyouarewatching
Monitorset.
Ifafixedimagedisplaysonthescreenfor
alongperiodoftime,itcouldbeimprinted
andbecomeapermanentdisfigurementon
thescreen.Thisis“imageburn”or“burn-in”
andnotcoveredbythewarranty.
Iftheaspectratioissetto4:3foralong
periodoftime,imageburnmayoccuron
theletterboxedareaofthescreen.
CAUTION
Youcanalsochangetheimagesizeby
accessingthemainmenus.
NOTE
MODE
ARC
RGB Display
Port
DVI-D HDMI
PC DTV PC PC DTV PC
16:4 o o o o o o
Just Scan x o x x o x
1:1 o x o o x o
4:3 o o o o o o
TOP o o o o o o

19
ENG
ENGLISH
USING THE MONITOR SET
-4:3 :Thisselectionwillallowyoutoviewa
picturewithanoriginal4:3aspectratio,black
barswillappearonboththeleftandrightofthe
screen.
-TOP :Thisselectionwillallowyoutodisplayonly
theupperpartofthevideoinput.
-16:4 :Thisselectionwillallowyoutoadjustthe
picturehorizontally,inlinearproportion,tofillthe
entirescreen(usefulforviewing4:3formatted
DVDs).
-Just Scan :ThisSelectionwillallowyouview
thepictureofbestqualitywithoutlossoforiginal
pictureinhighresolutionimage.Note:Ifthereis
noiseinoriginalPicture,Youcanseethenoise
attheedge.
-1:1 :Theaspectratioisnotadjustedfromthe
original.(OnlyDisplayPortPC,HDMIPC,
DVI-DPC,RGBPC)
Just Scan

20
ENG
ENGLISH
USING THE MONITOR SET
Using the input list
Selecting an input source
1 PressINPUTtoaccesstheinputsourcelist.
2 PresstheNavigationbuttonstoscrolltooneof
theinputsourcesandpressOK.
Input source Description
RGB ViewaPCdisplayonthescreen
DVI-D ViewaPCdisplayonthescreen
HDMI WatchcontentsfromaPC,DVD
ofDigitalset-topboxotherhigh
definitiondevices
Display Port WatchcontentsinaPC,DVD
ofDigitalset-topboxotherhigh
definitiondevices
USB Playsthemultimediafilesavedin
theUSB.
Other manuals for 38WR50MS
1
This manual suits for next models
2
Table of contents
Other LG Monitor manuals