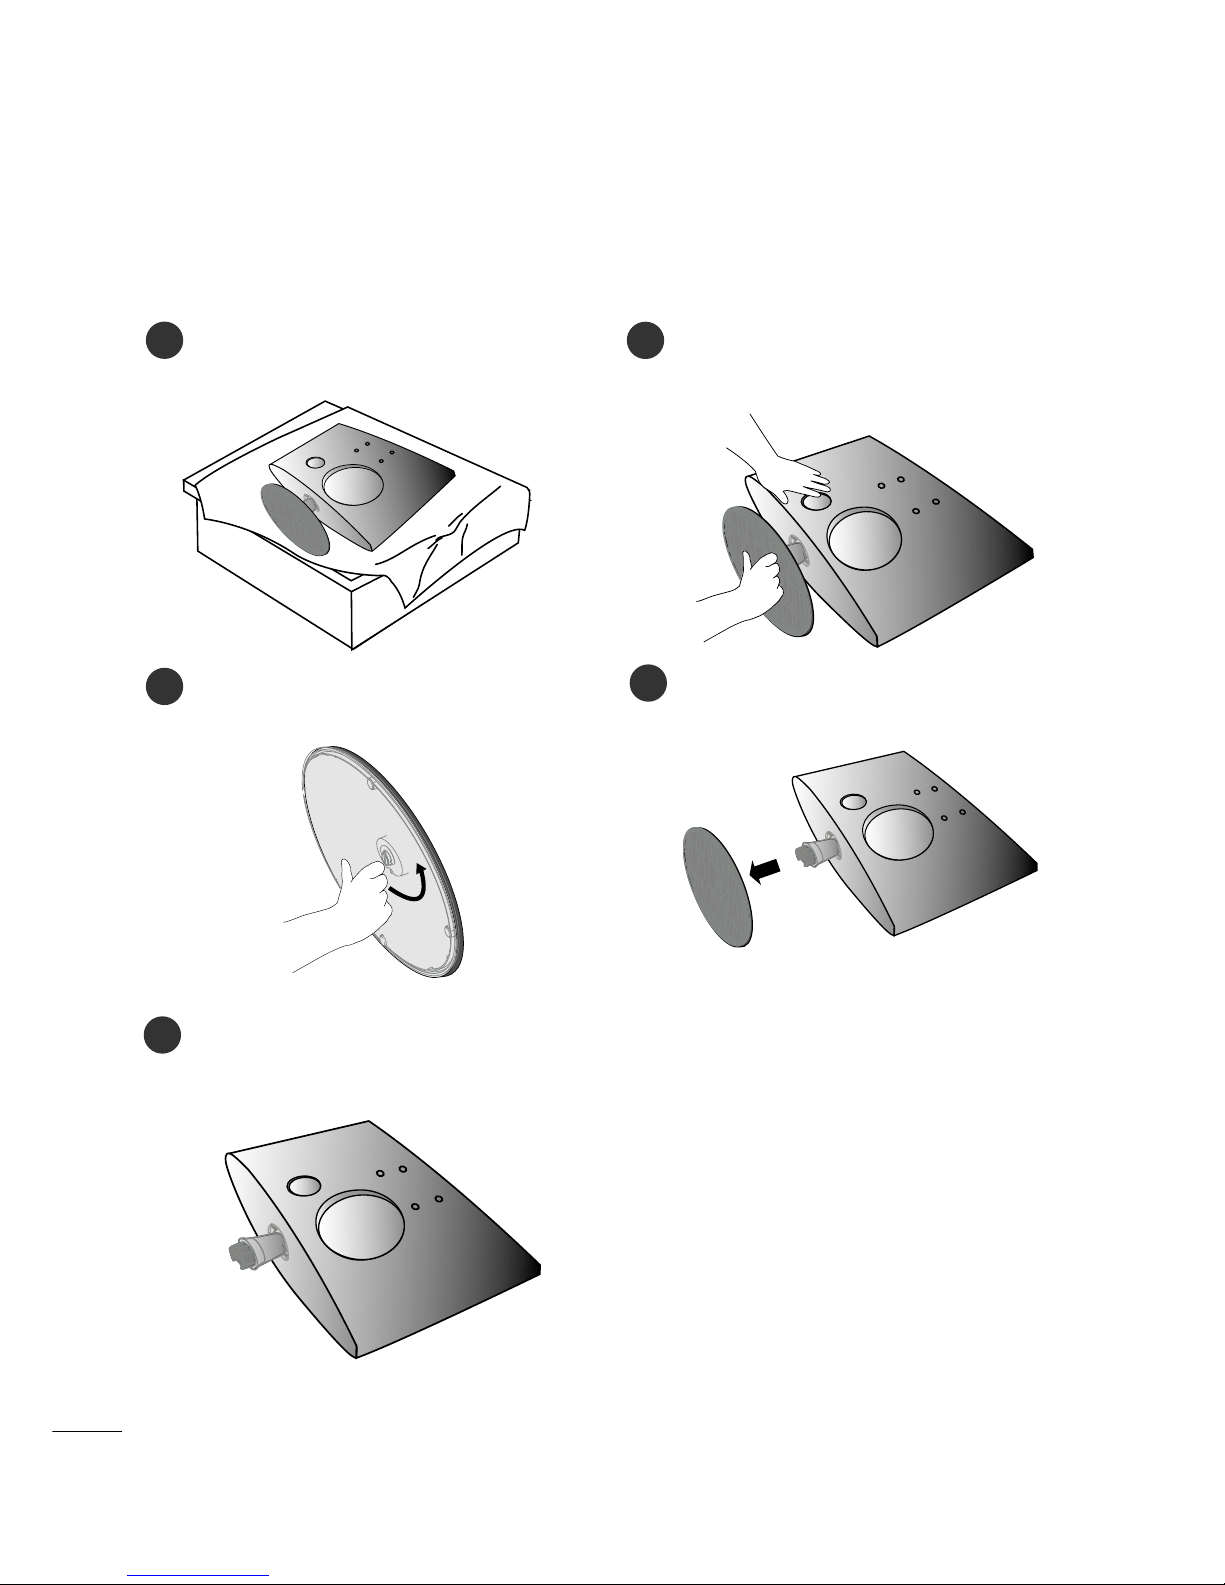
manuals.online logo
Brands
  1. Home
  2. •
  3. Brands
  4. •
  5. LG
  6. •
  7. Monitor
  8. •
  9. LG M227WA User manual

LG M227WA User manual

Other manuals for M227WA

1

This manual suits for next models

1

Other LG Monitor manuals

LG Flatron F700P User manual

LG

LG Flatron F700P User manual

LG W2241S-BF User manual

LG

LG W2241S-BF User manual

LG E2260V-PN User manual

LG

LG E2260V-PN User manual

LG 25UM65 User manual

LG

LG 25UM65 User manual

LG 24CK550Z-BP.AUB User manual

LG

LG 24CK550Z-BP.AUB User manual

LG 32MR50C User manual

LG

LG 32MR50C User manual

LG M4214C User manual

LG

LG M4214C User manual

LG Flatron W1953S User manual

LG

LG Flatron W1953S User manual

LG UltraWide 49WQ950G User manual

LG

LG UltraWide 49WQ950G User manual

LG W2254V-PF User manual

LG

LG W2254V-PF User manual

LG UltraGear 24GN65R-B User manual

LG

LG UltraGear 24GN65R-B User manual

LG Flatron L1510B User manual

LG

LG Flatron L1510B User manual

LG 29WL50S User manual

LG

LG 29WL50S User manual

LG 22MB35PU User manual

LG

LG 22MB35PU User manual

LG 32MB25VQ User manual

LG

LG 32MB25VQ User manual

LG 42PQ30 Series Installation guide

LG

LG 42PQ30 Series Installation guide

LG 27MP68VQ-P User manual

LG

LG 27MP68VQ-P User manual

LG Flatron L1515S User manual

LG

LG Flatron L1515S User manual

LG W2230S-EF User manual

LG

LG W2230S-EF User manual

LG MU-42PZ90XC User manual

LG

LG MU-42PZ90XC User manual

LG Flatron L1710BK User manual

LG

LG Flatron L1710BK User manual

LG 27MK600MB User manual

LG

LG 27MK600MB User manual

LG Flatron W1952TE User manual

LG

LG Flatron W1952TE User manual

LG Flatron F700P (F700PJ-ALE) User manual

LG

LG Flatron F700P (F700PJ-ALE) User manual

Popular Monitor manuals by other brands

Samsung ME32C user manual

Samsung

Samsung ME32C user manual

ViewSonic VA926-LED user guide

ViewSonic

ViewSonic VA926-LED user guide

Furuno Mu 120c Operator's manual

Furuno

Furuno Mu 120c Operator's manual

Asus VB171D - 17" LCD Monitor Service manual

Asus

Asus VB171D - 17" LCD Monitor Service manual

AOC 9GLR Technical specifications

AOC

AOC 9GLR Technical specifications

DMG RAFFAELLO manual

DMG

DMG RAFFAELLO manual

AOC LM720 - 17" Technical specifications

AOC

AOC LM720 - 17" Technical specifications

Sony Trinitron GDM-F500 Service manual

Sony

Sony Trinitron GDM-F500 Service manual

Memorex MT1701 user guide

Memorex

Memorex MT1701 user guide

ViewSonic VE510s-4 Service manual

ViewSonic

ViewSonic VE510s-4 Service manual

Farenheit T-1503CM instruction manual

Farenheit

Farenheit T-1503CM instruction manual

Ditel DINOS DN129/AT Quick installation guide

Ditel

Ditel DINOS DN129/AT Quick installation guide

Sony SDM-S51 Specifications

Sony

Sony SDM-S51 Specifications

Kenwood DMX1025BT quick start guide

Kenwood

Kenwood DMX1025BT quick start guide

Dell S2409WFP user guide

Dell

Dell S2409WFP user guide

EverFocus EN-7517E instruction manual

EverFocus

EverFocus EN-7517E instruction manual

Dell P3222QE user guide

Dell

Dell P3222QE user guide

Panasonic TH152UX1 - 152" PLASMA TV Service manual

Panasonic

Panasonic TH152UX1 - 152" PLASMA TV Service manual

manuals.online logo
manuals.online logoBrands
  • About & Mission
  • Contact us
  • Privacy Policy
  • Terms and Conditions

Copyright 2025 Manuals.Online. All Rights Reserved.

Make sure to read the Safety Precautions before
using the product.
Keep the User's Guide(CD) in an accessib e p ace
for furture reference.
See the abe attached on the product and give the
information to your dea er when you ask for service.
OWNER’S MANUAL
MM222277WWAA
MM223377WWAA
1
PREPARATION
FRONT PANEL CONTROLS
■
This is a simp ified representation of the front pane . The image shown may be somewhat different from your
set.
INPUT MENU VOL CHENTER
CHANNEL
Buttons
VOLUME
Buttons
MENU
Button
ENTER
Button
INPUT
Button
Power
Button
Headphone
Ja k
<<MM222277WWAA>><<MM223377WWAA>>
2
PREPARATION
BACK PANEL INFORMATION
■
This is a simp ified representation of the back pane . The image shown may be somewhat different from your
set.
AC IN
AC IN
AUDIO IN
(RGB/DVI)
VIDEO
COMPONENT
IN
AV IN
VIDEO AUDIO
(MONO)
S-VIDEO
AUDIO
Y
P
B
P
R
L
R
DVI-D IN (PC)
RS-232C IN
(CONTROL & SERVICE)
HDMI IN
1
2
AC IN
ANTENNA/
CABLE IN
LR
RGB IN (PC)
2
11
910
8
4 6 73 5
PPoowweerr CCoorrdd SSookkeett
This set operates on AC power. The voltage is indi-
ated on the Spe ifi ations page. Never attempt to
operate the set on DC power.
HHDDMMII IInnppuutt
Conne t a HDMI signal to HDMI IN.
Or DVI (VIDEO) signal to HDMI IN with DVI to
HDMI able.
RRGGBB//DDVVII AAuuddiioo IInnppuutt
Conne t the audio from a PC.
RRGGBB IInnppuutt ((PPCC))
Conne t the output from a PC.
CCoommppoonneenntt IInnppuutt
Conne t a omponent video/audio devi e to these
ja ks.
AAVV((AAuuddiioo//VViiddeeoo)) IInnppuutt
Conne t audio/video output from an external
devi e to these ja ks.
AAnntteennnnaa IInnppuutt
Conne t over-the-air signals to this ja k.
DDVVII--DD IInnppuutt((PPCC))
Conne t the output from a PC.
RRSS--223322CC IINN ((CCOONNTTRROOLL && SSEERRVVIICCEE)) PPOORRTT
Conne t to the RS-232C port on a PC.
SS--VViiddeeoo IInnppuutt
Conne t S-Video out from an S-VIDEO devi e.
1
2
3
4
5
6
7
8
9
10
3
PREPARATION
STAND INSTALLATION
■
The image shown may be somewhat different from your set.
1
2
3
Carefu y p ace the product screen side down on a
cushioned surface that wi protect product and
screen from damage.
Insert the ssttaanndd bbaasseeinto the product
Attach the monitor to the Stand Base by turning
the screw to the right.
* Turn the screw by using the screw hand e
Screw
<M227WA>
4
PREPARATION
STAND INSTALLATION
■
The image shown may be somewhat different from your set.
1
2
3
Carefu y p ace the product screen side down on a
cushioned surface that wi protect product and
screen from damage.
Insert the ssttaanndd bbaasseeinto the product
Attach the monitor to the Stand Base by turning
the screw to the right.
* Turn the screw by using the screw hand e
Screw
<M237WA>
5
PREPARATION
DETACHING STAND
12
3
P ace the set screen side down on a cushion or
soft c oth.
Detach the monitor to the Stand Base by turn-
ing the screw to the eft.
Turn the screw by using the screw hand e 4
Pu the stand base.
5
■
The image shown may be somewhat different from your set.
<M227WA>
6
PREPARATION
DETACHING STAND
12
3
P ace the set screen side down on a cushion or
soft c oth.
Detach the monitor to the Stand Base by turn-
ing the screw to the eft.
Turn the screw by using the screw hand e 4
Pu the stand base.
5
■
The image shown may be somewhat different from your set.
<M237WA>
7
PREPARATION
DESKTOP PEDESTAL INSTALLATION
For proper ventilation, allow a learan e of 4 in hes on ea h side and from the wall.
4 inches
4 inches
4 inches
4 inches
WALL MOUNT: HORIZONTAL INSTALLATION
For proper ventilation, allow a learan e of 4 in hes on ea h side and from the wall. Detailed installation
instru tions are available from your dealer, see the optional Tilt Wall Mounting Bra ket Installation and
Setup Guide.
4 inches
4 inches
4 inches 4 inches
4 inches
8
PREPARATION
POSITIONING YOUR DISPLAY
■
The image shown may be somewhat different from your set.
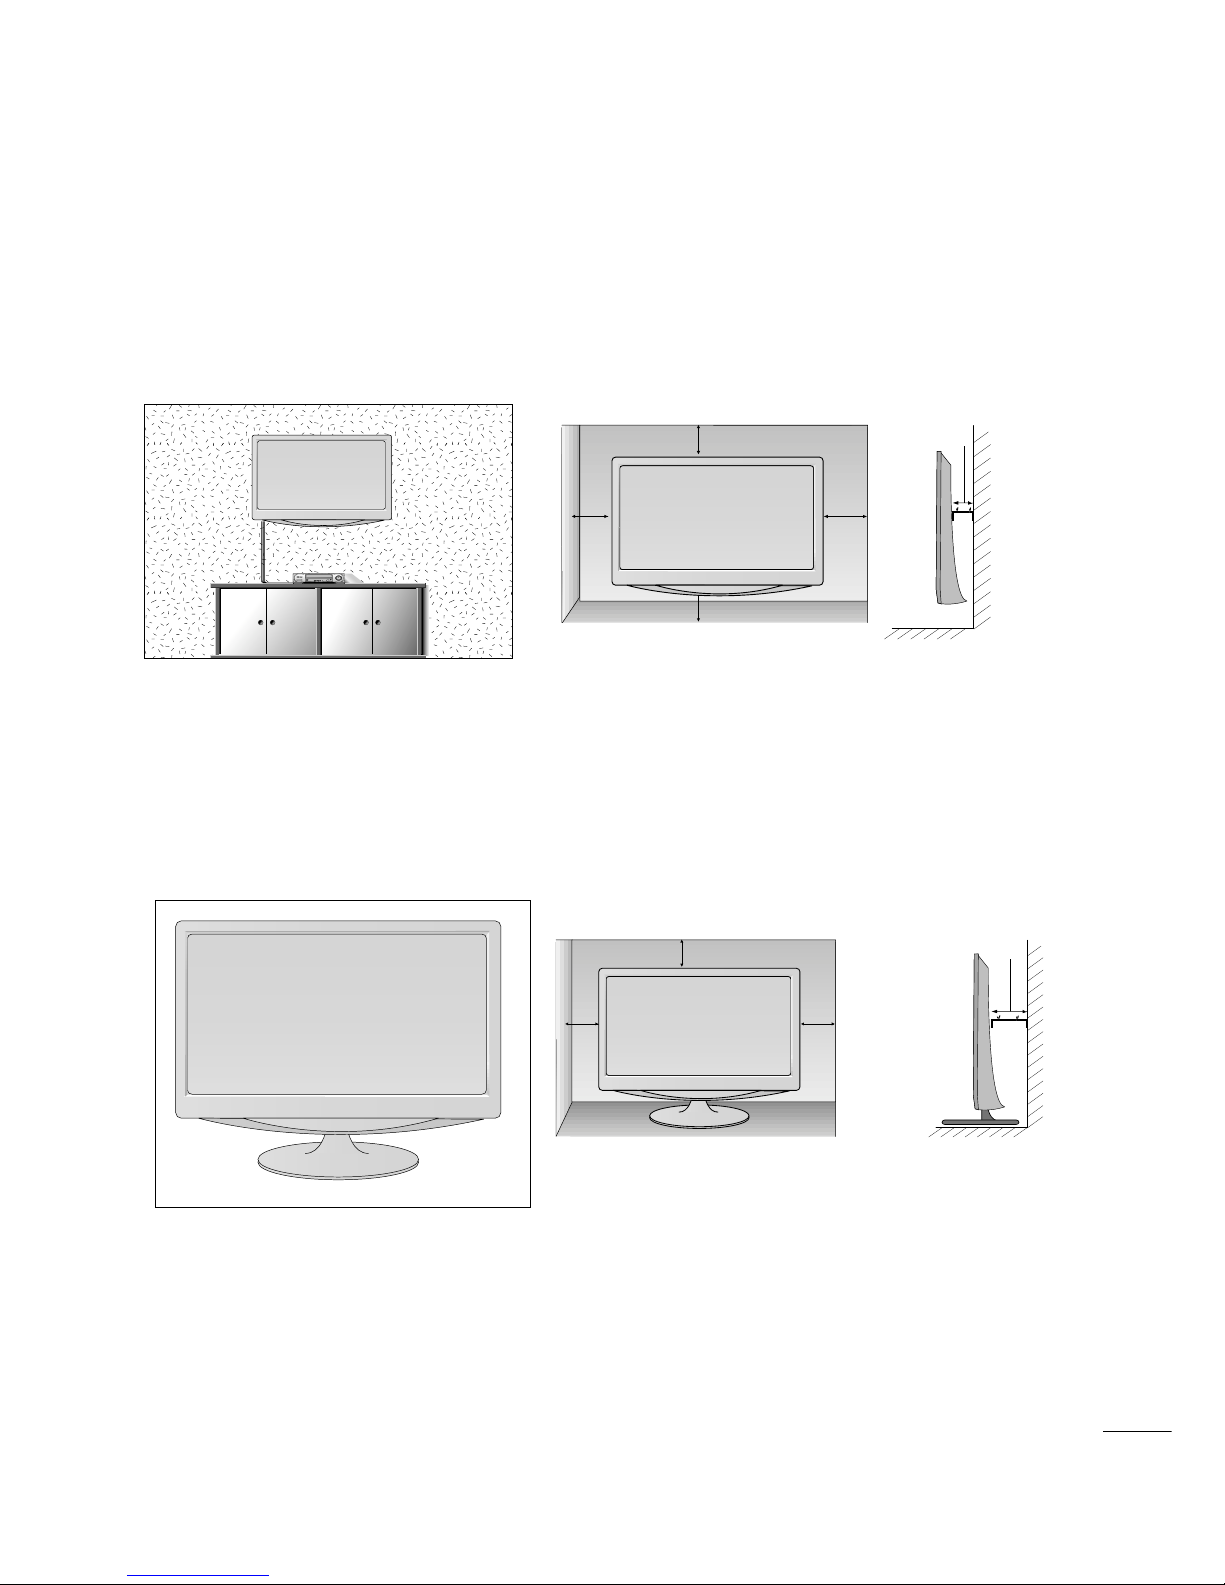
Adjust the position of the panel in various ways for maximum omfort.
•• TTiilltt rraannggee
LOCATION
Position your set so that no bright light or sunlight falls dire tly onto the s reen. Care should be taken not to
expose the set to any unne essary vibration, moisture, dust or heat. Also, ensure that the set is pla ed in a posi-
tion to allow a free flow of air. Do not over the ventilation openings on the ba k over.
If you intend to mount the set to a wall, atta h Wall mounting interfa e (optional parts) to the ba k of the set.
When you install the set using the wall mounting interfa e (optional parts), atta h it arefully so it will not drop.
- Be sure to use s rews and a wall mount that meet VESA standards.
- Using s rews longer than those re ommended might damage the produ t.
- Using s rews that do not meet VESA standards might either damage the produ t or result in it oming away from
the wall. We will not be held responsible for any damage resulting from failure to follow these instru tions.
< S rew Mounting Interfa e Dimension >
M227WA : 100mm x 100mm hole spa ing
M237WA : 75mm x 75mm hole spa ing
-6
°
~ -2
°
12
°
~ 18
°
WWaarrnniinngg::
When adjusting the angle of the s reen,do not put your
finger(s)in between the head of the monitor and the stand
body.You an hurt your finger(s).
9
PREPARATION
KENSINGTON SECURITY SYSTEM
- The produ t is equipped with a Kensington Se urity System onne tor on the ba k panel. Conne t the
Kensington Se urity System able as shown below.
- For detailed installation and use of the Kensington Se urity System, refer to the user’s guide provided with
the Kensington Se urity System.
For further information, onta t hhttttpp::////wwwwww..kkeennssiinnggttoonn..oomm, the internet homepage of the
Kensington ompany. Kensington sells se urity systems for expensive ele troni equipment su h as note-
book PCs and LCD proje tors.
NOTE
- The Kensington Se urity System is an optional a essory.
NOTES
a. If the produ t feels old to the tou h, there may be a small “fli ker” when it is turned on.
This is normal, there is nothing wrong with produ t.
b. Some minute dot defe ts may be visible on the s reen, appearing as tiny red, green, or blue spots.
However, they have no adverse effe t on the monitor's performan e.
. Avoid tou hing the LCD s reen or holding your finger(s) against it for long periods of time.
Doing so may produ e some temporary distortion effe ts on the s reen.
<M227WA> <M237WA>