LG 50PC3DD-UE User manual

50" Plasma TV-720P
NS-PDP50
User Guide
07-287_NS-PDP50_English Only.fm Page 1 Wednesday, July 11, 2007 12:05 PM

07-287_NS-PDP50_English Only.fm Page 2 Wednesday, July 11, 2007 12:05 PM

3
www.insignia-products.com
Insignia NS-PDP50
50" Plasma TV-720P
Contents
Introduction . . . . . . . . . . . . . . . . . . . . . . . . . . . . . .3
Safety information . . . . . . . . . . . . . . . . . . . . . . . . .3
Features. . . . . . . . . . . . . . . . . . . . . . . . . . . . . . . . .4
Front . . . . . . . . . . . . . . . . . . . . . . . . . . . . . . . . . . . . . 5
Back . . . . . . . . . . . . . . . . . . . . . . . . . . . . . . . . . . . . . 5
Remote control . . . . . . . . . . . . . . . . . . . . . . . . . . . . . 6
Setting up your plasma TV. . . . . . . . . . . . . . . . . . .7
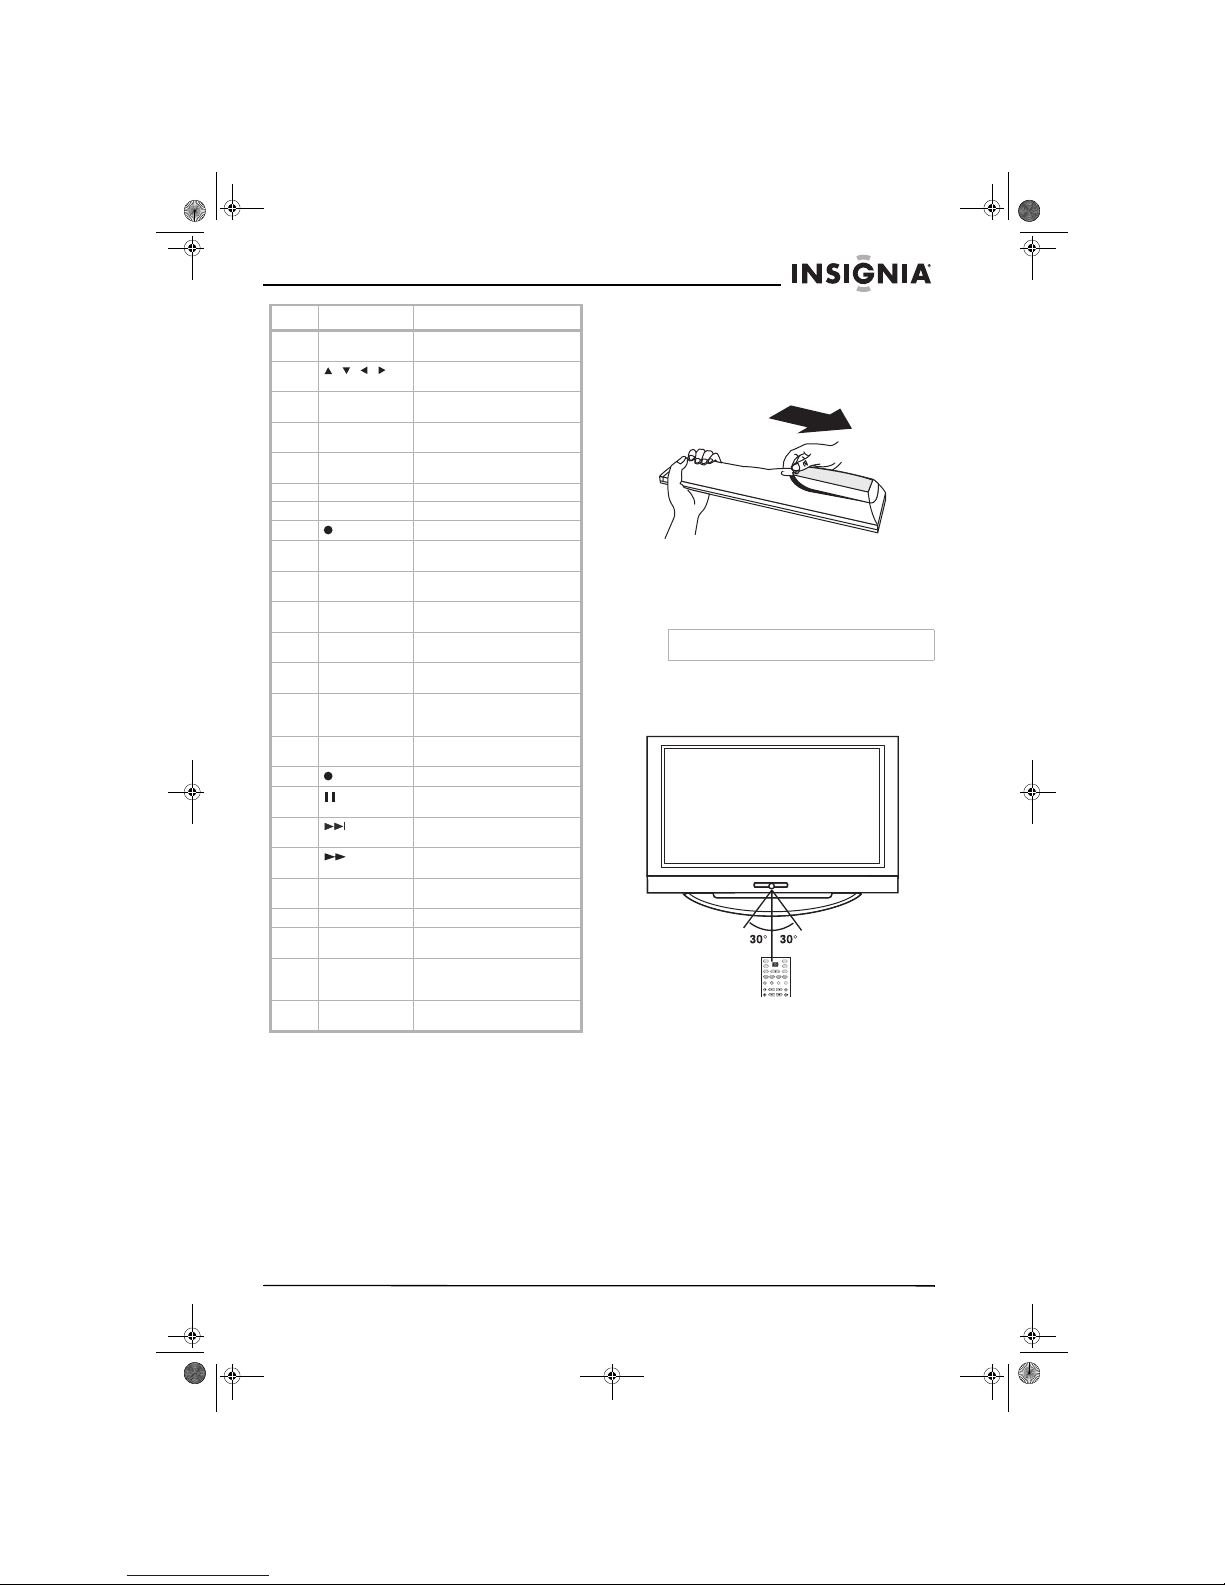
Installing batteries . . . . . . . . . . . . . . . . . . . . . . . . . . 7
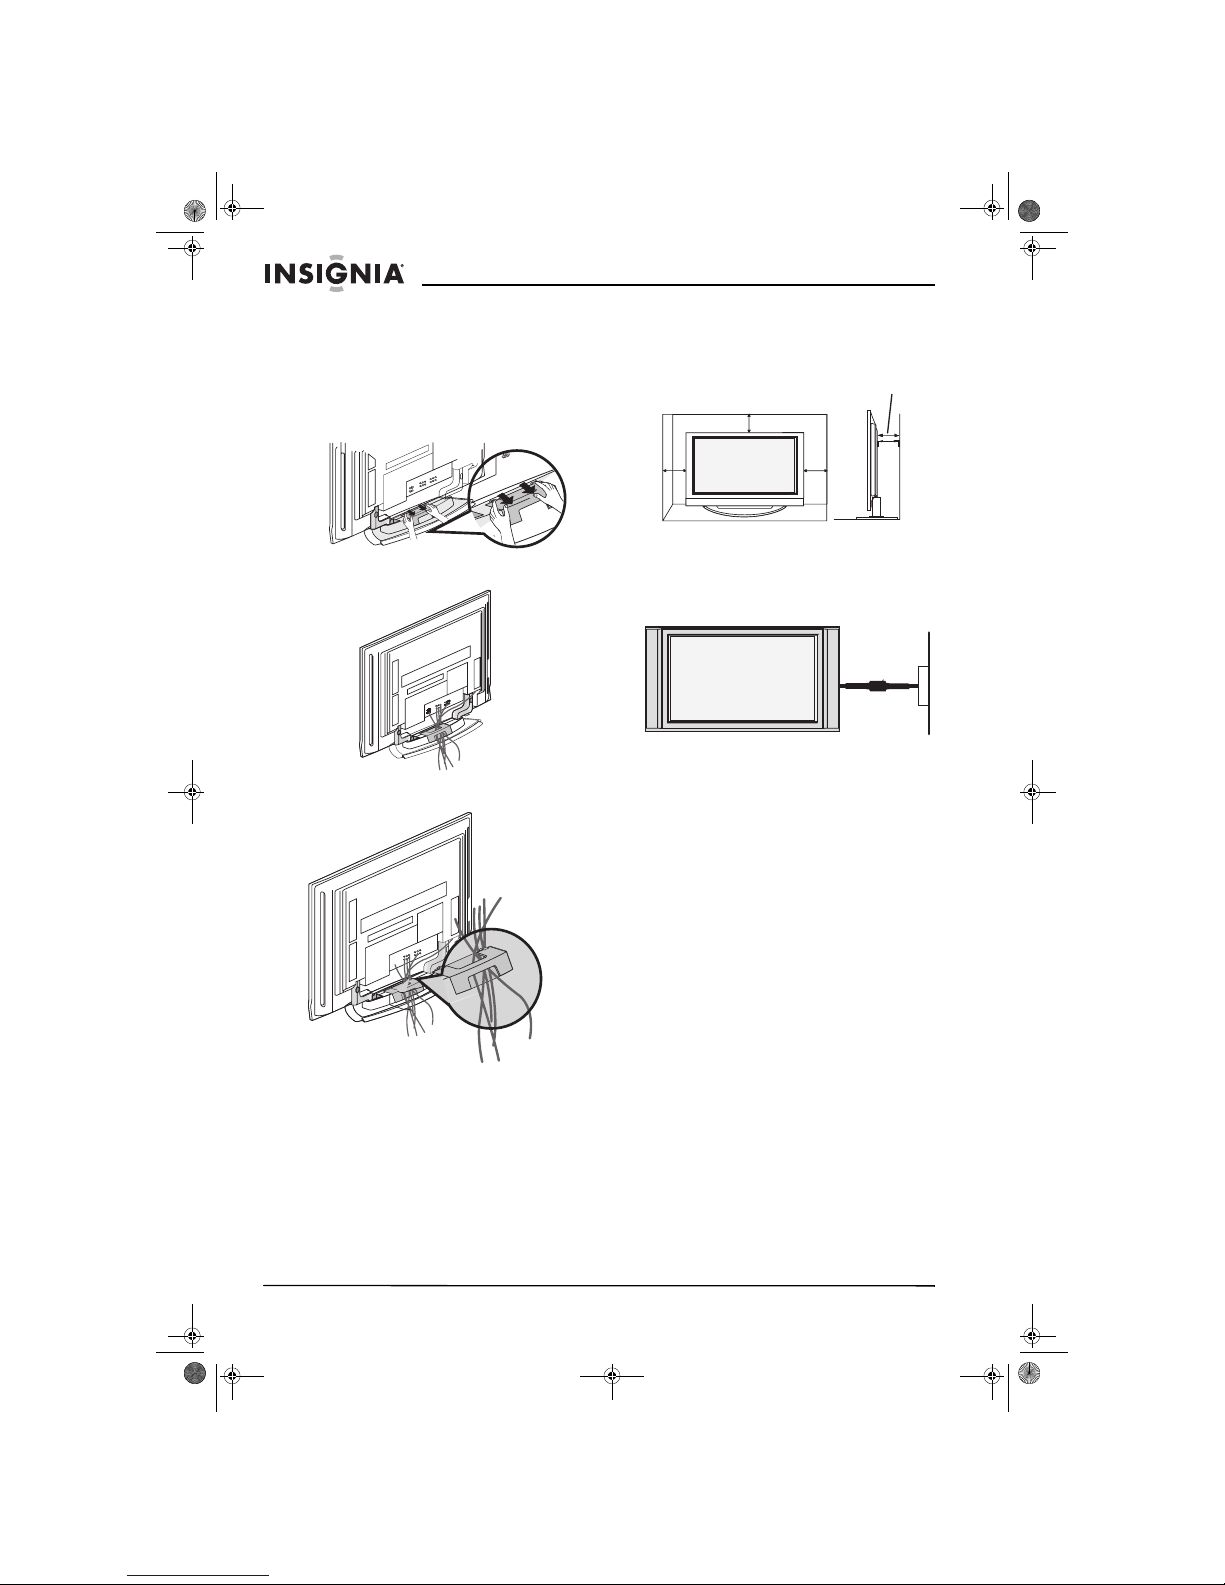
Bundling cables . . . . . . . . . . . . . . . . . . . . . . . . . . . . 8
Grounding. . . . . . . . . . . . . . . . . . . . . . . . . . . . . . . . . 8
Connecting an antenna or cable TV. . . . . . . . . . . . . 9
Connecting a standard A/V device . . . . . . . . . . . . . . 9
Connecting an S-Video device . . . . . . . . . . . . . . . . . 9
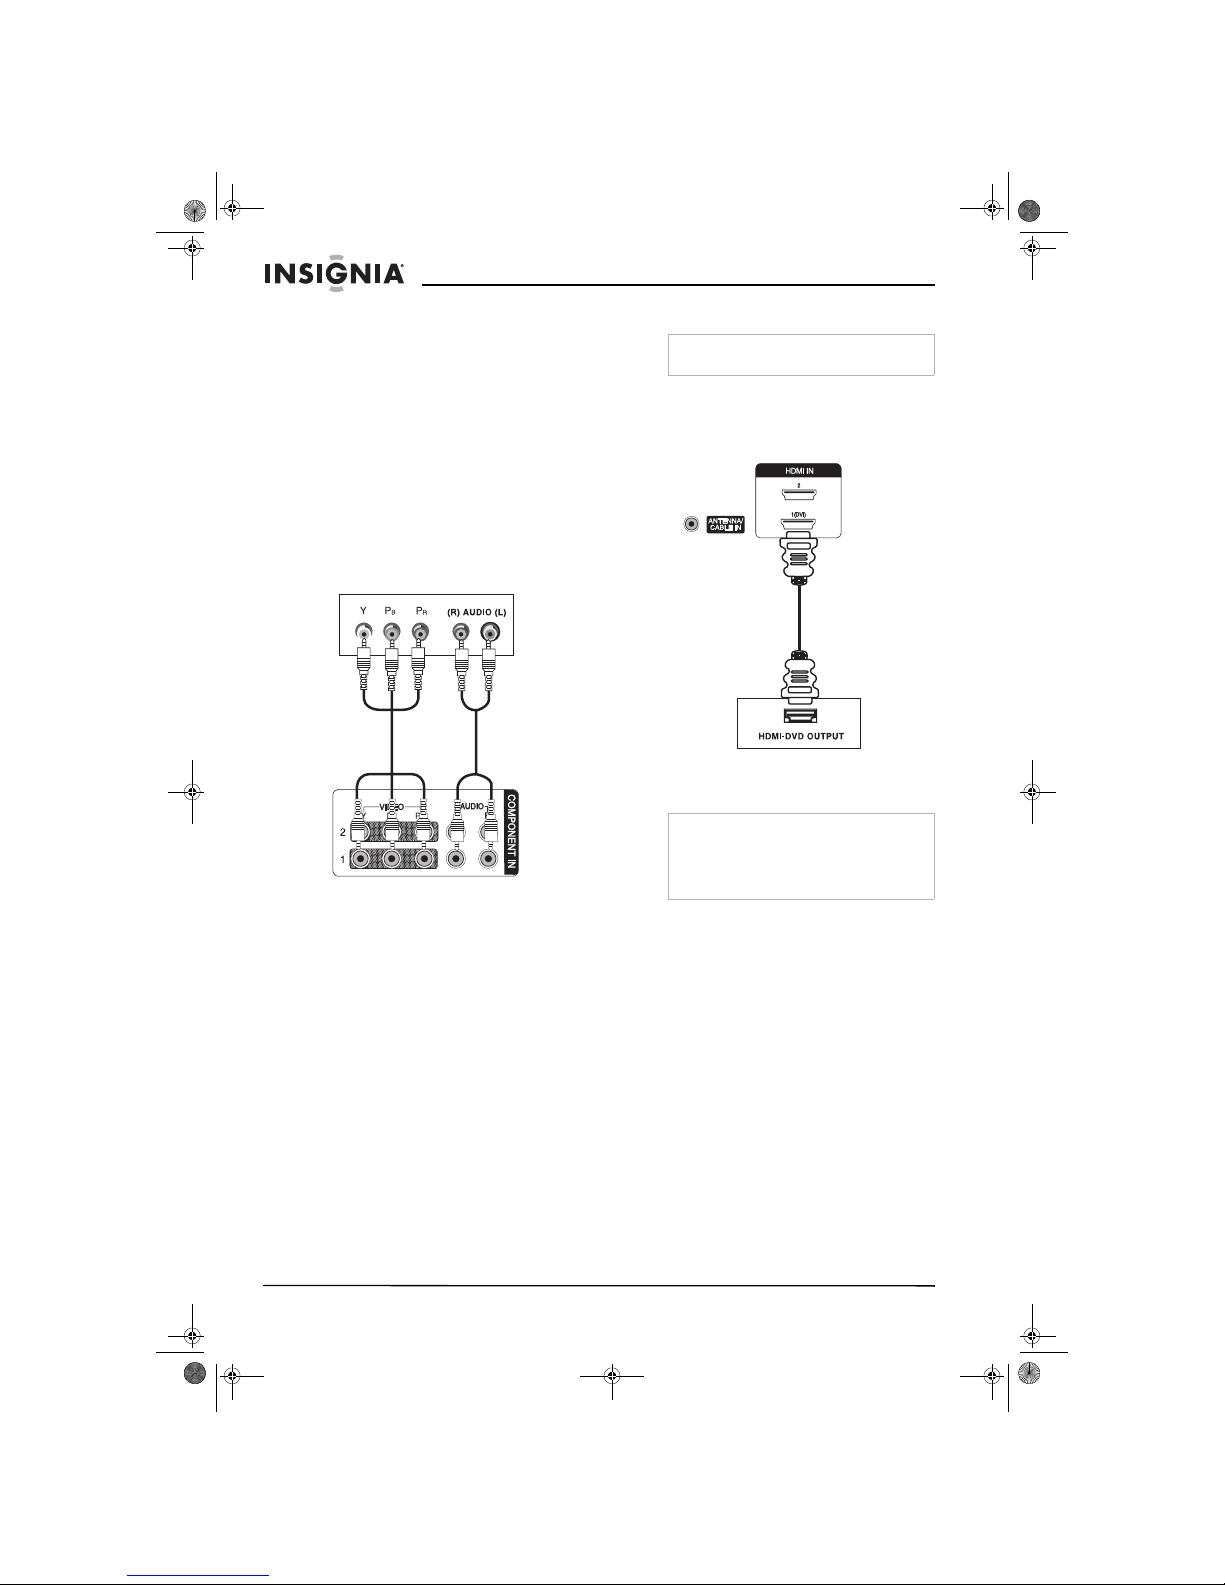
Connecting a component device . . . . . . . . . . . . . . 10
Connecting an HDMI device. . . . . . . . . . . . . . . . . . 10
Connecting a DVI device . . . . . . . . . . . . . . . . . . . . 11
Connecting a digital audio device. . . . . . . . . . . . . . 11
Connecting a PC . . . . . . . . . . . . . . . . . . . . . . . . . . 12
Using your plasma TV . . . . . . . . . . . . . . . . . . . . .12
Turning your plasma TV on or off. . . . . . . . . . . . . . 12
Selecting the video input source . . . . . . . . . . . . . . 13
Labeling a video input source. . . . . . . . . . . . . . . . . 13
Changing channels. . . . . . . . . . . . . . . . . . . . . . . . . 13
Adjusting the volume . . . . . . . . . . . . . . . . . . . . . . . 13
Creating the channel list. . . . . . . . . . . . . . . . . . . . . 13
Adding or deleting a channel . . . . . . . . . . . . . . . . . 14
Creating a favorite channel list . . . . . . . . . . . . . . . . 14
Selecting the picture mode. . . . . . . . . . . . . . . . . . . 15
Adjusting the color temperature . . . . . . . . . . . . . . . 15
Adjusting the HD picture quality . . . . . . . . . . . . . . . 16
Adjusting the movie picture quality. . . . . . . . . . . . . 16
Adjusting the black level. . . . . . . . . . . . . . . . . . . . . 17
Restoring video settings . . . . . . . . . . . . . . . . . . . . . 17
Selecting a sound mode. . . . . . . . . . . . . . . . . . . . . 17
Adjusting the balance . . . . . . . . . . . . . . . . . . . . . . . 18
Selecting the audio language . . . . . . . . . . . . . . . . . 18
Turning the speakers on or off . . . . . . . . . . . . . . . . 19
Setting the clock . . . . . . . . . . . . . . . . . . . . . . . . . . . 19
Setting the on and off timers . . . . . . . . . . . . . . . . . 20
Setting the sleep timer . . . . . . . . . . . . . . . . . . . . . . 20
Turning Auto Off on and off . . . . . . . . . . . . . . . . . . 20
Selecting the aspect ratio . . . . . . . . . . . . . . . . . . . . 21
Selecting the on-screen display (OSD) language . 21
Checking the DTV signal strength . . . . . . . . . . . . . 21
Selecting closed captions. . . . . . . . . . . . . . . . . . . . 22
Changing closed caption styles . . . . . . . . . . . . . . . 22
Using low power . . . . . . . . . . . . . . . . . . . . . . . . . . . 23
Avoiding image burn-in. . . . . . . . . . . . . . . . . . . . . . 23
Setting parental controls. . . . . . . . . . . . . . . . . . . . . 23
Maintaining. . . . . . . . . . . . . . . . . . . . . . . . . . . . . .24
Cleaning the screen . . . . . . . . . . . . . . . . . . . . . . . . 24
Cleaning the cabinet. . . . . . . . . . . . . . . . . . . . . . . . 24
Troubleshooting . . . . . . . . . . . . . . . . . . . . . . . . . .25
Specifications. . . . . . . . . . . . . . . . . . . . . . . . . . . .26
Programming the remote control . . . . . . . . . . . . .26
Remote control codes . . . . . . . . . . . . . . . . . . . . . . 26
One-Year Limited Warranty . . . . . . . . . . . . . . . . .31
Introduction
Congratulations on your purchase of a
high-quality Insignia product. Your NS-PDP42
represents the state of the art in plasma TV
design and is designed for reliable and
trouble-free performance.
Safety information
Important safety
instructions
1Read these instructions.
2Keep these instructions.
3Heed all warnings.
4Follow all instructions.
5Do not use your plasma TV near water.
6Clean the cabinet with a dry cloth only.
7Do not block any ventilation openings. Install
in accordance with the manufacturer’s
instructions.
Note
A few small colored dots may be present on your
plasma TV screen. This is normal in plasma TVs
and does not mean that your plasma TV is
defective.
Note
Your plasma TV has cooling fans that insure
reliable operation. When the fans are running
there is a small amount of noise. This is normal
and does not mean that your plasma TV is
defective.
CAUTION
RISK OF ELECTRIC SHOCK
DO NOT OPEN
Warning
To reduce the risk of electric shock, do not remove
the cover or back. No user serviceable parts
inside. Refer servicing to qualified service
personnel.
To reduce the risk of fire or electric shock, do not
expose your plasma TV to rain or moisture.
Warning
To prevent electric shock, match the wide blade
on the power cord plug to the wide slot on an
electric outlet. If the plug does not fit, consult a
licensed electrician to replace the obsolete outlet.
Do not modify the power cord plug, or you will
defeat this safety feature.
This symbol indicates that dangerous voltage
constituting a risk of electric shock is present
within your plasma TV. This label is located on
the back of your plasma TV.
This symbol indicates that there are important
operating and maintenance instructions in the
literature accompanying your plasma TV.
07-287_NS-PDP50_English Only.fm Page 3 Wednesday, July 11, 2007 12:05 PM

4
Insignia NS-PDP50 50" Plasma TV-720P
www.insignia-products.com
8Do not install near any heat sources such as
radiators, heat registers, stoves, or other
apparatus (including amplifiers) that produce
heat.
9Do not defeat the safety purpose of the
polarized or grounding-type plug. A polarized
plug has two blades with one wider than the
other. A grounding type plug has two blades
and a third grounding prong. The wide blade
or the third prong is provided for your safety.
If the provided plug does not fit into your
outlet, consult an electrician for replacement
of the obsolete outlet.
10 Protect the power cord from being walked on
or pinched particularly at plugs, convenience
receptacles, and the point where they exit
from your plasma TV.
11 Only use attachments or accessories
specified by the manufacturer.
12 Use only with a cart, stand,
tripod, bracket, or table
specified by the manufacturer.
13 Unplug your plasma TV during
lightning storms or when
unused for long periods of time.
14 Refer all servicing to qualified service
personnel.
Servicing is required when your plasma TV
has been damaged in any way, such as the
power-supply cord or plug is damaged, liquid
has been spilled or objects have fallen into
your plasma TV, your plasma TV has been
exposed to rain or moisture, does not operate
normally, or has been dropped.
15 Do not overload wall outlets. Overloaded wall
outlets, loose or damaged wall outlets,
extension cords, frayed power cords, or
damaged or cracked wire insulation are
dangerous. Any of these conditions could
result in electric shock or fire. Periodically
examine the cord of your plasma TV, and if
its appearance indicates damage or
deterioration, unplug it, discontinue use of
your plasma TV, and have the cord replaced
with an exact replacement part by an
authorized service person. Protect the power
cord from physical or mechanical abuse,
such as being twisted, kinked, pinched,
closed in a door, or walked upon. Pay
particular attention to plugs, wall outlets, and
the point where the cord exits your plasma
TV.
16 Ensure that you connect the earth ground
wire to prevent possible electric shock. If
grounding methods are not possible, have a
qualified electrician install a separate circuit
breaker. Do not try to ground the unit by
connecting it to telephone wires, lightening
rods, or gas pipes.
17 Mains plug is the disconnecting device. The
plug must remain readily operable.
18 If an outside antenna or cable system is
connected to your plasma TV, make sure that
the antenna or cable system is grounded to
provide some protection against voltage
surges and built-up static charges. Article
820-40 of the National Electrical Code (USA)
provides guidelines for correct grounding
and, in particular, specifies that the cable
ground shall be connected to the grounding
system of the building, as close to the point of
the cable entry as practical.
Features
Your plasma TV features:
• Wide viewing angle (over 160°) so the screen
is clearly visible anywhere in the room.
• Widescreen display for viewing movies in a
theater-like experience.
• Light-weight and thin design that makes it
easy to install your plasma TV in locations
where conventional TVs do not fit.
Your package should contain:
• Your plasma TV
• Remote control and batteries
•Powercord
• Round 75 ohm cable
• Eye-bolts (2)
• Bolts (2)
• Wall brackets (2)
• This user guide
1 Electric service equipment
2 Power service grounding electrode
system
3 Ground clamps
4 Grounding conductors
5 Antenna discharge unit
6 Grounding clamp
7 Antenna lead-in wire
6
7
5
2
1
3
4
07-287_NS-PDP50_English Only.fm Page 4 Wednesday, July 11, 2007 12:05 PM

5
Insignia NS-PDP50 50" Plasma TV-720P
www.insignia-products.com
Front Back
Side jacks
Note
If your plasma TV stand has a protective film
covering, remove it, then wipe the stand with the
polishing cloth.
# Component Description
1 Remote control
sensor
Receives signals from the remote
control. Do not block.
2 Power LED When your plasma TV is off, this
LED is red. When you turn on
your plasma TV, this LED blinks
green, then turns solid green just
before the image appears on the
screen.
3CH /CH Press to go to the previous or
next channel.
4VOL /VOL Press to decrease or increase the
volume.
5 ENTER Press to confirm selections in the
on-screen display (OSD).
6 MENU Press to open the on-screen
display (OSD).
7 INPUT Press to select the video input
source.
8Power Press to turn your plasma TV on
or off.
Note: When your plasma TV is
off, power is still present. To
disconnect power, unplug the
power cord.
CH
CH
V
OL
OL
ENTER
ENTER
MENU
MENU
INPUT
INPUT
12
3
4
5
6
7
8
# Jack Description
1 S-VIDEO Connect an S-Video device to this
jack.
Note: An S-Video cable does not
carry sound. You must connect
an audio cable to the audio jacks
for sound.
2 AUDIO-R and
AUDIO L MONO
Connect the right and left audio
for a standard AV or S-Video
device to these jacks.
3 VIDEO Connect the video for a standard
A/V device to this jack.
1
2
3
07-287_NS-PDP50_English Only.fm Page 5 Wednesday, July 11, 2007 12:05 PM

6
Insignia NS-PDP50 50" Plasma TV-720P
www.insignia-products.com
Back jacks
Remote control
Note
To access the back jacks, remove the jack cover.
# Jack Description
1 SERVICE Reserved. Do not use.
2ANTENNA
/CABLE IN
Connect an antenna, cable TV, or
satellite receiver to this jack.
3 HDMI1/DVI IN 1
/HDMI IN 2
Connect HDMI (DVI) devices to
these jacks. There are two jacks.
Note: An HDMI cable carries
sound, so you do not need to
make any additional audio
connections. A DVI cable does
not carry sound. If you connect a
DVI device, you need to connect
an audio cable.
4RGBIN
(PC)/AUDIO IN
(RGB/DVI)
Connect a PC to these jacks to
use your plasma TV as a PC
monitor.
5 REMOTE
CONTROL IN
Connect a wired remote control to
this jack.
6 RS-232C IN Service port. Do not use.
7 DIGITAL AUDIO
OUT
Connect a digital sound system to
this jack.
8 COMPONENT IN Connect component video
devices to these jacks. There are
two sets on jacks.
9 AV OUT Connect an external TV or
monitor to these jacks to send the
signal from your plasma TV to the
external device.
10 AV IN 1 Connect a standard AV or S-Video
device to these jacks.
11 Power cord
connector
Plug the power cord into this
connector.
HDMI IN
VIDEO
VIDEO
AUDIO
AUDIO
VIDEO
VIDEO
AUDIO
AUDIO
MONO
( )
S-VIDEO
S-VIDEO
AV IN 1
AVIN1
AV OU T
AVOUT
ANTENNA/
CABLE IN
(CONTROL & SERVICE)
RGB IN
COMPONENT IN
COMPONENTIN
OUT
1(DVI)
2
SERVICE
4
5
6
7
8
9
10
11
3
2
1
# Button Description
1 POWER Press to turn your plasma TV on
or off.
2 TUNER Press to select analog or digital
TV.
3 INPUT Press to select the video input
source.
4 ZOOM Press to select the aspect ratio.
5+/ – Press to increase or decrease the
brightness.
6 VIDEO Press to select the video input
source.
7 COMP Press to select a connected
component device as the video
input source.
8 PICTURE Press to select the picture mode.
9 AUDIO Press to select the sound mode.
10 Press to pause videotape or DVD
playback.
11 Press to start videotape or DVD
playback.
12 Press to go the previous chapter
or track on a disc.
13 Press to fast-reverse on a
videotape or DVD.
14 CCD In analog TV mode, press to
select a closed caption mode.
ENTER
TV
TUNER
INPUT
DVD
ZOOM
EXIT
VOL
AUDIO
DISPLAY
PC ADJ
PICTURE
MUTE
RECALL
CH
SLEEP
CCD
MTS/SAP
MENU
VCR
POWER
123
456
789
0
FAV
MODE
VIDEO COMP HDMI
PC
1
2
3
4
5
6
7
8
9
10
11
12
13
14
15
16
17
18
19
20
21
23
24
25
26
27
28
29
30
31
32
33
34
37
35
22
36
38
07-287_NS-PDP50_English Only.fm Page 6 Wednesday, July 11, 2007 12:05 PM

7
Insignia NS-PDP50 50" Plasma TV-720P
www.insignia-products.com
Setting up your plasma TV
Installing batteries
To install remote control batteries:
1Open the battery compartment cover.
2Insert two AA batteries into the battery
compartment. Make sure that the + and –
symbols on the batteries align with the + and
– symbols in the battery compartment.
3Close the battery compartment cover.
Remote control range
Use the remote control within 23 feet (7 meters)
and 30° to the left or right of the remote control
sensor on the front of you plasma TV.
15 EXIT Press to close the on-screen
display (OSD).
16 , , , Press to make selections in the
on-screen display (OSD).
17 ENTER Press to confirm selections in the
on-screen display (OSD).
18 RECALL Press to go to the previously
selected channel.
19 VOL+/VOL– Press to increase or decrease the
volume.
20 Number buttons Press to select a TV channel.
21 FAV Press to select a favorite channel.
22 Press to select a sub-channel.
23 TV Press to select TV as the video
input source.
24 DVD Press to select a connected DVD
player as the video input source.
25 VCR Press to select a connected VCR
as the video input source.
26 PC Press to select the RGB
(computer) video mode.
27 HDMI Press to select a connected HDMI
device as the video input source.
28 DISPLAY Press to display information
about the channel you are
watching.
29 PC ADJ Press to adjust the video settings
for a connected computer.
30 Press to start recording.
31 Press to pause videotape or disc
playback.
32 Press to go to the next chapter or
track on a disc.
33 Press to fast-forward on a
videotape or disc.
34 MTS/SAP Press to select the audio format
for the TV speakers.
35 SLEEP Press to set the sleep timer.
36 MENU Press to open the on-screen
display (OSD).
37 CH+/CH– Press to go to the next or
previous channel in the channel
list.
38 MUTE Press to mute the sound. Press
again to restore the sound.
# Button Description
Warning
Dispose of used batteries as hazardous waste.
TV
TUNER
INPUT
DVD
ZOOM
AUDIO
DISPLAY
ADJUST
PICTURE
VCR
POWER
VIDEO
MODE
COMP HDMI
RGB-PC
07-287_NS-PDP50_English Only.fm Page 7 Wednesday, July 11, 2007 12:05 PM

8
Insignia NS-PDP50 50" Plasma TV-720P
www.insignia-products.com
Bundling cables
You plasma TV has a cable management
bracket that lets you bundle the cables for all the
device you install.
To bundle the cables:
1Hold the cable management bracket with
both hands, then pull it in the direction shown
to remove it.
2Connect all external devices and the power
cord.
3Pull the cables through the opening on the
cable management bracket.
4Reinstall the cable management bracket.
Positioning your plasma TV for ventilation
When you position your plasma TV, make sure
that you leave 4 inches (10.16 cm) of space on
all sides.
Grounding
Make sure that you connect the earth ground
wire to prevent possible electric shock. If
grounding methods are not possible, have a
qualified electrician install a separate circuit
breaker.
Do not try to ground the unit by connecting it to
telephone wires, lightening rods, or gas pipes.
4" (10.16 cm)
4" (10.16 cm)
4" (10.16 cm)
4" (10.16 cm)
Power outlet
Short-circuit
breaker
07-287_NS-PDP50_English Only.fm Page 8 Wednesday, July 11, 2007 12:05 PM

9
Insignia NS-PDP50 50" Plasma TV-720P
www.insignia-products.com
Connecting an antenna or cable TV
Analog and digital TV signals on a single cable
To connect an antenna or cable TV:
1Connect one end of a 75 ohm cable to the
ANTENNA/CABLE IN jack on the back of
your TV.
2Connect the other end of the cable to the
antenna or cable TV jack.
Analog and digital TV signals on separate cables
To connect an antenna or cable TV:
Using a signal amplifier or two-way splitter
You may need to install a signal amplifier or a
two-way splitter if:
• Reception is poor (use a signal amplifier).
• Signal from the antenna needs to be split
between two TVs (use a two-way splitter).
Connecting a standard A/V device
To connect a standard A/V device:
1Connect the video (yellow), right audio (red),
and left audio (white) plugs on a standard
A/V cable to the AV1 (back) or AV2 (side)
jacks on your plasma TV.
2Connect the plugs on the other end of the
cable to the corresponding jacks on the
external device.
3Turn on your plasma TV and the device.
4Press INPUT one or more times to select
AV1 or AV2.
Connecting an S-Video device
To connect an S-Video device:
1Connect an S-Video cable to the S-VIDEO
jack on the back or side of your plasma TV,
then connect the other end of the cable to the
S-Video out jack on the external device.
ANTENNA/
CABLE IN
Cable TV
Antenna
OR
ANTENNA/
CABLE IN
OR
ANTENNA/
CABLE IN
Signal amplifier or
two-way splitter
R
L
AUDIO VIDEO
Side jacks shown
07-287_NS-PDP50_English Only.fm Page 9 Wednesday, July 11, 2007 12:05 PM

10
Insignia NS-PDP50 50" Plasma TV-720P
www.insignia-products.com
2Connect the right audio (red) and left audio
(white) plugs on a standard audio cable to
the AV IN1 (back)or AV2 (side) jacks on
your plasma TV, then connect the plugs on
the other end of the cable to the right audio
out and left audio out jacks on the external
device.
3Turn on your plasma TV and the device.
4Press INPUT one or more times to select
AV1 or AV2.
Connecting a component device
To connect a component device:
1Connect the plugs on a component cable to
the COMPONENT IN 1 or COMPONENT
IN 2 (Y, Pb, and Pr) jacks on the back of your
TV, then connect the plugs on the other end
of the cable to the component out jacks on
the back of the external device.
2Connect the right audio (red) and left audio
(white) plugs on a standard audio cable to
the COMPONENT 1 or COMPONENT 2
(AUDIO L and AUDIO R) jacks on the back
of your plasma TV, then connect the plugs on
the other end of the cable to the right audio
out and left audio out jacks on the external
device.
3Turn on your plasma TV and the device.
4Press INPUT one or more times to select
COMPONENT 1 or COMPONENT 2.
Connecting an HDMI device
To connect an HDMI device:
1Connect an HDMI cable to the HDMI1/DVI or
HDMI2 jack on the back of your plasma TV,
then connect the other end of the cable to the
HDMI out jack on the external device.
2Turn on your plasma TV and the device.
3Press INPUT one or more times to select
HDMI1/DVI or HDMI2.
Note
An HDMI cable carries both video and audio. You
do not need to make additional audio connections.
Note
If the external device supports the Auto HDMI
function, the screen resolution is automatically set
to 1280 × 720p.
If the external device does not support the Auto
HDMI function, you need to set the screen
resolution to 1280 × 720p.
07-287_NS-PDP50_English Only.fm Page 10 Wednesday, July 11, 2007 12:05 PM

11
Insignia NS-PDP50 50" Plasma TV-720P
www.insignia-products.com
Connecting a DVI device
To connect a DVI device:
1Connect an HDMI-to-DVI cable to the
HDMI IN 1/DVI jack on the back of your TV,
then connect the other end of the cable to the
DVI out jack on the external device.
2Connect the single-plug end of a two-to-one
audio cable to the AUDIO IN (RGB/DVI) jack
on the back of your plasma TV, then connect
the double-plug end of the cable to the right
audio (red) and left audio (white) jacks on the
external device.
3Turn on your plasma TV and the device.
4Press INPUT one or more times to select
HDMI1/DVI.
Connecting a digital audio device
To connect a digital audio device:
1Connect a digital optical cable to the
DIGITAL AUDIO OUT jack on the back of
your TV, then connect the other end of the
cable to the digital audio in jack on the
device.
2Turn off your plasma TV’s speakers. For
more information, see “Turning the speakers
on or off” on page 19.
Note
If the external device supports the Auto HDMI
function, the screen resolution is automatically set
to 1280 × 720p.
If the external device does not support the Auto
HDMI function, you need to set the screen
resolution to 1280 × 720p.
Warning
Do not look into the DIGITAL AUDIO OUT jack.
The jack uses a laser that could damage your
eyes.
07-287_NS-PDP50_English Only.fm Page 11 Wednesday, July 11, 2007 12:05 PM

12
Insignia NS-PDP50 50" Plasma TV-720P
www.insignia-products.com
Connecting a PC
You can connect a PC using the computer’s
VGA jack or DVI jack.
Connecting to the VGA port
To connect a PC:
1Connect a VGA cable to the RGB IN (PC)
jack on the back of your plasma TV, then
connect the other end to the VGA (also called
RGB) out jack on the computer.
2Connect an audio cable to the AUDIO IN
(RGB/DVI) jack on the back of your TV, then
connect the other end to the audio out jack
on the computer.
3Turn on your plasma TV and the computer.
4Press INPUT one or more times to select
RGB-PC.
Connecting to the DVI port
To connect a PC:
1Connect an HDMI-to-DVI cable to the HDMI
IN 1 (DVI) jack on the back of your plasma
TV, then connect the other end of the cable
to the DVI out jack on the computer.
2Connect an audio cable to the AUDIO IN
(RGB/DVI) jack on the back of your plasma
TV to the audio out jack on the computer.
3Turn on your plasma TV and the computer.
4Press INPUT one or more times to select
HDMI1/DVI.
Adjusting the PC display image
After you connect the PC to your plasma TV, you
may need to adjust the PC display image’s
resolution, position, size, or phase.
To adjust the PC display image:
1Press PC ADJ.
2Press or to select the option you want to
adjust, then press ENTER. You can select:
•Resolution–Adjusts the size of the items
(such as icons and dialog boxes) that are
displayed.
•Position–Moves the display image up,
down, right, or left.
•Size–(RGB only) Minimizes vertical bars
or stripes on the display image’s
background. The range is -30 to +30.
When you change this option, the
horizontal screen size also changes.
•Phase–(RGB only) Removes any
horizontal noise and clears or sharpens
the display image. The range is -16 to
+16.
3Press , , , or to adjust the option.
4Press ENTER.
To reset PC display image settings:
1Press PC ADJ, then press or to select
Reset.
2Press ENTER, then press or to select
Yes.
3Press ENTER.
Using your plasma TV
Turning your plasma TV on or off
To turn your plasma TV on or off:
1Make sure that the power cord is connected
and plugged into a power outlet. Your plasma
TV enters standby mode.
2Press one of the following buttons:
On the front of your plasma TV:
•Power
• INPUT
• CH+
•CH–
On the remote control:
•POWER
• TUNER
• INPUT
• TV INPUT
•CH+
•CH–
3To turn off your plasma TV, press POWER
on the remote control. Your plasma TV
enters standby mode.
Caution
If you do not intend to use your plasma TV for an
extended time, unplug the power cord from the
power outlet. This will protect your plasma TV
from power surges or lightning.
07-287_NS-PDP50_English Only.fm Page 12 Wednesday, July 11, 2007 12:05 PM

13
Insignia NS-PDP50 50" Plasma TV-720P
www.insignia-products.com
Selecting the video input source
To select the video input source:
• Press TUNER or INPUT to select the video
source.
If you press TUNER, you can select digital or
analog TV.
If you press INPUT, you can select TV, AV1,
AV2, Component 1, Component 2,
RGB-PC, HDMI1/DVI, or HDMI2.
Labeling a video input source
You can label a video input source to make it
easier to recognize.
To label a video input source:
1Press MENU, then press or to select
SETUP. The
SETUP
menu opens.
2Press , then press or to select Input
Label.
3Press , then press or to select the
input source you want to label. You can
select AV1, AV2, Component 1,
Component 2, RGB-PC, HDMI1/DVI, or
HDMI2.
4Press or to select the label.
5Press EXIT to return to TV viewing or press
MENU to return to the previous menu.
Changing channels
To change channels:
• Press CH+ or CH– to go to the next higher or
lower channel.
• Or, press the number buttons for the channel
you want.
• Or, to select a digital sub-channel, select the
main channel, press –, then press the
number button for the sub-channel.
Adjusting the volume
To adjust the volume:
• Press VOL+ or VOL– to increase or
decrease the volume.
• To mute the sound, press MUTE. To restore
the sound, press MUTE, VOL+, or VOL–.
Creating the channel list
When you press CH+ or CH–, your plasma TV
goes to the next or previous channel in the
channel list.
You should set up the channel list when you first
set up your plasma TV. You should update the
channel list when your antenna or cable
connection changes.
You can create the channel list automatically
from the
EZ Scan
menu, or you can create the
channel list manually.
You can still select a channel that is not in the
channel list by pressing the number buttons for a
channel.
Creating the channel list from the EZ Scan menu
When you scan from the
EZ Scan
menu, your
plasma TV scans for available channels in your
area and stores them in the channel list. Your
plasma TV skips any channels that have a weak
signal or no signal.
To create the channel list with EZ Scan:
1Press MENU, then press or to select
SETUP. The
SETUP
menu opens.
2Press , then press or to select
EZ Scan. The
EZ Scan
menu opens.
3Press ENTER to start scanning for channels.
Note
Your plasma TV automatically detects connected
devices. When you press INPUT, only the video
sources that have devices connected to them
appear.
Note
Your plasma TV remembers the last selected
video input source even if the power cord is
unplugged.
Note
If you have turned on the Lock System, you need
to enter the password before you can create the
channel list.
Note
Make sure that you let your plasma TV scan for
both ANTENNA and CABLE channels.
07-287_NS-PDP50_English Only.fm Page 13 Wednesday, July 11, 2007 12:05 PM

14
Insignia NS-PDP50 50" Plasma TV-720P
www.insignia-products.com
Creating the channel list manually
When you manually create the channel list, you
add or delete the channels you want in the
channel list.
To manually create the channel list:
1Press MENU, then press or to select
SETUP. The
SETUP
menu opens.
2Press , then press or to select Manual
Scan.
3Press , then press or to select TV,
DTV, CATV, or CADTV.
4Press , then press or to select the
channel you want to add or delete.
5Press ENTER to add or delete the channel.
6Press EXIT to return to TV viewing or press
MENU to return to the previous menu.
Adding or deleting a channel
After you create the channel list from the
EZ
Scan
menu, you can add a channel to or delete
a channel from the channel list.
To add or delete a channel:
1Press MENU, then press or to select
SETUP. The
SETUP
menu opens.
2Press , then press or to select
Channel Edit.
3Press . The channel list appears with a
preview window.
4Press , , , or to select the channel,
then press ENTER to add or delete the
channel.
5Press EXIT to return to TV viewing, or press
MENU to return to the previous menu.
Creating a favorite channel list
To create a favorite channel list:
1Press MENU, then press or to select
SETUP. The
SETUP
menu opens.
2Press , then press or to select
Channel Edit.
3Press . The channel list appears with a
preview window.
4Press , , , or to select the channel,
then press FAV to add the channel to the
favorite channel list.
5Press EXIT to return to TV viewing, or press
MENU to return to the previous menu.
Note
Active channels in the channel list are in black.
Channels that have been deleted are in grey.
Note
A favorite channel has a heart icon next to it.
Note
To go to a favorite channel, press FAV.
07-287_NS-PDP50_English Only.fm Page 14 Wednesday, July 11, 2007 12:05 PM

15
Insignia NS-PDP50 50" Plasma TV-720P
www.insignia-products.com
Selecting the picture mode
You can select a preset picture mode or create a
custom picture mode.
Selecting a preset picture mode
To select a preset picture mode:
1Press PICTURE one or more times to select
the picture mode you want. You can select
Daylight, Normal, Night Time, User 1
(custom) or User 2 (custom).
2Press EXIT to save your selection and return
to TV viewing.
Creating a custom picture mode
To create a custom picture mode:
1Press MENU, then press or to select
VIDEO. The
VIDEO
menu opens.
2Press , then press or to select
EZ Picture.
3Press , then press or to select User 1
or User 2.
4Press , then press or to select the
option you want to adjust. You can select:
•Contrast–Increases the picture level to
adjust the white areas of the picture.
Decreases the picture level to adjust the
black areas of the picture.
•Brightness–Increases the brightness to
add more light to dark areas of the
picture. Decreases the brightness to add
more dark to light areas of the picture.
•Color–Adjusts the picture color.
•Sharpness–Increases the sharpness
level to show cleaner and clearer images.
Decreases the level to show a smoother
picture.
•Tint–Adjusts the overall picture color
(from red to green).
5Press , then press or to adjust the
option.
6Press EXIT to return to TV viewing, or press
MENU to return to the previous menu.
Adjusting the color temperature
The Color Temperature option adjusts the
amount of red, blue, and green in the picture.
You can select a preset color temperature mode
or create a custom color temperature mode.
Selecting a preset color temperature mode
To select a preset color temperature mode:
1Press MENU, then press or to select
VIDEO. The
VIDEO
menu opens.
2Press , then press or to select Color
Temperature.
3Press , then press or to select Cool,
Medium, Warm, or User (custom).
4Press EXIT to return to TV viewing, or press
MENU to return to the previous menu.
Note
You can also select a preset picture mode from
the
Video
menu.
07-287_NS-PDP50_English Only.fm Page 15 Wednesday, July 11, 2007 12:05 PM

16
Insignia NS-PDP50 50" Plasma TV-720P
www.insignia-products.com
Creating a custom color temperature mode
To create a custom color temperature mode:
1Press MENU, then press or to select
VIDEO. The
VIDEO
menu opens.
2Press , then press or to select Color
Temperature.
3Press , then press or to select User.
4Press , then press or to select Red,
Green, or Blue.
5Press , then press or to adjust the
color.
6Press EXIT to return to TV viewing, or press
MENU to return to the previous menu.
Adjusting the HD picture quality
You can use the
EZ Picture
menu to adjust the
picture quality for high definition (HD)
broadcasts. This option is called DB (digital
booster).
When you select a preset Picture mode
(Daylight, Normal, or Night time), your plasma
TV sets the DB option to Auto.
You can also manually adjust the DB settings to
create a custom DB mode.
To create a custom DB mode:
1Press MENU, then press or to select
VIDEO. The
VIDEO
menu opens.
2Press , then press or to select DB.
3Press , then press or to select Manual.
4Press , then press or to select the
option you want to adjust. You can select:
•DB Contrast–Adjusts the contrast
automatically based on the brightness of
the picture.
•DB Color–Adjusts the picture colors
automatically to match the original colors
as closely as possible.
•DB Noise–Reduces the video “noise.”
5Press EXIT to return to TV viewing, or press
MENU to return to the previous menu.
Adjusting the movie picture quality
Your plasma TV can improve the movie picture
quality by converting movies recorded at 24 fps
(frames per second) to 30 fps for optimum
viewing. This option is called Cinema 3:2 Mode
and is only available in Analog, AV1, AV2, and
Component 480i modes.
To turn the Cinema 3:2 Mode on or off:
1Press MENU, then press or to select
VIDEO. The
VIDEO
menu opens.
Note
You can also turn the DB option on or off from the
Video
menu.
07-287_NS-PDP50_English Only.fm Page 16 Wednesday, July 11, 2007 12:05 PM

17
Insignia NS-PDP50 50" Plasma TV-720P
www.insignia-products.com
2Press , then press or to select
Advanced.
3Press , then press or to select Cinema
3:2 Mode.
4Press , then press or to select On or
Off.
5Press EXIT to return to TV viewing, or press
MENU to return to the previous menu.
Adjusting the black level
The Black Level option adjusts the amount of
black in the picture. This option is only available
in HDMI1/DVI, HDMI2, AV1, and AV2 modes.
To adjust the black level:
1Press MENU, then press or to select
VIDEO. The
VIDEO
menu opens.
2Press , then press or to select
Advanced.
3Press , then press or to select Black
Level.
4Press , then press or to select Low or
High. Selecting Low makes the picture
darker. Selecting High makes the picture
brighter.
5Press EXIT to return to TV viewing, or press
MENU to return to the previous menu.
Restoring video settings
You can restore all video settings to the factory
defaults.
To restore video settings:
1Press MENU, then press or to select
VIDEO. The
VIDEO
menu opens.
2Press , then press or to select Video
Reset.
3Press to reset the video options to the
factory defaults.
4Press EXIT to return to TV viewing, or press
MENU to return to the previous menu.
Selecting a sound mode
You can select a preset sound mode or create a
custom sound mode.
Selecting a preset sound mode
To select a preset sound mode:
1Press AUDIO one or more times to select the
sound mode you want. You can select
Normal, Stadium, News, Music, Theater, or
User.
2Press EXIT to save your selection and return
to TV viewing.
Creating a custom sound mode
Note
When you select Stadium or Theater, the
Balance option on the
VIDEO
menu is
automatically set to 0.
When you set Front Surround to SRS
TruSurround XT, the Balance option is
automatically set to 0. When you switch to another
mode, the balance is restored to the previous
value.
Note
You can also select a preset picture mode from
the
AUDIO
menu.
Note
SRS TruSurround XT takes advantage of any
multi-channel format without needing to add extra
speakers or equipment. Dialog clarity, bass
enrichment, and the addition of stereo audio
enhancement produces an impressive sound
experience from standard stereo equipment.
07-287_NS-PDP50_English Only.fm Page 17 Wednesday, July 11, 2007 12:05 PM

18
Insignia NS-PDP50 50" Plasma TV-720P
www.insignia-products.com
To create a custom sound mode:
1Press MENU, then press or to select
AUDIO. The
AUDIO
menu opens
2Press , then press or to select EZ
Sound.
3Press , then press or to select User.
4Press , then press or to select the
sound option you want to adjust. You can
select Treble, Bass, or Front Surround.
5Press , then press or to adjust the
option. The options for Front Surround are
Off or SRS TruSurround XT.
6Press EXIT to return to TV viewing, or press
MENU to return to the previous menu.
Adjusting the balance
To adjust the balance:
1Press MENU, then press or to select
AUDIO. The
AUDIO
menu opens
2Press , then press or to select
Balance.
3Press , then press or to adjust the
balance.
4Press EXIT to return to TV viewing, or press
MENU to return to the previous menu.
Selecting the audio language
To select the audio language:
1Press MENU, then press or to select
AUDIO. The
AUDIO
menu opens
2Press , then press or to select Audio
Language.
Note
When you set Front Surround to SRS
TruSurround XT, the Balance option is
automatically set to 0. When you switch to another
mode, the balance is restored to the previous
value.
Note
The available languages depend on what
languages the broadcaster provides.
07-287_NS-PDP50_English Only.fm Page 18 Wednesday, July 11, 2007 12:05 PM

19
Insignia NS-PDP50 50" Plasma TV-720P
www.insignia-products.com
3Press , then press or to select the
language.
4Press EXIT to return to TV viewing, or press
MENU to return to the previous menu.
Turning the speakers on or off
If you are using an external sound system, you
need to turn off your plasma TV’s speakers.
To turn the TV speakers on or off:
1Press MENU, then press or to select
AUDIO. The
AUDIO
menu opens
2Press , then press or to select TV
Speaker.
3Press , then press or to select On or
Off.
4Press EXIT to return to TV viewing, or press
MENU to return to the previous menu.
Setting the clock
You can set the clock automatically from a digital
channel signal provided by a broadcaster. You
can also set the clock manually.
If you set the clock automatically and the time is
wrong, set the clock manually.
Setting the clock automatically
To set the clock automatically:
1Press MENU, then press or to select
TIME. The
TIME
menu opens.
2Press , then press or to select Auto
Clock.
3Press , then press or to select On.
4Press , then press or to select the time
zones. You can select:
In the United States:
•Eastern
•Central
• Mountain
• Pacific
•Alaska
• Hawaii
In Canada:
•Eastern
•Central
• Mountain
• Pacific
• New F.land
•Atlantic
5Press , then press or to select the
daylight savings option. You can select:
•Auto
•Off
•On
6Press EXIT to return to TV viewing, or press
MENU to return to the previous menu.
To set the clock manually:
1Press MENU, then press or to select
TIME. The
TIME
menu opens.
2Press , then press or to select Manual
Clock.
Note
The default Auto Clock setting is Off.
07-287_NS-PDP50_English Only.fm Page 19 Wednesday, July 11, 2007 12:05 PM

20
Insignia NS-PDP50 50" Plasma TV-720P
www.insignia-products.com
3Press , then press or to select Year,
Date, or Time.
4Press , then press or to set the year,
date, or time.
5Press EXIT to return to TV viewing, or press
MENU to return to the previous menu.
Setting the on and off timers
You can set the on and off timers to turn your
plasma TV on and off at set times.
To set the on and off timers:
1Press MENU, then press or to select
TIME. The
TIME
menu opens.
2Press , then press or to select Off
Timer or On timer.
3Press , then press or to select On.
4Press , then press or to set the hour.
5Press , then press or to set the
minutes.
6For the on timer only, press , then press
or to select the channel you want your
plasma TV to tune to when it turns on.
7For the on timer only, press , then press
or to set the volume you want when your
plasma TV turns on.
8Press EXIT to return to TV viewing, or press
MENU to return to the previous menu.
Setting the sleep timer
You can specific the amount of time you want
your plasma TV to stay on before it automatically
turns off. If you turn off your plasma TV before
the time has expired, the sleep timer is
automatically turned off.
To set the sleep timer:
1Press SLEEP one or more times to select the
number of minutes you want your plasma TV
to stay on before it turns off. You can select
10, 20, 30, 60, 90, 120, 180, or 240 minutes.
2Press SLEEP again to save your selection.
Your plasma TV starts counting down the
minutes.
3To check the remaining minutes, press
SLEEP once.
4To cancel the sleep timer, press SLEEP one
or more times until Off appears.
Turning Auto Off on and off
If your plasma TV is turned on and is not
receiving an input signal, it turns off
automatically after 10 minutes. You can turn this
option off or on.
To turn the Auto Off feature on and off:
1Press MENU, then press or to select
TIME. The
TIME
menu opens.
2Press , then press or to select Auto
Off.
3Press , then press or to select Off or
On.
4Press EXIT to return to TV viewing, or press
MENU to return to the previous menu.
Notes
You must set the clock for the on and off timers to
work.
If you set the on and off times to the same time,
your plasma TV turns off.
Your plasma TV must be in standby mode for the
on timer to work.
If you do not press any button within two hours
after your plasma TV turns on, your plasma TV
turns off automatically.
Note
To turn off the timer, select Off.
Note
You can also set the sleep timer from the
TIME
menu.
07-287_NS-PDP50_English Only.fm Page 20 Wednesday, July 11, 2007 12:05 PM
Table of contents
Other LG Plasma TV manuals
Popular Plasma TV manuals by other brands

Zenith
Zenith Z60PV220 Product description

Panasonic
Panasonic TH37PR10UA - HD PLASMA DISPLAY Manual de instrucciones

Optoma
Optoma SP50A Specification sheet

Panasonic
Panasonic TC-P42C1 - 41.6" Plasma TV operating instructions

Panasonic
Panasonic Viera TX-P42G10E operating instructions

Sony
Sony WEGA KE-W50A10E quick start guide