Life Smart LSAF520T3 User manual

Questions, problems, missing parts? Contact technical support department at
657-341-0362, 9:00 a.m. - 5 p.m., PST, Monday - Friday or visit us Online at
www.lifesmartcomfort.com
Please have your model and serial number ready
1
ATTACH YOUR RECEIPT HERE
Purchase Date ____________Serial Number (located on back of unit) __________________
LIFE SMART® is a registered trademark of
Supply Chain Sources LLC., All Rights Reserved.
REV1-092220
AIR FRYER GRILL
Model #LSAF520T3

2
TABLE OF CONTENTS
Package Contents ............................................................... 3
Safety Information .............................................................. 4
Preparation .................................................................... 8
Control Panel. . . . . . . . . . . . . . . . . . . . . . . . . . . . . . . . . . . . . . . . . . . . . . . . . . . . . . . . . . . . . . . . . . . 9
Operating Instructions .......................................................... 11
Care and Maintenance .......................................................... 12
One-Year Limited Warranty ...................................................... 13
Technical Support .............................................................. 14

3
PACKAGE CONTENTS
8
9
10
11
12
13
14
1
2
3
4
5
6
7
PART DESCRIPTION QUANTITY
1 Air Fryer 1
2 Control Knob 1
3 Control Panel 1
4 Power Cord 1
5 Heating Chamber 1
6 Door 1
7 Door Handle 1
8 Cage Tong 1
9 Rotisserie Prongs 1
10 Wire Rack 1
11 Fryer Mesh Basket 1
12 Grease Drip Tray 1
13 Fryer Basket 1
14 Bamboo Grill 1

4
SAFETY INFORMATION
Please read and understand this entire manual before attempting to assemble, operate, or install the product.
IMPORTANT SAFETY INSTRUCTIONS
WARNING: POTENTIAL ELECTRICAL HAZARD IF NOT ADHERED TO. When using electrical appliances,
basic precautions should always be followed to reduce the risk of fire, electric shock, and injury to persons,
including the following:
• This appliance must be plugged into a 120 V, 15 amp (or more) circuit of its own. Do not plug anything
else into the same circuit. If unsure if your home meets this specification, consult a certified electrician
prior to use. Risk of fire, overheating, malfunction, property damage, injury, or even death may
result if not adhered to!
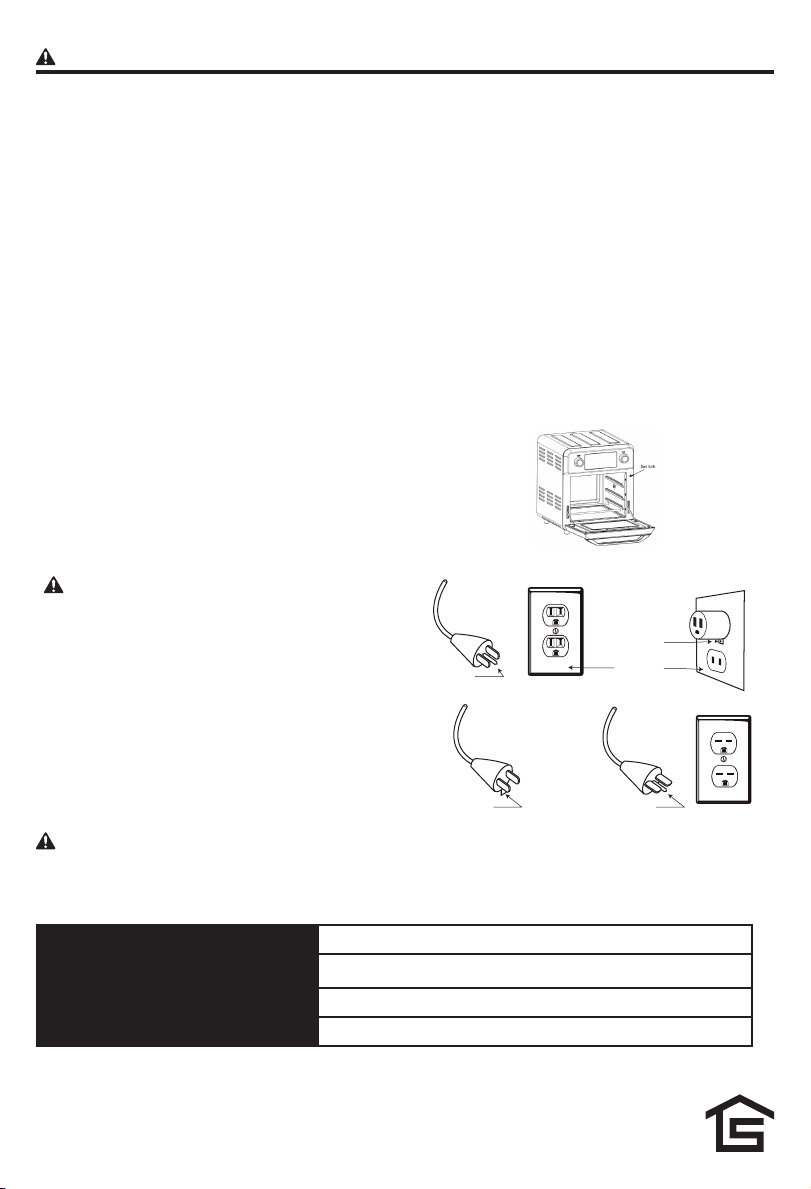
• Connect to a properly grounded, 3-prong outlet only. Do not connect the appliance to extension cords,
surge protectors, timers, direct breakers, or an outlet with other appliances connected to the same
outlet. Risk of fire, overheating, malfunction, property damage, injury, or even death may result if
not adhered to!
• This appliance is hot when in use and after including it’s accessories. To avoid burns, do not let bare
skin touch hot surfaces or the inside immediately after use.
• Keep combustible materials, such as tablecloths, wallpaper, and curtains at least 3 ft. (0.9 m) from the
front of the unit and keep them away from the sides and rear of the appliance.
• This appliance is not designed to be used by people (including children) with a physical, sensory
or mental impairment, or people without knowledge or experience, unless they are supervised or
given prior instructions concerning the use of the appliance by someone responsible for their safety.
Children must be supervised to ensure that they do not play with the appliance.
• Keep the appliance and its cord out of reach of children less than 8 years.
• Always unplug the unit when not in use or during cleaning.
• Do not operate with a damaged cord or plug or after the unit malfunctions, has been dropped, or
damaged in any manner. Contact the manufacturer for resolution options.
• Do not use outdoors. Exposure to outdoor elements such as rain, snow, sun, wind, or extreme
temperatures may cause the unit to become a safety hazard.
• Do not immerse the power cord, plug or housing in water or under the tap during cleaning to avoid risk
of electrical shock or damage. Never place the appliance where it may fall into a sink.
• Do not let cord hang over the sharp edge of counter.
• The unit must be plugged into a wall outlet that is a dedicated circuit with a minimum 15 amp rating
on that individual circuit.
• To disconnect the unit, first turn the power button to the OFF position and then remove the plug from
the wall outlet.
• Do not allow foreign objects to enter or block any ventilation or exhaust opening as this may cause
electric shock, fire, or damage the unit.
• Use this unit only as described in this manual. Any other use not recommended by the manufacturer
may cause fire, electric shock, or injury to persons.
• Do not use abrasive solvents to clean the unit as it may cause damage to the finish or casing.
• To prevent a possible fire, do not block air intakes or exhaust in any manner. Do not use on soft
surfaces, like a bed, where opening may become blocked.
• Always plug appliances directly into a wall outlet/receptacle. Never use with an extension cord or
relocatable power tap (outlet/power strip).
• Avoid any liquid entering the appliance that can cause electric shock or short circuit the appliance.
• The accessories will be hot during use, handle with care. Please use the handle, tong or glove instead
of hand touching directly.
• Do not let cord hang over the sharp edge of counter.
• Do not plug in power cord or operate the appliance with wet hands.
• Do not put plastic or paper dishware into the appliance and operate.
• The appliance should be put on a horizontal and stable surface when using. Do not put it on plastic,
board or any other hot-short, easy-wear surface.
• Do not place anything on the top of appliance.
• Do not use this product unattended.

5
SAFETY INFORMATION
• During the appliance operation, hot steam is released through the air outlet openings. Keep your
hands and face at a safe distance from the steam and the air outlet openings. Be careful and be aware
of hot steam released when opening the door or taking out the accessories from the appliance.
• Once finish cooking and take out the accessories, the accessories are with very high temperature. Do
not touch them directly.
• Do not use any accessories that are not provided by the manufacturer.
• Clean and wipe dry the accessories before putting the food inside.
• Appliances are not intended to be operated by means of an external timer or separate remote-control
system.
• The door or the outer surface may get hot when the appliance is running.
SAVE THESE INSTRUCTIONS
Door Safety Switch
This appliance is equipped with an open-door safety
switch feature. Once the appliance door is opened,
an internal switch will automatically shut the
appliance off and display “--”. Once the appliance
door is closed the appliance will turn on.
WARNING: This unit has a voltage rating of
120 volts. The cord has a three-blade, grounding-
type plug. An adapter is available for connecting
three-blade grounding-type plugs to two-slot
receptacles. The grounding lug extending from
the adapter must be connected to a permanent
ground such as a properly grounded outlet box.
The adapter should not be used if a three-slot
grounded receptacle is available.
DO NOT DEFEAT THE SAFETY PURPOSE OF THE
GROUNDED PLUG.
Grounding Pin
Grounding Means
Grounding Pin
Metal Screw
Cover of Grounded
Outlet Box
WARNING: It is normal for the power cord to feel warm to the touch. However, a loose fit between the
outlet and the plug may cause overheating of the plug. If this occurs, try inserting the plug into a different
outlet. Contact a qualified electrician to inspect the original outlet for damage.
Specifications
Voltage Rating 120 V (60 Hz)
Power Consumption 1,700 W
Unit Size 14.57 in. (W) x 12.99 in. (D) x 14.96 in.(H)
Unit Weight 21.91 lbs.

6
PREPARATION
BEFORE FIRST USE
1. Remove all packaging materials, stickers and labels.
2. Clean all other accessories with hot water, dish washing liquid, and a non-abrasive sponge.
3. Wipe the inside and outside of the appliance with a cloth.
4. During initial use it is normal to smell a slight odor due to the unit’s manufacturing process.
This odor will sometimes be present when the box is opened. When the unit is exposed to heat, it
produces this particular odor during the first few hours of operation. This will dissipate after the
break-in period. If you are sensitive to odors, you may want to pre-burn the unit in a garage with the
door open until the initial odor dissipates.
DRIP TRAY
Open front door, put drip tray into the appliance(under the bottom heating element) according to the
directions shown in the figure below.
WIRE RACK
Insert the wire rack or other accessories into the appliance according to the directions shown in the
figure below.

7
PREPARATION
MESH BASKET
Put the food into the mesh basket, put it into the inner chamber, close the door. As below photos.
ROTISSERIE
The rotisserie attachment allows for poultry to cook more evenly by rotating 360º while cooking.
Below figures show the right way to cook a whole chicken with spindle and rotisserie forks:
CAGE TONGS
Use the tong to take the rotisserie fork into or out of the appliance. As shown in the figure below. This
tong helps prevent any possible burns from hot metals and food.

8
PREPARATION
AIR FRY BASKET WITH HANDLE
Assemble the handle by clipping it into the corresponding slot of the basket. Place food into the
basket, and insert basket into the chamber. Remove the handle, then close the door. Remember to
slide the wire rack into the lowest slot and then place basket onto the wire rack. As shown in below:
After cooking, please make sure that the handle and the basket are tightly connected, grab the handle,
remove the basket from the cavity, and put it in a safe horizontal plane.
BAMBOO GRILL PLATE
Put steak onto the bamboo grill, put the grill into the bottom layer above the heating tubes, as below
photos, and then close the door, set up the GRILL function and start.
Note:
• Choose the proper accessories for different cooking methods.
• Use personal gloves to take remove the drip tray, wire rack, mesh basket after cooking completed.
• Use cage tong to take out the rotisserie fork or rolling cage.
• Please always keep the drip tray in the lowest position for gathering oil from fried food.
• Don’t put the food close to the heating tube, keep the distance of 1.5 inches minimum, to allow food
expansion and avoid burning by touching hot internal cabinet.

9
CONTROL PANEL
321
PART NAME DESCRIPTION
1 Temperature Dial Adjusts temperature up and down and indicates set temp.
2 Preset Cook Modes Preset cooking time and temperature for various food.
3 Time Dial Adjusts off-time up and down and indicates remaining time.
Cooking guide for common items below, can be adjusted to meet variables of quantity and size. Rotate
food regularly, and adjust cooking time/temp based on size of foods.
MENU DEFAULT
TEMP
DEFAULT
TIMER
ADJUSTABLE
TEMP
ADJUSTABLE
TIMER
HEATING
ELEMENT
FRIES 430ºF 20 mins 120ºF - 500ºF 1 - 120 MIN TOP+BOTTOM
WINGS 400ºF 15 mins 120ºF - 500ºF 1 - 120 MIN TOP+BOTTOM
CHICKEN 430ºF 30 mins 120ºF - 500ºF 1 - 120 MIN TOP
PIZZA 360ºF 10 mins 120ºF - 500ºF 1 - 120 MIN TOP+BOTTOM
TOAST 430ºF 6 mins 120ºF - 500ºF 1 - 120 MIN TOP+BOTTOM
FISH 360ºF 15 mins 120ºF - 500ºF 1 - 120 MIN TOP+BOTTOM
BAKE 360ºF 12 mins 120ºF - 500ºF 1 - 120 MIN TOP+BOTTOM
DEHYDRATE 160ºF 480 mins 120ºF - 160ºF 10 - 720 MIN TOP
GRILL 500ºF 12 mins 120ºF - 500ºF 1 - 120 MIN TOP+BOTTOM
AIR FRY 450ºF 12 mins 120ºF - 500ºF 1 - 120 MIN TOP+BOTTOM

10
OPERATING INSTRUCTIONS
1. Once the unit is plugged it will indicate receiving power with, the buzzer ring once, and digital
display will illuminate once, then turn off.
2. Press “ “, button to turn the appliance into standby mode.
3. In standby mode, all function are locked, except: “ ”,“ ”,“ ”,“ ”,“ ” .
4. In standby mode, the unit will shut off automatically if no selection is made within 60 seconds.
5. In standby mode, press the menu button to select a function. Once mode is selected, press “ ”
to begin cooking.
6. Time and Temperature can be adjusted by turning the dial on clockwise to increase or
counterclockwise to decrease anytime during cooking or before selecting a cooking mode.
7. In mode selection, press ”ROTISSERIE ” ” and LIGHT ”, the corresponding indicator light
will illuminate up, the interior light in the appliance will light up and the rotisserie function will
start working.
8. If you press “ ” during the working process, the appliance will skip into the standby mode
immediately, other electrical parts will stop working. The fan will stop after continuing working for
a minute and it can play a role of heat dissipation. If you open the door at this time, the fan will stop
working immediately, or when you press “ ”, it will shut down immediately.
SETTING COOKING TIME AND TEMPERATURE
1. After selecting the function, set the desired OFF-Time or adjust the cooking temperature by rotating
the appropriate dial clockwise to increase or counter clockwise to decrease.
2. Set cooking temperature between 120ºF to 480ºF in 10º increments each turn.
3. Set OFF-Timer between 1 min to 120 min in 1 minute increments each turn.
4. “DEHYDRATE” mode, set temperature between 120ºF~160ºF and set time between 10min~720min.
HEATING ELEMENT SELECTION
5. “CHICKEN”,“DEHYDRATE” will operate with top heating tube only.
6. Other MODES can use either top or bottom: After function is selected, press “TOP HEATING ”
or “BOTTOM HEATING ”to engage or disengage the heating element. The corresponding light
will illuminate on the control panel.
PAUSE FUNCTION
During cooking, the appliance will stop automatically when door is opened. Only the following will
functions operate: “ ”,“ ”,“ ”.
Note: If the door is opened during cooking and not closed within 10 minutes the appliance will shut off
automatically.
ROTISSERIE FUNCTION
1. This mode allows food to be cooked rotating 360º. See page 9 for rotisserie assembly instructions.
Note: Select the appropriate chicken size (around 3lbs) to not touch any sides of the unit and allowing
proper rotation. Secure the chicken legs and wings with strings and make several holes in the
chicken legs to allow for proper heat penetration.

11
OPERATING INSTRUCTIONS
MANUAL MODES
Press ” ” for standby power mode, then press” ” key to enter manual mode. Default temperature
and time is 300ºF, 20 minutes. You can increase or decrease the desired temperature between 120ºF~
480ºF and off timer between 1 min-120 min using the corresponding knobs on the control panel. Along
with selecting the desired heating element or rotisserie function. Press “ “ to start cooking.
FINISH COOKING
1. When cooking modes is complete the buzzer will “DING” and the appliance will turn off. The fan will
continue to operate for 90 seconds to allow the internal chamber cool.
2. Open the door, then use insulated gloves or cage tong to take out the accessories from the inner
chamber, and place on a heat resistant surface.
PAUSE FUNCTION
During cooking, the appliance will stop automatically when door is opened. Only the following will
functions operate: “ ”,“ ”,“ ”.

12
CARE AND MAINTENANCE
WARNING: Before performing any maintenance task, turn off the unit, unplug the unit, and allow it to
cool completely.
1. To keep the unit clean, clean the outer shell and inner shell with a soft, damp cloth. After cleaning,
dry the unit with a soft cloth.
2. To keep the accessories clean, use a soft, damp cloth. Use a mild detergent if necessary. After
cleaning, dry the accessories with a soft cloth.
CAUTION: DO NOT let liquid enter the unit.
1. DO NOT use alcohol, gasoline, abrasive powders, furniture polish, or rough brushes to clean the
unit. This may cause damage or deterioration to the surface of the unit.
2. DO NOT immerse the unit in water.
3. Wait until the unit is completely dry before use.
4. If you will not be using the unit for a while, take the batteries out of the remote control and store
for future use.
5. Store the unit in a cool, dry location when not in use. To prevent dust and dirt build-up, use the
original packaging to repack the unit.

13
ONE-YEAR LIMITED WARRANTY
The manufacturer warrants this unit against defects in materials and workmanship on functional parts,
for a period of 1 year from the original date of purchase. Your sales receipt showing the date of purchase of
the product is your proof of purchase. Keep it in a safe place for future reference. This warranty is subject
to personal use only, commercial or rental applications will not be covered.
This product is made with the highest quality materials and is warranted to be free from defects
in materials and workmanship at the time of purchase. This limited warranty applies to products
manufactured or distributed by the manufacturer, are delivered in the continental United States or
Canada and extends to the original purchaser, or gift recipient. This warranty becomes valid at the time
of purchase and terminates either by the specified time frame listed above and/or owner transfer. Any
refunds or monetary compensations must be claimed through the place of purchase (retailer), and
not through the manufacturer. Any extended warranties (warranties that cover above and beyond this
manufacturer warranty) that are sold through a retailer or third party, are not directly correlated with this
products’ limited warranty, and may be redirected to said retailer or third party for coverage.
This warranty extends through the manufacturer of the product, and covers functional parts only.
Cosmetics are not covered, unless unequivocally determined it is a workmanship defect. Shipping damage
should be addressed with the shipping company, retailer, or place of purchase, not the manufacturer
unless the manufacturer was the direct shipper.
The manufacturer’s sole obligation under this warranty shall be limited to furnishing the original purchaser
replacement parts for units deemed repairable by the supplier’s warranty department. The purchaser
is responsible for insuring any parts shipped or returned, if desired. The purchaser is responsible to
prepay any shipping charges (both ways) including, but not limited to taxes and duties. All exchanged parts
and products replaced under this warranty will become the property of manufacturer. The manufacturer
reserves the right to change manufacturers of replacement parts or products for use, in order to cover
any existing warranty.
The purchaser may be asked to provide the supplier with proof of purchase documents (including the date
of purchase) if requested. Any evidence of alteration, erasing, or forgery of proof of purchase documents
will be just cause to VOID this limited warranty. Products, in which the serial number has been defaced or
removed are not eligible for warranty coverage.
This warranty does not apply if the unit has been subject to negligence, fabrication, misuse, abuse, or
repairs, alteration by non-manufacturer authorized personnel, inappropriate installations, or any case
beyond the control of the manufacturer. Examples of warranty invalidation may also include, but are not
limited to:
• Use of lacquer or paints in (and around) the appliance
• Appliance placed on non-approved surfaces
• Electrical requirement deficiencies (15-20 amp dedicated outlet)
• Use on extension cords/timers/surge protectors/GFCI
• Outdoor applications
• Normal wear/tear/weathering
• Pet/consumer accidents
• Purchases from dealers unauthorized by the manufacturer (Authorization in writing)
The manufacturer shall not be liable for any loss due to use (or misuse) of the unit or other incidental
or consequential costs, expense or damages without irrefutable foundations. Under no circumstances
shall the manufacturer or any of its representatives be held liable for injury to any person or damage to
any property, however arising. Any implied warranty shall have duration equal of the applicable warranty
stated above. Specifications are subject to change without notice or obligation.
This limited warranty gives the original purchaser specific legal rights. Other rights may vary from state
to state.

Printed in China
lifesmart® is a registered trademark
of Supply Chain Sources., All Rights Reserved.
PLEASE REMEMBER TO REGISTER YOUR WARRANTY:
web: www.lifesmartcomfort.com
email: cs@scsources.com
14
CUSTOMER SERVICE OR TECHNICAL SUPPORT
For customer service or technical support department please call 657-341-0362, 9 a.m. - 5 p.m., PST,
Monday - Friday or email your questions to cs@scsources.com
Table of contents