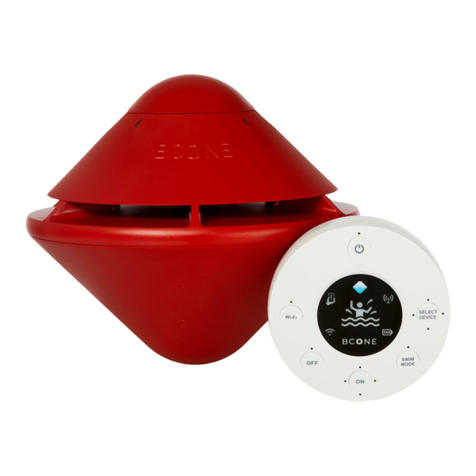
Lifebuoy LBPABUOY1 User manual

1

2

3
Congratulations on
the purchase of the
Lifebuoy Pool Alarm
System
We at Lifebuoy love
pools and believethat
poolscanandmustbe
safer for children and
toddlers.
The system was tested in accordance
with the ASTM F2208 Standard and is
intended to warn of falling into the
pool and when the cover is removed.
This guide is intended to review the
safety instructions and manner of
operating the warning system.
Itisrecommended tokeep thisguide
handy for futurereading.

4
Important
Read this guide fully prior to use.
Lifebuoyisexclusivelya safetydevice
and isnot alifesaving product.
Under nocircumstances should you
relate to this product as a substitute
for other means of safety, such as
a lifeguard, parental supervision,
fences, gates andso on.
Without detracting from the
aforementioned, your attention is
drawn to the fact that the product
may not sound a warning in cases
ofgradual entry into the pool.
Ensure that the system covers the
entire area of the pool and if
necessary adjust the sensitivity of
the system.
Do not leave objects in the pool
when the system is activated.
Thesystemwarningwhenopening
a pool cover has been tested for
vinylcoversthatarelightproof.The
warningisbasedonlightsensorsin
the floating unit and will not work
properly with a solar cover or any
other cover that is not sufficiently
lightproof.Furthermore, this mode
is not intended for use when the
outside lighting is weak (for
example, atnight).

5
Package Contents
Thepackage was uniquely designed
to provide protection for thelifebuoy
system until it is purchased. Check
the integrity of the packaging prior to
initial opening.
The package contains:
•
User’s guide including the
warranty certificate.
•
Floating unit1
•
Transparent balancing cone2
•
Control unit
3
1. Floating unit
2. Transparent balancing cone
3.
Control unit (Homeunit)

6
Definitions and Manner
of Action in Principle
The Floating unit
•
The floating unit contains an
alarmservingasawarningandfor
indication.
•
The floating unit contains abroad-
casting and receiving processor
that serves for communications
with the control unit.
•
The floating unit contains
miniature sensors whosepurpose
is to identify activity in the pool,
such as a fall into the water or
opening ofthe cover.
•
Atransparentconeisconnected
to the floating unit and serves to
stabilize thesystem.
The control unit
•
The control unit contains analarm
serving as a warning and for
indication.
•
The control unit contains a broad-
casting and receiving processor
that serves for communications
with the floating unit.
•
The control unit contains a
broadcasting and receiving
processor that serves for
communications with a cellular
device (smartphone).
•
The control unit contains a button
in the shape of a life buoy, and
this button serves for controlling
the system. The possibilities for
use of the button are described
later in this guide.
Manner of action in principl
When the system is activated, the
sensors in the floating unit operate
continuously in order to sense any
changes in the environment of the
pool. The floating unit’s processor
analysesthedatafromthesensors.
Iftheprocessingunitdeterminesthat
there wasa fall into the water (and/or
openingofthe cover) the alarm inthe
floatsoundsanda notification issent
to the control unit, which operates
the control alarm in response.

7
Installation
Connect the cone to the floating unit,
as shown in the illustration (make
sure cone is securely connected),
andplace the system in the pool.
On the perimeter of the floating unit
are two holes through which nylon
string can be threaded to secure the
system to a specific area of the pool.
Instructions for securing the unit
appearlater in thisguide.
Install a 9Vbattery in the control unit
asshown in the illustration:
Pay attention to the proper
directionofinstallation(polarity)of
the battery. Incorrect installation
could cause harm to the device
andvoid the warranty.
Choose a location for hanging the
control unit.
Do not install the
control unit at this stage.
Tips for selecting a location for the
control unit:
1. Select a high location, out of the
reach of children.
2. Install the unit as close as
possible to the floating unit in
the pool. The closer the two
units are, the longer the battery
will last, and the better the
communications between the
units will be.
3. Choose a location that is easily
accessible.
4.
The control unit is an indoor unit
andis notintended to withstand
outdoor conditions or any
dampness.

8
Testingtheselectedlocationofthe
control unit.
In order to ensure that the location
is suitable, test the quality of
communication between the units:
1. Install the Lifebuoy application
(Lifebuoy Alarm mobile app).
2.
Secure the floating unit at the
desiredplaceatthepool(away
from the poolpump).
3.
Position the control unit atthe
selected location.
4.
Operate theapplication.
5.
Press on the operating button of
the control unit and wait up to30
seconds for indication of the
applicationdescribingthequality
of the connection between the
control unit and the floating unit:
6. If the level of communications is
“good" or “great” the control unit
can be installed at the selected
location. If the communication
level is “poor” another location
must be selected. Repeat
this stage until proper result
obtained.
7. Turn off the device by a long
push of about 3 seconds and 3
beeps will be sounded by the
control unit followed by 3 beeps
from the floating unit.
Direction of the outlet of the
pump
Direct the opening of the outlet of
the pump downwards asshown in
the illustration:

9
Operating the System
The floating unit must be in the pool
when the system is activated.
The system has two operating modes:
Pool without a cover:
From a shut
down state or stand-by, a short pushon
Pool with a cover:
From a fully shut
downstate(not stand-by)a long push on
thecontrol unit button will activateit.
•
Push on the button for 3 seconds
until 4 beeps are heard from the
control unit, accompanied by 4
beeps from the floating unit and a
green light will appear on the
the control unit button will activate it
•
•
When the button is pushed a
single beep will be sounded by
the floating unit accompanied by a
control unit for a few seconds.
Afterwards a green light will
flash on the control unit every 6
seconds.Nolightwillflashonthe
floating unit in thismode.
single beep from the floatingunit,
while a green light will show fora
fewsecondsonthecontrolunit.
•
Afterwards a green light will flash
every 2 seconds on the control
unit and a green light will flash
every 20 seconds on the floating
unit.
•
Thesystem willactivate15 seconds
fromthe timeofoperation,and an
alarm will sound in the event of a
fall into the pool
•
This mode should only be
operated when the pool has no
cover.
•
The system will activate 15
seconds after operation and an
alarm will sound in the event of
the cover being opened and/or a
fall into the water.
•
This mode shall only beoperated
when the pool iscovered.

10
Shutting Down the
System
•
When the system is operating (with/
without a cover) or during an active
alarm.
Short press on the control unit
operation similarly to regular
operation (see page 12).
The system will reactivate to
regular mode, also if prior to the
button being pushed the
operational state of the system
was thatofa covered pool.
buttontransfersto stand-by mode:
•
If an alarm is sounded prior to
enteringstand-bymode,itwillbe
neutralized andcease.
•
Two beeps will be heard from the
control unit, accompanied by two
beeps from the floating unit. The
system will move to stand-by.
Red and green lights will flash on
the control unit every 2 seconds.
No light will flash on the floating
unit in this mode.
•
When the system is in stand-by
mode it will not warn of opening
the cover and/or falling into the
pool.
•
Tenminutesafterthesystemhas
sensed nomovementin thepool
thesystemwillreactivateandwill
perform automatic tests upon
Long push on the button of the
control unit for total shut down:
•
Push the button for 3 seconds until
3 beeps are heard from the control
unit, accompanied by a single red
flash. The floating unit will also
beep 3 times and the system will
shutdown.
•
In this state the system is not
operational and will not warn in
the event of a fall into the pool
and/orraising the cover.
Transfertostand-by modefromthe
floating unit in the pool:
•
When the system is switched on
and activated, holding the floating
unit vertically for a few seconds will
transfer the system to stand-

11
by mode.
•
When the unit is raised thesystem
will sounda warning and will cease
after a few seconds in a vertical
position.
•
Both the floating unit and the
control unit will sound 2 beeps,
and on the control unit red and
green lights will flash, as
described for stand-by mode.
•
In this state the system is inactive
and will not sound a warning in
the event of a fall into the pool
and/or raising the cover.
•
If a warning is sounded prior to
entering stand-bymode it will be
neutralized andcease.
•
After 10 minutes of absence of
movement, the system will
reactivate and a warning will
sound inthe event of afall into the
pool.
•
The system will reactivate to
regular state, even if prior to
leaving the water it had been in
anoperationalstateofacovered
pool.

12
Warning Alarm
In the event of a warning the alarm
will sound continuously for 3 minutes
from both the control unit and the
floating unit.
A steady red light will appear on the
control unit.
After the alarm is sounded it will cease
for 30 minutes during the course of
which the system is inactive and will
not sound a warning in the event of a
fall into the pool and/or raising the
cover.
After 30 minutes of inactivity, and
providing that during the last 10
minutes the system sensed no
movement in the pool, the system
will turn on. If the system senses
movement the turning on will be
delayed until the system senses no
movement for10 minutessimilarly to
stand-by mode.
If the user turns the system off and
on during the 30 minutes of
inactivity, the system will return to
operation immediately (the system
will activate 15 seconds after
operation).
Neutralization of the system during
the sounding of the alarm can be
performed by means of each of the
3 ways of switching the system off:
1. Transfer to stand-by mode by a
short push on the control unit
button.
2.
Fullshutdown bya long push on
the control unitbutton.
3.
Transfer to stand-by mode by
holdingthefloatingunitvertically
forafewsecondsasshowninthe
illustration:
Automatic Testing
When Operating
In order to ensure that the system
activatesproperlyafteritisoperated,
the system performs two self-tests
when operated:

13
1.
Operatingthesystemwhenthe
floating unit is not horizontal
If the floating unit is not in the
pool or encounters a physical
obstruction (causing it not to be
horizontal)thesystem cannotbe
operatedproperly.Whenoperated
in this condition the floating unit
and the control unit will beep
everyfewsecondstowarnthatthe
systemisnotactivated.
In this case the system must be
shut down by pushing the
controlunitbutton(see“Shutting
down the system”). Ensure that
the floating unit is floating
horizontally in the pool and
operate onceagain.
2.
Operating the system when
there is no communication
between the units
Whenthereisnocommunication
between the units (for example
when they are too far apart), the
system cannot be properly
activated. A few seconds after
switching on the system, a loud
beep will be heard and the
system will switchoff.
1.
Operating the system when the floating unit
is nothorizontal
2.
Operatingthesystemwhenthereisno
communication between theunits

14
Automatic Testing when
the System is Activated
In order to ensure that the system is
working properly, the system
performsanumberofautomatictests
when operated:
Communication test
Every 15minutes the system checks
that communication is in order
between the control unit and the
floating unit. If the communication
test fails, green and red lights will
flash on the control unit every 2
seconds.
Batteries test
Therearetwobatteriesinthesystem,
one in the control unit and the other
in the floating unit. The systemtests
the levels of voltage in both batteries
every hour.
•
If the voltage level in the control
unit drops below 7 volts, the
control unit will sound a single
beep every 15 minutes. If this
occurs the battery in the control
unit must be replaced.
•
If the voltage level in the floating
unit drops below 7 volts, the
control unit will sound two beeps
every 15 minutes. If this occurs
the floating unit must be delivered
to the place of purchase for the
battery to be replaced.
Do not open the floating unit.
Openingthefloatingunitwillvoid
the warranty of the product and
couldharmitswaterproofness.
Furthermore do not submerge
thesysteminthewaterorleaveit
upside down in the pool.

15
Testing Good Working
Order
Mandatorypriortoinitialoperation
of the system or replacement of
the pool
•
The system is designed to warn
when a person or pet weighing 9
kilograms (20 lb) or more falls into
a pool that is up to 10 meters (32
ft)long.
•
To test that the system is in good
working order throw a water
different places around the pool.
•
Perform this working order test
prior to the initial operation of
the system and in each of the
following instances: If the user
choosesto securethe system by
anchoring it to a specific areaof
the pool that has not yet been
tested; for every change in the
definitionsofthe software; when
thepoolhasbeenchanged;after
changing the batteries andafter
the system has been stored
without use for any period of
container of 9 liters (or a six- pack
of mineral water in 1.5 liter
bottles; 9 liters are equivalent to
20 lb) into the pool from a height
of 20 centimeters (6" in), while the
floating unit is positioned at the
far end of the pool (up to 10
meters or 32'ft). The alarm should
sound within a fewseconds.
•
Switch off the system completely
(long push on the button) and
then switch on the system 10
minutes later (to ensure that
there arenomorewaves). Repeat
the process from a number of
time.
If the good working order test
fails, in other words the system
does not sound a warning, the
sensitivity of the system can be
calibrated and adjusted to the
pool (see the chapter “Adjusting
and calibrating the system’s
sensitivity”).
•

16
Testing Working Order
when Operating with a
Pool Cover
Mandatorypriortoinitialoperation
ofthe system or replacement ofthe
•
Operate the system in the
covered pool mode, asdescribed
on page 9.
•
Waitfor20secondsafteractivation
andthenraisethecoverto openit
partially, as shown in illustration
pool
•
•
Ifthereisnointentionofusingthe
system when the pool is covered,
you can skip this chapter.
on page 11.
A few seconds after opening the
cover the system should sound a
warning from both the floating
unitand from the controlunit.
•
The warning when the cover of
the pool is opened is based on
entry of light into the pool when
the cover isopened.
•
The warning may not work
properly if the cover is not
sufficiently lightproof.
•
The warning is not designed to
work when the light outside is
weak (for example at night).
•
It is recommended to use a vinyl
cover or any other completely
lightproof cover.
•
The test must be performed in
daylight.
•
Cover the pool while the floating
unit is in thepool.
•
Shut the system down completely
and repeat the test process by
opening the cover from different
sides of the pool.

17

18
Adjusting and Calibrating
the System'sSensitivity
If the working order test fails (see
chapter“Testing goodworkingorder”),
it is possible to calibrate the system’s
sensitivity and adjust it for the pool.
The system has 10 grades of
sensitivity with grade 1 being the
lowest sensitivity and 10 being the
highest.
The default sensitivity setting is 5. If
the system did not identify the object
being thrown unto the pool during the
test, the sensitivity of the system
should be increased, for instance to
raise it from 5 to 6 and tryagain.
Changingthesensitivitygrade:
The sensitivity grade can be easily
changed from the LifebuoyAlarm
mobile application (recommended) or
from the control unit.
Following are the
instructions for changing
the sensitivity grade from
the control unit:
1. Operating the system –a green
flash should be seen every 2
seconds.
2. Pushonthebuttonfor10seconds
–a number of beeps will be
heardaccordingtothesensitivity
grade (5 beeps is the default).
Thesystementersprogramming
mode. The system will exit
programming mode if no action
istakenfor10seconds,therefore
moverapidlyto thenextstep.
3. During the additional extended
push on the button, beeps will be
heard. The pushing on the button
should be stopped after the
required number of beeps is
reached according to the
sensitivity grade desired. If you
want to reach sensitivity grade 6,
stop after 6 beeps.
4. At the conclusion of the action
once again a number of beeps
will be heard according to the

19
new sensitivity grade to indicate
that the new sensitivity was set.
5. If the button is pressed for more
than 10 seconds, a double beep
will be sounded and the system
will enter stand-by mode (green
and red flashing lights every 2
seconds), without a change in the
sensitivity threshold.
6.
Please note that raising the
sensitivity grade could cause
false alarms, while lowering the
sensitivity may result in
decreased detectability offalling
into the pool.
SecuringtheFloating
Unit in the Pool
At the sides of the floating unit are
two holes intended for securing the
unit.
Securing the unit could prevent false
alarms as a result of the proximity of
the system to the pump outlet
opening or any other local
obstruction in the pool.
The location of the securing must be
distanced from the source of
obstruction in the pool.
Attach nylon string to one of the
holes at the side of the unit as
shown in the illustration:
The length of the nylon string must be
sufficient to enable the system to float
freely for a distance of about 30 cm
(approximately 12” inches) from the
sides of the pool. Attach the nylon
string to a stable part of the pool, such
as a ladder oruprights.

19
This manual suits for next models
1
Table of contents
Other Lifebuoy Security System manuals