manuals.online logo
Brands
  1. Home
  2. •
  3. Brands
  4. •
  5. Lifegard
  6. •
  7. Aquarium
  8. •
  9. Lifegard Intelli Feed R440950 User manual

Lifegard Intelli Feed R440950 User manual

USER MANUAL
R440950 UPC 788379 314088
MAIN FEATURES
u The LIFEGARD® Automatic Fish Feeder keeps food dry inside the
container and protects it from humidity resulting in trouble free operation
and prevents the possible formation of dangerous molds and toxins.
u Sealed container moves forward, rotates and drops the desired
amount of food, then returns back into housing….keeping moisture
out and food dry.
u Manually push Set button to feed at any time.
u Easy to program digital keyboard with LCD display.
u Designed to keep moisture out of food container for trouble free operation.
u Pre-programmed for 2 feedings per day (8:00 am and 6:00 pm), with
possible settings of up to 12 feedings daily, depending on the number of sh
in your aquarium. Can program up to Four dierent feeding times.....and
each feeding time can then be programmed to feed up to 3 rations of food....
for a total of 12 feedings withing a 24 hour period.
u Includes Aquarium mounting bracket that ts most aquarium tank frames.
u
Feeder operates with (4) AA 1.5V batteries or a 6V power supply (sold separately).
INSTALLATION
1. Open the battery compartment (fig. 1) and
insert (4) AA 1.5V batteries (not included).
2. When using the 6V Power Adapter, remove the protective cap
from feeder and insert the Power Adapter plug (g.1A).
3. Remove the food container by pulling it outwards (g. 2).
4. Open the food container by pulling the feeder cover (g. 3) and
ll it up to 1/2 inch from the top, without compressing the food.
5. Close the food container; adjust the desired quantity of food
by moving the slider (g. 4). Then insert the container into the
feeder housing (To check the quantity of the food portion,
manually press the SET button to start feeding)
fig. 1
fig. 2
fig. 3
fig. 4
fig. 1A
INSTALLATION continued
6. Attach the Aquarium Mounting Bracket onto the base of the
feeder by sliding it until the two front parts of both units are
aligned (g. 5)
7. Place the forked side of the Aquarium Mounting Bracket on the
top frame of the aquarium and then tighten by turning the screw
to the desired position. (g. 6)
INSTALLATION ON AQUARIUM TOP
1. If the Aquarium Mounting Bracket is not needed for proper
installation.....then turn the feeder upside-down and attach the
adhesive feet on the base (g. 7)
2. Position the feeder onto the top of the aquarium (or chosen
space) (g. 8).
fig. 5
fig. 6
fig. 7
fig. 8
PROGRAMMING
Programming is divided into two phases :
Time setting and feeding settings during a 24 hour
period, including the number of rations for each feeding (ration
means the quantity of food distributed from a single rotation of
the food container).
Setting of Time :
u After the batteries have been
inserted or the Power Adapter
is used, the display time
shows 00:00 with the hours
blinking.
u Adjust current time with
+ and – and then press
Set to store.
u Then the Minutes blink,
adjust with + and -, then store by pressing Set.
u The two dots will blink and the clock starts to work.
Hours Minutes
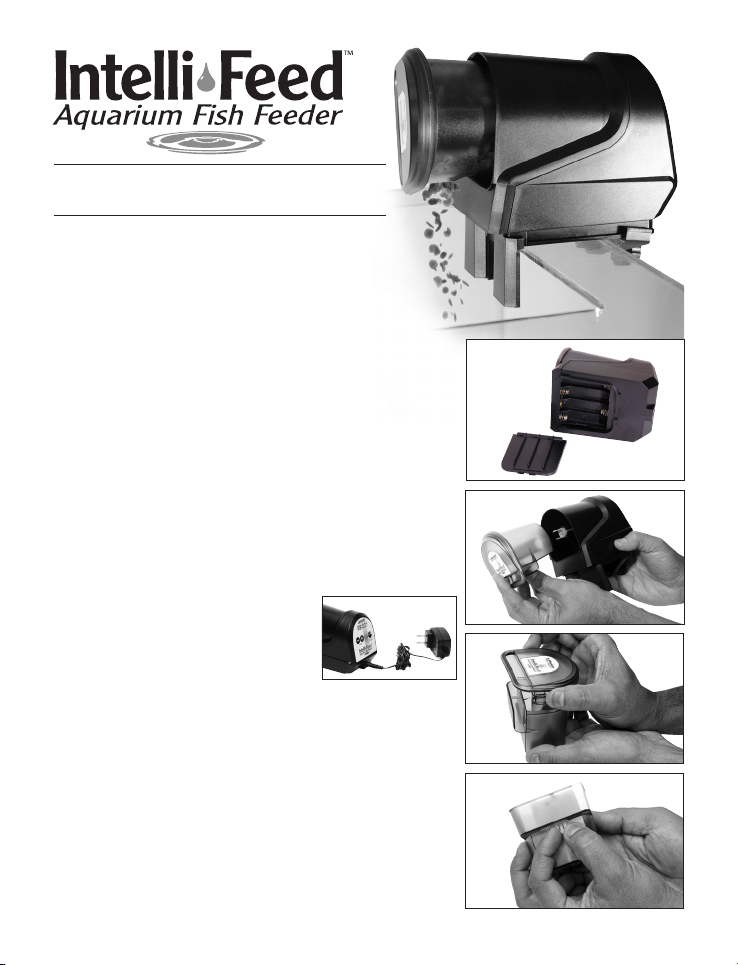
Programming of Feedings :
Very important notice ! Your feeder is already
programmed : Two standard feedings a day with
one single ration at 8:00 AM and 6:00 PM. If this is
sucient for your shes no additional programming
is required. If more or dierent options are needed
please proceed as follows:
u Press Set for 3 seconds (long press).
u The rst digit will show the number of
programmed feeding (1) and the last digit will
show a blinking 0. This digit is the number of
rations for each feeding, which have to be set by
pressing + or -, from a minimum of 0 (no feeding)
to a maximum of 3 rations. Then press set to store.
u The clock will appear in order to program the rst
feeding time. Set the rst feeding time (hours and
minutes) by pressing the + or – buttons.
u Now that the rst feeding is programmed, the
rst digit will show number 2. (The 2nd feeding to
program) and the last digit will show a blinking 0.
u Repeat same feeding procedure until the 4th
feeding is programmed. After the 4th feeding is
programmed the two dots of the clock will blink,
indicating the programming is completed.
SPECIAL FUNCTIONS
u The SET button can be pressed a short time for
manual feeding. This feature can be used to give
an additional feeding at any time or to check if the
right quantity of food is being dispensed by placing
the feeder over a paper sheet to observe the food
ration before installation.
u Press the SET and + simultaneously, and the
display will show the total number of feedings
(programmed and manual) since the feeder was
rst installed.
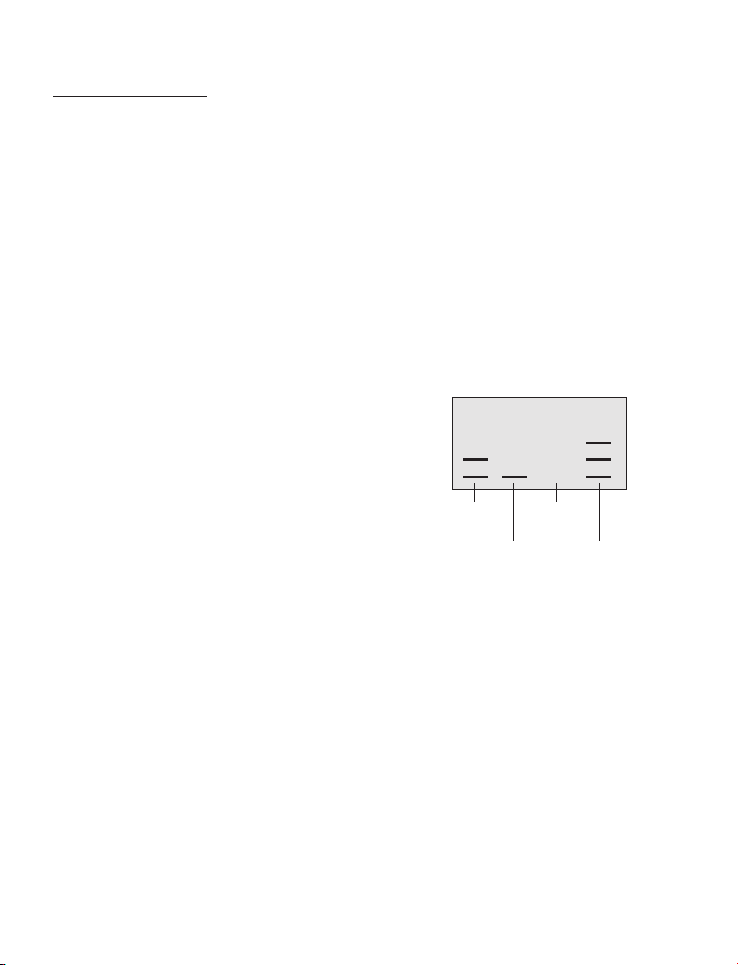
u Press the SET and – simultaneously, and the
display will show number of programmed feedings
in the form of horizontal segments (see illustration).
Meal 1 Meal 3
Ration 2 Ration 0
Meal 2 Meal 4
Ration 1 Ration 3
IMPORTANT NOTICE
u After replacing of the batteries, it is necessary to
re-program the time.
u Do not use rechargeable batteries.
u If the batteries have not been used for a long
time... replace them.
u It is recommended you use crisps or pellet food.
Before using ake food, make sure it is properly
crushed to allow a homogeneous distribution.
u When lling up the container make sure that
the food is not touching the central pivot on the
feeder housing as this may cause malfunctioning
and increased consumption of batteries.
TROUBLE SHOOTING
PROBLEM POSSIBLE CAUSE SOLUTION
Display does not turn on. No power supply available. Check to see if the batteries and/or
power supply is installed properly.
Food container is blocked Accidental block during Remove the food container. Do a manual
while closing. operation. reset and mount the food container again.
Feeder rotates outwards Dirty. Batteries exhausted. Dry clean the central pivot so that it
with diculties. rotates without friction. Replace batteries.
PARTS BREAKDOWN
COMPONENTS DESCRIPTION LIFEGARD PART # UPC#
A Feeder motor housing (Not a replacement part)
B Battery compartment cover R440952 788379314101
C Food container R440953 788379314118
D Slider for food dispensing R440954 788379314125
E “O” Ring, feeder cover R440955 788379314132
F Feeder cover R440956 788379314149
G Adhesive feet (4) R440957 788379314156
H Aquarium mounting bracket R440958 788379314163
I Optional 6V power adapter R440951 788379314095
WARRANTY
u This unit is warranteed for a period of 12 months from date of purchase and must be validated with copy
of original purchase receipt.
u Warranty requests by phone will not be honored.
u Warranty items returned without copy of original purchase receipt will not be honored.
u Products purchased from Ebay, Craig’s List, etc. cannot be honored for warranty unless returned by original
purchaser with proof of purchase.
u All items must rst be returned to Lifegard Aquatics for inspection, evaluation and processing to determine if
product qualies for warranty replacement or repair. No warranty (repair, replacement or credit) will be issued
prior to inspection of product.
u Please contact us rst for warranty assistance. Many times the product can be repaired
without the cost and time involved in sending it back to us. If absolutely necessary, return product
freight prepaid to the following address for warranty evaluation and processing:
13911 Struikman Road, Cerritos, CA 90703
562-404-4129 Fax: 562-404-4159
Email: info@lifegardaquatics.com
www. lifegardaquatics.com
Made in Italy

This manual suits for next models

1

Popular Aquarium manuals by other brands

Tetra Waterfall Globe quick start guide

Tetra

Tetra Waterfall Globe quick start guide

PAPILLON AquaParts MAGIC BUBBLE LED operating instructions

PAPILLON

PAPILLON AquaParts MAGIC BUBBLE LED operating instructions

TMC Reef Skim 100nano instructions

TMC

TMC Reef Skim 100nano instructions

Amtra FILPRRO EX 500 manual

Amtra

Amtra FILPRRO EX 500 manual

EHEIM 2324 Operating instructions and technical information

EHEIM

EHEIM 2324 Operating instructions and technical information

Tetra AirSilent Airpump Mini instruction manual

Tetra

Tetra AirSilent Airpump Mini instruction manual

CIANO Nexus Pure 25 user guide

CIANO

CIANO Nexus Pure 25 user guide

Deltec 400i operating instructions

Deltec

Deltec 400i operating instructions

Dennerle TR7 Tropic quick start guide

Dennerle

Dennerle TR7 Tropic quick start guide

Marineland Eclipse Three Quick setup guide

Marineland

Marineland Eclipse Three Quick setup guide

Ferplast Cayman professional Timer quick start guide

Ferplast

Ferplast Cayman professional Timer quick start guide

Red Sea REEFER G2+ Series Operation manual

Red Sea

Red Sea REEFER G2+ Series Operation manual

Ferplast BLUSKIMMER 250 user manual

Ferplast

Ferplast BLUSKIMMER 250 user manual

Reef Octopus SUPER REEF OCTUPUS XP-1000SSS quick start guide

Reef Octopus

Reef Octopus SUPER REEF OCTUPUS XP-1000SSS quick start guide

Deltec KM 500 Operating instructions and spare parts list

Deltec

Deltec KM 500 Operating instructions and spare parts list

D-D The Aquarium Solution KH Manager instruction manual

D-D The Aquarium Solution

D-D The Aquarium Solution KH Manager instruction manual

Waterbox REEF LX product manual

Waterbox

Waterbox REEF LX product manual

Oase EAC Aquarium Controller operating instructions

Oase

Oase EAC Aquarium Controller operating instructions

manuals.online logo
manuals.online logoBrands
  • About & Mission
  • Contact us
  • Privacy Policy
  • Terms and Conditions

Copyright 2025 Manuals.Online. All Rights Reserved.