Lifeproducts PT-01-NL User manual

2-in-1 electric
Lint remover
User manual
EN DE ES FR IT PL SENL

Contents
English
Deutsch
España
Français
Italiano
Nederlands
Polski
Dansk
01 - 05
06 - 10
11 - 15
16 - 20
21 - 25
26- 30
31 - 35
36- 40

Safety
English
1. Carefully read this manual before use, and keep for future
reference.
2. This appliance is only connects to USB port.
3. During charging.the appliance will not work.
4. Avoid recharging and storing in damp places.
5. Before use,check that the mesh cover is tight, otherwise the
appliance will not be able to work properly.
6. lt is prohibited to use the appliance on clothes that being worn,as
this may cause damage to the body or clothing.
7. Use only for trimming clothing hair.
8. Don't disassemble the appliance.
9. Do not let children play with this appliance.
10. This appliance can be used by children aged from 8 years and
above and persons with reduced physical, sensory or mental capabili-
ties or lack of experience and knowledge if they have been given
supervision or instruction concerning use of the appliance in a safe
environment and understand the hazards involved. Children must
never play with this appliance. Cleaning and user maintenance shall
not be done by children unless they are older than 8 and supervised.
11. Do not open and take out blade.
12. Do not use the appliance if it has obvious damage or if the blade’s
components or outside mesh have been damaged.
13. Do not open and use if the appliance is charging, or during cleaning
and maintenance.
14. Keep your fingers and hands away from the blade during cleaning
and maintenance.
1

Productoverview
Charging methodCharging method
Anti-static brush
Anti-static brush
cover
Charge connector
Pop-up
button
Indicator
light
On-/off switch
Mesh cover Blade USB-cableFan Brush
1. Before charging, please make sure the output of the power
adapter is 5 v. l-2A.
2. During charging, the indicate light will flicker to remind the user
that the battery is charging. 2

Operation
3. Use the USB cable for charging. connected the USB cable to the
appliance first, then connect the USB cable to your computer's USB
connector or the charger of a mobile phone.tablet. The indicator light is
flicker during charging.
4. After 8 hours of charging, when the indicate light discontinues
flickering and remains turned on, remove the USB plug.
Before use
Charging time should be no more
than 16 hours. When removing the
mesh cover, the appliance will
automatically stop running.
Avoid these areas on your garment
Highlights parts on
the clothes such as
screen prints
Cuffs and threaded areas
Stains
The part is easy
to be cracked
The sides of the buttons
and zippers
Special notes
Don't use the appliance on clothes that are being
worn as this may cause damage to the body or
clothing. Before use,test on the clothing.
3

1. turn on the switch
2. put the appliance on the flat cloth surface, then sliding back and
forth and maintenance.
- During use, do not turn away the mesh cover,
to avoid damaged to the appliance and injury to
the user.
- Do not use on the silk part because of the silk
thread. May be sucked into the blade and
damaged the appliance
Turn of the switch Take of the mesh Take of the blade
Use brush to clean Push the button to
pop out the storage
box
Throw away the
sundries from
storage tank
4

Product specifications
Sequentially assemble
all the parts Clean the anti-static
cloth with small brush
• Product type: V03/PT-01-NL /PT-01-EU
• Rated power: 2W
• Voltage: 5 V
• Battert capacity: 1200 mA Ni-MH
• Charging time: 8 hours
• User time: 40 minutes
Environmental protection: the battery may pollute the
environment, you must remove the battery before
discarding the appliance, or send the appliance to a designat-
ed recycling collection point.
This symbol on the product or in the instructions
means that your electrical and electronic equipment
should be disposed at the end of it's life separately
from your house hold waste. There are separate
collection systems for recycling in the EU. For more
information, please contact the local authority or your
retailer where you purchased the product.
5

Sicherheit
Deutsch
1. Bitte lesen dieses Handbuch vor Gebrauch sorgfältig durch und
bewahren es zum späteren Nachschlagen auf.
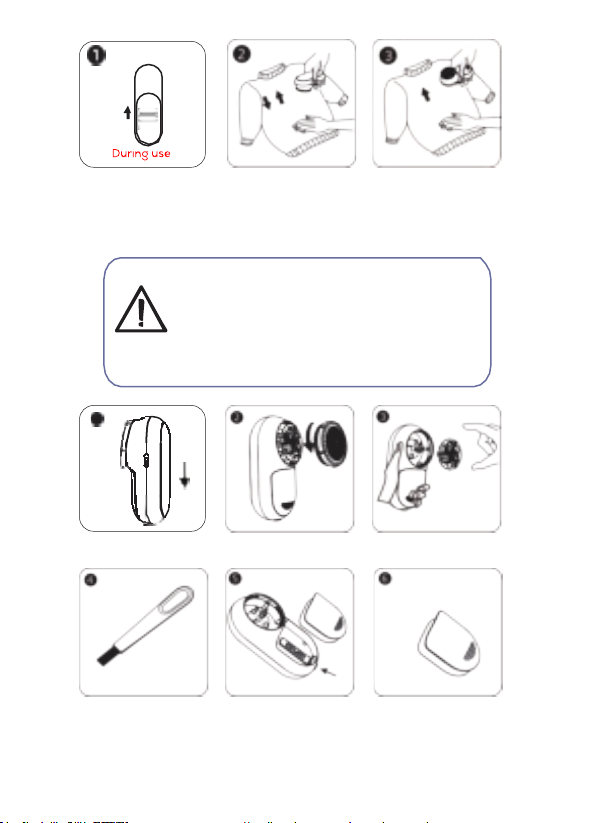
2. Das Gerät ist nur an den USB-Anschluss angeschlossen.
3. Das Elektrogerät funktioniert während des Ladevorgangs nicht.
4. Vermeiden das Laden und Lagern an feuchten Orten.
5. Überprüfen vor dem Gebrauch, ob die Netzabdeckung dicht ist,
sonst funktioniert das Gerät nicht ordnungsgemäB.
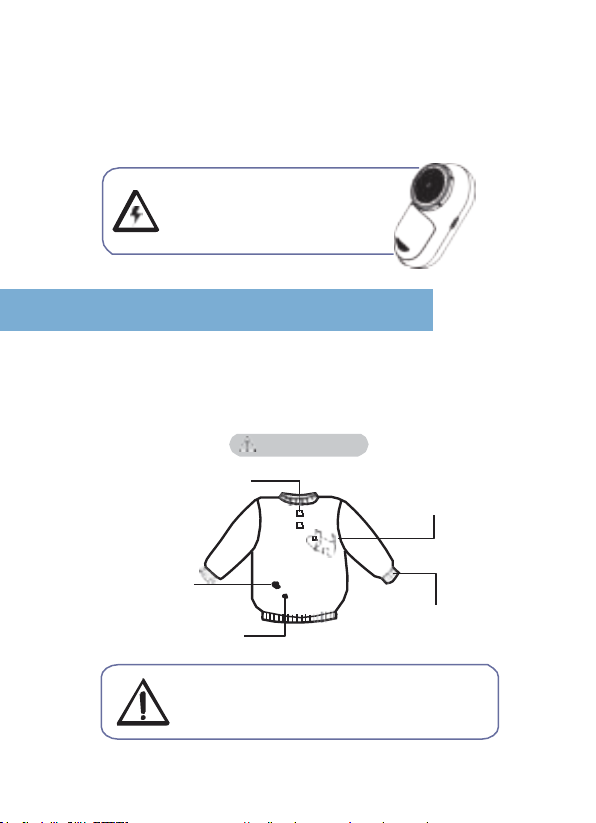
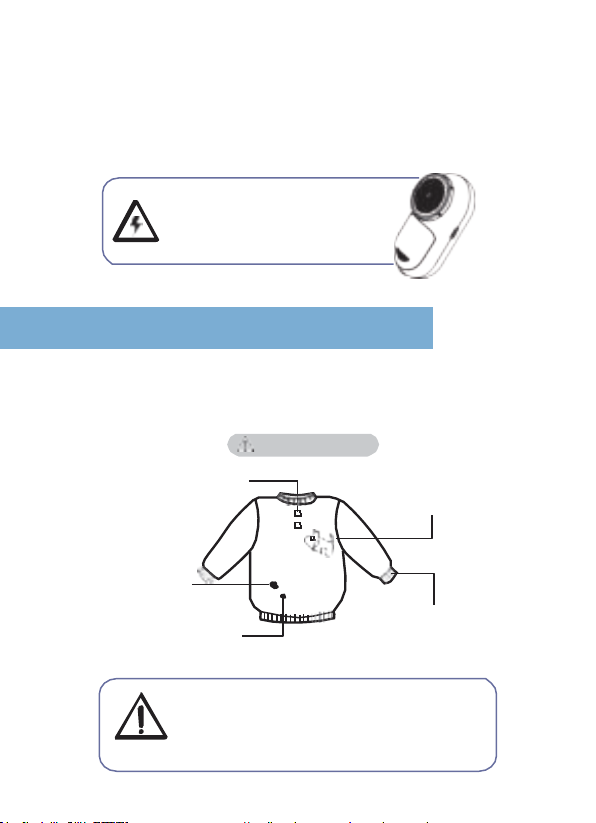
6. Es ist verbeten, das Gerät an angezogenen Kleidungsstücken zu
verwenden, da dies den Körper oder die Kleidung beschädigen
kann.
7. Das Gerät wird nur zum Trimmen von Kleidungshaaren verwen-
det.
8. Zerlegen das Gerät nicht.
9. Lassen Sie Kinder nicht mit diesem Gerät spielen.
10. Kinder ab 8 Jahren und Personen mit eingeschränkten körperli-
chen, sensorischen oder geistigen Fähigkeiten oder mangelnder
Erfahrung und Wissen können dieses Gerät verwenden, sofern sie
eine Aufsicht oder Anleitung bezüglich der sicheren Verwendung
dieses Geräts erhalten haben und die damit verbundenen Gefahren
verstehen. Kinder dürfen niemals mit diesem Gerät spielen. Kinder
dürfen keine Reinigung und Wartung durch den Benutzer durch-
führen, es sei denn, sie sind älter als 8 Jahre und werden beauf-
sichtigt.
11. Bitte öffnen und heben die Klinge nicht ab.
12. Nicht verwenden, wenn offensichtliche Schäden vorliegen oder
die Klingenteile oder das äuBere Netz beschädigt sind.
13. Wenn das Gerät aufgeladen oder gereinigt und gewartet wird,
öffnen und verwenden Sie es bitte nicht.
14. Bitte alten beim Reinigen und Warten Finger und Hände von der
Klinge fern.
6

Der überklik vom produktDer überklik vom produkt
Abrechnungsmethode
1. Stellen Sie vor dem Laden sicher. dass der Ausgang des Netzteils
5V. 1-2 A beträgt.
2. Während des Ladevorgangs kann das Gerät arbeiten. Die
Anzeigelampe blinkt. urn den Benutzer daran zu erinnern. den
Akku aufzuladen.
Antistatisch bürste
Kugelsichere abdeck-
ung elektrostatische
bürste
Aufladen-verbinder
Pop-up
knopf
Kontrol-
leuchte
Ein-/aus knopf
Netzdeckung Klinge USB-kabelVentilator Burste
7

Benutzen
Vor gebrauch
3. Urn mit einem USB-Kabel aufzuladen, schlieBen Sie zuerst das
USB-Kabel an das Gerät und dann das USB-Kabel an die USB-Schnitt-
stelle des Computers oder das Ladegerät des Mobiltelefons oder
Tablet-Computers an. Die Anzeige blinkt während des Ladevorgangs.
4.Noch 8 Stunden Ladezeit leuchtet die Kontrollleuchte Beleuchten Sie
weiter und ziehen Sie den USB-Stecker aus der Steckdose.
Die Ladezeit sollte 16 Stunden nicht
überschreiten. Nach dem Entfernen
der Netzabdeckung hört das Gerät
automatisch auf zu laufen.
Ermeiden sie diese stellen auf ihrer kleidung
Hebt teile auf der
kleidung hervor
Manschetten und Faden-
bereich
Flecken
Dieser teil ist
leicht zu knacken
Knopfe und reisver-
schlusse an der seite
Besondere tipps
- Verwenden das Gerät nicht für die Kleidung, die
Sie tragen, da dies lhren Körper ader lhre
Kleidung beschädigen kann.
- Testen die Kleidung var dem Gebrauch.
3. Urn mit einem USB-Kabel aufzuladen, schlieBen Sie zuerst das
USB-Kabel an das Gerät und dann das USB-Kabel an die USB-Schnitt-
stelle des Computers oder das Ladegerät des Mobiltelefons oder
Tablet-Computers an. Die Anzeige blinkt während des Ladevorgangs.
4.Noch 8 Stunden Ladezeit leuchtet die Kontrollleuchte Beleuchten Sie
weiter und ziehen Sie den USB-Stecker aus der Steckdose.
8

1. Schalten Sie den Schalter ein.
2. Stellen Sie das Gerät auf die flache Stoffoberfläche, dann gleiten Sie
hin und her
9
- Du Ring verwenden, drehen Sie nicht awoy die
Mesh-Abdeckung, um Schäden am Gerät und
Verletzungen des Benutzers zu vermeiden.
- Nicht auf dem Seidenteil verwenden, da der
Seidenfaden in die Blase gesaugt werden und
das Gerät beschädigen kann.
Schalten Sie den
Schalter aus Nehmen Sie das
Netz ab
Nehmen Sie die
Klinge ab
Bürste zum
Reinigen verwenden Drücken Sie den
Knopf, um die
Aufbewahrungsbox
zu öffnen
Werfen Sie das
Zubehör aus dem
Vorratsbehälter weg

Produkt specifikationen
• Produkttyp: V03
• Nennleistung: 2W
• Spannung: 5V
• Batteriekapazität: 1200 mAh Ni-MH
• Ladezeit: 8 Stunden.
Umweltschutz: Der Akku kann die Umwelt verschmutzen. Sie
müssen zuerst den Akku entfernen und das Gerät entsorgen
oder das Gerät an eine dafür vorgesehene Sammelstelle
senden.
Die Symbole auf dem Produkt oder in der Bedienung-
sanleitung bedeuten. dass lhre elektrischen und
elektronischen Geräte om Ende ihrer Lebensdauer
getrennt von lhrem Hausmüll entsorgt werden sollten.
Die EU verfügt über ein separates Recyclingsystem.
Mehr lnformationen erhalten Sie von der örtlichen
Behörde oder dem Händler, bei dem Sie das Produkt
gekauft haben.
10
Montieren alle teile
nach der reihe Reinigen Sie das Antistatietuch
mit einer kleinen Bürste

Securidad
Español
1. Lea atentamente este manual antes de usarlo y guárdelo para
futuras referencias.
2. Este aparato solo se conecta al puerto USB.
3. Durante la carga. el aparato no funcionará.
4. Evite la recarga y el almacenamiento en lugares hûmedos.
5. Antes de usar. verifique que la cubierta de la molla esté apretada.
de lo contrario el opa rato no podrá funcionar correctamente.
6. Está prohibido usar el aparato en la ropa que se está usando. ya
que esto puede darïar el cuerpo o la ropa.
7. Utilice solo para recortar el cabello de la ropa.
8. No desmonte el aparato.
9. No permita que los nirïos jueguen con este aparato.
10. Este electrodoméstico puede ser utilizado por nirïos a partir de 8
arïos y personas con capacidades fisicas. sensoriales o mentales
reducidas o falta de experiencia y conocimiento si se les ha dodo
supervisión o instrucciones sobre el uso del electrodoméstico en
una caja fuerte y entienden peligros involucrados. Los nirïos nunca
deben jugar con este aparato. Los nirïos no deben realizar la
limpieza y el mantenimiento a menos que sean mayores de 8 arïos y
estén supervisados.
11. No abra y saque la cuchilla.
12. No utilice el aparato si tiene darïos evidentes o si los componen-
tes de la cuchilla o la molla exterior se han darïado.
13. No lo abra ni lo use si el electrodoméstico se está cargando o si
realiza tareas de limpieza y mantenimiento.
14. Mantenga los dedos y las manos alejados de la cuchilla durante
la limpieza y el mantenimiento.
11

Descripción del producto
Método de carga
Cepillo antiestàtico
Cubierta de Cepillo
antiestàtico
Conector de carga
Pop-op botón
Luz indicadora
On/off
interruptor
Cubierta de
malla
Cuchill Ventilador USB cable Cepillo
1. Antes de cargar, asegûrese de que la salida del adaptador de
alimentación sea de 5 v, 1-2A.
2. Durante la carga. el aparato puede funcionar, la luz indicadora
parpadeará para recordarle al usuario que cargue la bateria.
12

Operatión
Antes del uso
3. Utilice el cable USB para cargar. primero conecte el cable USB al
aparato. luego conecte el cable USB al conector USB de su computadora
o al cargador de una tableta de teléfono. La luz indicadora parpadea
durante la carga.
4. Después de 8 horas de carga. la luz indicadora
se mantiene encendida. luego retire el enchufe USB.
El tiempo de carga no debe ser más
de 16 el horas. Al quitar la cubierta
de malla. El aparato dejorá de
funcionar automáticamente
Los laterales de los
botones y cremalleras
Manchas
La parte es fácil
de romper
Destaca partes de la ropa
como serigrafias
Puños y zonas roscadas.
Notas especiales
Evite estas áreas en su ropa
- No use el electrodoméstico en la ropa que se
está usando. ya que esto puede darlar el cuerpo
o la ropa.
- Antes de usar, pruebe en la ropa.
Evite estas áreas en su ropa
13

1. Encienda el interruptor
2. Coloque el aparato sobre la superficie plano de tela, luego deslicelo
de un lado a otro
- Duronte el uso, no gire la cubierto de molla
para evitar darios al aparato y lesiones al
usuario.
- No lo use en la parte de seda, ya que el hilo de
seda puede ser absorbido por la cuchilla y
donor el opa rato.
Apague el interruptor Ouite la molla Ouite la cuchilla
Use un cepillo
para limplar Presione el botón
para abrir la caja de
almacenamiento
Tire los artfculos del
tanque de almace-
namiento.
14

Especificaciones del producto
Ensamble secuencialmente
todas las partes Limpie el paño antiestático
con un cepillo pequeño.
• Tipo de producto: V03
• Potencia nominal: 2W
• Voltaje: 5V
• Capacidad de la bateria: 1200mA Ni-MH
• Tiempo de carga: 8 horas.
Protección del medio ambiente: la bateria puede contaminar
el medio ambiente, debe retirar la bateria antes de desechar
el electrodoméstico o enviar el electrodoméstico a un punto
de recolección de reciclaje designado.
Este simbolo en el producto oen las instrucciones
significa que su equipo eléctrico y electrónico debe
desecharse al final de su vida ûtil por separado de los
desechos de su hogar. Existen sistemas de recolección
separados para el reciclaje en la UE. Para obtener más
información. comunfquese con la autoridad local o su
minorista donde compró el producto.
15

Sécurité
Français
1. Lisez attentivement ce manuel avant utilisation et conservez-le
pour référence future.
2. Cet appareil est uniquement connecté au port USB.
3. Pendant la charge, l'appareil ne fonctionnera pas.
4. Évitez de recharger et de stocker dans les endroits humides.
5. Avant l'utilisation, vérifiez que Ie couvercle maillé soit serré, sinon
l'appareil ne pourra pas fonctionner correctement.
6. Il est interdit d'utiliser l'appareil sur des vêtements portés sur Ie
corps. car cela pourrait endommager Ie corps ou les vêtements.
7. Utilisez uniquement pour rendre les vêtements lisses.
8. Ne démontez pas l'appareil.
9. Ne laissez pas les enfants jouer avec eet appareil.
10. Cet appareil peut être utilisé par des enfants êgés de 8 ons et
plus et des personnes ayant des capacités physiques, sensorielles
ou mentales réduites ou manquant d'expérience et de connaissanc-
es s'ils ont donné une supervision ou des instructions concernant
l'utilisation de l'appareil en teute sécurité et comprennent les
dangers impliqués. Les enfants ne doiventjamaisjouer avec eet
appareil. Le nettoyage et la maintenance ne doivent pas être
effectués par des enfants à moins qu'ils ne soient êgés de plus de 8
ons et supervisés.
ll. Ne pas ouvrez ou retirez la lome.
12. Ne pas utilisez l'appareil s'il a des dommages évidents ou si les
composants de la lome ou Ie mail lage extérieur ont été endom-
magés.
13. Ne pas ouvrez ou utilisez l'appareil s'il est en charge, ou en cours
de nettoyage et de maintenance.
14. Gardez vos doigts et vos mains éloignés de la lome pendant Ie
nettoyage et la maintenance.
16

Description du produit
Méthode de charge
Brosse antistatique
Couvercle de brosse
Connecteur de charge
Antistatique bouton
pop-up
Voyant d’indicateur
Commutateur on/off
Couvercle maille Lame Ventilateur USB Câble Brosse
1. Avant de charger, veuillez assurer que la sortie de l'adaptateur
d'alimentation est de 5V, 1-2A.
2. Pendant la charge, l'appareil peut travailler, le voyant d'indicateur
clignotera pour rappeler à l'utilisateur de charger la batterie.
17

Opération
Avant d’utilisation
3. Utilisez Ie coble USB pour charger, connectez d'abord Ie coble USB à
l'appareil, puis connectez Ie coble USB au connecteur USB de votre
ordinateur ou au chargeur d'un téléphone portable ou d'une tablette. Le
voyant d'indicateur clignote pendant la charge.
4. Après 8 heures de charge, Ie voyant d'indicateur reste allumé, puis
retirez la prise USB.
Le temps de charge ne doit pas
dépasser 16 heures. En retirant Ie
couvercle maillé, l'appareil s'arrêtera
automatiquement.
Évitez ces zones sur votre vêtement
Notas spéciales
Les cótés des boutons
et zips
Taches
La partie est facile
à craquer
Les piéces saillantes sur les
vétements comme les
sérigraphies
Poignets et zones filetées
Notas spéciales
18
N'utilisez pas l'appareil sur des vêtements en
cours de port, car cela pourrait endommager
le corps ou les vêtements. Avant l'utilisation,
faites un test sur les vêtements.
This manual suits for next models
1
Table of contents
Languages:
Popular Household Appliance manuals by other brands

Dyson
Dyson Airblade 9KJ installation manual

Chandler And Me
Chandler And Me The Candle Maker +PLUS instruction manual

Allen + Roth
Allen + Roth WSWS-WB1 manual

Di4
Di4 Aspirojet Duo manual

DAYTEK
DAYTEK Laundry Quick Lock Fold Down Clothesline installation instructions

HoMedics
HoMedics WFL-SLVS Instruction manual and warranty